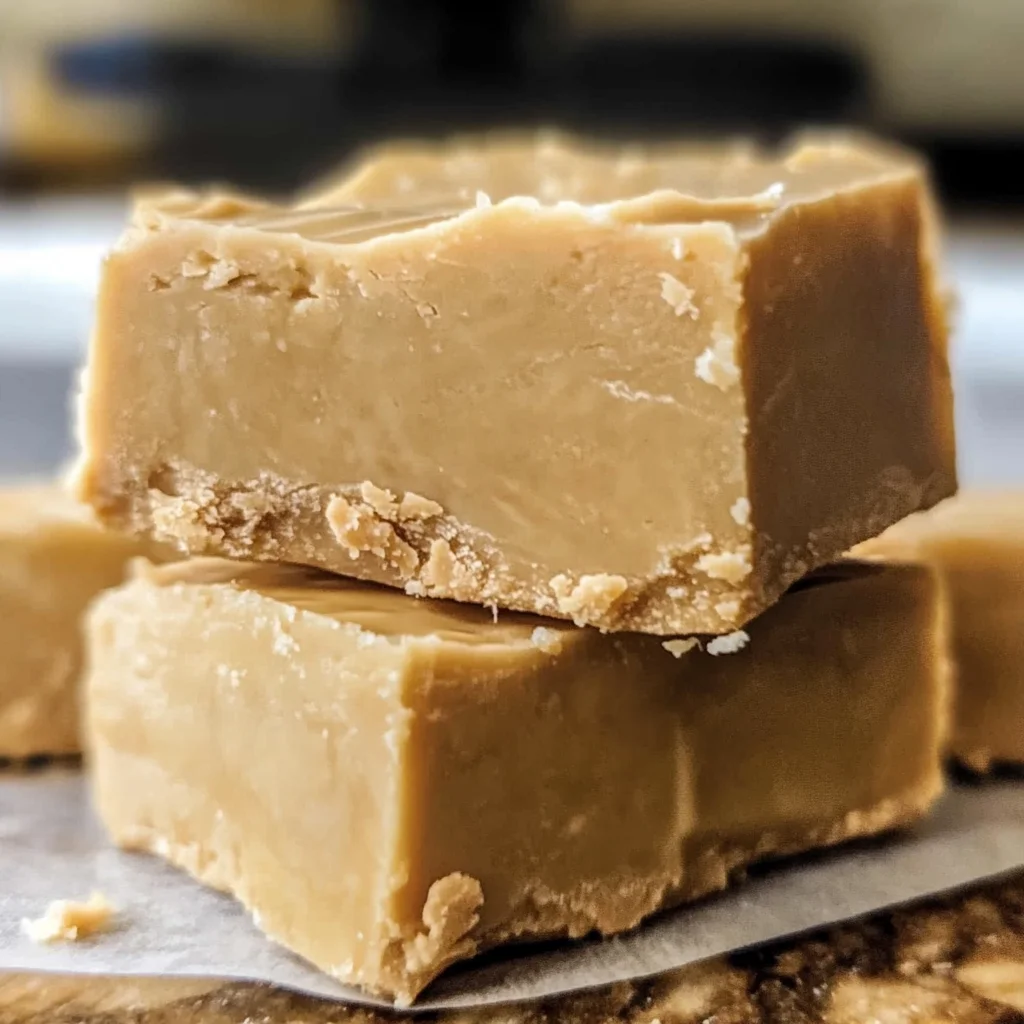
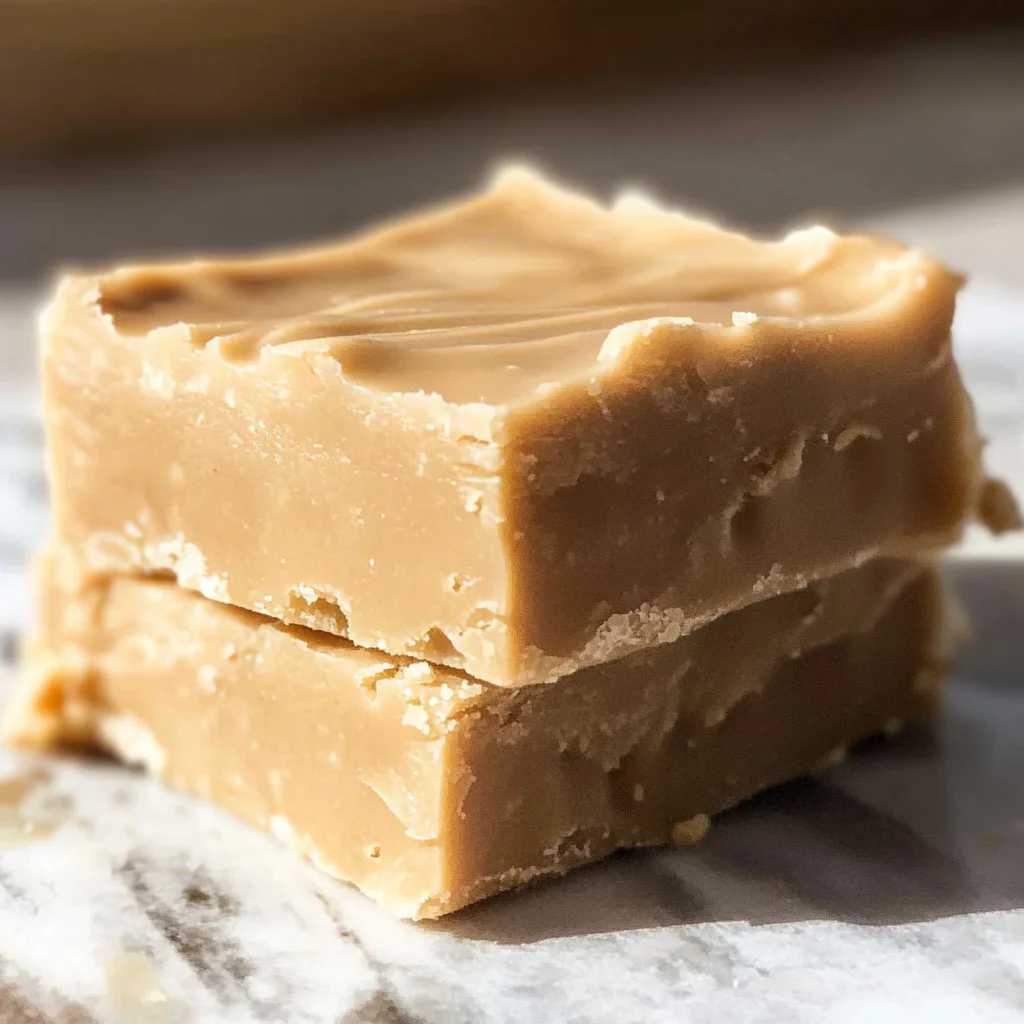
3 Ingredient Peanut Butter Fudge
There’s something truly magical about making homemade sweets, isn’t there? It’s more than the simple act of cooking; it’s a journey that connects us to memories, emotions, and the sheer joy of sharing. I’ve always been captivated by the way certain recipes have the power to evoke nostalgia or spark happiness at gatherings. This 3 Ingredient Peanut Butter Fudge is one such recipe that transcends mere dessert—it’s an experience, a delightful bridge between comfort food and indulgence. With every rich bite, the creamy peanut butter and sweet white chocolate blend into a symphony of flavors that simply melts in your mouth, offering a moment of bliss that can brighten even the dullest day. I promise you, once you make this fudge, it will become a cherished go-to for gatherings, celebrations, or just a cozy night in.
Now let’s talk about why this 3 Ingredient Peanut Butter Fudge is not just easy but utterly irresistible. Imagine hosting your friends for a movie night or perhaps needing to bring something sweet to share at a potluck. This fudge not only requires minimal effort but also delivers maximum flavor without any fuss. The three ingredients—white chocolate chips, creamy peanut butter, and sweetened condensed milk—come together to create a treat that’s decadently rich yet uncomplicated. Each bite offers that perfect balance of sweetness and creaminess while being incredibly satisfying. Trust me when I say this fudge will be devoured before you even have time to offer seconds!
3 Ingredient Peanut Butter Fudge: A Sweet Symphony of Simplicity
Welcome to your new favorite dessert! This 3 Ingredient Peanut Butter Fudge is as easy as it gets while still packing an incredible punch of flavor. Whether you’re an experienced cook or just dipping your toes into the world of dessert-making, you’ll find this recipe straightforward and delightful.
Ingredients:
As we embark on this culinary journey together, let’s take a moment to appreciate each ingredient’s role in crafting our luscious fudge. Each component contributes uniquely to creating that rich texture and exquisite flavor we crave.
- 12 ounces white chocolate chips. These little morsels are absolutely paramount for achieving that creamy base we’re aiming for in our fudge. The white chocolate provides sweetness and a velvety texture that harmonizes beautifully with the peanut butter. When selecting white chocolate chips, look for high-quality brands without fillers; they should have cocoa butter as an ingredient for optimal melting and flavor. Avoid those cheaper varieties that might not melt smoothly—only the best for your fudge!
- 1.5 cups creamy peanut butter (do not use natural peanut butter). Here’s where we dive into the heart of this recipe: the peanut butter! Using creamy peanut butter ensures a smooth blend with the melted white chocolate and sweetened condensed milk, creating that luxurious texture we all adore. Natural peanut butter can separate or be too oily; therefore, stick with classic creamy varieties for consistency—brands like Jif or Skippy work wonders here! The peanut butter adds depth and richness that balances perfectly with the sweetness of the other ingredients.
- 1 can sweetened condensed milk (14 oz.). This luscious liquid gold is what really elevates our fudge to another level! Sweetened condensed milk acts as both a binder and sweetener, giving our fudge its signature chewy texture while enhancing its overall sweetness without being cloying. It’s crucial to use full-fat sweetened condensed milk here; low-fat versions simply won’t yield the desired richness and creaminess we’re after in our final product.
Equipment You’ll Need:
Having the right tools makes all the difference when whipping up something truly special in the kitchen! While these may not be ingredients in themselves, they are essential partners in creating your delicious fudge seamlessly.
- 8X8 baking pan – This is where all the magic happens! An 8X8 pan is perfect for setting your fudge; it creates just the right thickness so every piece has that perfect fudgy center when cut into squares. Make sure it’s metal or glass for even distribution of heat as it cools.
- Microwave-safe mixing bowl – We’ll be using this lovely bowl to melt our white chocolate chips and peanut butter together effortlessly! A glass bowl works best since it heats evenly; just ensure it’s labeled microwave-safe to avoid any mishaps during our melting process.
- Spatula – A good spatula is vital for scraping down those sides and ensuring every bit of goodness gets incorporated seamlessly into your fudge mixture! Opt for silicone if you can; they withstand heat well and are gentle on your bowls.
Step 1: Preparing Your Pan Like a Pro
First things first: let’s prepare our baking pan so we can pour our glorious mixture later without any sticky situations! Start by spraying an 8X8 baking pan with cooking spray—a non-stick coating ensures effortless release once our fudge has set up beautifully. After misting it lightly, line the bottom with waxed paper or parchment paper. This step might seem small but trust me—it’s absolutely crucial if you want neat squares instead of crumbled chaos when cutting it later!
Step 2: Melting Magic
Now it’s time for the fun part: melting those white chocolate chips along with our creamy peanut butter! In your trusty microwave-safe mixing bowl, add both ingredients together—trust me on this combination; it’s going to be heavenly! Heat them in short bursts—30 seconds at a time—to avoid burning; stirring after each interval helps everything meld beautifully into a smooth mixture without any lumps remaining. You’ll know you’re ready when everything looks like silky liquid gold—this process transforms these humble ingredients into something extraordinary!
Step 3: Sweetening Things Up
Once you’ve achieved that divine melty state (and oh my goodness, doesn’t it smell incredible?), it’s time to stir in one can of sweetened condensed milk until fully combined! As you mix this velvety addition in, pay attention—the sweetness will envelop everything like an embrace from an old friend! Ensure no streaks remain because uniformity is key here; each morsel must be equally indulgent when you finally dig in!
Step 4: Pouring Perfection
With everything now mixed together perfectly into a luscious batter reminiscent of dreams coming true (seriously!), carefully pour this mixture into your prepared baking dish. Spread it evenly across so each corner gets love—it’ll help with even setting later on! Now comes my favorite part: refrigerate until set—about 2-3 hours should do just fine. While you wait impatiently (I know how hard it can be!), take pride knowing you’re about to create something utterly extraordinary!
Continue following these steps through cutting and serving until every detail feels complete—and remember: patience pays off deliciously in this endeavor!
Step 5: Pouring the Mixture – The Moment of Transformation
Now that your delightful concoction is ready, it’s time to pour this creamy, luscious mixture into your prepared baking dish. This step might seem simple, but let me tell you, it’s where the magic begins! Gently scrape every last bit from the mixing bowl, using a silicone spatula to ensure not a trace of that velvety goodness goes to waste. As you pour the mixture into your greased and lined 8×8 baking pan, take a moment to admire the beautiful swirl of white chocolate and peanut butter intertwining—it’s like watching a masterpiece come together!
Once poured, use the spatula to spread the mixture evenly across the pan, ensuring every corner is filled with that irresistible fudge. This uniformity is crucial; an even surface ensures that each piece of fudge will set perfectly and have an equal distribution of flavor. You want it to be smooth and level so that when you slice into it later, each square is just as decadent as the last. Trust me on this—it makes all the difference for presentation and taste!
Step 6: Chilling – The Power of Patience
With your fudge mixture beautifully spread out in the pan, it’s time for my favorite part—chilling! This step may require a little patience (and I know sometimes we all struggle with that), but oh, how worth it this wait is! Placing your fudge in the refrigerator for about 2-3 hours allows it to firm up beautifully—this transformation from a gooey blend to solid pieces is nothing short of extraordinary. The chilling process gives time for those flavors to meld together harmoniously until they reach their peak deliciousness.
While it’s chilling, resist the urge to peek too often; I promise you, allowing it to sit undisturbed contributes greatly to its texture. The longer it chills, up until about three hours, allows for that perfect fudgy consistency—smooth yet firm enough to hold its shape when cut into squares. If you rush this step and remove it too early, you may end up with fudgy blobs rather than perfect little squares bursting with flavor.
Step 7: Cutting Your Fudge – Creating Perfect Portions
It’s finally time for one of the most satisfying steps: cutting your chilled fudge into those lovely little squares! When you’re ready to tackle this step, grab a sharp knife and run it under hot water for a few seconds—this little trick helps create clean cuts through your fudge without tearing or crumbling it apart. Carefully remove the fudge from the pan using the edges of your parchment paper or waxed paper as handles. Place it on a cutting board for easy access.
As you begin slicing into your chilled delight, aim for generous bite-sized pieces; after all, these treats are meant to be savored! A standard size would be about 1-inch squares. But don’t stress too much about perfection—fudge has that charming homemade quality that makes each piece unique. As you cut through this blissful creation, feel free to indulge in a small nibble; it’s absolutely non-negotiable—you deserve a taste test after all your hard work!
Step 8: Serving – Presentation Matters
Now comes one of my favorite parts: sharing this beautiful creation with friends and family! After cutting your fudge into those lovely squares, consider how you’ll present them. A simple serving platter or decorative box can transform these humble treats into something truly special. You could even dust them lightly with powdered sugar or cocoa powder if you’re feeling fancy; this adds not only an appealing visual touch but also an extra hint of sweetness or richness.
When serving your homemade peanut butter fudge at gatherings or parties, don’t forget to share its story! Tell your loved ones how easy it was to prepare and how just three ingredients created such an incredibly rich dessert that brings joy with every bite. The aroma alone will draw people toward you like moths to a flame—trust me on this! The combination of sweet vanilla from white chocolate paired with nutty peanut butter creates an utterly intoxicating experience that will have everyone asking for more.
Next Major Phase: Enjoying Your 3 Ingredient Peanut Butter Fudge
Step 9: Savoring Every Bite – The Grand Finale
Finally, here we are—the moment we’ve been eagerly awaiting! Each piece of this 3 Ingredient Peanut Butter Fudge holds within it not just flavors but memories waiting to be made. As you take that first bite, allow yourself to truly savor everything—the creaminess melting in your mouth alongside that unmistakable nuttiness from the peanut butter; it’s an explosion of joy in every morsel.
Take time with each piece; feel free to close your eyes and let the flavors dance on your palate as they intermingle in a wonderful symphony of tastes. Whether enjoyed after dinner with friends or shared at a festive gathering or simply indulged during a cozy night in, I promise you’ll find this fudge evokes feelings of warmth and happiness unlike any other treat can provide.
Don’t hesitate to share leftovers (if there are any!) or tuck some away for later indulgence because trust me—you’ll want more than just one piece! So gather around those you love most and celebrate together over these delectable bites; after all, good food is best enjoyed when shared! Happy savoring!
Storage and Enjoyment Tips for Your 3 Ingredient Peanut Butter Fudge
At this point, your kitchen is filled with the sweet aroma of your freshly made 3 Ingredient Peanut Butter Fudge, and it’s time to celebrate! I can hardly contain my excitement as I think about all the delicious moments waiting to unfold. Whether you’re preparing for a gathering or just indulging during a cozy night in, knowing how to store and enjoy this delectable treat will only enhance your experience. Trust me, there’s nothing better than having a stash of this creamy, dreamy fudge at your fingertips!
Storing Leftover 3 Ingredient Peanut Butter Fudge
When it comes to storing any leftovers of this delightful fudge—if there are any!—the key is to keep it fresh and delicious. I recommend placing your fudge in an airtight container; this helps lock in that rich peanut butter and chocolate flavor that makes every bite a little piece of heaven. You can keep it at room temperature for up to a week, but if you’re looking to preserve its creamy texture even longer, pop it in the refrigerator where it can last for about two weeks. An insider tip? Slip a slice of bread into the container with the fudge; it’ll help maintain moisture and prevent the fudge from drying out, keeping its texture utterly intoxicating. As time passes, you’ll find that the flavors deepen beautifully, making each piece even more profoundly satisfying. When you’re ready to indulge again, simply take a piece out—no reheating required! Just let it sit at room temperature for a few minutes before diving back in.
Freezing 3 Ingredient Peanut Butter Fudge for Later
Now, if you find yourself with an abundance of fudge (or you simply want to save some for a rainy day), freezing is an excellent option! To freeze your fudge properly, start by cutting it into squares and laying them out on a parchment-lined baking sheet. This prevents them from sticking together. Once frozen solid—usually after a couple of hours—transfer the pieces into a freezer-safe bag or container, ensuring they are well-wrapped or separated by parchment paper to avoid freezer burn. You can keep your fudge frozen for up to three months without losing that charming flavor and texture we love so much. When you’re ready to enjoy these frozen treasures, simply remove what you need from the freezer and let them thaw in the fridge or at room temperature for an hour or so. The convenience factor here is absolutely paramount; having homemade fudge on hand means you’re always prepared for unexpected guests or those late-night cravings that just won’t quit!