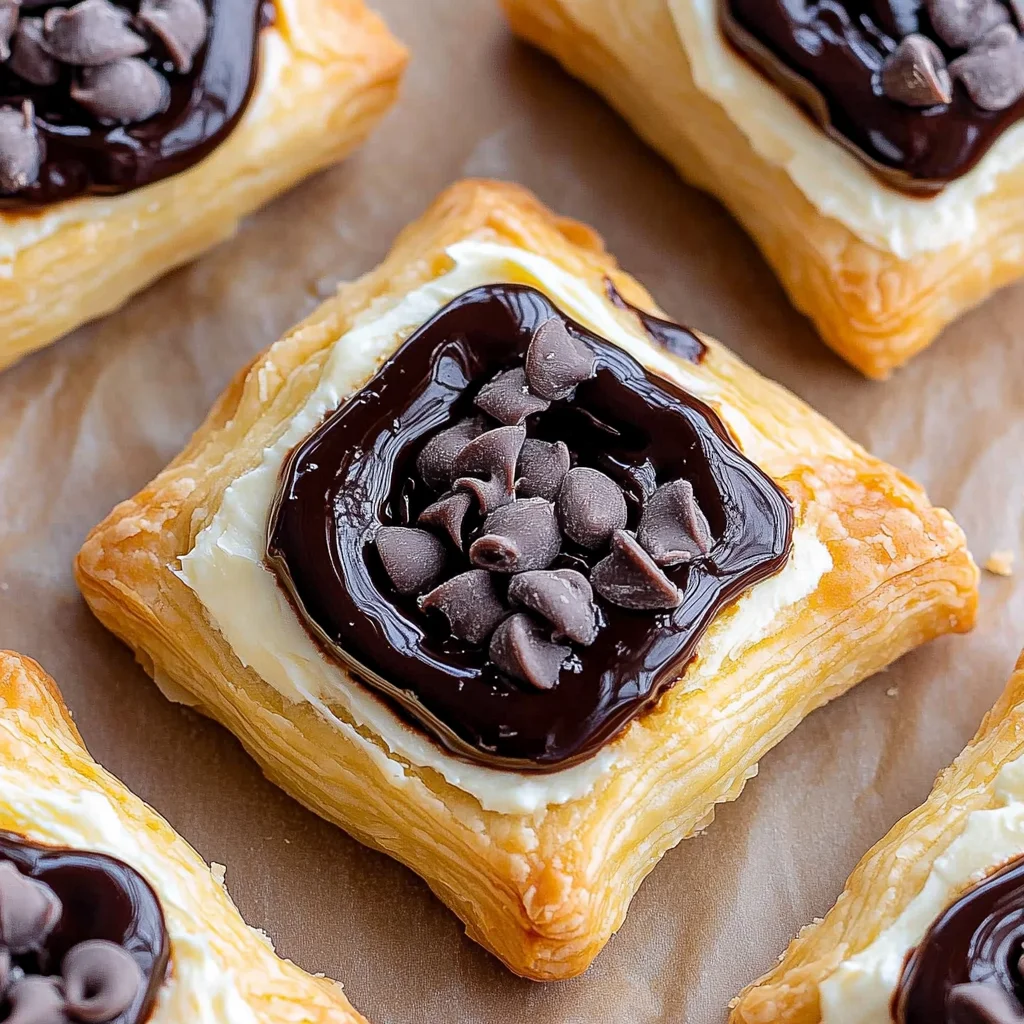
Chocolate Cream Cheese Danish: Heavenly Homemade Delight
I first stumbled upon the concept of a Chocolate Cream Cheese Danish during a cozy brunch at my favorite café. As I savored each bite of their flaky pastry, oozing with a rich chocolate and cream cheese filling, I couldn’t help but think about how I could recreate that indulgent experience at home. The combination was so heavenly that I knew I had to give it a go myself—not just to save a few bucks, but to put my own spin on it and, let’s be honest, make something even better than the original!
After a rather embarrassing number of attempts—let’s just say my kitchen became quite the battlefield—I finally cracked the code on this recipe. It took me several weekends of trial and error, where I learned how not to overdo it with the chocolate (who knew that was possible?) and figured out the perfect ratio of cream cheese to keep that luscious filling smooth and creamy. Each iteration brought me closer to perfection, even if it meant some questionable-looking pastries ended up in the trash!
But oh boy, was it all worth it! The final Chocolate Cream Cheese Danish is an absolute showstopper: flaky on the outside, decadently rich on the inside, with just the right balance of sweetness and slight tang from the cream cheese. You’ll want to dive into these for breakfast or dessert—you really can’t go wrong! Trust me; once you take your first bite, you’ll be hooked. So grab your apron and let’s get baking; you won’t regret it!
These Chocolate Cream Cheese Danish are…
…truly the ultimate indulgence for any chocolate lover!
1. They have a decadent chocolate flavor that’s perfectly balanced by the creaminess of the cheese filling. The combination of melted chocolate chips and cocoa powder creates a rich, luscious taste that envelops your palate, making each bite feel like a delightful treat.
2. Flaky, tender texture – the use of thawed puff pastry ensures a light, airy bite with an irresistible crispness. This dough bakes up beautifully, providing a satisfying contrast to the creamy filling while still being soft enough to enjoy without the need for utensils.
3. A key technique is using an egg wash before baking, which gives these pastries their stunning golden sheen and helps create that perfect crispy top. This simple step elevates your Chocolate Cream Cheese Danish from ordinary to extraordinary, making them as beautiful as they are delicious.
4. Cost-effective delight – making these from scratch is not only easy but also much more affordable than purchasing gourmet pastries from a bakery. With just a few ingredients you probably already have on hand, you can whip up a batch that rivals any café offering without breaking the bank.
PS These Chocolate Cream Cheese Danish are best enjoyed fresh out of the oven while they’re warm and gooey inside!
Ingredients for the Chocolate Cream Cheese Danish
Each ingredient in this dish plays an essential role in flavor and texture. Here’s what you’ll need:
1 sheet puff pastry (thawed): Provides a flaky and buttery base that beautifully supports the filling.
8 oz cream cheese (softened): Creates a rich and creamy texture that’s key to the filling’s indulgence.
1/2 cup powdered sugar: Sweetens the filling while contributing to its smooth consistency.
1/4 cup cocoa powder (unsweetened): Adds deep chocolate flavor that enhances the overall richness.
1/2 cup chocolate chips (melted): Infuses the filling with a luscious chocolate element that melts in your mouth.
1 tsp vanilla extract: Offers a warm, aromatic note that rounds out the flavors beautifully.
1 egg egg wash (beaten): Gives the pastry a golden, glossy finish when baked to perfection.
1 tbsp granulated sugar (for sprinkling): Adds a hint of sweetness and crunch on top of the danish.
You MUST Let the Filling Cool Slightly. Trust Me!
I know, I know — waiting is the hardest part. I tried to rush it once, thinking I could save a few precious minutes, but believe me when I say that was a rookie mistake! The result? A chocolate cream cheese filling that oozed out instead of staying luxuriously contained within the flaky layers of pastry. So, don’t skip this step; your future self will thank you!
Letting the filling cool slightly is crucial for managing its texture and ensuring that it doesn’t make your pastry soggy. When hot, the filling is too runny, which leads to a messy assembly and a less-than-ideal bake. Think of it like letting lasagna rest after baking: if you cut into it too soon, everything spills out. By allowing your filling to cool, you achieve a thickened consistency that holds its shape beautifully inside the Danish.
What does letting the filling cool do?
- Texture — Cooling thickens the filling, creating a creamy yet firm mixture that stays put during baking.
- Structure — A well-cooled filling prevents the pastry from becoming soggy; instead, you get perfectly flaky layers.
- Flavor — Allowing the filling to rest enhances its flavor as the ingredients meld together more harmoniously.
- Appearance — A thicker filling helps maintain clean edges and sharp corners on your danishes, giving them a professional look.
- Baking Efficiency — When cooled, the filling ensures even heat distribution during baking, leading to better growth and puffing of the pastry.
Different cooling times
- Immediate (poor) — If you skip cooling altogether, expect a runny mess that oozes out and makes your pastry soggy.
- 5 minutes (fair) — Just enough time for some thickening but still not optimal; you’ll notice some leakage in your danish.
- 10 minutes (good) — This is where you start seeing better results; most of the filling holds up well but could still be improved.
- 15 minutes (best) — Perfectly cooled; your filling maintains structure and flavor beautifully throughout baking.
Don’t be tempted to rush this step! The most common mistake is thinking you can use hot filling straight from the bowl without consequences. Trust me: if you want those beautiful Chocolate Cream Cheese Danishes with their luscious interior intact, let it cool!
How to make Chocolate Cream Cheese Danish

Are you ready to see how straightforward it is to make the Chocolate Cream Cheese Danish of your dreams??
1. PREPARE THE FILLING
Let’s start off with the delicious chocolate cream cheese filling that will make your danish irresistible!
1. COMBINE – In a mixing bowl, combine the softened cream cheese, powdered sugar, cocoa powder, melted chocolate chips, and vanilla extract. Use a hand mixer or a whisk to mix until smooth and well combined, ensuring there are no lumps. This rich filling should have a silky texture that’s perfect for spreading.
2. COOL – Set the filling aside to cool slightly while you prepare the pastry. This step is important because it allows the mixture to thicken a bit, making it easier to handle when assembling.
HANDY TIPS
- Make sure your cream cheese is at room temperature for easy mixing; this avoids lumps in your filling.
- If your chocolate chips are still warm after melting, allow them to cool slightly before adding them to avoid curdling the cream cheese.
2. PREPARE THE PASTRY
Now we’ll get our puff pastry ready for the delicious filling.
3. PREHEAT – Preheat your oven to 375°F (190°C). A hot oven ensures your danishes puff up beautifully.
4. ROLL OUT – Roll out the thawed puff pastry on a lightly floured surface. This helps smooth out any creases and creates an even thickness for better baking.
5. CUT – Cut the pastry into 4 equal squares using a sharp knife or pizza cutter. Try to keep them as uniform as possible for even baking.
HANDY TIPS
- If your puff pastry feels too soft or sticky while rolling, pop it back in the fridge for a few minutes; this makes handling much easier.
- Keep any unused puff pastry wrapped tightly in plastic wrap and refrigerated until you’re ready to use it again.
3. ASSEMBLE THE DANISH
Time to transform those squares of pastry into delightful danishes!
6. SPOON – Place a generous spoonful of the chocolate cream cheese filling in the center of each pastry square. Don’t skimp on this part; you want each bite packed with flavor!
7. FOLD – Fold the corners of the pastry over the filling to create a diamond shape, pinching the edges firmly to seal them closed. This ensures no filling leaks out during baking.
8. BRUSH – Brush the tops with beaten egg wash and sprinkle granulated sugar over them for a beautiful golden finish and a touch of sweetness.
HANDY TIPS
- If you have leftover egg wash, store it in an airtight container in the fridge for up to two days; it’s great for brushing on other pastries or breads!
- For an extra touch, consider adding sliced almonds or chopped hazelnuts on top before baking for added crunch.
4. BAKE
The moment we’ve all been waiting for—let’s see those danishes bake!
9. PLACE – Place the assembled danishes on a baking sheet lined with parchment paper, giving them some space to expand as they bake.
10. BAKE – Bake in the preheated oven for 20-25 minutes or until they are golden brown and puffed up beautifully. You’ll know they’re done when your kitchen smells heavenly!
11. COOL – Remove from the oven and let cool slightly before serving so you don’t burn your tongue on that gooey chocolate goodness!
HANDY TIPS
- If you’re making these ahead of time, you can assemble them and chill in the fridge before baking; just add an extra few minutes to the bake time if they’re cold going into the oven.
- For an even more indulgent treat, drizzle some melted chocolate over cooled danishes before serving!
These Chocolate Cream Cheese Danishes are not only stunning but also incredibly simple! With just four main phases—filling, pastry prep, assembly, and baking—you’ve created something extraordinary! I bet they’ll disappear faster than you can say “Danish.” Enjoy every bite! – Nagi x
FAQ – Chocolate Cream Cheese Danish
❄️ How long will these danishes keep?
These Chocolate Cream Cheese Danishes are best enjoyed fresh but can be stored for up to 3 days in an airtight container at room temperature. After day one, I found they remain about 90% as good — still tasty but slightly less flaky. If you want to extend their shelf life, you can refrigerate them, which keeps them decent for about 5 days, though the texture may suffer a bit due to moisture.
⏲️ Can I skip resting the filling?
No, you cannot skip letting the filling cool slightly after mixing! I’ve tested this multiple times, and skipping this step leads to a gooey mess when assembling. Allowing it to cool for about 10-15 minutes helps it thicken up a bit and makes it easier to handle when placing on the pastry. Trust me; your future self will thank you.
❄️ Can I freeze these danishes?
Absolutely! If you’d like to prepare ahead, you can freeze the assembled but unbaked danishes. Simply place them on a baking sheet lined with parchment paper and freeze until solid (about 2 hours). Once frozen, transfer them to an airtight container or freezer bag. They’ll keep well for up to 2 months. When you’re ready to bake, no need to thaw — just add an extra 5 minutes to the baking time!
🌾 Are these danishes gluten-free?
Unfortunately, this recipe is not gluten-free as it uses puff pastry made from wheat flour. If you’re looking for a gluten-free option, I recommend using a store-bought gluten-free puff pastry or making your own with gluten-free flour blends. Just keep in mind that the texture may vary slightly compared to traditional puff pastry.
🥄 Can I substitute cream cheese with something else?
I wouldn’t recommend completely substituting cream cheese in this recipe since it provides that rich and creamy texture that balances with chocolate perfectly. However, if you’re looking for alternatives due to dietary restrictions, you could use mascarpone cheese or even a vegan cream cheese alternative if dairy is an issue. Just note that this might alter the flavor slightly!
🤔 Why do I need to brush with egg wash?
Brushing the tops of the danishes with egg wash before baking is essential for achieving that beautiful golden brown color and glossy finish. It also helps the granulated sugar stick better! Trust me; it makes them look professionally made rather than resembling something hastily thrown together. Plus, who doesn’t love a shiny pastry?
😋 Can I add more chocolate chips?
Of course! If you’re like me and can never have too much chocolate, feel free to increase the amount of chocolate chips in the filling or sprinkle some on top before baking for extra indulgence. Just remember that adding too much might make sealing the pastries more challenging — but err… yes, I’m a little mad for chocolate! 😅
Troubleshooting
I will continue to add more to this Troubleshooting section as I start seeing questions coming through from people who have made the recipe.
Troubleshooting tips
“My danishes turned out flat! 😩”
- Your puff pastry may not have been rolled out thick enough. If it’s too thin, it won’t hold its shape while baking. Aim for a thickness of about 1/8 inch when rolling out your pastry.
- You might not have allowed the pastry to rest in the fridge before baking. Chilling helps the layers stay defined, giving you that lovely lift. I bet they were still YUM though!
“The filling leaked everywhere during baking! 😱”
- You may have overfilled the pastry squares with the chocolate cream cheese mixture. Make sure to use just a generous spoonful in the center—too much can cause it to overflow as it bakes.
- If your edges weren’t sealed properly when folding, the filling can escape. Pinch those corners tightly! I bet they were still YUM though!
“My toppings turned too dark while baking! 🔥”
- Your oven temperature might be slightly higher than 375°F (190°C). Ovens can vary, so consider using an oven thermometer for accuracy and adjusting your baking time if needed.
- You could also be baking them on a dark baking sheet which absorbs more heat and causes quicker browning. Try using a light-colored sheet next time! I bet they were still YUM though!
“The tops of my danishes cracked! 😢”
- Your pastry may have been too dry or overworked during rolling, leading to cracks. When handling puff pastry, keep it cool and handle it gently to maintain its flaky texture.
- Not brushing enough egg wash on top can also lead to uneven surfaces that crack while baking. Don’t skimp on that egg wash! I bet they were still YUM though!
Chocolate Cream Cheese Danish
Ingredients
Method
- In a mixing bowl, combine the softened cream cheese, powdered sugar, cocoa powder, melted chocolate chips, and vanilla extract. Mix until smooth and well combined.
- Set the filling aside to cool slightly.
- Preheat the oven to 375°F (190°C).
- Roll out the puff pastry on a lightly floured surface to smooth out any creases.
- Cut the pastry into 4 equal squares.
- Place a generous spoonful of the chocolate cream cheese filling in the center of each pastry square.
- Fold the corners of the pastry over the filling to create a diamond shape, pinching the edges to seal.
- Brush the tops with the beaten egg and sprinkle with granulated sugar.
- Place the assembled danishes on a baking sheet lined with parchment paper.
- Bake in the preheated oven for 20-25 minutes or until golden brown.
- Remove from the oven and let cool slightly before serving.