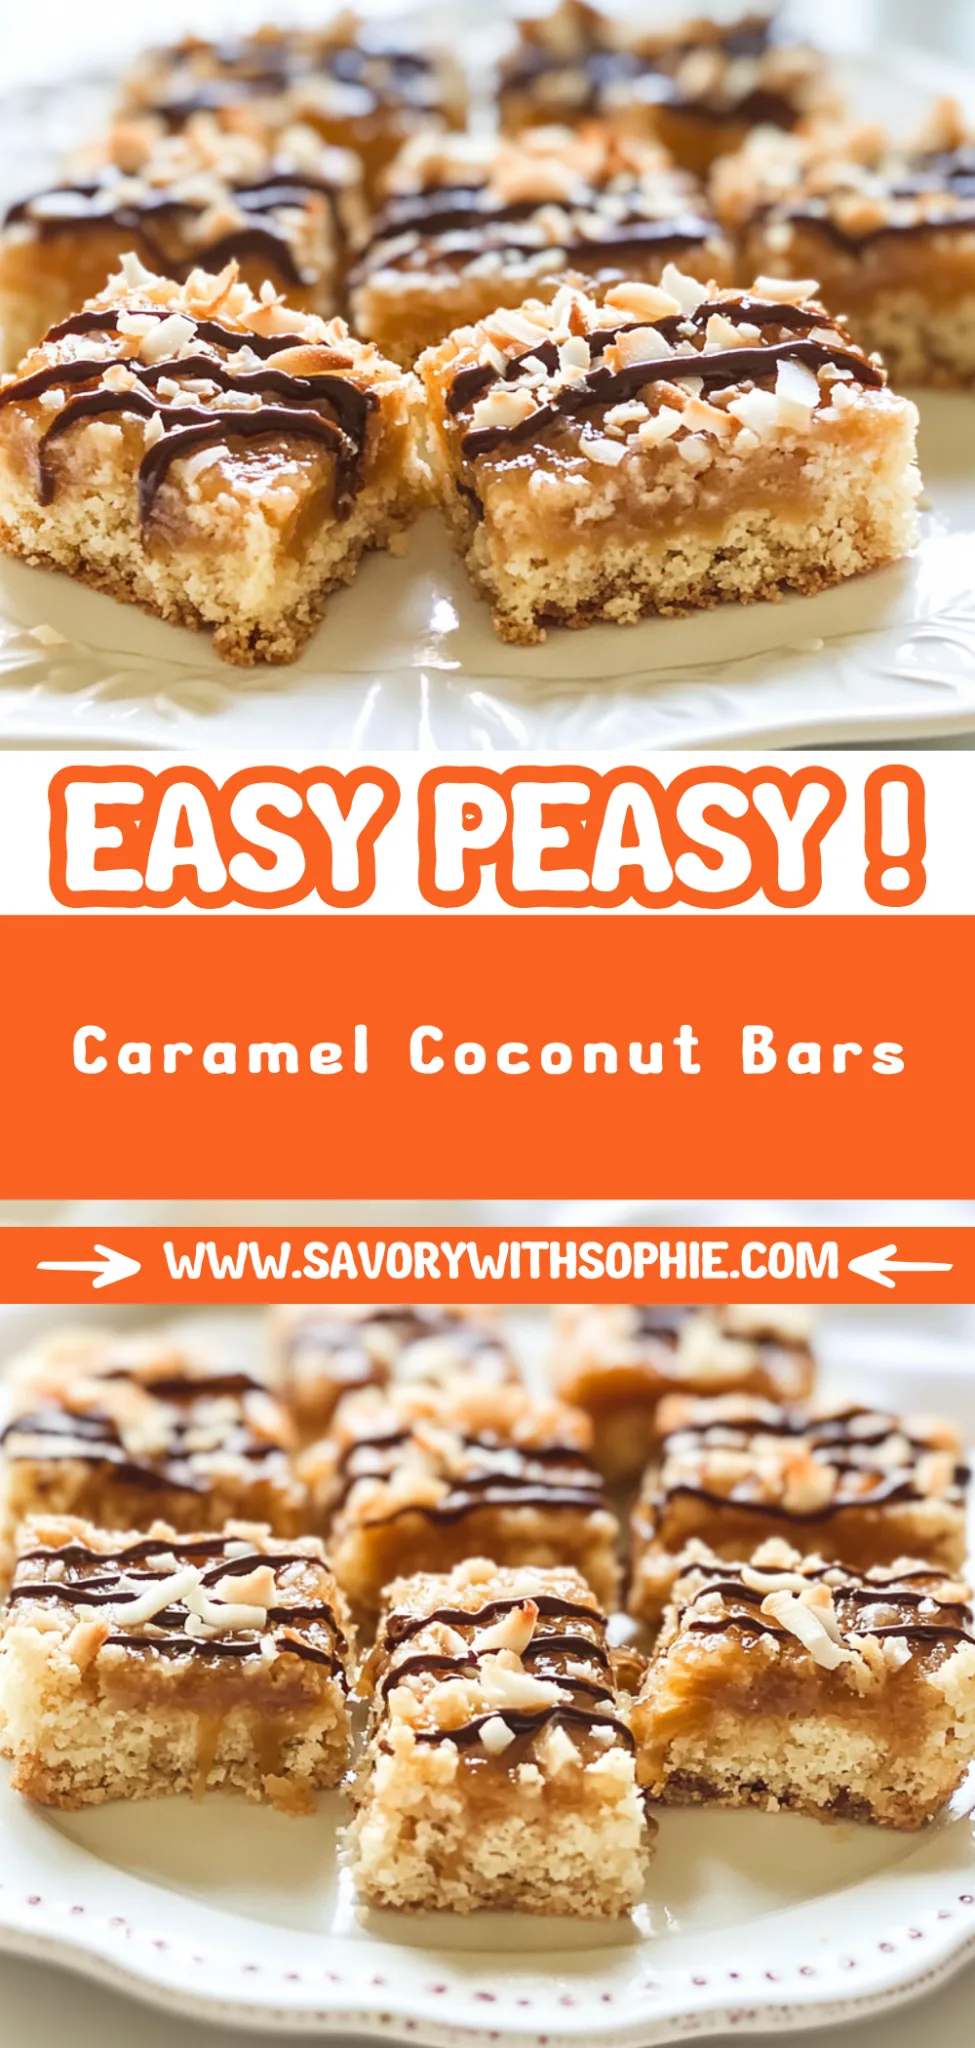
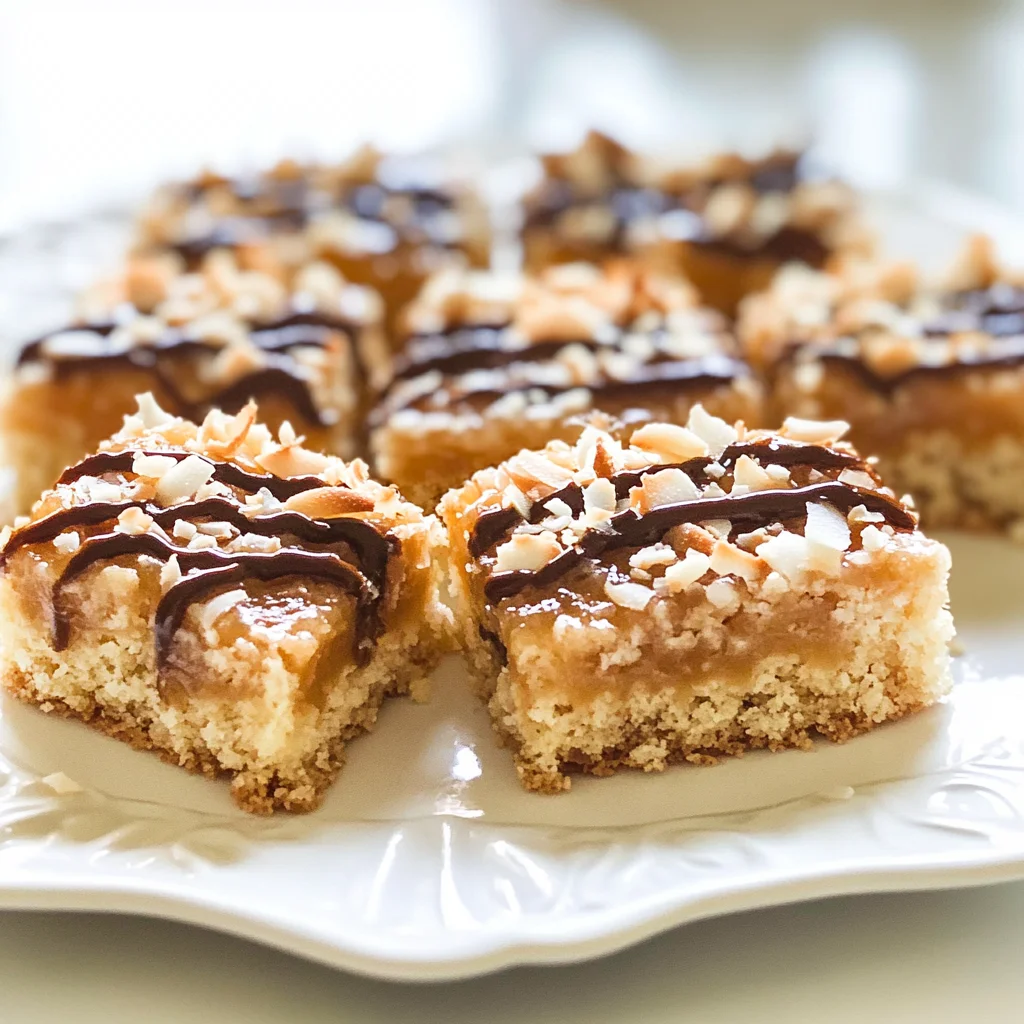
Caramel Coconut Bars: Chewy Bliss You Can Make at Home
I first fell in love with Caramel Coconut Bars during a visit to a charming little café that had a reputation for their sweet treats. The moment I took a bite, I was met with the perfect harmony of chewy coconut and rich caramel, all nestled atop a crunchy base. It was pure bliss! But as I indulged, I couldn’t help but think about the cost of those little delights and how easy it would be to whip them up at home — not to mention, make them even better. So, with my taste buds tingling and my wallet in mind, I decided to embark on this sweet mission.
Let me tell you, perfecting this recipe took way more trial and error than I care to admit! After what felt like my kitchen’s version of “Survivor,” I finally nailed it after five attempts. Each round was an adventure filled with burnt caramel disasters and overly crumbly bases that had me questioning my baking skills. But with every iteration, I learned something new about balancing the flavors and textures until I finally achieved that glorious chewy yet crunchy perfection that makes these Caramel Coconut Bars so irresistible.
And let me tell you — all that effort was totally worth it! The final result is a dreamy combination of textures: chewy bars filled with toasted coconut wrapped in luscious caramel atop a satisfyingly crunchy base. They’re not just delicious; they’ve got staying power too! These bars hold up beautifully for days, making them perfect for snacking or sharing (if you can bear to part with them). Trust me, once you try making these at home, you’ll never look back! Happy baking!
These Caramel Coconut Bars are…
….the ultimate treat for anyone who craves a blissful balance of chewy and crunchy!
1. They deliver a delectable caramel richness that truly elevates these bars. The combination of sweetened shredded coconut and creamy caramel sauce creates a mouthwatering depth of flavor, making each bite a heavenly experience that lingers on the palate.
2. Irresistibly chewy texture – the perfect blend of soft and crunchy. The buttery base provides a solid foundation while the filling adds a delightful chewiness, ensuring that you experience both textures in every satisfying bite.
3. Expert layering technique – my secret to achieving an even distribution of flavors. By carefully layering the caramel sauce over the toasted coconut, I ensure that each bar is packed with flavor from top to bottom, allowing for a consistent taste throughout.
4. Incredible value – homemade goodness that saves you money! With simple ingredients like all-purpose flour, brown sugar, and butter, you can whip up these Caramel Coconut Bars at home for a fraction of the cost compared to store-bought versions, without sacrificing quality or taste.
PS These bars are cut into generous squares, making them perfect for sharing (or keeping all to yourself)!
Ingredients You’ll Need
Each ingredient in this dish plays an essential role in flavor and texture. Here’s what you’ll need:
- 1 cup all-purpose flour: Provides the structure for a sturdy base.
- 1/2 cup brown sugar (packed): Adds rich sweetness and moisture to the crust.
- 1/2 cup unsalted butter (melted): Brings richness and helps bind the base together.
- 1/4 teaspoon salt: Enhances the overall flavor, balancing the sweetness.
- 1 cup sweetened shredded coconut: Delivers chewy texture and tropical flavor.
- 1 cup caramel sauce (store-bought or homemade): Offers a luscious, gooey filling.
- 1/4 cup heavy cream: Adds creaminess and helps meld the filling ingredients together.
- 1/2 cup chocolate chips (optional): Provides a delightful chocolatey contrast for added richness.
- 1/4 cup toasted coconut flakes (for garnish): Adds crunch and elevates visual appeal as a topping.
Pressing the Base: Don’t Skip This Step!
I confess, I thought I could shortcut this crucial step when making my Caramel Coconut Bars. I mean, how hard can it be to press a crumbly mixture into a pan? Spoiler alert: I was wrong. The results were less than stellar, and trust me, you don’t want to end up with a soggy base that crumbles apart instead of holding your delicious filling.
Pressing the base of your bars is essential for achieving that perfect chewy texture and sturdy structure. Think of it like building a solid foundation for a house; without it, everything above will waver and collapse. By firmly pressing the mixture of flour, brown sugar, melted butter, and salt into the baking pan, you create a cohesive layer that bakes evenly and holds up beautifully under the luscious coconut-caramel filling.
What does pressing the base do?
- Texture — It ensures the base has a firm yet chewy texture that complements the gooey filling.
- Sturdiness — A well-pressed base provides stability to hold the bars together when sliced.
- Even Cooking — Helps achieve an evenly baked bottom layer without any soggy spots.
- Flavor Development — Pressing creates more surface area for caramelization, enhancing the overall flavor.
- Shelf Life — A sturdy base helps the bars stay together longer, keeping them fresher for days.
Different pressing techniques
- Barely pressed (average) — The mixture is loose; results in a crumbly and unstable base that can fall apart easily.
- Lightly pressed (good) — Some cohesion but still lacks firmness; bars may be slightly fragile.
- Firmly pressed (great) — Achieves a solid base with good chewiness; holds the filling in perfectly.
- Extra firm press (best) — Maximum compactness leads to a bar that’s both chewy and structurally sound; ideal for slicing.
Be warned: the most common mistake is not pressing down hard enough. If your base isn’t compacted well, you’ll struggle with bars that crumble apart when you cut them. Trust me on this one—don’t let all that delicious coconut-caramel goodness go to waste!
How to make Caramel Coconut Bars
Are you ready to see how straightforward it is to make the Caramel Coconut Bars of your dreams??
1. PREPARE THE BASE
Let’s start by creating that chewy, crunchy base that holds everything together!
1. Preheat – Preheat the oven to 350°F (175°C). This ensures even cooking and helps achieve a perfectly golden crust.
2. Combine – In a mixing bowl, combine the flour, brown sugar, melted butter, and salt. Mix until crumbly. The melted butter binds the ingredients while providing moisture and flavor.
3. Press – Press the mixture into the bottom of the prepared baking pan evenly. Make sure it’s packed tightly for a sturdy base!
4. Bake – Bake for 10-12 minutes until lightly golden. The edges should be just starting to brown, signaling it’s time to remove them from the oven. Let cool slightly.
HANDY TIPS
- Use a spatula or your fingers to ensure the base is evenly pressed; uneven bases can lead to uneven cooking!
- If you want extra flavor, try adding a pinch of vanilla extract or a touch of cinnamon when mixing your dry ingredients.
2. MAKE THE FILLING
Next up is that luscious coconut-caramel filling! Your kitchen will smell heavenly!
5. Combine – In a saucepan over medium heat, combine caramel sauce and heavy cream. Stir until smooth and heated through. This step ensures that the caramel blends beautifully with the cream for a rich texture.
6. Stir in – Remove from heat and stir in the shredded coconut until well combined. The coconut adds delightful chewiness and tropical flavor, making this filling irresistible!
HANDY TIPS
- For an extra layer of flavor, consider using homemade caramel sauce if you’re feeling adventurous!
- If you prefer less sweetness, reduce the amount of caramel sauce slightly; it’ll still be delicious!
3. ASSEMBLE THE BARS
Now it’s time to bring everything together — get ready for some mouthwatering magic!
7. Pour – Pour the coconut-caramel mixture over the cooled base and spread evenly—this creates a beautiful layer on top.
8. Sprinkle – If using, sprinkle chocolate chips on top and gently press them into the filling for extra indulgence.
9. Bake Again – Bake for an additional 15-18 minutes until the filling is bubbly and set. You’ll know they’re done when they’re just starting to bubble at the edges.
10. Cool – Remove from the oven and let cool completely before cutting into bars; this will help maintain their shape.
HANDY TIPS
- For smaller portions, cut them into bite-sized squares! You can also use a different pan size; just adjust baking times accordingly.
- Allowing them to cool completely helps enhance their chewy texture—resist the temptation to dig in too soon!
4. SERVE
Finally, let’s add those finishing touches before indulging in these sweet creations!
11. Cut – Once cooled, cut into squares and garnish with toasted coconut flakes if desired for that extra crunch.
12. Serve & Enjoy – Serve these delicious caramel coconut bars at your next gathering or keep them all to yourself (no judgment here!).
Make these once, and I wager they will invade your dreams every night too! – Nagi x
FAQ – Caramel Coconut Bars
🍫 Can I make these bars without chocolate chips?
Yes, you can absolutely make these caramel coconut bars without chocolate chips! While the chocolate adds a nice contrast to the sweetness of the caramel and coconut, the bars are still deliciously chewy and flavorful without them. If you’re looking for alternatives, consider adding chopped nuts like pecans or walnuts for an extra crunch! Just remember, if you’re skipping the chocolate, you might want to increase the toasted coconut flakes for added texture.
🥥 Can I use unsweetened shredded coconut instead?
While you can use unsweetened shredded coconut, I personally prefer sweetened for this recipe as it enhances the overall sweetness and balances the rich caramel filling. If you decide to go with unsweetened coconut, you might want to add an extra tablespoon of sugar to the filling to compensate for the lack of sweetness. Just keep in mind that it might be a bit less chewy and more chewy-crisp!
❄️ How should I store leftover bars?
To maintain their freshness, store your caramel coconut bars in an airtight container at room temperature for up to 3 days. After that, they start losing their delightful chewiness — I’d say they’re about 85% as good on day 4. For longer storage, you can refrigerate them for up to a week or freeze them for up to 3 months. When freezing, cut them into squares before placing them in a freezer-safe container with parchment paper between layers. To thaw, simply leave them at room temperature for about 30 minutes!
🌾 Are these bars gluten-free?
Unfortunately, these caramel coconut bars cannot be made gluten-free without some adjustments. The base contains all-purpose flour which is not gluten-free. However, if you switch out the regular flour with a gluten-free all-purpose blend that includes xanthan gum (to mimic the texture), you can enjoy this treat! Just be aware that texture may vary slightly depending on the flour used.
❓ Why do I need to let the base cool slightly before adding the filling?
Letting the base cool slightly is important because if it’s too hot when you pour in the coconut-caramel mixture, it can cause the filling to melt excessively rather than set properly during baking. This creates a gooey mess rather than those delightful layered bars we’re after! So trust me on this one: patience is key!
💡 Can I use homemade caramel sauce instead of store-bought?
Absolutely! I highly recommend making your own caramel sauce if you have time; it’s often richer and more flavorful than store-bought versions. Just ensure it’s cooled down slightly before mixing it with heavy cream. I’ve experimented with both options countless times and found that homemade gives these bars an elevated taste — plus, who doesn’t love that satisfying feeling of making something from scratch?
⏰ How long do I need to bake these bars?
Bake your assembled bars for 15-18 minutes until they are bubbly and set in the middle. If you’re unsure whether they’re done, a quick toothpick test will help: insert it into the center; it should come out clean or with just a few sticky crumbs (not wet batter). Remember that every oven is different; I once had mine take nearly 20 minutes due to some sneaky hot spots—so keep an eye on them!
Troubleshooting
I will continue to add more to this Troubleshooting section as I start seeing questions coming through from people who have made the recipe.
Troubleshooting tips
“My bars turned out too thin! 😩”
- You might not have pressed the base mixture firmly enough into the baking pan, causing it to spread too much while baking. Make sure to really pack that crumbly mixture down tightly!
- If you used a larger baking pan than specified, the bars will naturally be thinner. For best results, stick to a 9×9 inch pan for these caramel coconut delights!
- I bet they were still YUM though!
“My bars are too dry and crumbly! 😭”
- If you accidentally added too much flour when measuring, that could lead to a dry texture. Make sure to spoon flour into your measuring cup and level it off with a knife for accuracy.
- Another culprit could be overbaking the base; if it gets too dark or hard in the oven, it won’t retain moisture. Keep an eye on it after 10 minutes!
- I bet they were still YUM though!
“The top of my bars cracked and split! 😬”
- This can happen if the filling was poured over a very hot base or if the oven temperature was too high. Allow the base to cool slightly before adding the filling, and make sure your oven is at the right temperature.
- Overmixing the filling after adding coconut can also create air bubbles that lead to cracks while baking. Mix gently until just combined!
- I bet they were still YUM though!
“My filling didn’t set properly and is runny! 🤦♀️”
- If you didn’t allow enough time for the filling to bake (it should be bubbly and set), it might not firm up as expected. Make sure to stick to that 15-18 minute bake time!
- Using cold heavy cream straight from the fridge can also affect how well your caramel sauce combines—room temperature cream mixes in better and helps create a smoother filling.
- I bet they were still YUM though!
Caramel Coconut Bars
Ingredients
Method
- Preheat the oven to 350°F (175°C). Grease and line a 9x9 inch baking pan with parchment paper.
- In a mixing bowl, combine flour, brown sugar, melted butter, and salt. Mix until crumbly.
- Press the mixture into the bottom of the prepared baking pan evenly.
- Bake for 10-12 minutes until lightly golden. Remove from oven and let cool slightly.
- In a saucepan over medium heat, combine caramel sauce and heavy cream. Stir until smooth and heated through.
- Remove from heat and stir in the shredded coconut until well combined.
- Pour the coconut-caramel mixture over the cooled base and spread evenly.
- If using, sprinkle chocolate chips on top and gently press them into the filling.
- Bake for an additional 15-18 minutes until the filling is bubbly and set.
- Remove from the oven and let cool completely before cutting into bars.
- Once cooled, cut into squares and garnish with toasted coconut flakes if desired.
- Serve and enjoy your delicious caramel coconut bars!