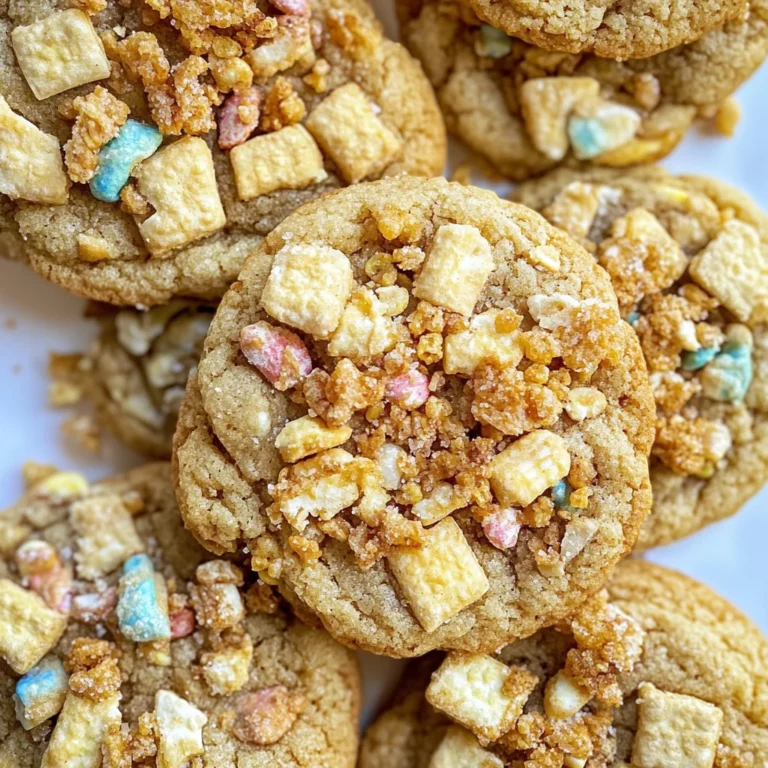
Salted Honey Pistachio Cookies: Irresistibly Sweet Treats
It all started one lazy afternoon when I stumbled upon a cozy little café that boasted the most incredible salted honey pistachio cookies. With their golden edges and the irresistible aroma wafting through the air, I was hooked at first bite. The combination of sweet honey, crunchy pistachios, and a sprinkle of sea salt was heavenly! I knew I had to recreate these beauties at home—not just because they were too good to be true, but also because let’s face it, my wallet can only handle so many trips to a fancy café!
After an embarrassing number of attempts—let’s just say my kitchen looked like a cookie war zone—I finally nailed it. It took me over a week of testing different ratios of honey to flour, experimenting with various types of pistachios, and even having a few cookies turn out like hockey pucks. Each iteration was a lesson learned; I aimed for that perfect balance of chewiness and crunch that would make my taste buds sing. Honestly, if you could’ve seen my face during those flops, you’d probably have laughed right along with me!
But oh boy, was it worth it! These Salted Honey Pistachio Cookies are everything I dreamed they’d be: delightfully chewy with a luscious honey flavor that’s perfectly complemented by the salty crunch of pistachios. They’re not just cookies; they’re the ultimate treat that’ll make you swoon! Trust me when I say that once you try them warm out of the oven, you’ll be hooked just like I am—so grab your apron and let’s get baking!
These Salted Honey Pistachio Cookies are…
…a delightful fusion of flavors and textures that will elevate your cookie game to new heights!
1. They deliver a honeyed sweetness that is simply irresistible, thanks to the generous use of honey. This natural sweetener not only adds depth but also creates a deliciously fragrant aroma that wafts through your kitchen, making it impossible to resist these cookies fresh out of the oven.
2. Chewy perfection is what you can expect with each bite of these cookies. The combination of all-purpose flour and brown sugar works wonders together; it gives the cookies a soft, tender texture while the crispy edges provide that satisfying contrast we all crave in a cookie.
3. A game-changing technique lies in how we incorporate the ingredients. By creaming together softened butter and brown sugar before adding in the egg and honey, I ensure a light and airy mixture that helps achieve those dreamy chewy centers while still allowing for a slight crispiness on the outside.
4. These cookies offer exceptional value, as they are made with accessible ingredients found in most pantries. Unlike store-bought versions that can be pricey or lack flavor, these homemade Salted Honey Pistachio Cookies are not only cost-effective but also burst with freshness and warmth from your own oven.
PS These cookies are best enjoyed warm, straight from the oven, where the pistachios provide an extra crunch amidst the gooey goodness!
Ingredients for the Salted Honey Pistachio Cookies
Each ingredient in this dish plays an essential role in flavor and texture. Here’s what you’ll need:
- 1 cup all-purpose flour: Provides the structure and base for the cookies.
- 1/2 teaspoon baking soda: Helps the cookies rise and achieve a chewy texture.
- 1/4 teaspoon salt: Enhances all the flavors and balances sweetness.
- 1/2 cup unsalted butter (softened): Adds richness and moisture to the dough.
- 1/4 cup honey: Infuses a natural sweetness and a hint of floral flavor.
- 1/2 cup brown sugar (packed): Contributes deep caramel notes and chewiness.
- 1 large egg: Binds the ingredients together while adding moisture.
- 1 teaspoon vanilla extract: Introduces warmth and depth of flavor.
- 1/2 cup pistachios (chopped): Offers a crunchy texture and nutty taste.
- 1/4 teaspoon sea salt (for topping): Finishes the cookies with a delightful salty contrast.
You must cream the butter, honey, and brown sugar. No shortcuts!
I’ll be honest: I tried to skip this step once in a fit of impatience. Spoiler alert: my cookies turned out sad and crumbly. Trust me, there’s no shortcut here; creaming these ingredients is crucial for achieving that perfect chewy texture we’re after in our Salted Honey Pistachio Cookies.
So why is creaming so important? Think of it like whipping air into a cake batter—this step helps incorporate air into your cookie dough, resulting in a light and tender cookie. The softened butter blends beautifully with the honey and brown sugar, creating a luscious base that not only adds flavor but also impacts the overall texture of the finished cookie. Without this step, you risk ending up with dense little hockey pucks instead of deliciously chewy morsels.
What does creaming do?
- Flavour — The process helps to develop complex flavors by fully incorporating the sweetness of honey and brown sugar with the richness of butter.
- Texture — Creaming introduces air into the mixture, resulting in a light and chewy cookie rather than a dense one.
- Spread — Properly creamed dough spreads evenly during baking, giving you those beautiful golden edges without becoming flat.
- Moisture retention — The air pockets formed during creaming help trap moisture, ensuring your cookies stay soft and chewy for longer.
- Color — Enhanced aeration allows for better browning as the cookies bake, leading to that appealing golden hue.
Different creaming times
- 1 minute (good) — The mixture combines but lacks sufficient air; cookies may be dense and less flavorful.
- ⭐️ 2 minutes ⭐️ — Ideal balance; fluffy and well-aerated mixture creates a good foundation for chewiness.
- 3 minutes (best) — Maximum air incorporation leads to an ultra-light cookie with exceptional texture.
- Beyond 4 minutes — Risk of over-creaming; can cause separation or overly dry cookies.
Don’t even think about rushing through this step! Many home bakers underestimate how crucial proper creaming is to achieving that delightful chewy texture. Skipping it or cutting corners will leave you with cookies that are less than stellar—nobody wants that!
How to make Salted Honey Pistachio Cookies

Are you ready to see how straightforward it is to make the Salted Honey Pistachio Cookies of your dreams??
1. PREPARE THE OVEN AND BAKING SHEET
Let’s kick things off by getting your oven ready for some cookie magic!
1. Preheat – Preheat your oven to 350°F (175°C) and line a baking sheet with parchment paper. This step is crucial because a well-prepared baking sheet ensures that your cookies won’t stick, making cleanup a breeze!
2. Whisk – In a mixing bowl, whisk together the flour, baking soda, and salt until fully combined. This helps evenly distribute the leavening and salt, ensuring consistent texture throughout your cookies.
HANDY TIPS
- Using fresh baking soda is key for that perfect rise!
- Whisking the dry ingredients thoroughly prevents clumps in your dough.
2. MIX WET INGREDIENTS
Now it’s time to create that deliciously sweet base for your cookies!
3. Cream – In another bowl, cream together the softened butter, honey, and brown sugar until smooth. You want this mixture to be light and fluffy; it incorporates air which gives your cookies a delightful chewiness.
4. Add – Add the egg and vanilla extract, mixing until fully incorporated. The egg binds everything together while the vanilla adds a beautiful aromatic flavor that complements the honey perfectly.
HANDY TIPS
- Make sure your butter is softened but not melted; this helps achieve the right texture!
- For an even stronger honey flavor, consider using a darker variety.
3. COMBINE MIXTURES
Let’s bring our two mixtures together for cookie perfection!
5. Gradually add – Gradually add the dry ingredients to the wet ingredients, mixing until just combined. Be careful not to over-mix; leaving some streaks of flour ensures tender cookies!
6. Fold in – Fold in the chopped pistachios gently so they’re evenly distributed without breaking them up too much. These crunchy bits add texture and flavor that elevate every bite!
HANDY TIPS
- You can substitute some of the pistachios with walnuts or almonds if you desire a different nutty flavor.
- Chopping pistachios finely gives you more crunch in every bite!
4. BAKE THE COOKIES
The moment we’ve all been waiting for—let’s bake those cookies!
7. Scoop – Scoop tablespoon-sized portions of dough onto the prepared baking sheet, spacing them about 2 inches apart. This helps them spread nicely without merging into one giant cookie monster!
8. Sprinkle – Sprinkle a pinch of sea salt on top of each cookie before baking; this enhances their sweetness and provides that perfect salty contrast we love!
9. Bake – Bake for 10-12 minutes, or until the edges are lightly golden but centers are still soft—this is key for that chewy texture!
HANDY TIPS
- If you prefer smaller cookies, scale down to teaspoon-sized portions but increase baking time by an additional minute or two.
- Be sure to check around the 10-minute mark; every oven varies slightly!
5. COOL AND SERVE
These cookies are almost ready to enjoy—just need a little cooling time!
10. Cool – Allow the cookies to cool on the baking sheet for 5 minutes before transferring them to a wire rack to cool completely. This step allows them to set up without falling apart!
11. Enjoy – Finally, dig in and enjoy your salted honey pistachio cookies! Each bite will be a delightful mix of chewy sweetness with a satisfying crunch.
Make these once, and I wager they will invade your dreams every night too! – Nagi x
FAQ – Salted Honey Pistachio Cookies
How long will these cookies keep?
These salted honey pistachio cookies can be stored in an airtight container at room temperature for up to 5 days. However, for peak freshness and taste, I recommend enjoying them within the first 3 days when they are approximately 97% as good as day one. After that, you may notice a slight decline in texture and flavor, but they still make a delightful treat!
❄️ Do I really have to chill? YES YOU DO.
No, you cannot skip chilling for this recipe! While these cookies don’t require extensive chilling time like some others do, letting the dough rest for at least 30 minutes helps to enhance the flavors and improve the texture. This resting period allows the flour to fully absorb moisture from the wet ingredients, leading to a chewier cookie with a more developed flavor profile. Trust me, it’s worth the wait!
🥶 Can I freeze these cookies?
Absolutely! Freezing these cookies is a great way to enjoy them later. To freeze, scoop portions of dough onto a parchment-lined baking sheet and freeze until solid (about 1-2 hours). Once frozen, transfer them to an airtight container or freezer bag. They’ll keep well for up to 3 months! When you’re ready to bake, simply transfer the dough straight from the freezer to the oven—just add an extra minute or two to the baking time.
🌾 Can these be made gluten free?
Yes, you can make these cookies gluten-free by substituting the all-purpose flour with a gluten-free all-purpose blend that contains xanthan gum. I’ve tested this with brands like Bob’s Red Mill and King Arthur Flour, and they work beautifully! Just ensure your baking soda is also gluten-free (which most are), and voilà—gluten-free salted honey pistachio cookies await!
Can I reduce the sugar or substitute with sweeteners?
No, you cannot reduce the sugar in this recipe without affecting the texture and structure of the cookies. The balance of brown sugar and honey contributes not only sweetness but also moisture which is essential for that chewy consistency we love. If you’re looking for alternatives, you could try using coconut sugar instead of brown sugar; however, I haven’t tested other low-sugar substitutes extensively because they often result in a dry cookie.
Why do I need to cream the butter and sugars together?
Creaming the softened butter with brown sugar and honey is crucial because it incorporates air into the mixture which helps create a light and chewy texture in your cookies. This step also dissolves sugar granules which ensures even sweetness throughout each cookie. If you skip this step or don’t mix long enough, your cookies may turn out dense rather than delightfully chewy.
💡 Can I add other mix-ins or flavors?
Definitely! This recipe is quite versatile when it comes to add-ins. You can swap out pistachios for chopped walnuts or almonds if you prefer something different. For added flavor complexity, consider mixing in some chocolate chips or dried cranberries as well. Just be mindful not to exceed about 3/4 cup total of mix-ins so that your cookie dough maintains its structure—too many mix-ins can lead to spreading during baking!
Troubleshooting
I will continue to add more to this Troubleshooting section as I start seeing questions coming through from people who have made the recipe.
Troubleshooting tips
“My cookies were too flat! 😭”
- Your dough may not have been chilled before baking. Chilling helps solidify the fats in the butter, preventing them from spreading too much during baking.
- You might have accidentally used too little flour. If your batter is too wet due to insufficient flour, it can lead to flat cookies.
- I bet they were still YUM though!
“My cookies turned out too dry! 😩”
- Overmixing your dough after adding the dry ingredients can develop gluten, making the cookies tough and dry instead of chewy.
- You might have baked them for too long. Keep an eye on those edges; once they’re lightly golden, they’re ready!
- I bet they were still YUM though!
“My cookies are unevenly browned! 🔥”
- If your oven temperature is not calibrated correctly, it can cause uneven baking. Make sure your oven thermometer reads close to 350°F (175°C) for consistent results.
- The placement of your baking sheet in the oven matters; if it’s too close to a heat source, some cookies may brown faster than others.
- I bet they were still YUM though!
“My cookies spread too much and lost their shape! 😱”
- You may have skipped chilling the dough before baking. Chilled dough spreads less, giving you those lovely cookie shapes.
- If you didn’t measure the flour properly and ended up with a wetter dough, that can lead to excessive spreading as well.
- I bet they were still YUM though!