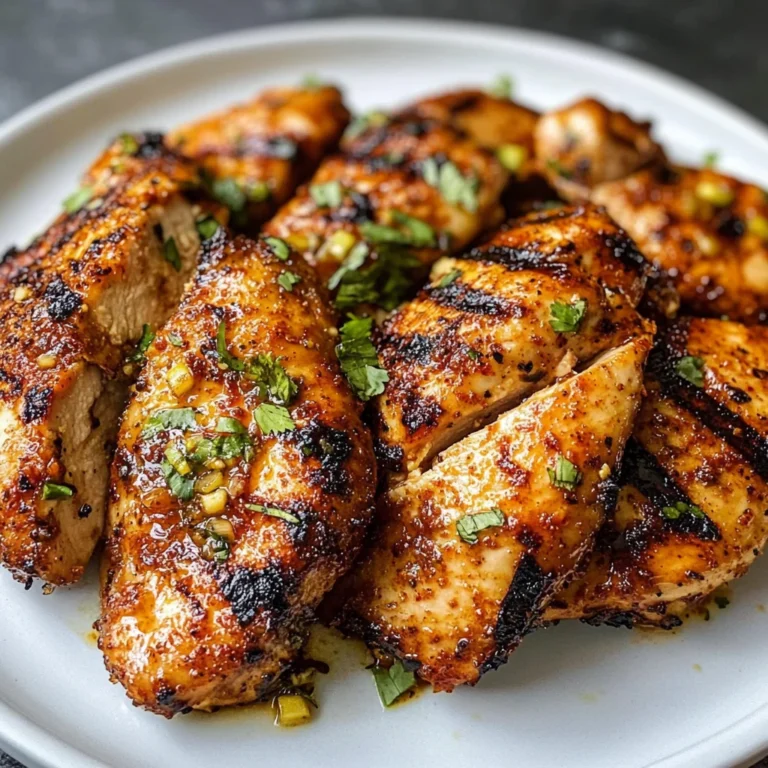
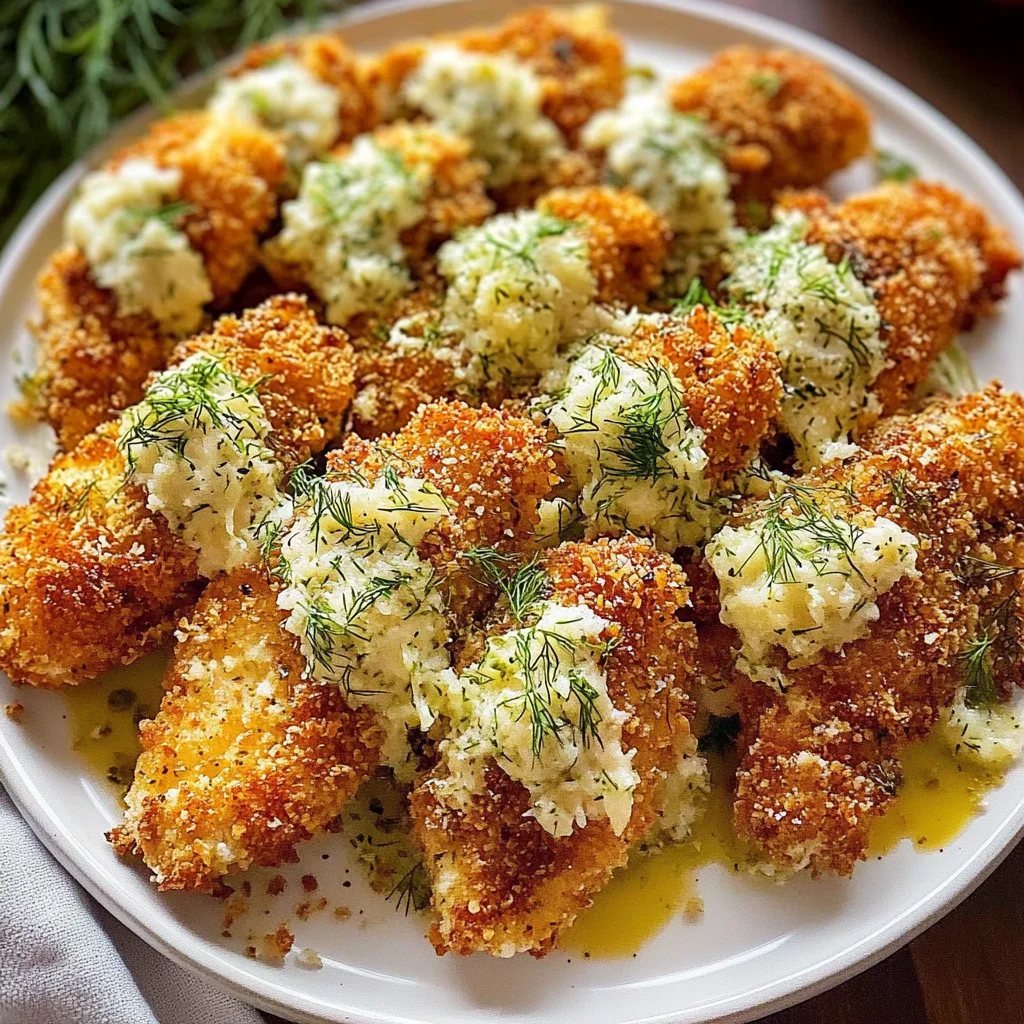
Crispy Dill Pickle Parmesan Chicken
There’s something truly magical about the way food brings us together—it’s more than just sustenance; it’s a celebration of flavors, memories, and, most importantly, love. This Crispy Dill Pickle Parmesan Chicken is a delightful blend of nostalgia and innovation that promises to enchant your taste buds and fill your home with the irresistible aroma of fried goodness. Imagine the first bite: succulent chicken, marinated in zesty dill pickle juice, perfectly complemented by a crunchy, golden crust that shatters delightfully as you sink your teeth in. It’s a dish that doesn’t just satisfy your hunger; it evokes warmth and joy—like wrapping yourself in a cozy blanket on a chilly evening. Trust me when I say this recipe will become an instant favorite around your dinner table.
What makes this Crispy Dill Pickle Parmesan Chicken so special? It’s the perfect harmony between savory and tangy that dances on your palate and leaves you craving more. The dill pickle juice not only infuses the chicken with moisture but also adds an exhilarating punch of flavor that transforms a simple meal into an extraordinary experience. Whether you’re serving it for a casual family dinner or impressing friends at a gathering, this dish fits any occasion like a glove. So roll up those sleeves, grab your favorite apron, and let’s embark on this culinary journey together!
Crispy Dill Pickle Parmesan Chicken: A Crunchy Delight
Let’s dive right in! This Crispy Dill Pickle Parmesan Chicken is bound to become one of those recipes you’ll want to share with friends and family—not just for its incredible taste but also for how easy it is to make. With every step, you’ll feel like you’re uncovering little secrets that elevate this dish from ordinary to extraordinary. You’ll find that the combination of crispy breadcrumbs and sharp Parmesan cheese creates a crust that makes every bite utterly intoxicating. Plus, knowing that it’s brined in pickle juice not only keeps the chicken moist but also adds layers of flavor you never knew you needed.
Ingredients:
Before we get started on our delicious adventure, let’s gather all our ingredients! Each component plays a vital role in ensuring our crispy chicken turns out perfection every single time.
- 4 boneless, skinless chicken breasts. The star of our show! Choosing high-quality chicken breasts is non-negotiable; they should be plump and fresh for optimal flavor and juiciness. Make sure to check for any signs of discoloration—fresh chicken should have a light pink hue. Boneless and skinless means we’re eliminating excess fat while still getting that juicy chicken experience we crave.
- 1 cup dill pickle juice (from a jar of pickles). Ah, the secret weapon! Dill pickle juice infuses our chicken with unparalleled flavor while simultaneously tenderizing it thanks to its acidic nature. When selecting pickles for brining, look for ones with spices that appeal to you—this could include garlic or dill for extra zest! The beauty of using pickle juice is its ability to transform mundane ingredients into something unforgettable.
- 1 cup seasoned breadcrumbs. These little nuggets are essential for achieving that coveted crunch! When choosing breadcrumbs, don’t skimp on quality—opt for seasoned varieties which bring added depth without needing extra herbs or spices. If you’re feeling adventurous or want to avoid gluten, homemade breadcrumbs made from stale bread can be wonderfully satisfying! They add texture and help create that golden crust we all adore.
- 1/2 cup grated Parmesan cheese. This ingredient is absolutely paramount—it brings richness and an irresistible umami kick to the party! Freshly grated Parm works wonders because it melts beautifully into the breadcrumb mixture, creating pockets of cheesy goodness as it crisps up during frying. If you can find imported Parmigiano-Reggiano, treat yourself; it’s worth every penny!
- 1/2 cup all-purpose flour. Flour serves as the first layer in our breading station; it creates an initial barrier while helping the egg adhere later on. This process is crucial because without it, your coating might slip off during cooking—definitely something we want to avoid! Opting for all-purpose flour ensures versatility and ease; however, if gluten-free options are desired, almond or oat flour would work beautifully too!
- 2 large eggs, whisked until frothy. Eggs play a critical role here—they act as glue for our breadcrumb coating while adding richness to each bite. Whisking them until frothy introduces air which helps create an even coating on our chicken pieces; trust me when I say this step enhances texture significantly!
- 1 tsp garlic powder. Garlic powder brings aromatic warmth and subtle sweetness without overwhelming other flavors—it’s simply divine! Make sure you choose quality garlic powder because freshness matters greatly here; aged spices can lose their potency over time.
- 1 tsp onion powder. Similar to garlic powder but with its unique touch! Onion powder adds depth alongside garlic without introducing any chunks or bits into our crispiness equation—it melds beautifully into the breadcrumb coating.
- 1/2 tsp paprika. A splash of paprika gives not only color but also hints of smokiness—a lovely addition indeed! Sweet paprika works well if you prefer milder tastes or smoked paprika if you’re looking for something bolder.
- Salt and pepper, to taste. These two staples are absolute must-haves—they enhance every other flavor present in our dish! Don’t be shy with seasoning; remember—you can always add more later if needed!
- Cooking oil, for frying (about 1/2 inch deep). Choosing the right oil is vital here—opt for oils with high smoke points like canola or vegetable oil so you achieve golden perfection without burning anything along the way!
Equipment You’ll Need:
Now that we’ve gathered everything we need let’s talk about some essential tools that’ll make this cooking experience smoother than ever! Having the right equipment isn’t just about convenience; it’s about making your culinary journey enjoyable from start to finish.
- Large skillet – A sturdy skillet is essential for frying up these beauties evenly across their surface area which promotes consistent browning while allowing enough space so they don’t overcrowd each other during cooking.
- Tongs – These handy tools will help you flip those juicy cutlets with ease without damaging them during their fry session—the last thing we want after all this hard work is shredded chicken!
- Shallow dishes or bowls – For setting up your dredging station: one each for flour mixture, whisked eggs, and breadcrumb-Parmesan combo ensures efficient assembly line style prepping which allows quick turnaround time when breading!
- Wire rack – Once fried perfectly golden brown (trust me—you’ll know!), transferring them onto wire racks ensures excess oil drips away while preventing sogginess—a crucial step I urge not to skip!
Now that we’ve laid out our ingredients and tools let’s jump into preparing this delightful dish! Get excited because soon you’ll be indulging in mouthwatering Crispy Dill Pickle Parmesan Chicken that’ll have everyone asking for seconds—and maybe even thirds!
Step 1: Marinating Your Chicken
First things first: let’s marinate our chicken breasts in luscious dill pickle juice! This step isn’t merely about adding flavor; it’s where real magic happens as acidity from the brine breaks down proteins within those lovely cuts resulting in unbelievably tender meat once cooked through later on—perfectly juicy bites await us ahead! Whether you choose 30 minutes or two hours depends entirely upon how bold you’re feeling today—the longer they soak up all those zesty flavors means bigger impact come meal time! Just remember: don’t rush this step—great flavor takes time.
Step 2: Setting Up Your Dredging Station
While your chicken marinates away happily soaking up all those delightful flavors let’s prepare our dredging station—we’re creating an assembly line that’ll allow us swift yet efficient breading action shortly thereafter! Start by taking three shallow dishes (or whatever containers suit your fancy) then get mixing: combine flour with garlic powder alongside onion powder plus paprika along with generous pinches salt & pepper into one bowl until well blended before moving onto next container where whisked eggs await looking frothy just like clouds floating overhead—a sign they’re ready when bubbles begin forming too! Finally take last bowl filled halfway full with seasoned breadcrumbs mixed generously alongside grated Parmesan until combined completely ensuring no clumps remain visible anywhere throughout mixture before proceeding onward toward final stages ahead…
Step 3: Dredging Your Chicken
Once marinated my friends—and oh boy does it smell divine—remove those beautiful breasts from their tangy bath then pat dry gently using paper towels because excess moisture will inhibit crispiness later down road which simply won’t do at all… Now begins fun part: dredging each piece individually starting off by gently rolling through flour mixture first ensuring full coverage occurs everywhere possible followed closely behind by dipping into egg wash next allowing liquid gold cling effortlessly before finally pressing firmly into breadcrumb-parmesan blend coating thoroughly on both sides making sure no naked spots exist whatsoever since these areas could lead us astray leaving some unfortunate bites lacking crunchiness entirely—which would break my heart!
Step 4: Frying Perfection Awaits!
With everything prepped up nicely now heat approximately half inch deep oil within large skillet over medium-high flame keeping watchful eye throughout process because timing here plays crucial role toward success as patience often pays off dividends when attempting achieve golden results… Fry each cutlet approximately five-seven minutes per side depending upon thickness involved until gorgeous coloration appears signaling readiness—the aroma wafting around kitchen should also serve reminder delightful feast awaits shortly thereafter—it almost feels like magic unfolding right before eyes doesn’t it? Just ensure internal temperature reaches 165°F before removing from skillet carefully transferring onto wire rack positioned nearby allowing excess oil drain away effectively whilst resting few moments prior serving hot straight away either alone alongside dipping sauce options galore available nearby…
Now you’ve got everything covered—from preparation through frying—your Crispy Dill Pickle Parmesan Chicken evolution has taken place successfully following along beautifully towards delectable end result awaiting quickly approaching dinner plates soon enough…
Step 5: Creating the Perfect Crust – The Art of Dredging
Once your chicken has marinated beautifully in that tangy dill pickle juice, it’s time to give it the attention it deserves by coating it to perfection. Trust me, this step is absolutely paramount for achieving that crispy, golden exterior! Start by removing the chicken from the brine—this process not only infuses flavor but also helps to tenderize the meat. Gently pat each piece dry with paper towels; this is crucial because excess moisture can hinder that delightful crust from forming. No one wants soggy chicken!
Now, let’s set up our assembly line: in one shallow dish, combine the all-purpose flour with garlic powder, onion powder, paprika, and a sprinkle of salt and pepper. This mixture will act as a foundational layer, creating a barrier between the chicken and the egg wash. In another dish, whisk those eggs until they are frothy—this will help bind our breadcrumb mixture to the chicken. Finally, in your last shallow dish, combine seasoned breadcrumbs with grated Parmesan cheese; this is where the magic happens! The combination of these two ingredients creates a symphony of flavors and textures—crunchy breadcrumbs with that nutty, salty kick from the Parmesan. Don’t rush this setup; taking your time ensures everything flows seamlessly.
Step 6: Mastering the Dredging Technique
Now comes my favorite part—the dredging! Take one piece of chicken and gently roll it in the flour mixture first. This initial coating is essential because it helps create a dry surface that allows for better adhesion when you dip into the egg wash. Make sure to coat every nook and cranny! Afterward, dip it into the whisked eggs; this step is critical as it acts like glue for our breadcrumbs. Let any excess egg drip off before moving on to the breadcrumb-Parmesan mixture. Here’s where you want to press down firmly as you coat your chicken—don’t be shy! I promise you, this pressure helps those crumbs stick better and creates an extra crunchy crust when fried.
Repeat this process for all pieces of chicken, taking care not to overcrowd them once they’re coated. You want each piece to have its own room to shine in that hot oil later on. As you prepare your chicken cutlets, take a moment to admire their transformation; they’ve gone from simple poultry to something truly extraordinary! Set them aside on a plate while we get ready for frying.
Step 7: Getting Ready for Frying – The Heat is On!
Before we move on to frying our Crispy Dill Pickle Parmesan Chicken, let’s talk about oil temperature—a non-negotiable aspect of frying that can make or break your dish! In a large skillet or frying pan, pour in enough cooking oil to create about half an inch of depth; this allows for even cooking. Heat your oil over medium-high heat until shimmering—this should take about 5-7 minutes but keep an eye on it! To test if it’s ready without a thermometer (though I recommend having one handy), drop a tiny pinch of breadcrumbs into the oil; if they sizzle immediately upon contact and float to the surface, congratulations—you’re ready to fry!
Here’s where patience plays a critical role again: do not overcrowd your pan! Frying in batches allows each cutlet enough space to fry properly without steaming one another. If you crowd them together, they’ll lose that beautiful crunch we’ve worked so hard for. Gently ease each piece into the hot oil using tongs or a slotted spoon—this prevents splashing hot oil everywhere (and trust me, that’s something we want to avoid). You should hear that satisfying sizzle right away—it means something magical is happening!
Step 8: Frying to Golden Perfection
As your chicken cooks in its bubbling bath of liquid gold, keep an eye on those cooking times—aim for about 5-7 minutes per side depending on thickness. You’ll know it’s time to flip when the edges begin turning golden brown and crispy; don’t just rely on time alone—use your senses as well! Look for a beautiful deep color and listen for that delightful crackling sound—these are indicators that you’re on track.
When flipping each piece over with tongs or carefully sliding them with a spatula, be gentle yet confident; you want everything intact and beautifully crisped up. Once cooked through (doneness is confirmed at an internal temperature of 165°F), remove each piece from the skillet using tongs or a slotted spoon and transfer them onto a wire rack set over paper towels. This method allows any excess oil to drain away while keeping your chicken perfectly crispy—not soggy!
Letting them rest here for just a few minutes before serving is essential—it allows juices inside to settle back into those delicious cuts of chicken rather than spilling out when you slice into them. Trust me on this one; patience will reward you with profoundly satisfying bites!
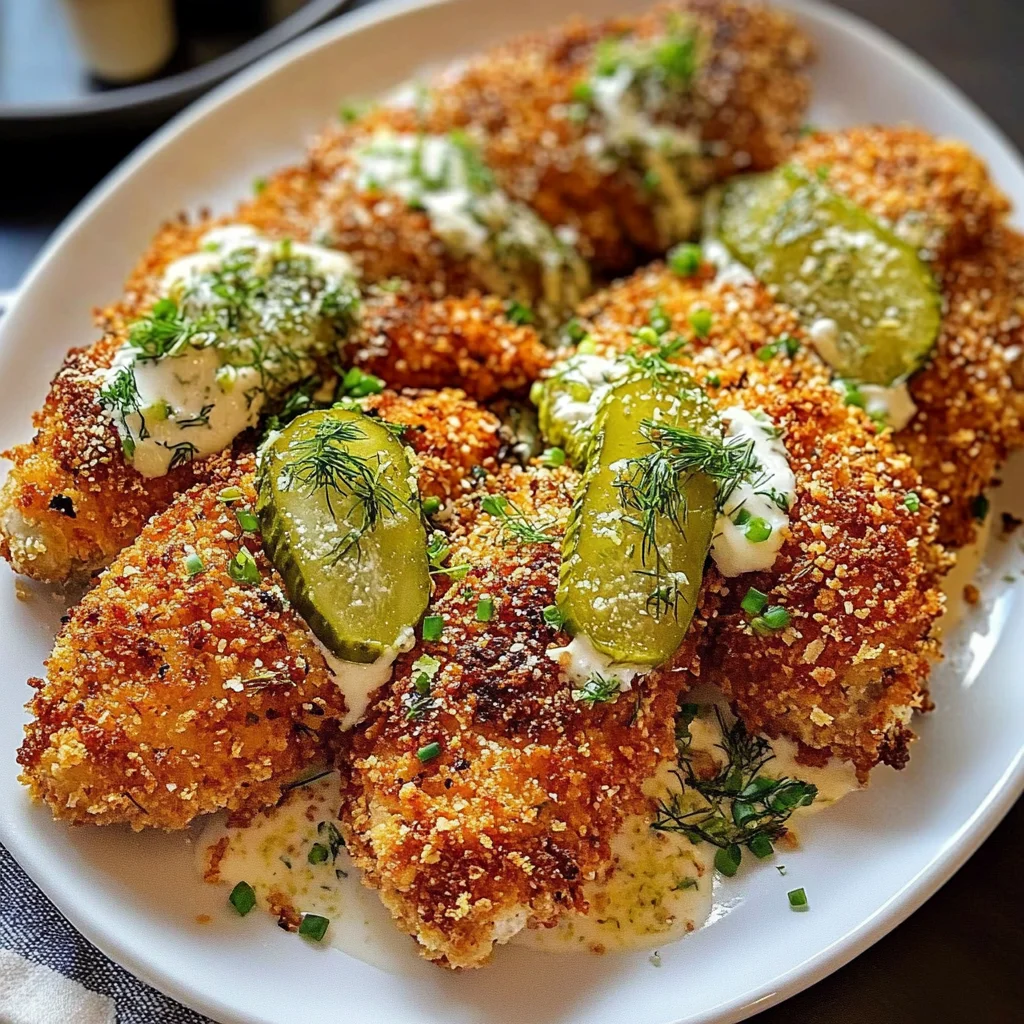
Final Touches – Serving Your Crispy Dill Pickle Parmesan Chicken
Step 9: Serving Up Joy
Finally! After all our hard work and tantalizing aromas filling your kitchen, it’s time to serve up this Crispy Dill Pickle Parmesan Chicken masterpiece! I can almost hear my friends raving about how juicy and flavorful these cutlets are going to be! When plating up, consider pairing them with some homemade ranch dressing or even tzatziki sauce—a cooling contrast against that zesty pickle flavor really rounds out each bite delightfully.
Don’t forget about sides; think crispy roasted potatoes or perhaps even some fresh coleslaw—the crunch complements what we’ve achieved beautifully here! As everyone gathers around the table eager for their first taste, take a moment yourself to appreciate what you’ve created—a dish that’s more than merely food but an experience filled with joy and love.
I promise you this recipe will become an instant favorite among family and friends alike—and who knows? It may even become part of your own culinary traditions passed down through generations like mine has been! Enjoy every bite—you’ve earned it!
Storage and Enjoyment Tips for Your Crispy Dill Pickle Parmesan Chicken
Now that your kitchen is filled with the mouthwatering aroma of Crispy Dill Pickle Parmesan Chicken, it’s time to savor every crunchy, juicy bite! But what happens when you inevitably have leftovers? Fear not, my friends! This delightful dish not only makes for a fantastic meal but can also be easily preserved to enjoy later. The key is in how you store it; let’s dive into the art of keeping that crispy goodness intact.
Storing Leftover Crispy Dill Pickle Parmesan Chicken
To ensure your leftover Crispy Dill Pickle Parmesan Chicken stays fresh and flavorful, the best approach is to use airtight containers. Glass or plastic containers with secure lids work wonders in preserving both moisture and crunch. Place your chicken in the fridge, where it will remain delicious for up to three days. To maintain that delightful crispiness, consider placing a slice of bread in the container; it absorbs excess moisture and helps keep your chicken from getting soggy—a little trick I learned from my grandmother that never fails! When reheated, this chicken retains its juicy texture with a crunch that might just remind you of when it was first cooked. For the best results, warm it up in an oven at 350°F (175°C) until heated through—this way, you’ll revive that golden crust without sacrificing flavor.
Freezing Crispy Dill Pickle Parmesan Chicken for Later
If you want to save some of your delicious creation for a future craving, freezing is a fabulous option! Simply allow the chicken to cool completely before wrapping each piece tightly in plastic wrap or placing them in freezer-safe bags. This will protect them from freezer burn and keep those flavors locked in. When done properly, your chicken can last up to three months in the freezer—great news for busy weeknights or unexpected guests! When you’re ready to indulge again, you can bake the frozen pieces directly from the freezer at 425°F (220°C) for about 20-25 minutes or until heated through—trust me on this; it’s incredibly convenient! Just imagine having this savory delight ready at your fingertips whenever you desire.
With these storage strategies under your belt, you’ll always have a little piece of culinary joy waiting for you!