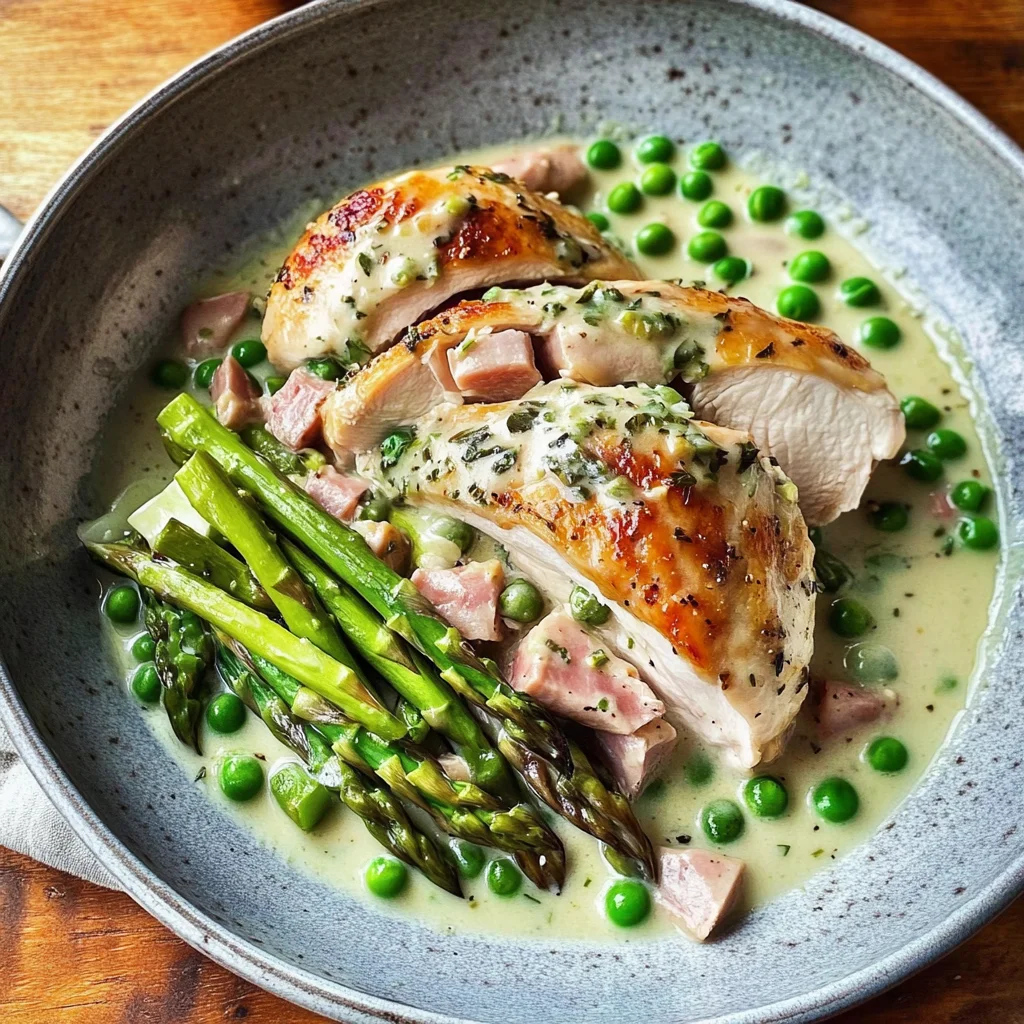
Fontina & turkey slices Stuffed Chicken with Spring Vegetables
The magic of cooking often lies in the stories we tell through our food. When I think about Fontina & turkey slices stuffed chicken with spring vegetables, it’s not just a delightful dish; it’s an experience that brings warmth and comfort to our tables. Imagine tender chicken breasts, lovingly stuffed with creamy fontina cheese and savory turkey slices, drizzled in a rich sauce that elevates every bite. The vibrant colors of spring vegetables—bright green asparagus and sweet peas—dance alongside the chicken, creating a symphony of flavors that beckons you to savor each moment. This recipe is more than nourishment; it’s an invitation to gather around the table with loved ones, share laughter, and create memories.
As you prepare this dish, you’ll find it’s not just about combining ingredients; it’s about embracing the joy of cooking and the satisfaction that comes from crafting something beautiful and delicious. Every step in making Fontina & turkey slices stuffed chicken is filled with purpose—from selecting the freshest ingredients to mastering simple techniques that ensure success. I promise you, this meal will not only please your palate but will also resonate in your heart as a truly extraordinary experience.
Fontina & turkey slices Stuffed Chicken with Spring Vegetables: A Flavorful Embrace
Welcome to one of my favorite recipes! This Fontina & turkey slices stuffed chicken with spring vegetables is perfect for a cozy dinner or an impressive gathering. With its creamy filling and colorful vegetable medley, this dish embodies the essence of comfort food while remaining fresh and vibrant. Trust me when I say that once you dive into this recipe, you’ll find yourself returning to it time and again!
Ingredients:
Embarking on this culinary journey begins with gathering the right ingredients, each playing a crucial role in creating this delightful dish. Let’s explore what you’ll need:
- 0.5 cup shredded fontina cheese: This exquisite cheese is known for its smooth texture and rich flavor profile. When melted, fontina becomes wonderfully creamy, adding a luxurious touch to your stuffing. Look for high-quality fontina at your local cheese shop or grocery store; it should have a slightly nutty aroma and be soft but not overly crumbly. If you can’t find fontina, feel free to substitute with another semi-soft cheese like Gruyère or Havarti for similar melting qualities.
- 0.25 cup chopped turkey slices or chicken ham: These tender slices lend a savory depth to our stuffing while keeping things light and flavorful. Turkey is an excellent choice because it’s lean yet full of protein, making this dish both satisfying and nutritious. If you’re feeling adventurous, consider using smoked turkey for an added layer of flavor!
- 1 teaspoon chopped fresh tarragon, plus more for garnish: This herb brings an aromatic quality that’s simply intoxicating! Tarragon has a unique flavor reminiscent of anise, which beautifully complements the richness of the fontina cheese. Fresh herbs are always preferable as they pack more flavor than dried ones; if tarragon isn’t available, try substituting with fresh basil or parsley.
- 2 boneless, skinless chicken breasts (about 1 pound total): Chicken breasts are versatile and easy to work with, making them perfect for stuffing! Be sure to choose plump breasts without any blemishes for optimal juiciness. The key here is to avoid overcooking them—using an instant-read thermometer will help ensure they reach that perfectly cooked state without drying out.
- 0.25 teaspoon salt, divided: Salt enhances all the flavors in our dish by bringing out their natural essence—it’s absolutely paramount for achieving balance in any recipe! We’ll use this salt at different stages to ensure every component is seasoned just right.
- 0.25 teaspoon ground pepper, divided: Just like salt, freshly cracked black pepper adds depth and warmth! Using it thoughtfully throughout the cooking process ties all our flavors together beautifully.
- 1 tablespoon plus 1 teaspoon cornstarch, divided: Cornstarch acts as a thickening agent that transforms our broth into a luscious sauce that clings lovingly to everything on your plate! It’s perfect for achieving that silky texture we desire without adding unnecessary flour or gluten.
- 2 tablespoons extra-virgin olive oil: Good olive oil is liquid gold in the kitchen! It imparts richness while helping us achieve that gorgeous golden-brown crust on our chicken when sautéing. Always opt for extra-virgin olive oil when possible; its flavor is far superior compared to regular olive oil.
- 1 cup low-sodium chicken broth: Broth adds depth and moisture during cooking while enhancing overall flavor without overwhelming saltiness—this allows us to control seasoning better throughout the dish!
- 1 pound asparagus, trimmed and cut into 2-inch pieces: Asparagus not only adds vibrant color but also provides crunch and freshness against our creamy filling! When selecting asparagus at the market, look for firm stalks with tightly closed tips; these are indicators of freshness!
- 0.5 cup peas: Sweet peas bring a burst of color and sweetness that balances out the savory elements beautifully! Whether fresh or frozen is fine—just be sure they’re bright green!
- 2 spring onions or scallions, sliced: These delicate onions add mild onion flavor without overpowering other ingredients—a lovely touch for brightness!
- 0.25 cup half-and-half: This combination of milk and cream gives our sauce its lusciousness while maintaining just enough lightness so we don’t feel weighed down after enjoying this meal!
Equipment You’ll Need:
Having the right tools makes all the difference when bringing culinary visions to life! While these items may not be ingredients, they are essential partners in creating something wonderful.
- Sharp knife: A good chef’s knife makes slicing through chicken breasts effortless while ensuring clean cuts when prepping veggies; investing in quality knives pays off greatly in ease of use!
- Cutting board: A sturdy cutting board provides stability when chopping ingredients—opt for one made from bamboo or plastic since they’re easier on knives than glass surfaces.
- Large skillet: A wide skillet allows ample space for browning our stuffed chicken evenly; make sure it has high sides so those glorious juices won’t escape during cooking!
- Instant-read thermometer: This little gadget is invaluable—it takes away any guesswork concerning doneness! Insert it into the thickest part of your chicken breast; once it reads 165°F (75°C), you know it’s safe and perfectly cooked!
- Small mixing bowl: You’ll need this for combining your stuffing ingredients before filling those beautiful chicken breasts!
With all your ingredients prepped and tools at hand, let’s dive into preparing these luscious Fontina & turkey slices stuffed chicken breasts together!
Step 1: Preparing Your Flavor-Filled Stuffing
First things first—let’s bring together our stuffing ingredients! In a small mixing bowl, combine your ½ cup shredded fontina cheese with ¼ cup chopped turkey slices (or chicken ham) along with 1 teaspoon of freshly chopped tarragon. Mixing these components creates an utterly intoxicating blend where each ingredient contributes something special—the creaminess from fontina melds beautifully with savory bits of turkey while tarragon adds its aromatic charm. Take a moment here—inhale deeply as you stir; trust me on this—the scent alone will make your heart flutter in anticipation!
Step 2: Stuffing The Chicken Breasts
Now comes one of my favorite parts—stuffing those succulent chicken breasts! Take each boneless breast and carefully cut a horizontal slit along one long edge—not quite through but enough so you can create a pocket for all that delightful filling we’ve prepared. Open each breast gently like a book; then scoop half of your cheesy mixture into each pocket before pressing down lightly to secure everything inside. Once filled up nicely—you’ll want to sprinkle each breast with ⅛ teaspoon salt and pepper from both sides before lightly coating them using 1 tablespoon cornstarch—you’re aiming for just enough coverage that helps keep moisture locked within during cooking!
Step 3: Searing To Perfection
Time to heat things up! In a large skillet over medium-high heat, pour in those glorious 2 tablespoons extra virgin olive oil until shimmering—a sign it’s ready for action! Gently lay down each stuffed breast into this hot pool of liquid gold; allow them some time here undisturbed until they develop an enticing golden-brown crust—about three minutes per side should do it nicely (flipping only once). Don’t rush through this step—it’s crucial as browning adds layers upon layers of flavor through caramelization which elevates every bite later on.
Step 4: Simmering For Succulence
Once browned adequately on both sides (it’ll look heavenly!), we’ll introduce some moisture back into play by pouring in our prepared cup low-sodium chicken broth around those beauties nestled within their pan—this creates steam which helps cook through without drying out any precious goodness inside those pockets we created earlier! Lower heat immediately after adding broth so everything simmers gently rather than boiling away too quickly—we want tenderness here—not tough meat—and cover tightly with lid allowing them approximately twelve minutes until internal temperature hits that magical mark at 165°F (75°C) when done perfectly juicy yet safe too!
I can already sense how amazing dinner will taste tonight—and I can’t wait for you all to experience these incredible flavors together! As we continue exploring assembly further down below…
Step 5: The Art of Sautéing Your Vegetables to Perfection
Now that we have our beautifully stuffed chicken cooked to a lovely golden brown, it’s time to turn our attention to the vegetables, which will not only accompany our dish but elevate it to new heights. In the same skillet where you seared your chicken, you’ll notice those delicious brown bits clinging to the bottom—this is liquid gold! These bits are packed with flavor and will infuse your vegetables with an utterly intoxicating taste. So, without washing the pan, add in 1 pound of asparagus, which you’ve already trimmed and cut into manageable two-inch pieces, along with 1/2 cup of peas—fresh or frozen work beautifully here. Also toss in 2 sliced spring onions or scallions for a hint of sweetness and crunch that complements the other flavors perfectly.
This step is crucial for creating a well-rounded dish, as the sautéing process not only cooks the vegetables but also allows them to absorb all those wonderful flavors left behind by the chicken. Cook these beauties over medium heat until the asparagus turns bright green and slightly tender—this usually takes about 4 minutes. Keep an eye on them; you want them crisp-tender rather than mushy. The vibrant colors should scream freshness at you! Stir occasionally so they cook evenly and don’t stick. Trust me on this; a little patience pays off as you watch them transform from raw to radiant.
Step 6: Creating a Luscious Sauce
Once your vegetables are just right—and they should be looking gorgeous now—it’s time to elevate this dish further by making a creamy sauce that ties everything together. Grab a small bowl and whisk together 1/4 cup of half-and-half with the remaining 1 teaspoon of cornstarch. This mixture is key because it will give your sauce that velvety texture we all crave while ensuring it thickens beautifully without any lumps—absolutely paramount for a polished dish!
Pour this mixture into your vegetable-filled skillet gently, stirring continuously as it heats up. You’ll notice how quickly that creamy goodness begins to thicken; this should take just about 1 minute. Be vigilant during this stage; you want it to be thick enough to coat the back of a spoon but still pourable over your chicken and veggies when serving. The science behind this step lies in the cornstarch activating and binding with moisture, which creates that delightful creamy consistency we’re after. Once thickened, return your lovely stuffed chicken breasts back into the pan, turning them carefully to coat each piece in that luscious sauce. The aroma wafting through your kitchen at this moment will make your heart sing!
Step 7: The Grand Finish – Plating Your Masterpiece
Now comes one of my favorite parts—the plating! This is where your hard work truly shines and presenting your dish becomes an art form. Start by slicing each stuffed chicken breast in half diagonally; this not only makes for beautiful presentation but also allows those delectable layers of Fontina cheese and turkey slices to peek out invitingly. Place these juicy slices atop a bed of your sautéed vegetables right in the center of each plate, allowing them to cradle each other like old friends at a reunion.
Drizzle any remaining sauce from the skillet over both the chicken and vegetables generously—don’t skimp here! It’s like giving them a warm hug before they hit the table. For that final touch, sprinkle some freshly chopped tarragon over everything; not only does it add color, but its subtle anise-like flavor brings another layer of depth that dances on your palate. This simple act transforms an already beautiful meal into something truly extraordinary—a feast both for the eyes and soul.
Step 8: The Moment of Truth – Time to Indulge!
Before you dive into this culinary creation, take a moment to appreciate what you’ve crafted—a symphony of flavors beautifully married together—each bite promising joy and satisfaction. As you sit down with family or friends (or even just yourself), let each forkful remind you why cooking is such an intimate experience; it’s about creating warmth around the table and sharing love through food.
When serving, encourage everyone to dig in while noting how every element—the tender chicken bursting with cheesy goodness, crunchy asparagus kissed by olive oil, and sweet peas—all combine wonderfully on their plates for a profoundly satisfying meal. I absolutely promise you this Fontina & turkey slices Stuffed Chicken with Spring Vegetables will become one of those recipes you’ll cherish forever—a true testament to home cooking’s magic!
So gather around, savor every bite, share stories or laughter—it’s moments like these that create lasting memories in our kitchens. Enjoy!
Storage and Enjoyment Tips for Your Fontina & turkey slices Stuffed Chicken with Spring Vegetables
Now that your kitchen is filled with the mouthwatering aroma of Fontina & turkey slices stuffed chicken, it’s time to relish every bite! I can almost hear the clinking of forks as friends and family gather around the table, ready to indulge in this delectable dish. But what happens if you have leftovers? Trust me, this recipe is just as enjoyable the next day, so let’s dive into how to preserve those delightful flavors for later enjoyment!
Storing Leftover Fontina & turkey slices Stuffed Chicken with Spring Vegetables
To keep your leftover Fontina & turkey slices stuffed chicken fresh and delicious, I recommend using an airtight container—this is absolutely paramount for retaining moisture and flavor. Storing your chicken in the refrigerator will allow it to maintain its quality for about 3-4 days. If you want to enhance its longevity even further, consider placing a slice of bread inside the container; this little trick helps absorb excess moisture while keeping your chicken succulent. After a day or two, you might find that the flavors have deepened beautifully, creating an even more harmonious blend of the rich fontina and savory turkey slices mingling together in each bite. When you’re ready to enjoy those leftovers again, simply reheat them gently in a skillet over low heat or pop them in the microwave for a quick meal; just be sure not to rush this step to avoid drying them out!
Freezing Components for Later
If you’re looking to extend the life of your culinary masterpiece even further, freezing is a fantastic option! To freeze your Fontina & turkey slices stuffed chicken, make sure each piece is tightly wrapped in plastic wrap or aluminum foil before placing them in a freezer-safe container or bag. This method protects against freezer burn and keeps those delightful flavors intact. You can store it frozen for up to 3 months—perfect for those nights when you crave something comforting but don’t want to spend much time cooking. When you’re ready to use it from frozen, simply thaw it overnight in the refrigerator before reheating as mentioned earlier. The convenience of having such a flavorful meal at your fingertips is incredibly exciting; it’s like having a secret stash of comfort waiting just for you!
Fontina & Turkey Slices Stuffed Chicken with Spring Vegetables

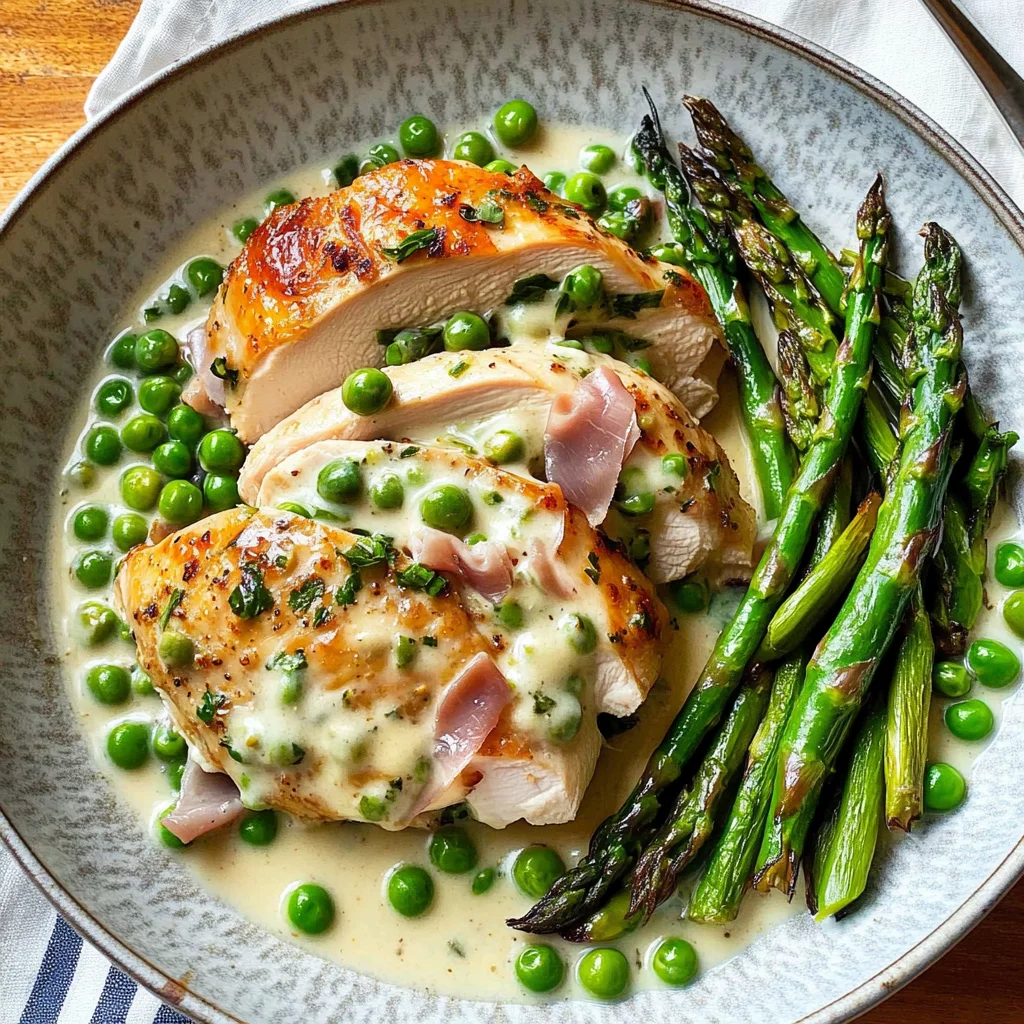
Indulge in the delightful experience of Fontina & turkey slices Stuffed Chicken with Spring Vegetables—a comforting dish that transforms ordinary weeknight meals into extraordinary culinary moments. This recipe features tender chicken breasts filled with creamy fontina cheese and savory turkey slices, all complemented by vibrant spring vegetables like asparagus and peas. The dish is not only visually stunning but also bursting with flavor, making it perfect for cozy dinners or impressive gatherings. With easy-to-follow instructions and wholesome ingredients, you’ll create a meal that brings warmth to your table and joy to your heart.
- Prep Time: 15 minutes
- Cook Time: 20 minutes
- Total Time: 35 minutes
- Yield: Serves 2
- Category: Main
- Method: Sautéing
- Cuisine: Italian
Ingredients
- 0.5 cup shredded fontina cheese
- 0.25 cup chopped turkey slices
- 2 boneless, skinless chicken breasts (about 1 pound total)
- 1 teaspoon chopped fresh tarragon
- 1 cup low-sodium chicken broth
- 1 pound asparagus, trimmed and cut into 2-inch pieces
- 0.5 cup peas
- 2 tablespoons extra-virgin olive oil
- 0.25 teaspoon salt, divided
- 0.25 teaspoon ground pepper, divided
- 1 tablespoon plus 1 teaspoon cornstarch, divided
- 0.25 cup half-and-half
Instructions
- Preheat your skillet over medium-high heat and add olive oil.
- In a small bowl, combine fontina cheese, turkey slices, and tarragon.
- Cut slits into each chicken breast to create pockets; fill them with the cheese mixture.
- Season the outside of the chicken with salt and pepper before dusting with cornstarch.
- Sear chicken in the skillet until golden brown on both sides (about 3 minutes per side).
- Pour in chicken broth, cover, and simmer for about 12 minutes or until the internal temperature reaches 165°F.
- In the same skillet, add asparagus, peas, and scallions; sauté for about 4 minutes until tender-crisp.
- For the sauce, whisk together half-and-half and cornstarch; stir into vegetable mixture until thickened.
- Slice stuffed chicken breasts and serve over sautéed vegetables, drizzled with sauce.
Nutrition
- Serving Size: 1 stuffed chicken breast (200g)
- Calories: 385
- Sugar: 3g
- Sodium: 420mg
- Fat: 20g
- Saturated Fat: 7g
- Unsaturated Fat: 11g
- Trans Fat: 0g
- Carbohydrates: 14g
- Fiber: 3g
- Protein: 36g
- Cholesterol: 105mg