Spring Chicken Pot Pie
There’s something truly magical about the first bite of a homemade Spring Chicken Pot Pie. It’s an experience that goes beyond just nourishment; it’s a comforting hug in a dish, a celebration of seasonal produce, and a beautiful way to gather friends and family around the table. Picture this: as you cut through the golden, flaky puff pastry crust, steam escapes, carrying with it the enticing aroma of tender chicken mingled with fresh vegetables. The creamy, lemony sauce glistens like liquid gold, inviting you to indulge in its richness. Every forkful is a symphony of flavors—salty, savory, and just a hint of brightness from the lemon zest. This isn’t just a recipe; it’s an invitation to create warm memories in your kitchen, where every ingredient has a story and every bite feels profoundly satisfying.
In my own kitchen, I cherish the moments spent crafting this dish during springtime gatherings. The vibrant colors of asparagus and radishes remind me that fresh ingredients have their own seasons—much like life itself. This Spring Chicken Pot Pie is not only an ode to those seasonal treasures but also a reminder of how food can connect us to our roots while allowing room for creativity. I encourage you to embrace this recipe with open arms; it’s versatile enough for any occasion—be it a cozy weekday dinner or a festive gathering—and I promise you’ll find joy in every step of its creation.
Spring Chicken Pot Pie: A Bright and Comforting Delight
Today, let’s dive into making this delightful Spring Chicken Pot Pie that combines tender chunks of chicken with fresh seasonal vegetables in a creamy sauce, all tucked beneath a golden puff pastry crust. It’s simple yet sophisticated—a perfect balance! The beauty lies not only in the taste but also in the process of bringing everything together. As we embark on this culinary journey together, let me share some tips and tricks along the way!

Ingredients:
As we prepare for this delightful journey into flavor town, let’s take a moment to appreciate each ingredient’s role in creating this masterpiece. Each component works harmoniously to elevate our Spring Chicken Pot Pie into something truly extraordinary.
- 2 tablespoons butter. Butter is essential here for building depth and flavor; it acts as the base for sautéing our veggies and creates that rich mouthfeel we all crave. Look for high-quality unsalted butter so that you can control the saltiness of your dish better; European-style butter works wonders due to its higher fat content which gives an even more luxurious texture.
- 1 large leek (white and light green parts diced, about 1 cup). Ahh, leeks—the unsung hero of many dishes! Their mild onion flavor adds sweetness without overwhelming other ingredients. When selecting leeks at the market, choose those that are firm with vibrant green tops; they should feel heavy for their size and have no signs of wilting or yellowing.
- 1 ½ cups carrots (diced). Sweet carrots bring both color and natural sweetness to our pot pie—can you already imagine how they’ll brighten up each bite? When chopping them into uniform pieces, aim for about half-inch cubes; this ensures they cook evenly alongside our other lovely veggies.
- 1 cup radishes (diced). Radishes might surprise you here—they add peppery notes that contrast beautifully with the sweetness of carrots. Choose firm radishes with smooth skin (no blemishes!) for optimal crunchiness; when cooked gently like we will be doing here, they lose some of their sharpness yet retain their vibrant color.
- 1 cup asparagus (diced). Tender asparagus spears are like nature’s little green gems in our pot pie! They provide freshness while adding beautiful texture when diced into bite-sized pieces. Look for bright-green stalks that are firm but not woody; if they snap easily when bent, you know they’re fresh!
- 3 tablespoons flour. This humble ingredient is crucial as it thickens our creamy sauce beautifully! It helps bind everything together while preventing any unwanted runniness; remember to cook it slightly with butter before adding liquids—which builds flavor without leaving raw flour taste behind.
- 1 cup homemade or low sodium chicken stock. Homemade stock elevates your dish significantly! It infuses deep flavor throughout while keeping things moist without overpowering other elements—a real game changer! If you’re using store-bought stock instead, opt for low-sodium varieties so you can manage seasoning more effectively.
- 2 teaspoons salt (plus more to taste). Salt is non-negotiable—it enhances flavors across all ingredients! Start with two teaspoons when cooking; remember that some ingredients like stock may already contain salt too!
- Freshly cracked black pepper (to taste). Pepper adds warmth and depth—I recommend grinding your own right before use since pre-ground versions often lack vibrancy! Just trust me on this one—freshly cracked black pepper makes all the difference!
- 8 ounces mascarpone cheese. Mascarpone adds creaminess unlike anything else—its luscious texture envelops everything beautifully without being overly rich or cloying! If you can’t find mascarpone at your local grocery store though—don’t fret—a mixture of cream cheese mixed with sour cream can work as an adequate substitute!
- 2 cups diced or shredded chicken. Whether you’re using leftover roasted chicken or poaching fresh pieces specifically for this dish—the key is tenderness! I always recommend using skinless boneless pieces since they integrate seamlessly into your filling.
- ¾ cup frozen peas. These little green pearls bring bursts of sweetness alongside lovely color contrast; plus—they’re quick-cooking which saves time during assembly! You can always swap them out for other frozen veggies if desired—but peas add that quintessential touch!
- 2 teaspoons lemon zest & 2 teaspoons lemon juice: Citrus elevates dishes remarkably well by cutting through richness while adding brightness! Zest first then squeeze juice afterward—you’ll want every bit of flavor from these little gems!
- 2 tablespoons minced chives: Chives lend depth along with gentle onion flavor—they’re delicate yet impactful! Make sure to chop finely so their essence permeates throughout beautifully.
- 1 sheet all-butter puff pastry (such as Darfour): Puff pastry creates that irresistible flaky crust we adore—look for quality products made strictly from butter rather than margarine or shortening which won’t yield quite the same result!
- Flour (for rolling): A light dusting will ensure your dough doesn’t stick while rolling out—it helps maintain its flakiness too!
- 1 egg (whisked together with 1 teaspoon water): This egg wash gives our pastry its stunning golden brown color during baking—it’s absolutely paramount if we want our pot pie looking as beautiful as it tastes!
Equipment You’ll Need:
Before we get started on creating magic in your kitchen, let’s talk about some essential tools you’ll need along the way! Having these trusty partners by your side not only makes cooking smoother but also adds joy to each step.
- Large skillet or sauté pan – A sturdy skillet is vital here because we’ll be cooking multiple ingredients at once while achieving that perfect sautéed texture! Choose one that distributes heat evenly—a non-stick surface can make clean-up easier too.
- Cutting board – A good-sized cutting board provides plenty of space when dicing those gorgeous vegetables without feeling cramped or rushed!
- Chef’s knife – Invest in a sharp chef’s knife—it makes slicing through veggies effortless while ensuring precision cuts which help them cook evenly!
- Rolling pin – Important for rolling out puff pastry without tearing—look for one made from hardwood since it provides great grip against dough surfaces!
- Oven-safe baking dish (or individual ramekins) – Depending on how you’d like to serve this pot pie—choose something oven-safe where flavors meld together beautifully during baking time!
With all these wonderful components gathered together—the stage is set for creating something deliciously comforting!
Preparing the Spring Chicken Pot Pie
Step 1: Sautéing Aromatics
Let’s kick things off by heating up two tablespoons of butter over medium heat in your large skillet until it’s melted and bubbling gently—this process creates what chefs refer to as the foundation upon which many delicious recipes stand tall! Add in your diced leeks first because they need just a touch longer than others to soften properly without browning too much—the goal here is tender sweet leeks infused with buttery goodness after about five minutes of stirring occasionally until translucent but not browned at all; trust me on this part—it lays down incredible layers upon layers of flavor later on!
Step 2: Adding Vegetables
Once those leeks are perfectly softened and aromatic wafting through your kitchen air beckons everyone nearby closer—you’ll throw in those diced carrots next followed by radishes and asparagus too! Stirring occasionally allows even cooking across different textures—we want tender veggies but still holding their shape when incorporated into our filling at around seven-to-eight minutes total cook time should suffice here before moving onto thickening up our glorious sauce next step ahead…
Step 3: Creating Creamy Sauce
Now sprinkle three tablespoons flour directly over sautéed vegetables stirring continuously until fully coated letting cook briefly—it’ll help absorb moisture while thickening things up nicely once stock comes pouring in shortly after… Slowly whisk in one cup homemade chicken stock ensuring no lumps remain forming creamy goodness throughout everything mixing thoroughly before seasoning towards liking using salt & freshly cracked pepper giving chance flavors blend harmoniously together before folding luxurious mascarpone cheese smoothly causing utter intoxication when combined making sure nothing clumps left behind…
Step 4: Incorporating Chicken & Peas
At last adding two cups shredded or diced chicken then frozen peas brings home final touches needed within filling mixture—you’ll be amazed how quickly these additions transform everything into something profound indeed… Gently fold them throughout ensuring even distribution waiting patiently five additional minutes letting warmth penetrate through whilst maintaining tenderness achieving perfection here feels like triumph knowing each element shines brightly amongst others creating symphony flavors welcoming guests near anxious anticipation building up hope biting soon…
I hope you’re feeling inspired already because we’re just getting started on crafting this beautiful Spring Chicken Pot Pie together! Each step builds momentum toward creating something unforgettable—a dish worthy enough celebrating life’s sweetest moments shared among loved ones around table filled laughter warmth love… So hang tight as we continue unfolding magic ahead…
Step 5: Sautéing the Vegetables to Perfection
Now that your oven is preheating and the delightful aroma of anticipation is filling your kitchen, it’s time to turn our attention to the vegetables that will bring this Spring Chicken Pot Pie to life! In a large, heavy-bottomed skillet, melt those two tablespoons of butter over medium heat. As the butter gently sizzles, it transforms into a liquid gold that not only adds flavor but also acts as a foundation for your dish. Trust me on this—using quality butter makes a world of difference here. Once melted, add in the diced leek, which will contribute its sweet, onion-like flavor to the mix. You’ll want to sauté these for about 3-4 minutes until they become translucent. This step is crucial because it allows the leeks to soften and release their aromatic oils, creating an inviting base for your pie.
Next, it’s time to introduce the carrots and radishes into the skillet. These two vegetables are not just colorful; they each bring unique textures and flavors that play beautifully together in this pot pie symphony! Sauté them for another 5 minutes until they start to soften; you should see their vibrant colors deepening just slightly. As you stir occasionally, you may notice how the vegetables are beginning to caramelize at the edges—a truly intoxicating sight! After that, add in the asparagus and allow everything to cook together for another couple of minutes. The bright green spears will add a beautiful crunch and a fresh flavor profile that screams springtime. Remember, don’t rush this step; giving these veggies some love now will infuse your pot pie with layers of deliciousness later on.
Step 6: Creating a Luxurious Sauce
With your vegetables beautifully sautéed and ready for action, let’s take things up a notch by creating a creamy sauce that will bind everything together in perfect harmony! Sprinkle three tablespoons of flour over the sautéed veggies while continuously stirring. This is known as making a roux—a classic technique that thickens sauces and provides a rich texture. It’s important not to skip this step or rush through it; allow the flour to cook for about 2 minutes until it becomes golden brown. You’ll notice an incredible nutty aroma wafting through your kitchen—this is what we want!
Now comes one of my favorite moments: slowly pour in one cup of homemade or low-sodium chicken stock while whisking vigorously. This technique is called emulsification; it’s where you’re combining two liquids that typically wouldn’t mix well together. Whisking helps prevent lumps from forming and ensures that your sauce becomes smooth and velvety—absolutely paramount for achieving that luxurious mouthfeel we’re after! Allow this mixture to simmer gently on low heat for about 3-5 minutes until it thickens nicely into a creamy sauce. If you feel like your sauce needs more seasoning at this point, go ahead and sprinkle in two teaspoons of salt along with freshly cracked black pepper according to taste—it’s all about personal preference here!
Step 7: Folding in Flavorful Ingredients
Now that we have our silky sauce ready, let’s bring all those fabulous flavors together by adding in our remaining ingredients! Stir in eight ounces of mascarpone cheese—this ingredient adds an exquisite creaminess that’s simply out of this world! I promise you; once you taste this combined mixture, you’ll understand why I adore using mascarpone so much—it elevates every bite into something truly extraordinary. Next up is our cooked chicken; whether you’ve diced or shredded it doesn’t matter as long as it’s tender and succulent! Fold these ingredients gently so they’re evenly coated with that dreamy sauce.
Then comes the frozen peas (¾ cup) – their sweetness contrasts beautifully with the savory elements we’ve built thus far—and don’t forget those two teaspoons of lemon zest and juice! Adding lemon zest is like unleashing sunshine into this pot pie; it brightens up all those flavors in such a profound way. Finally, sprinkle in two tablespoons of minced chives which lend an elegant finish with their subtle onion flavor. At this stage, take a moment to relish in what you’ve created: an incredibly fragrant filling bursting with color and flavor!
Step 8: Assembling Your Spring Chicken Pot Pie
The moment has arrived where all your hard work culminates into one glorious dish—a Spring Chicken Pot Pie ready for its crowning glory: the puff pastry crust! First things first: make sure you’ve lightly floured your work surface before rolling out your sheet of puff pastry (I particularly love using Darfour). You’ll want to roll it out gently until it’s about ¼ inch thick—this gives us enough surface area while still allowing for that delightful flaky texture when baked.
Carefully transfer your beautifully mixed filling into a sturdy pie dish or individual ramekins if you’re feeling fancy—there’s something special about personal portions! Now comes an exciting yet slightly nerve-wracking part: draping the rolled-out puff pastry over your filling. It might seem daunting at first, but just remember—you’re creating something utterly magical here! Gently press down along the edges to seal everything inside, ensuring no filling escapes during baking (we definitely don’t want any spillovers!). To create an appealing aesthetic while also allowing steam to escape during cooking, make several small slits across the top crust before brushing it with your egg wash (the whisked egg mixed with water). This step adds beautiful color while ensuring every bite remains fabulously flaky.
Baking Your Perfect Spring Chicken Pot Pie
Finally, it’s time for our masterpiece to head into the oven for some transformative magic! Place your assembled pot pie onto a baking sheet (to catch any drips) and slide it into the oven set at 375°F (190°C). Bake for approximately 30-35 minutes or until you see that gorgeous golden-brown color gracing the crust—a visual cue that tells us our creation is nearing perfection! Keep an eye on it as each oven bakes differently; if at any point you notice excessive browning before it’s cooked through, feel free to cover loosely with aluminum foil.
As it bakes away blissfully in there, take some time to reflect on what you’ve accomplished—the blend of aromas swirling around will remind you why cooking can be such an act of love. When finished baking, let your Spring Chicken Pot Pie rest outside of the oven for about 10 minutes before serving—it may be tempting but trust me on this; allowing it some time helps all those warm flavors settle together beautifully and makes serving so much easier without creating chaos!
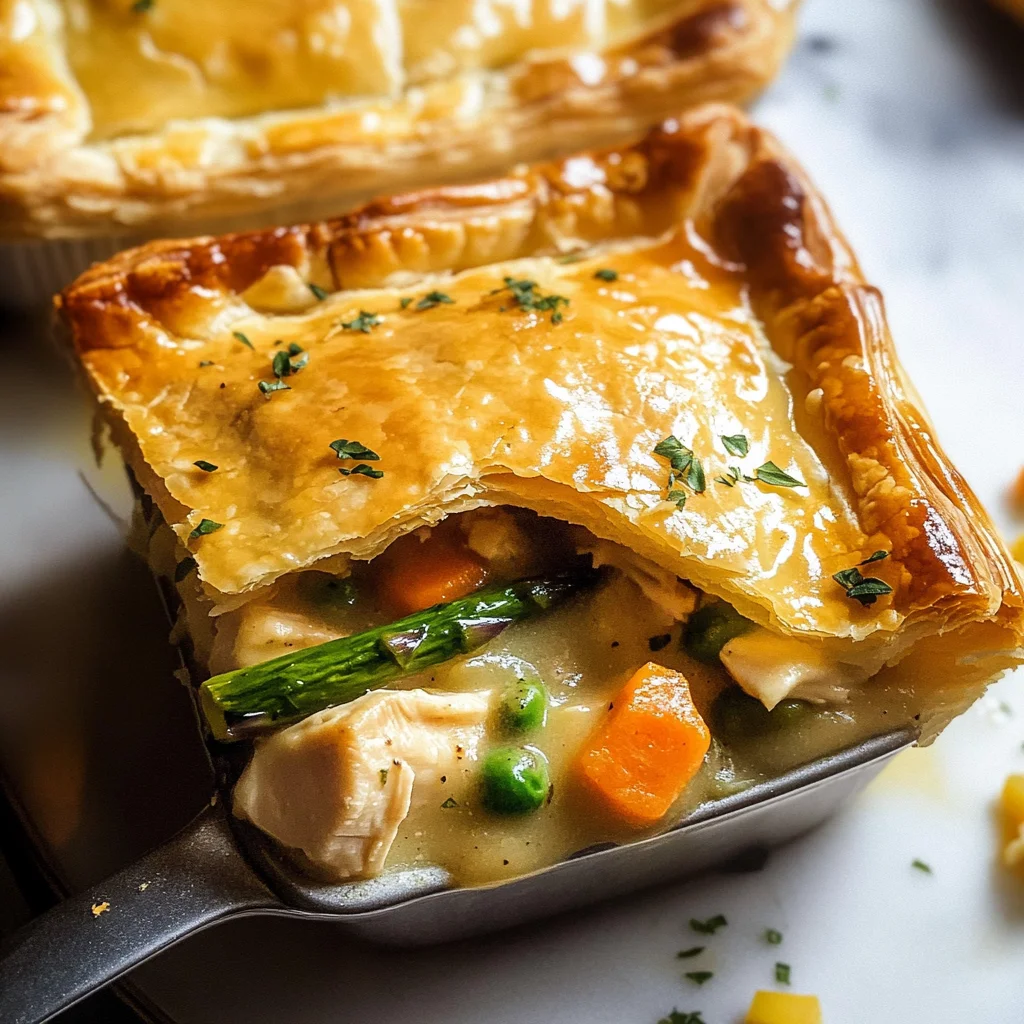
Enjoy each warm slice filled with tender chicken pieces surrounded by vibrant veggies enveloped in creamy goodness beneath that irresistible flaky crust—each bite takes me back home where love was served around every dinner table!
And there you have it—your own magnificent Spring Chicken Pot Pie awaits! I can’t wait for you to share this recipe with friends and family—it’s bound to become a cherished tradition just like it has in my home!
Storage and Enjoyment Tips for Your Spring Chicken Pot Pie
Now that you’ve crafted this delightful Spring Chicken Pot Pie, the kitchen is filled with the intoxicating aroma of buttery pastry and fresh vegetables. I can almost hear the sighs of satisfaction as you take your first bite! But what about those moments when you have leftovers or want to prepare ahead? Let’s dive into how to enjoy this comforting dish long after the last bite has been savored.
Storing Leftover Spring Chicken Pot Pie
When it comes to storing your leftover Spring Chicken Pot Pie, you’ll want to choose an airtight container that seals in all those delicious flavors and aromas. A glass or plastic container works beautifully; just make sure it’s deep enough to accommodate the height of that lovely puff pastry crust. For optimal freshness, pop it in the refrigerator where it can stay delicious for up to three days. Trust me on this—keeping it tightly sealed is crucial for preserving its creamy filling and flaky crust! If you find yourself with a little extra pie, consider placing a slice of bread inside the container; this clever trick helps absorb moisture and keeps your pastry from getting soggy. When you’re ready to enjoy it again, simply reheat individual portions in the oven at 350°F (175°C) for about 15-20 minutes until it’s warmed through and that crust is rejuvenated into a golden masterpiece once more.
Freezing Spring Chicken Pot Pie for Later
If you’re looking to savor this dish well into the future, freezing is a fantastic option! To freeze your Spring Chicken Pot Pie, allow it to cool completely before wrapping it tightly in plastic wrap followed by aluminum foil—this double layer prevents freezer burn and keeps all that flavor intact. It will hold up well in the freezer for about two to three months, making it a perfect candidate for meal prep or unexpected guests. When you’re ready to indulge again, there’s no need to thaw; simply place it straight into a preheated oven at 375°F (190°C) and bake for about 30-40 minutes until it’s bubbling and golden brown on top. Imagine pulling out your homemade pot pie on a chilly evening—it’s convenience at its finest wrapped in that familiar warmth!
Spring Chicken Pot Pie

Spring Chicken Pot Pie is the ultimate comfort food that perfectly captures the essence of springtime with its fresh vegetables and tender chicken enveloped in a flaky puff pastry crust. This dish not only warms your heart but also brings friends and family together around the dinner table. With a creamy, lemony filling that bursts with flavor, each bite is a delightful experience. Whether you’re hosting a cozy gathering or enjoying a weeknight dinner, this pot pie is sure to impress.
- Prep Time: 20 minutes
- Cook Time: 35 minutes
- Total Time: 55 minutes
- Yield: Serves eight
- Category: Main
- Method: Baking
- Cuisine: American
Ingredients
- 2 tablespoons butter
- 1 large leek (diced)
- 1 ½ cups carrots (diced)
- 1 cup radishes (diced)
- 1 cup asparagus (diced)
- 3 tablespoons flour
- 1 cup low-sodium chicken stock
- 8 ounces mascarpone cheese
- 2 cups cooked chicken (diced or shredded)
- ¾ cup frozen peas
- 2 teaspoons lemon zest & juice
- 2 tablespoons minced chives
- 1 sheet all-butter puff pastry
Instructions
- Preheat your oven to 375°F (190°C).
- In a large skillet, melt the butter over medium heat. Sauté the diced leek until translucent.
- Add carrots, radishes, and asparagus; cook for about 5 minutes until slightly softened.
- Sprinkle flour over the veggies and stir for 2 minutes.
- Gradually whisk in chicken stock, simmer until thickened.
- Fold in mascarpone cheese, chicken, peas, lemon zest, lemon juice, and chives; mix until well combined.
- Transfer filling to a baking dish and cover with rolled-out puff pastry. Seal edges and cut slits on top.
- Brush with egg wash and bake for 30-35 minutes or until golden brown.
Nutrition
- Serving Size: 1 slice (150g)
- Calories: 360
- Sugar: 4g
- Sodium: 550mg
- Fat: 22g
- Saturated Fat: 10g
- Unsaturated Fat: 11g
- Trans Fat: 0g
- Carbohydrates: 28g
- Fiber: 3g
- Protein: 16g
- Cholesterol: 55mg