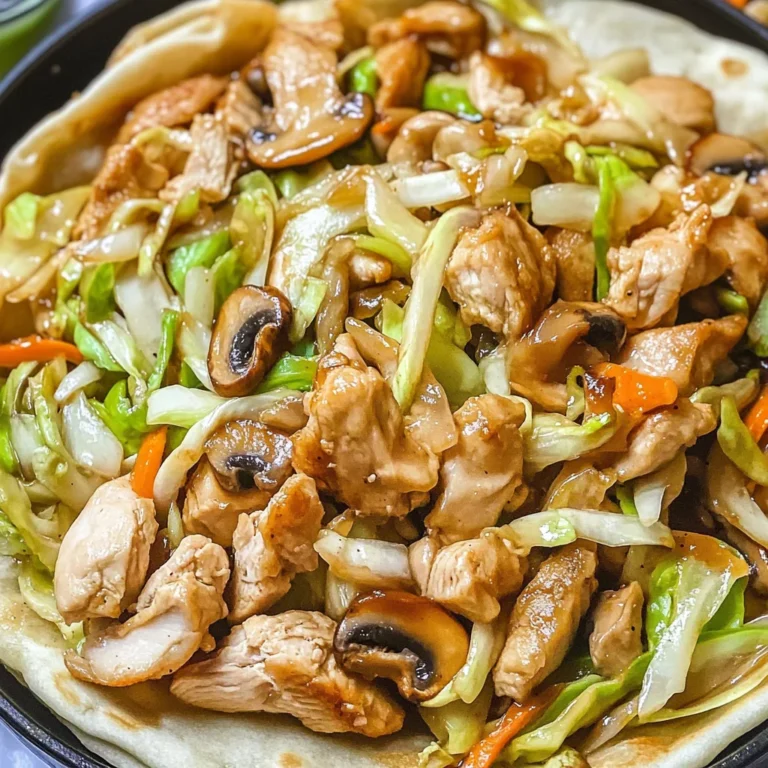
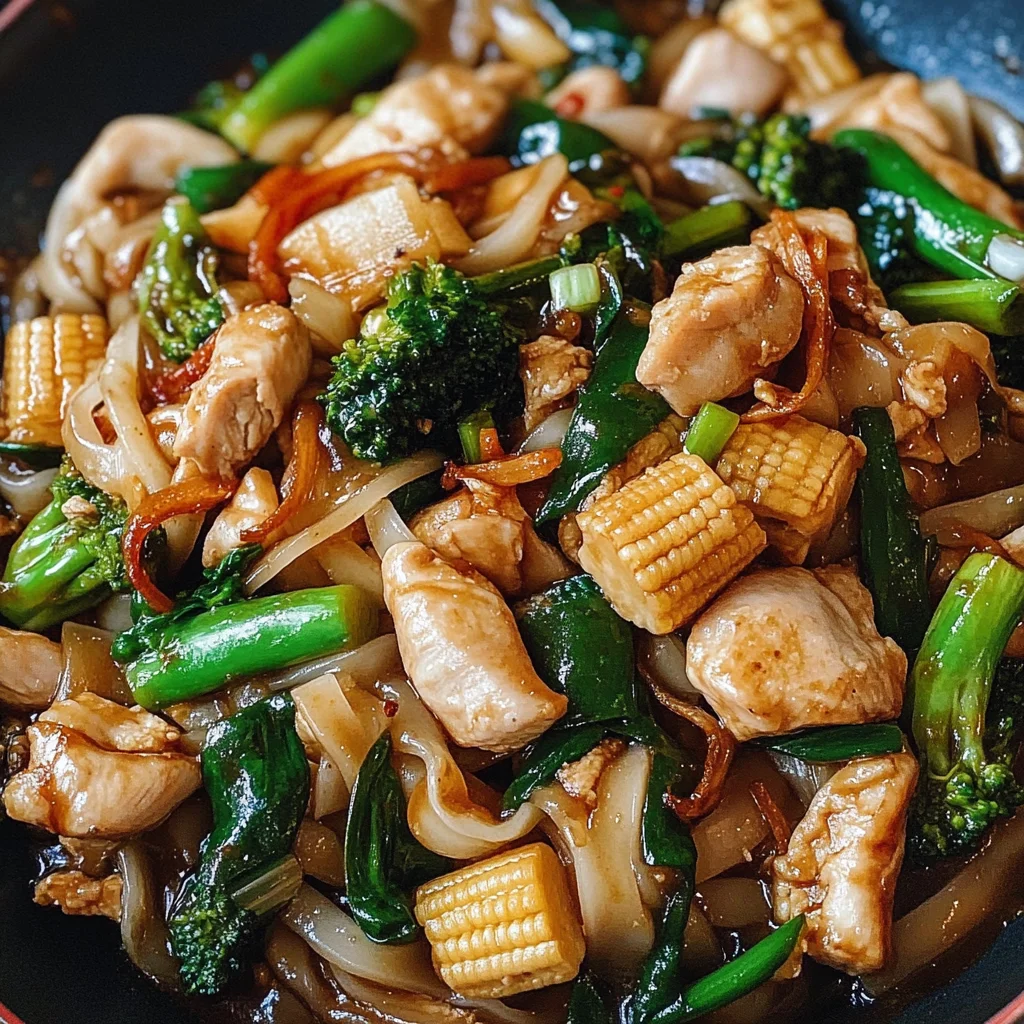
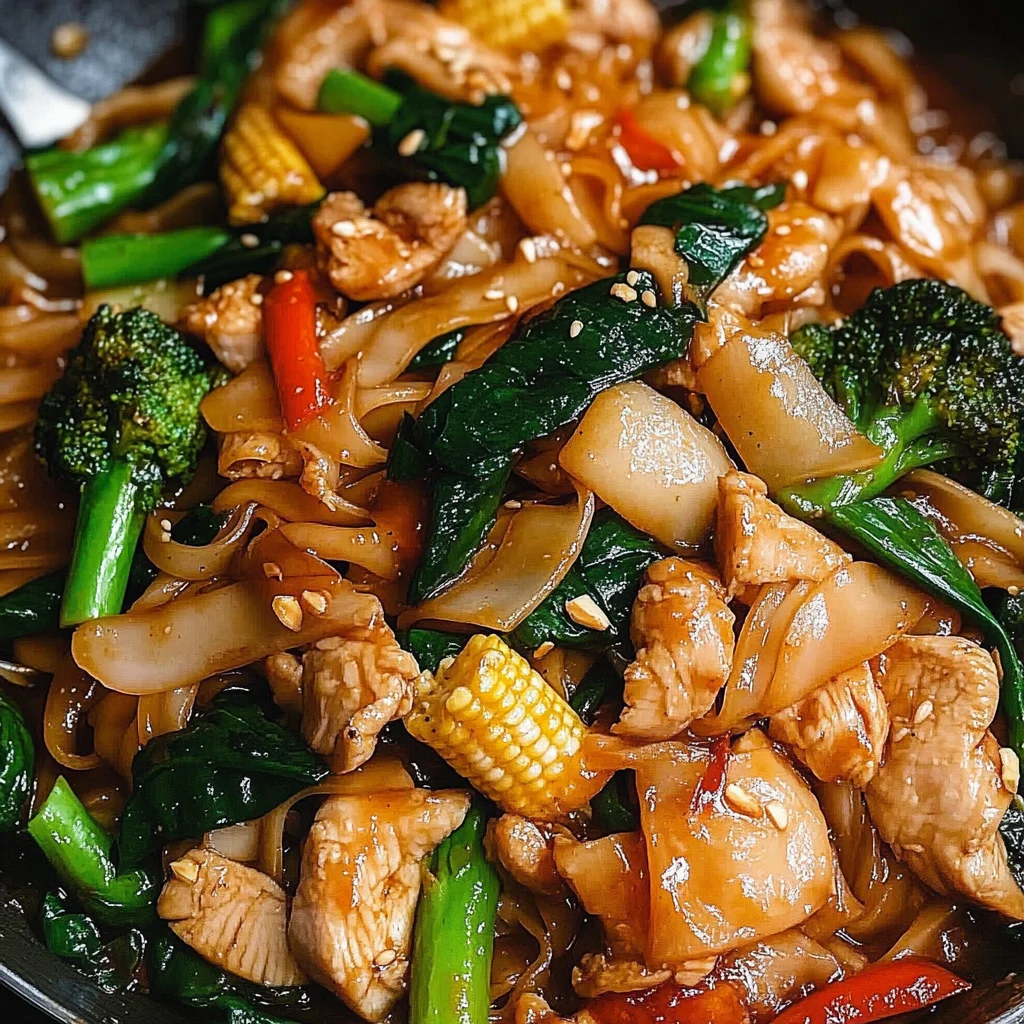
Drunken Noodles (Pad Kee Mao)
There’s something utterly captivating about the way food can transport us, isn’t there? One moment you’re in your kitchen, and the next, you could be wandering through the bustling streets of Bangkok, surrounded by the tantalizing aromas of street food vendors. That’s exactly how I feel every time I whip up a batch of Drunken Noodles (Pad Kee Mao). This dish isn’t just a meal; it’s a vibrant symphony of flavors dancing on your palate, showcasing how simple ingredients can come together to create something truly extraordinary. The savory brown sauce glistens like liquid gold, while colorful vegetables and tender chicken intermingle with thick rice noodles, making this dish not only pleasurable to eat but also a feast for the eyes.
I’ve always been captivated by how quickly these drunken noodles come together—just 15 minutes from start to finish! It’s one of those recipes that you can throw together on a busy weeknight or impress your friends during a laid-back dinner gathering. The beauty lies in its versatility; whether you choose chicken, tofu, or any protein of your choice, each bite bursts with flavor and texture that keeps you coming back for more. As we dive into this recipe today, I promise you’ll discover all my tips and secrets to elevate your Drunken Noodles to restaurant-quality perfection right in your own home.
Drunken Noodles (Pad Kee Mao): A Flavorful Journey in Just 15 Minutes
Welcome to this culinary adventure where we’ll create an unforgettable dish together! Drunken Noodles (Pad Kee Mao) are not just quick to prepare but are also packed with an array of flavors that will leave everyone at the table craving seconds. This dish is a delightful balance of sweet, salty, and spicy notes that come together in harmony—a true testament to Thai cuisine’s ability to surprise and delight. Let’s embark on this flavorful journey as we gather our ingredients!
Ingredients:
As we dive into the ingredient list for these phenomenal Drunken Noodles (Pad Kee Mao), let’s take a moment to appreciate each component’s role in crafting this vibrant dish. Each ingredient adds its unique touch—like notes in a beautiful melody—that creates the perfect balance.
- 2 tablespoons oyster sauce: This rich sauce is a cornerstone of many Asian dishes and provides a deep umami flavor that elevates the entire dish. It’s thick and slightly sweet with an oceanic hint that complements the other ingredients beautifully. When selecting oyster sauce, look for high-quality brands that use real oysters for authentic taste; you’ll thank yourself when it comes time to savor your noodles!
- 2 teaspoons light soy sauce: Light soy sauce contributes saltiness without overpowering the other flavors at play. It’s crucial for seasoning while allowing the natural tastes of chicken and vegetables to shine through. The key here is balance—using just enough light soy sauce enhances the overall complexity without making the dish too salty.
- 2 teaspoons dark soy sauce: This is where things get interesting! Dark soy sauce is thicker and richer than its lighter counterpart; it provides color and depth to our sauce mixture. It’s absolutely paramount for creating that signature look of drunken noodles—a glossy sheen that’s simply irresistible. Just remember, a little goes a long way!
- 1/2 teaspoon fish sauce: Oh, fish sauce! It’s often misunderstood but trust me—it adds an unparalleled depth of flavor that is non-negotiable in Thai cooking. It introduces a subtle brininess that rounds out our savory profile beautifully. When shopping for fish sauce, go for well-regarded brands that offer quality products without unnecessary additives.
- 1 tablespoon brown sugar: Sweetness plays an essential role here by balancing out the saltiness from our sauces while enhancing the richness of all those savory components. Brown sugar brings warmth and complexity compared to white sugar due to its molasses content—don’t skip this step as it’s crucial for achieving that addictive flavor!
- 6 oz chicken thigh (about 1 thigh): Chicken thighs are my absolute favorite protein choice here because they stay juicy and tender during cooking. Their slightly higher fat content compared to chicken breasts makes them perfect for absorbing all those delicious flavors from our sauces. However, feel free to substitute with tofu or another protein if you’re looking for something plant-based!
- 1/4 teaspoon dark soy sauce: Just another touch of dark soy sauce adds extra richness at this stage while ensuring every bite has that beautiful color we crave in our noodles.
- 4 cloves garlic: Garlic is not just an aromatic; it’s transformative! It infuses every ingredient with its warm flavor as it cooks down and becomes wonderfully fragrant. Make sure your garlic is fresh—look for firm cloves without any sprouting or soft spots!
- 3 to 5 fresh Thai chili peppers: These little gems bring heat! Adjust based on your preference; if you’re feeling adventurous, don’t hold back! They add not only spice but also vibrancy—just imagine those bright red chilies contrasting against your colorful veggies.
- 1 tablespoon canola oil: A neutral oil like canola (or peanut oil if you prefer) is ideal here since it allows other flavors to shine without competing for attention. Using oil prevents sticking while also helping to achieve that glorious stir-fried texture we adore!
- 4 stalks Chinese broccoli: Also known as Gai Lan, this leafy green gives our dish crunch and nutrition while having an earthy flavor that pairs beautifully with our noodles. If unavailable, broccolini or even spinach will work wonders too!
- 1/2 cup baby corn: These cute little veggies add both sweetness and crunch—perfect companions in our noodle adventure! If baby corn isn’t available, feel free to swap in water chestnuts or any crisp vegetable you fancy.
- 12 oz fresh thick rice noodles: Fresh rice noodles are heavenly! They cook up softer than dried ones and soak up sauces like sponges—trust me on this one! If using dried noodles instead, rehydrate them according to package instructions before tossing them into the mix.
- 1/2 cup basil (packed): Fresh basil is what seals the deal at the end—a fragrant herb whose aroma fills your kitchen with joy! Tossing it in last ensures its leaves wilt perfectly without losing their vibrant green color or lovely scent.
Equipment You’ll Need:
Embarking on this culinary journey means having some trusty tools by your side—they’re essential partners in creating something wonderful! While they may not be ingredients, having the right equipment ensures everything runs smoothly from prep through plating.
- Large nonstick pan: This will be your best friend when stir-frying—we want high heat without worrying about food sticking or burning! A good-quality nonstick surface ensures even cooking and easy cleanup afterward.
- Mortar and pestle or small food processor: For pulverizing garlic and chilies into a fragrant paste, these tools will amplify flavors like nothing else! If you don’t have either handy, finely mincing them works too; just know you’ll miss out on some deeper flavor extraction.
- Tongs: These versatile tools will help you toss everything together seamlessly once it’s time to integrate those delicious noodles with our flavorful sauces! They allow for quick movements without breaking apart delicate ingredients.
Now that we’ve gathered all our ingredients and tools let’s dive into preparing these irresistible Drunken Noodles (Pad Kee Mao)! Are you ready? I assure you—it’ll be worth every moment spent stirring over high heat as those mesmerizing aromas fill your kitchen…
Step 1: Crafting Your Flavorful Sauce
Start by combining all those lovely sauces—the oyster sauce, light soy sauce, dark soy sauce, fish sauce—and brown sugar—in a small bowl. Stir them gently until everything melds together into one harmonious mixture; this is going to be what makes our drunken noodles sing! Trust me when I say taking time here ensures every noodle gets coated evenly later on—and who doesn’t want fully flavored bites? Set aside this liquid gold so it can await its moment onstage during cooking!
Step 2: Marinating Your Protein
While your flavorful concoction rests patiently, slice up those chicken thighs into thin strips before tossing them into another medium-sized bowl along with dark soy sauce. The marination process serves two purposes—it flavors your protein deeply while also helping develop slight caramelization as they cook later on—we want tasty bits sticking around after frying! Toss thoroughly until each piece glistens under its coating; set aside so they can absorb all those delicious nuances before meeting their veggie friends.
Step 3: Preparing Your Aromatics
Now comes my favorite part—the heartwarming fragrance wafting through my kitchen as I pulverize garlic cloves alongside Thai chilies using either mortar & pestle or food processor until finely ground! This step releases essential oils locked within each ingredient resulting in sheer aroma brilliance—you’ll know when it’s done because trust me—you won’t be able resist inhaling deeply at every moment leading up next steps! Once pulverized sufficiently set aside coz we’re about ready kick off some serious flavor magic shortly!
Step 4: Prepping Those Noodles
If you’re using fresh rice noodle sheets—which I highly recommend—slice them carefully into 1 inch strips resembling wild ribbons full life awaiting their turn amid vibrant vegetables & proteins cooked ahead previously mentioned steps! For dried varieties follow package instructions carefully ensuring rehydration achieves optimal tenderness desired outcome later during stir-fry assembly phase; remember—overcooking equals mushy goodness lost forever… we wouldn’t want that now would we?
I can’t wait for you all to experience how these steps combine harmoniously into such an astonishingly delightful meal filled with layers upon layers flavors waiting just beneath surface ready explode joyfully mouthful after mouthful once served hot straight table—as always I’m rooting wholeheartedly cheering personally each successful endeavor made along way discovering joys homemade meals bring forth every single day life shared loved ones around table! Happy cooking everyone—with love always shining bright throughout process unfolding magically unfold right before eyes…
Step 5: Sizzling Aromas of Garlic and Chili
Now, let’s dive into the heart of our dish—the aromatics! Heat a tablespoon of canola oil (or peanut oil, if you prefer) in a large nonstick pan over medium-high heat. This is one of those moments where patience is key; allow the oil to get nice and hot because this will ensure that we achieve that delightful sizzle when we add our garlic and chili mixture. It should shimmer like liquid gold, signaling that it’s ready for the next step. Once your oil is hot, add the pulverized garlic and Thai chili peppers. Stir-fry them together for about 30 seconds, or until they become fragrant. You’ll know you’ve hit the sweet spot when your kitchen starts to smell utterly intoxicating, filling the air with a warmth that promises excitement ahead.
This step is crucial because we’re building the base flavor for our drunken noodles (Pad Kee Mao). The garlic brings a savory depth while the chilies add a fiery kick—an essential component of Thai cuisine. When stir-frying, keep an eye on the color; you want just a hint of golden brown on the garlic without burning it. If it turns too dark too quickly, reduce your heat slightly. Trust me on this: burnt garlic can turn your entire dish bitter! As those aromas waft around you, take a moment to appreciate how such simple ingredients can create a symphony of flavors that will transport you straight to Thailand with every bite.
Step 6: Perfectly Cooked Chicken
Next up is our protein—the chicken thigh! Carefully spread out your marinated chicken in the pan without overlapping pieces. This step is non-negotiable because even cooking ensures every bite is juicy and flavorful rather than dry or chewy. Let it cook undisturbed for about 2-3 minutes until the bottom is lightly browned and the top still shows a hint of pinkness—this visual cue tells you it’s not quite ready to flip yet. Resist the temptation to move it around too much; let those edges caramelize beautifully as they develop rich flavor.
Once you’ve achieved that lovely golden crust on one side, use your spatula to flip the chicken over and stir it in a few times to cook through—about another 2-3 minutes should do it. What makes this technique so effective? It’s all about creating texture and depth; by searing the chicken first, we’re locking in juices while also enhancing its flavor through the Maillard reaction—a fancy way of saying that browning gives us more taste! Keep an eye out for any sign of burning; if you notice dark bits forming on your pan, lower your heat slightly. Remember, this dish isn’t just about speed but also about maximizing flavor at each stage!
Step 7: Crisp-tender Vegetables
Now it’s time to bring some vibrant colors into play! Add in your sliced Chinese broccoli (or broccolini or spinach) along with baby corn—these crisp vegetables will not only add texture but also balance out our dish with their fresh crunch. As they join the party in your sizzling pan, stir them around gently for another couple of minutes until they’re tender yet still maintain their bright green color and crispness. You want them to be cooked enough so that they have absorbed some of those glorious flavors from earlier but firm enough to offer that satisfying crunch when bitten into.
Why does this matter? Well, cooking vegetables properly plays a vital role in preserving their nutrients and natural sweetness while preventing them from becoming mushy or lifeless. Trust me on this; there’s nothing worse than overcooked veggies in a vibrant dish like drunken noodles (Pad Kee Mao)! Aim for that perfect texture where every bite feels fresh and fulfilling—a true celebration of how beautiful vegetables can be when treated right! As you toss everything together in the pan, watch as their colors brighten beautifully amidst all those warm hues from the chicken.
Step 8: Noodles Meet Flavorful Sauce
Now comes one of my favorite parts—adding those luscious rice noodles along with our savory sauce! If you’re using fresh thick rice noodles, slice them into 1-inch strips beforehand; if you’ve opted for dried ones, make sure they’re rehydrated or boiled according to package instructions first—this is absolutely paramount for achieving that delightfully chewy texture characteristic of great drunken noodles (Pad Kee Mao). Once prepped, toss those noodles right into the pan along with your carefully crafted sauce mixture made earlier. I can’t stress enough how important this step is: pouring all those beautiful flavors over perfectly cooked ingredients will ensure every noodle gets coated in that savory goodness.
Using a pair of tongs (or chopsticks if you’re feeling adventurous!), gently toss everything together until every strand of noodle has absorbed that rich sauce—it should start crackling deliciously at this point! Keep an eye on your cooking time here; just about 2-3 minutes should suffice for everything to meld beautifully together while ensuring your veggies remain crispy and vibrant. Don’t rush this step; allow those flavors to mingle and deepen as they simmer together—this transformation is what makes these drunken noodles truly extraordinary!
Final Touches: Basil Bliss
As we approach the finish line with our drunken noodles (Pad Kee Mao), it’s time for one last flourish! Remove your pan from heat and toss in a generous handful of packed basil leaves—this herb brings an aromatic freshness that’s utterly essential here. As you give everything one final toss, watch how quickly those basil leaves wilt just slightly from the residual heat; it’s like magic happening right before your eyes! The moment those leaves release their aromatic oils into our dish, you’ll find yourself captivated by their fragrance—it elevates every other flavor present in such an exquisite way.
Why add basil at this stage? Because adding it after removing from heat preserves its delicate nature while keeping its bright flavor intact—not only does it enhance taste but visually transforms our dish into something utterly stunning! Serve up these glorious drunken noodles hot as a main course or alongside other dishes—either way, I promise you’ll find joy in every bite as they deliver layers upon layers of flavor alongside comforting textures! And remember: food made with love always tastes better—so don’t hesitate to share these delightful creations with friends or family who appreciate good home-cooked meals just as much as you do!
Enjoy making these Drunken Noodles (Pad Kee Mao), my friends—you’re going to love how simple yet profoundly satisfying they are!
Storage and Enjoyment Tips for Your Drunken Noodles (Pad Kee Mao)
Now that you’ve prepared this delectable plate of Drunken Noodles, it’s time to dive in and enjoy every mouthwatering bite! But what if you find yourself with leftovers? Fear not, my friend, because I’ve got some helpful tips to ensure your noodles remain just as scrumptious the next day. Storing them properly is essential to preserving that delightful balance of flavors and textures—trust me, you’ll want every last noodle to taste as good as when you first made them.
Storing Leftover Drunken Noodles (Pad Kee Mao)
To keep your Drunken Noodles fresh and flavorful, I recommend using an airtight container for storage. Glass containers are particularly great since they don’t retain odors or stains from previous meals. Place the container in the refrigerator, where these fabulous noodles will stay fresh for about 2-3 days. For an extra quality boost, try placing a slice of bread inside the container; it helps absorb any excess moisture that could otherwise make your noodles a bit soggy. Honestly, leftovers can sometimes be even better than the original dish—those flavors have had time to meld together beautifully! When it comes time to reheat, simply warm them up in a pan over medium heat with a splash of water or broth to bring everything back to life. Oh, and don’t forget to give it a little toss; we want those noodles dancing again in that rich sauce!
Freezing Drunken Noodles for Later
If you find yourself with more than you can eat in one sitting (which is often the case because they’re just so irresistible!), freezing is a fantastic option! To do this properly, allow your Drunken Noodles to cool completely before transferring them into freezer-safe bags or containers. Be sure to remove as much air as possible; this prevents freezer burn and keeps your noodles tasting divine. They can be frozen for up to 2 months without losing their charm! When you’re ready to enjoy these tantalizing noodles again, simply thaw them in the fridge overnight and reheat on the stovetop as mentioned earlier. The convenience factor here is absolutely exceptional—imagine having a restaurant-quality meal at your fingertips after a long day; it’s like magic!
So whether you’re enjoying them fresh off the stove or savoring a reheated version later on, these Drunken Noodles will always deliver warmth and comfort.
Drunken Noodles (Pad Kee Mao)

Enjoy delightful Drunken Noodles (Pad Kee Mao) ready in just 15 minutes! Dive into flavor and freshness—try this recipe today!
- Prep Time: 10 minutes
- Cook Time: 5 minutes
- Total Time: 15 minutes
- Yield: Serves 4
- Category: Dinner
- Method: Stir-frying
- Cuisine: Thai
Ingredients
- 2 tablespoons oyster sauce
- 2 teaspoons light soy sauce
- 2 teaspoons dark soy sauce
- 1 tablespoon brown sugar
- 6 oz chicken thigh (or tofu)
- 4 cloves garlic
- 3 to 5 fresh Thai chili peppers
- 1 tablespoon canola oil
- 4 stalks Chinese broccoli (or broccolini)
- 1/2 cup baby corn
- 12 oz fresh thick rice noodles
- 1/2 cup fresh basil
Instructions
- In a small bowl, mix oyster sauce, light soy sauce, dark soy sauce, and brown sugar until well combined. Set aside.
- Slice chicken thighs into thin strips and marinate with dark soy sauce.
- Finely chop garlic and Thai chilies using a mortar and pestle or food processor.
- Heat canola oil in a large nonstick pan over medium-high heat. Add garlic and chilies; stir-fry for about 30 seconds until fragrant.
- Add marinated chicken to the pan, cooking for about 2-3 minutes on each side until lightly browned.
- Toss in Chinese broccoli and baby corn; stir-fry for another couple of minutes until tender-crisp.
- Add fresh rice noodles and the prepared sauce to the pan; toss everything together until well coated and heated through.
- Remove from heat, stir in fresh basil, and serve immediately.
Nutrition
- Serving Size: 1 plate (350g)
- Calories: 475
- Sugar: 9g
- Sodium: 1080mg
- Fat: 15g
- Saturated Fat: 2g
- Unsaturated Fat: 11g
- Trans Fat: 0g
- Carbohydrates: 70g
- Fiber: 3g
- Protein: 24g
- Cholesterol: 90mg