No Bake Patriotic Cloud Cake
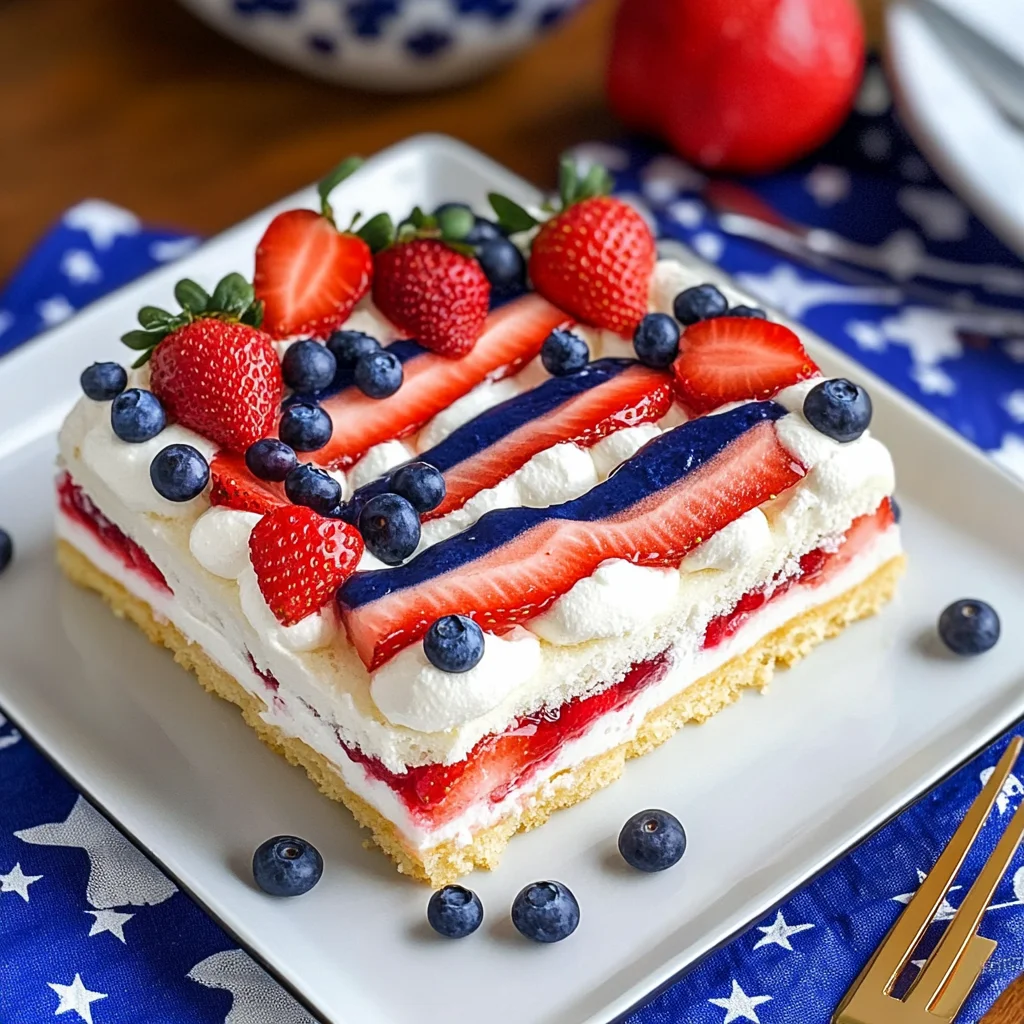
There’s something incredibly special about a dessert that brings together friends and family, evoking memories of laughter-filled gatherings and sunny afternoons. The No Bake Patriotic Cloud Cake is not just a cake; it’s a celebration of moments—those perfect snapshots of joy that occur during holidays like the Fourth of July, Memorial Day, or Labor Day. Picture this: layers of soft cloud cakes lovingly stacked and topped with vibrant berries, bathed in sweet strawberry glaze, all enveloped in a light and airy whipped topping. Just thinking about it makes my heart flutter! The beauty of this dessert lies not only in its stunning appearance but also in how effortlessly it comes together—a mere 10 minutes from start to finish. This isn’t merely a recipe; it’s an experience that brings forth the spirit of festivity while being as easy as pie (or should I say cake?).
As we dive into this delightful creation, I want you to feel the excitement I have every time I make it. It’s a treat that sparkles with patriotism yet feels utterly personal—a canvas where your creativity can shine through those luscious strawberries and blueberries arranged in a flag pattern. So whether you’re gearing up for a backyard barbecue or simply looking for a sweet way to honor summer celebrations, trust me: this No Bake Patriotic Cloud Cake will become your go-to dessert. The combination of textures and flavors creates an unforgettable symphony that dances on your palate, making it profoundly satisfying for both the eyes and taste buds.
Now let’s talk about what makes this cake so irresistible—and how you can create your own masterpiece!
No Bake Patriotic Cloud Cake: A Festive Treat for Every Occasion
Are you ready to embark on a culinary journey? This No Bake Patriotic Cloud Cake is not just about throwing some ingredients together; it’s about crafting something truly special that reflects love and joy. The beauty of this dessert is in its simplicity—no baking required, just pure assembly! Each layer tells its own story, from the moist sweetness of the cloud cakes to the juicy burst of fresh fruit. Now let’s gather our ingredients and get down to business!
Ingredients:
Every great dish starts with quality ingredients, so let’s take a moment to appreciate what we’re working with. Each component plays an important role in achieving that deliciously delightful taste we crave.
- 1 box cloud cakes (or Twinkies!) – These little gems are the foundation of our cake, providing moisture and sweetness without any fuss. Their spongy texture is simply heavenly! When selecting cloud cakes or Twinkies, look for ones that are fresh—soft but not overly squishy. If you prefer a homemade touch, consider making your own sponge cakes; however, I promise you there’s nothing wrong with using store-bought if time is tight!
- 2 cups sliced strawberries – Ahh strawberries! Their bright red hue is almost synonymous with summer celebrations, right? Not only do they lend their sweetness to our cake, but their vibrant color also adds visual appeal. When choosing strawberries, opt for ones that are plump and fragrant—this indicates they are ripe and bursting with flavor. Slice them evenly so they layer beautifully atop the cake.
- 1 cup blueberries – These little bursts of blue are not just stunning; they also offer a delightful tartness that balances out the sweetness of our cake perfectly. Blueberries are rich in antioxidants too—talk about a win-win! When picking blueberries at the store or farmers’ market, go for firm berries with smooth skin; avoid any that are mushy or shriveled.
- 1 cup strawberry glaze – This luscious sauce acts as both glue and flavor enhancer! It provides moisture while simultaneously enriching the strawberry essence throughout the layers of cake. You can find pre-made strawberry glaze at most grocery stores—or you might even whip up your own using fresh strawberries, sugar, and cornstarch for thickening if you’re feeling adventurous.
- 1 (12oz) whipped topping – The crowning glory! This fluffy topping adds lightness to our creation while making each bite feel indulgent without being heavy. Opt for non-dairy whipped topping if you’re avoiding animal products—it works beautifully here! Remember to let it thaw beforehand so it spreads easily over those delicious layers.
Equipment You’ll Need:
Having the right tools will make assembling this dessert smooth sailing! While these items may not be ingredients, they are essential partners in creating something wonderful.
- 9×13 inch baking dish – A standard size for many desserts; it allows you ample room to layer your cloud cakes comfortably without feeling cramped. Choose one made from glass or metal so you can easily see those beautiful layers as they come together.
- Mixing bowl – You’ll need one large enough to hold your whipped topping when mixing it before spreading over your cakes. A good mixing bowl will help ensure everything combines smoothly without splattering everywhere!
- Spatula – A must-have tool! It’ll help spread that whipped topping evenly across your layered masterpiece while keeping everything looking neat and tidy.
- Knife or kitchen scissors – These come in handy when slicing strawberries into uniform pieces; even cuts mean beautiful presentation when layering them on top!
With everything gathered and ready to go, let’s bring this No Bake Patriotic Cloud Cake to life!
Step 1: Layering Your Base
Start by grabbing your trusty baking dish—the heart where all magic happens! Lay down those cloud cakes side by side like soldiers standing proud in formation; their spongy softness will cradle every layer above them beautifully. Make sure they fit snugly without overlapping too much—this will keep everything stable as we build upward into delicious heights! Take care with placement; arranging them evenly helps ensure each slice has an equal share of deliciousness.
Step 2: Adding Sweetness with Strawberry Glaze
Next comes the star-studded act: pouring that glossy strawberry glaze over our cloud cakes! Use a spatula to spread it gently from edge to edge—allowing it to seep into every nook and cranny possible ensures maximum flavor absorption throughout the layers below. Don’t rush this step; take time letting each layer soak up all that tangy-sweet goodness—it’s absolutely paramount for flavor depth! Watch as the glaze glistens invitingly—it’s like liquid sunshine cascading over fluffy clouds.
Step 3: Topping It Off
Now it’s time for whipped topping—a step that transforms our humble creation into something divine! Gently scoop dollops onto the layered cake above the glaze; use your spatula once again to spread it out evenly across every surface area available. Trust me on this: smoothing out bumps creates an inviting surface that begs guests for just one more slice! The lightness of whipped topping paired with flavorful layers below creates an utterly intoxicating effect that’s hard to resist—it’s like hugging someone made entirely out of cream!
Step 4: Flagging Down Fresh Fruit
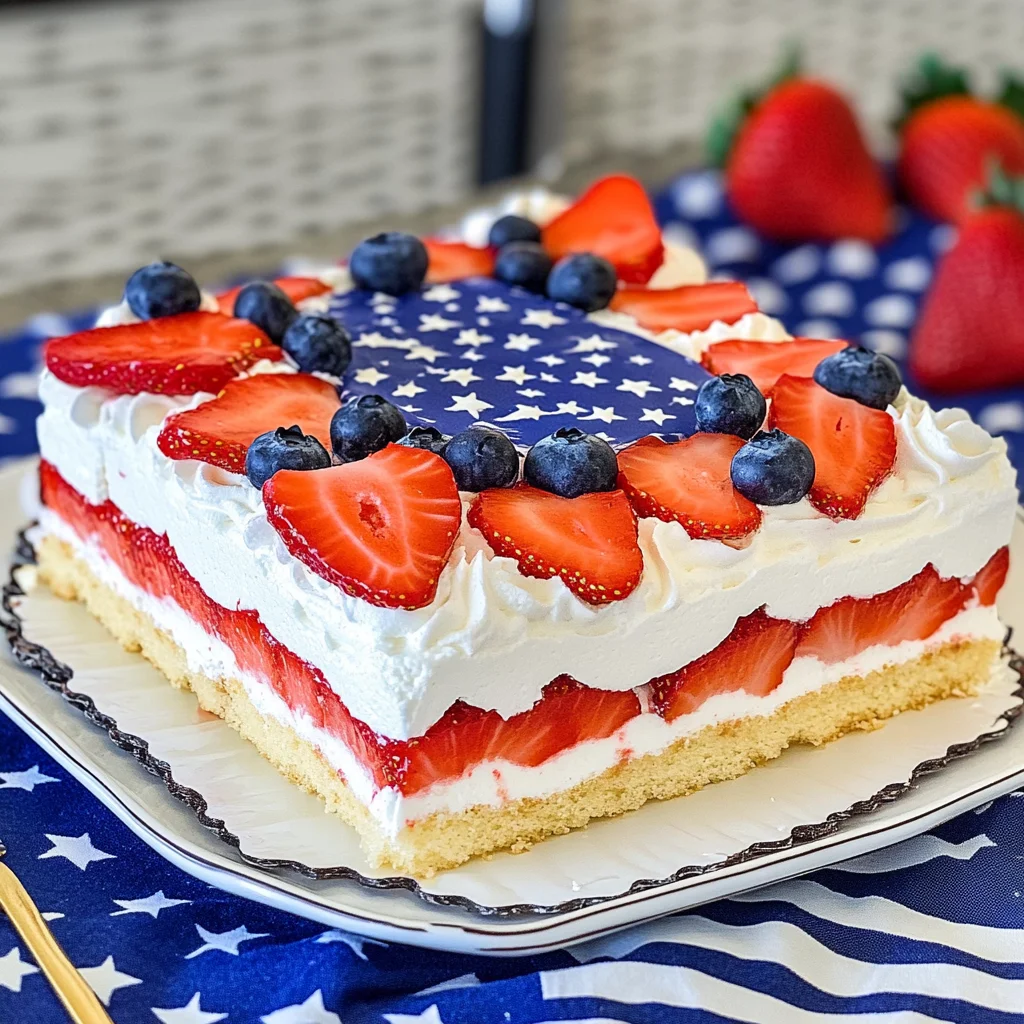
Finally comes perhaps my favorite part—the decoration process where artistry meets food! With your freshly washed fruits ready at hand (and oh-so-beautiful), arrange those sliced strawberries and blueberries atop whipped cream like stars lined up against flourishing stripes—the essence of patriotism captured on dessert itself! Don’t worry about perfection here; each arrangement tells its own story—that’s what makes homemade desserts truly special!
And there you have it—the beginning steps toward creating a glorious No Bake Patriotic Cloud Cake that’s destined to steal hearts at any gathering! I can’t wait for you to dig into this beauty full of flavor while building memories along the way.
Creating Your No Bake Patriotic Cloud Cake
Step 5: Building the Foundation
Now that you’ve laid down that first beautiful layer of cloud cakes, let’s dive into the next step! Take a generous cup of strawberry glaze and drizzle it over the cloud cakes. This luscious glaze not only adds a burst of sweetness but also acts as a binding agent, helping to keep everything together as the cake develops its flavors. You want to cover every inch of the cloud cakes, so use a spatula or the back of a spoon to spread it evenly. This is where flavor layering begins, and trust me, it’s utterly intoxicating! The glaze will soak into those soft cakes ever so slightly, creating a wonderful melding of textures that’s just divine.
Why is this step crucial? Well, the strawberry glaze serves not just as decoration; it elevates the entire dessert by infusing it with a fresh and fruity essence that complements our patriotic theme beautifully. As you spread it on, take a moment to appreciate that vibrant red hue—it’s like summer captured in a bowl! Make sure not to rush this process; taking your time ensures that each bite is bursting with flavor. Once you’ve achieved an even layer, it’s time to move on to our final creamy touch.
Step 6: The Creamy Dream Layer
Next comes the star of our show—the whipped topping! Grab your 12oz container of whipped topping and dollop it generously over the strawberry glaze. Use your spatula to spread it across evenly, creating an inviting cloud-like layer. This fluffy topping is what truly binds all the elements together, transforming our dessert from simple to sheer indulgence! As you smooth out the whipped topping, think about how its lightness balances out the sweetness from the strawberries and glaze; they work in harmony like an orchestra playing an exquisite symphony.
It’s essential to cover every bit of that vibrant strawberry layer because this creamy cap not only adds richness but also provides a delightful contrast in texture when you dive into your slice later on. Plus, this fluffy topping has another practical purpose: it protects the layers beneath from drying out if left for any extended period before serving. So go ahead; be generous with this step—it’s absolutely paramount for achieving that dreamy effect we’re after!
Step 7: Painting Your Patriotic Flag
Now we get to unleash our creativity! Grab those sliced strawberries and blueberries and prepare for some fun flag-making magic atop your whipped topping layer. Arrange them in alternating rows—start with strawberries forming stripes followed by blueberries creating stars in the corner. This little artistic endeavor elevates your No Bake Patriotic Cloud Cake into something visually stunning while honoring those red, white, and blue colors we all love so much during celebrations.
But remember, don’t just throw them on haphazardly; take your time crafting each line. The visual appeal is part of what makes this dessert so extraordinary—it invites everyone in for a taste! Each slice should embody that festive spirit while also promising delicious layers beneath. And here’s a tip: if you find yourself short on berries or want to add more flair, feel free to get creative with other fruits as well—blackberries or raspberries could work beautifully too!
Step 8: Chill Your Creation
Here comes one of my favorite parts—patience is key at this stage! Once you’ve adorned your cake with its patriotic fruit design, cover it gently with plastic wrap or aluminum foil and pop it into the refrigerator for at least an hour before serving (though I often recommend chilling overnight if you can bear the wait!). Why chill? Well, letting it sit allows all those beautiful flavors to meld together—you’ll find that after resting in the cool embrace of your fridge, each bite becomes an explosion of freshness.
During chilling time, something magical happens; the whipped topping firms up slightly while absorbing hints of strawberry sweetness from below—it’s like all those ingredients come together for one last cozy gathering before heading out to impress your friends and family! A perfectly chilled No Bake Patriotic Cloud Cake slices beautifully and holds its shape without falling apart when served—a true testament to why patience here is non-negotiable.
Conclusion:
As we wrap up our journey through this delightful recipe, I hope the excitement I’ve felt crafting this No Bake Patriotic Cloud Cake has sparked something within you as well! From its fluffy layers of cloud cakes embraced by a vibrant blanket of strawberry glaze to the enticing clusters of berries that create a flag-like masterpiece atop—every element sings harmoniously together in what I can only describe as a symphony of flavors. It’s not just about putting ingredients together; it’s about creating memories with each layer you stack and every slice you serve.
This recipe is truly a must-try—not only because it’s incredibly delicious but also due to how simple it is to whip together! Whether you’re celebrating Independence Day with family or hosting an impromptu barbecue with friends, this cake shines in any setting. Just picture pulling it from the refrigerator on a hot summer day—the coolness beckons everyone closer as they inhale the sweet aroma of strawberries mingling with whipped cream. The joy radiating around the table while digging into this colorful dessert is utterly extraordinary and profoundly satisfying!
When it comes time to savor your creation, imagine enjoying a piece alongside a refreshing glass of iced tea or perhaps even some homemade lemonade—it’s like summer encapsulated in every bite! For an afternoon pick-me-up, try serving it with coffee; the rich notes will perfectly complement the sweetness of the cake. And don’t hesitate to pair this dessert with some crunchy cookies on the side—what could be more delightful than creating new combinations that elevate your experience?
Feeling adventurous? This recipe is wonderfully adaptable too! You could switch out strawberries for raspberries or even peaches when they’re in season—each variation brings its own unique flair and flavor profile that will keep things exciting every time you make it. You could also try adding layers of crushed graham crackers for added texture or drizzling some chocolate syrup over top for an indulgent twist. I invite you to explore these options and make this cake your own! Share your experiences with loved ones or maybe even try making it together; there’s something so special about cooking alongside friends and family. So go ahead—embrace this delicious journey, connect with others through food, and most importantly, enjoy every heavenly bite!
No Bake Patriotic Cloud Cake

Celebrate summer gatherings with this delightful No Bake Patriotic Cloud Cake! This show-stopping dessert is as easy to assemble as it is beautiful, making it the perfect treat for holidays like the Fourth of July, Memorial Day, or Labor Day. Featuring layers of airy cloud cakes, luscious strawberry glaze, and a fluffy whipped topping adorned with vibrant strawberries and blueberries, this cake captures the spirit of festivity in every bite. With just 10 minutes of preparation time and no baking required, you can create a stunning centerpiece that will leave your guests raving about its lightness and refreshing flavors. Ideal for backyard barbecues or family get-togethers, this cake not only satisfies your sweet tooth but also brings everyone together to share joyful moments.
- Prep Time: 10 minutes
- Cook Time: 0 minutes
- Total Time: 10 minutes
- Yield: 12 servings 1x
- Category: Dessert
- Method: No Bake
- Cuisine: American
Ingredients
- 1 box cloud cakes (or Twinkies)
- 2 cups sliced strawberries
- 1 cup blueberries
- 1 cup strawberry glaze
- 1 (12oz) non-dairy whipped topping
Instructions
- In a 9×13 inch baking dish, lay cloud cakes side by side.
- Pour strawberry glaze evenly over the cakes.
- Spread whipped topping generously over the glaze.
- Decorate with sliced strawberries and blueberries to form a flag pattern.
- Chill in the refrigerator for at least one hour before serving.
Nutrition
- Serving Size: 1 slice (100g)
- Calories: 210
- Sugar: 22g
- Sodium: 130mg
- Fat: 8g
- Saturated Fat: 4g
- Unsaturated Fat: 3g
- Trans Fat: 0g
- Carbohydrates: 34g
- Fiber: 1g
- Protein: 2g
- Cholesterol: 0mg