Karpatka – Polish Carpathian Mountain Cream Cake
There’s something magical about the way food can weave itself into the fabric of our lives, isn’t there? Each recipe carries with it not just a list of ingredients, but stories, laughter, and love. Today, I want to share with you the enchanting experience of making Karpatka – Polish Carpathian Mountain Cream Cake. This delightful dessert is more than just a treat; it is a beautiful representation of tradition melding seamlessly with innovation. As you delve into this recipe, you’ll find yourself enveloped in the sweet aroma of freshly baked choux pastry, complemented by an utterly intoxicating cream that dances on your palate. The crispness of its layers combined with the rich filling creates a symphony of textures and flavors that will leave you yearning for more.
I’ve always been captivated by the way Karpatka brings people together. Whether it’s a family gathering or an afternoon tea with friends, this cake has a way of sparking conversation and sharing joy. Imagine serving this elegant creation at your next gathering—your loved ones’ eyes lighting up as they take their first bite, each mouthful revealing the luscious layers within. Trust me on this: once you master this recipe, it will become one of your go-to delights.
Karpatka – Polish Carpathian Mountain Cream Cake: A Sweet Journey Through Tradition
This stunning dessert is like a postcard from the Carpathian Mountains themselves—rustic yet refined and bursting with character. Its creation begins with a classic choux pastry that forms the base and is layered between a silky diplomat cream that whispers sweet nothings to your taste buds. With its origins nestled in Polish culture, Karpatka has transcended generations, becoming a beloved staple in kitchens far and wide. Let’s embark on this culinary journey together!
Ingredients:
As we gather our ingredients for this charming cake, think of each item as an essential note in our delicious melody. The quality and balance are key to achieving that perfect Karpatka.
- ½ cup Milk: This humble ingredient serves as the backbone for both our choux pastry and luscious cream filling. It adds moisture and richness while also contributing to creating that tender texture we crave in desserts. Always opt for whole milk if possible; its creaminess enhances flavor and mouthfeel beautifully.
- ½ cup Water: While seemingly simple, water plays a crucial role in forming our choux pastry. It works alongside milk to create steam during baking, which puffs up those delicate layers we adore in Karpatka. Using filtered water can elevate the purity of flavors subtly but significantly.
- 80 g Unsalted Butter: Butter is truly liquid gold in baking! It contributes to both flavor and texture in our pastry dough. Make sure it’s unsalted so you can control the seasoning of your final dish. When melted into the mixture with water and milk, it creates an emulsion that helps form those airy pockets during baking.
- ½ tsp Salt: Just a pinch! Salt amplifies sweetness and balances flavors beautifully—it’s absolutely paramount for bringing out the best in any dessert. A good quality sea salt or kosher salt will work wonders here.
- 2 tsp Sugar: Sugar does more than just sweeten; it caramelizes during baking to give our pastry that lovely golden hue while also contributing to its structure. You don’t want too much; just enough to round out the flavors.
- 150 g All-purpose Flour: This gluten-rich flour provides structure and stability to our pastry dough—a non-negotiable component! When selecting flour, look for one labeled as all-purpose or plain flour; these varieties have been milled specifically for versatility across recipes.
- 4 Egg: Eggs are essential for binding ingredients together while providing moisture and richness—think of them as nature’s glue! They will help create that perfect rise in your choux pastry when whipped properly until frothy.
- 2 cup Milk (for cream): More milk makes for a luscious diplomat cream filling! Again, using whole milk will ensure your cream stays rich and satisfying without being overly heavy.
- 2 Eggs (for cream): These eggs enrich our custard base further while maintaining stability when mixed with cornstarch—a vital element for creating that creamy consistency without curdling.
- ⅔ cup Sugar (for cream): Sweetness is essential here! The sugar dissolves into your custard base creating that luxurious filling we dream about when thinking of Karpatka’s wonderful layers.
- 50 g Cornstarch: Cornstarch thickens our custard wonderfully without making it heavy or gloopy—ideal for achieving that smooth texture! It also acts as a stabilizer when cooled properly.
- 2 tsp Vanilla Extract: Ah, vanilla—the heartwarming essence that elevates any dessert from good to extraordinary! Opt for pure vanilla extract over imitation whenever possible; you’ll appreciate its depth of flavor here.
- ¾ cup Unsalted Butter (room temperature): This later addition is crucial for making our diplomat cream luxuriously smooth! Room temperature butter emulsifies easily into your custard ensuring no lumps remain—a must-have!
- Powdered Sugar (for garnish): Finally, powdered sugar adds just the right touch for presentation—an ethereal dusting atop your masterpiece gives it that bakery-fresh look!
Equipment You’ll Need:
Having the right tools makes all the difference when embarking on any cooking adventure! Think of these pieces as your trusted companions guiding you toward success as you create something wonderful.
- Mixing Bowls – A set of mixing bowls in various sizes will be invaluable throughout this process, allowing you to whisk ingredients separately before bringing them together harmoniously. Choose glass or stainless steel bowls; they’re easy to clean and won’t retain odors or stains from previous uses.
- Saucepan – A sturdy saucepan is essential for melting butter and combining liquids over heat while also being used for preparing custards later on. Ensure it’s heavy-bottomed to distribute heat evenly without scorching your precious ingredients.
- Whisk – An indispensable tool! A good whisk helps incorporate air into mixtures while blending them smoothly—especially important when preparing both choux pastry batter and creamy fillings!
- Spatula – A silicone spatula can easily scrape down bowls without leaving behind stubborn remnants—perfect when transitioning between bowls or folding delicate mixtures together gently without deflating them too much!
- Baking Sheet/Pan – A light-colored baking sheet promotes even browning during baking—the magic moment where our pastry puffs up beautifully! Line it with parchment paper so nothing sticks as it bakes perfectly golden brown beauty!
Now that we’ve gathered everything we need let’s dive deeper into preparing this delicious masterpiece known as Karpatka – Polish Carpathian Mountain Cream Cake…
Step 1: Creating the Choux Pastry Base
The first step towards crafting your enchanting Karpatka is preparing the choux pastry—a technique often regarded as daunting but I promise you it’s easier than it seems! Begin by combining your milk, water, unsalted butter, salt, and sugar in a medium saucepan over medium heat. As you stand by watching those ingredients meld together into liquid gold—a comforting embrace of warmth—you’ll notice steam rising from bubbling pots—a sign you’re on track! Bring this mixture gently to a simmer until all butter has melted away completely. This initial phase is crucial because it sets up what’s known as the “paste,” which ultimately becomes airy puffiness once baked!
Once bubbling away nicely—and believe me; you’ll definitely notice that fragrant aroma wafting through—you’ll add in all 150 grams of all-purpose flour at once while whisking vigorously to avoid lumps forming like clumps trying desperately not to get left behind at school recess! Continue stirring relentlessly until everything comes together cohesively into one smooth ball pulling away from pan edges—that’s how you know you’ve created proper dough consistency!
Step 2: Mixing in Eggs
Now comes an exciting part where patience pays off handsomely—adding eggs into warm dough while mixing thoroughly until fully incorporated before adding another egg! Crack open each egg separately directly into dough after letting cool slightly but don’t worry if some residual heat remains—it shouldn’t cook them outright but allow some time for harmonization among elements before moving forward! Each egg introduces moisture along with proteins necessary for structure & lift upon baking—so be sure not rush through this step; allowing proper incorporation ensures fluffy results every time!
Step 3: Piping It Perfectly
With your luscious choux pastry ready for action now comes piping time—where creativity meets technicality through structured precision! Grab yourself either disposable piping bags fitted with large round tips—or even simpler use Ziploc bags cutting off corner—as you fill ’em up generously but not overflowing since these beauties expand quite delightfully upon heating! Pipe two rectangular shapes onto prepared lined baking sheets about 12 inches long & 4 inches wide leaving enough space between each piece allowing room needed during their glorious expansion later on inside oven’s warmth!
Step 4: Baking Until Golden
The final step before indulging involves placing those piped pastries inside preheated oven set at 375°F (190°C) where magic unfolds over next half hour transforming batter tubes into beautifully risen golden puffs filled with air pockets waiting eagerly beneath crusty exteriors longing lovingly begging attention from tastebuds everywhere begging “please eat us!” After around 20 minutes watch closely peeking occasionally only if necessary avoiding premature opening which could compromise rising action happening inside—it should be perfectly poised after approximately thirty minutes full-baked glory revealing its true beauty visible through glass doors inviting everyone nearby drawn hypnotically toward magic happening within…
Join me again shortly as we continue exploring every intricate detail involved until finally assembling finishing touches upon masterpiece creation awaiting proudly displayed centerpiece table adorned beautifully inviting admiration…
Step 5: Crafting the Choux Pastry
Now, let’s dive into the heart of our Karpatka – Polish Carpathian Mountain Cream Cake, which is the choux pastry. It all starts with a beautiful mixture of milk and water; pour ½ cup of each into a medium saucepan and add 80 grams of unsalted butter along with ½ teaspoon of salt and 2 teaspoons of sugar. Place this over medium heat, stirring gently until everything melts and combines into a luscious liquid gold. This moment is crucial because it sets the stage for your choux pastry to puff up beautifully when baked. Once it reaches a gentle simmer, remove it from the heat and quickly stir in 150 grams of all-purpose flour all at once. Now, here’s where the magic begins—the flour will absorb the liquid and start forming a dough.
Return the pot to low heat for about one to two minutes, continuously stirring. Trust me on this; this process is non-negotiable as it helps cook out any raw flour taste while allowing moisture to evaporate—what you’re aiming for is a cohesive dough that pulls away from the sides of the pan effortlessly. You’ll know it’s ready when you see a light film forming on the bottom of your pan; that’s your cue! Transfer this dough to a mixing bowl and let it cool for just a few minutes before adding your eggs. This resting time is essential because adding eggs to hot dough can result in scrambled eggs instead of smooth pastry! Gradually beat in four large eggs, one at a time, using either an electric mixer or your trusty wooden spoon until the mixture transforms into a silky, glossy batter that flows like molten lava.
Step 6: Piping Perfection
With our choux pastry now resting comfortably in its bowl, it’s time to get creative with piping! Preheat your oven to 200°C (about 400°F)—this high temperature is key for achieving that delightful puff we all crave. Line two baking sheets with parchment paper; this step not only prevents sticking but also makes cleanup so much easier later on. To pipe your pastry, you can use either a piping bag fitted with a large round tip or simply snip off one corner of a resealable plastic bag if you don’t have one handy. Start by filling your piping bag with that gorgeous choux pastry; I recommend squeezing out any air bubbles first for an even flow.
Now, pipe two equal rectangles onto the prepared baking sheets, each measuring about 10 inches long and 5 inches wide. Don’t worry if they’re not perfectly uniform; remember, we’re going for rustic charm here! Once piped, use a wet finger to smooth out any peaks or jagged edges—that’s essential because those peaks could burn during baking. Bake in your preheated oven for about 25-30 minutes until they are golden brown and puffed up like little clouds! Resist the temptation to open the oven door during this time as it can cause them to deflate—just breathe in that intoxicating aroma wafting through your kitchen!
Step 7: The Creamy Filling
While our choux pastry is transforming into airy wonders in the oven, let’s turn our attention to creating that utterly luxurious cream filling that will make our Karpatka truly extraordinary! In another saucepan, combine 2 cups of milk with ⅔ cup of sugar over medium heat; stir occasionally until it warms up but doesn’t boil—watching those sugar crystals dissolve feels like pure magic! In a separate bowl, whisk together 50 grams of cornstarch with two egg yolks (don’t throw away those whites just yet!), along with two teaspoons of vanilla extract for an extra layer of flavor.
Once your milk mixture is steaming but not boiling, slowly ladle about half of it into the egg yolk mixture while whisking vigorously—this technique is called tempering and prevents scrambling by gradually raising the temperature of the yolks without cooking them too quickly. Pour this tempered mixture back into the saucepan with the remaining milk while continuing to whisk constantly over medium heat until thickened, which should take around five minutes or so. You’ll know it’s ready when it resembles pudding—a perfect custard-like consistency that clings lovingly to your spoon! Remove from heat and allow it cool slightly before gradually incorporating ¾ cup of room-temperature unsalted butter until silky smooth.
Step 8: Assembling Your Masterpiece
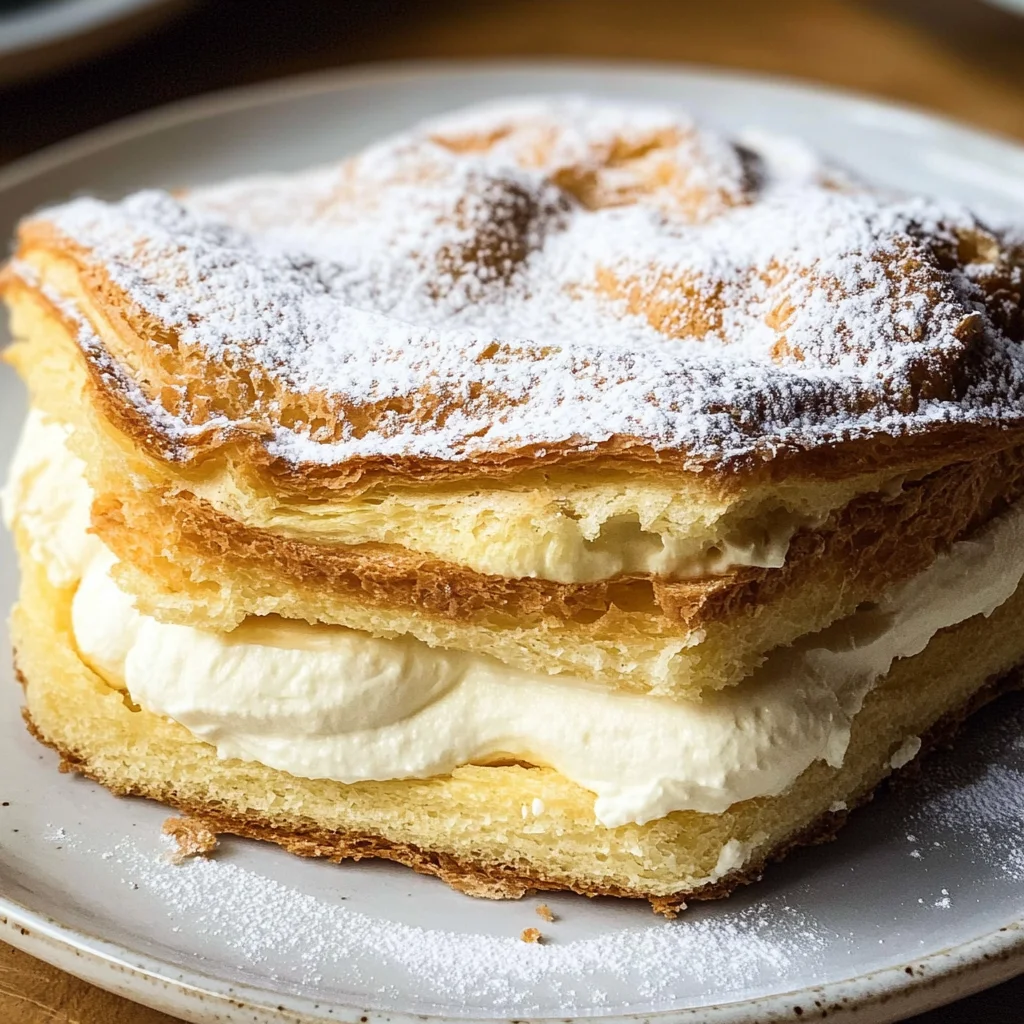
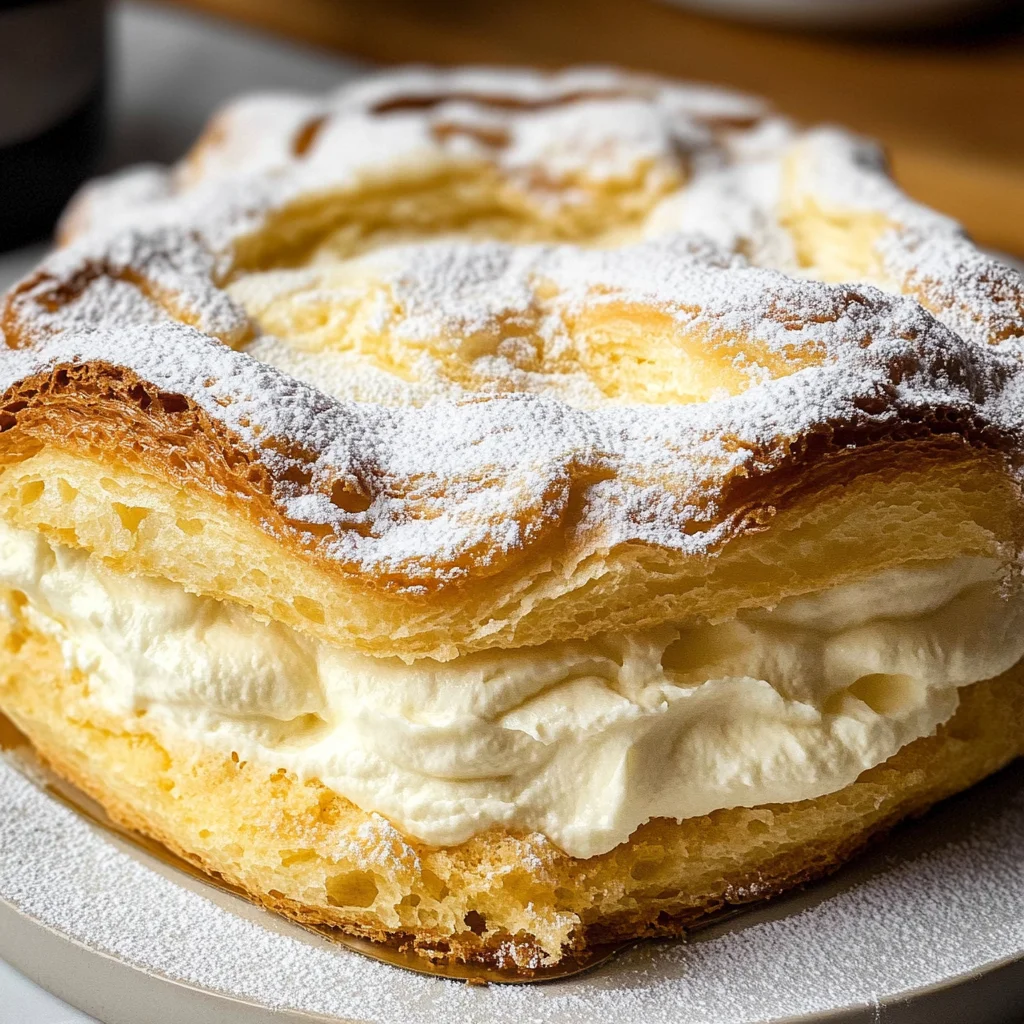
Now comes perhaps my favorite part – assembling our glorious Karpatka! Once your baked choux pastries have cooled completely on wire racks (which could take up to an hour), carefully slice each rectangle horizontally using a serrated knife; this creates two layers per piece—a top and bottom that will cradle our heavenly cream filling. Start by placing one layer on your serving platter or cake stand and generously spread half of that creamy custard filling onto it—you want every inch covered because let me tell you; each bite deserves nothing less than perfection!
Gently place the second layer on top without squishing down too hard; remember these delicate pastries are filled with love—so treat them gently! Now spread the remaining cream on top for that final touch before dusting generously with powdered sugar as if you were sprinkling fairy dust across a magical landscape. This isn’t just decoration; it adds an irresistible sweetness and visual appeal that beckons everyone to dive right in! Cover loosely with plastic wrap or foil if you’re planning to serve later—allowing it some chill time in the fridge (ideally at least an hour) lets those flavors meld beautifully together while giving you nice clean slices when serving.
Final Touches: The Sweet Ending
Step 9: A Slice Above
When you’re finally ready to serve your stunning Karpatka – Polish Carpathian Mountain Cream Cake, take a deep breath because what awaits you is beyond mouthwatering—it’s an experience! Using a sharp knife dipped in hot water (this trick helps prevent sticking), slice through both layers with ease and reveal those beautiful creamy layers within each slice. Enjoy those gasps from family and friends as they savor their first bites—the combination of airy pastry and rich cream filling will leave them utterly enchanted!
As everyone takes their first bite, I promise you they’ll be transported straight to Poland’s Carpathian Mountains where tradition meets indulgence in every single forkful. So go ahead—serve these slices chilled or at room temperature alongside fresh berries or whipped coconut cream if desired for an extra touch of decadence. Enjoy sharing this beloved recipe as much as I have loved sharing it with you today—I can hardly wait for you to experience how truly extraordinary this dessert can be! Happy baking!
Storage and Enjoyment Tips for Your Karpatka – Polish Carpathian Mountain Cream Cake
Now that you’ve lovingly crafted this stunning Karpatka, it’s time to revel in the delightful experience of enjoying your creation. But before you dive in, let’s talk about how to preserve this masterpiece so that every bite remains as heavenly as the first. Trust me, the magic doesn’t have to end after just one sitting! This cake is not only a delight fresh out of the oven or from the fridge; it also offers the luxury of being enjoyed over a few days, making it truly special for those who want to savor every morsel with friends and family.
Storing Leftover Karpatka – Polish Carpathian Mountain Cream Cake
To ensure your leftover Karpatka stays as scrumptious as when it first graced your table, I recommend storing it in an airtight container, which is absolutely crucial. When placed in the refrigerator, it will keep well for about 3 to 4 days. This timing allows those lush layers of choux pastry and diplomat cream to meld beautifully, creating a rich and harmonious flavor profile that is even more profound after a day or two. For a little pro tip: if you find your cake becoming slightly soggy, placing a slice of bread inside the container can help absorb excess moisture while keeping your dessert soft and delectable. Oh, and don’t worry—after storage, the taste remains utterly intoxicating; it’s like reliving that baking moment all over again! When you’re ready to serve, you can enjoy it cold straight from the fridge or let it sit at room temperature for about 30 minutes for an even richer flavor experience.
Freezing Components for Later
If you find yourself with extra Karpatka or simply want to prepare ahead for a special occasion—what an excellent idea! You can freeze individual slices or even whole portions of this divine dessert. Just wrap each piece tightly in plastic wrap and then place them into a freezer-safe bag or container. This method prevents freezer burn and preserves that luscious creaminess we all adore. The beauty of freezing your cake is that it can last up to three months in the freezer without losing its signature flavor or texture. When you’re ready to indulge again, simply transfer your desired portion from the freezer to the refrigerator for several hours (or overnight) to thaw gently. This convenience factor means you can always have a slice of happiness at hand whenever you desire—how wonderful is that?
Karpatka – Polish Carpathian Mountain Cream Cake

Karpatka – Polish Carpathian Mountain Cream Cake is a delightful dessert that beautifully showcases the art of baking. This elegant cake features layers of airy choux pastry enveloping a rich diplomat cream filling. With its origins rooted in Polish tradition, each bite offers a harmonious blend of textures and flavors that will transport you to the picturesque Carpathian Mountains. Perfect for gatherings or as an indulgent treat at home, this cake promises to make any occasion truly special.
- Prep Time: 30 minutes
- Cook Time: 30 minutes
- Total Time: 1 hour
- Yield: Approximately 12 servings 1x
- Category: Dessert
- Method: Baking
- Cuisine: Polish
Ingredients
- ½ cup milk
- ½ cup water
- 80 g unsalted butter
- ½ tsp salt
- 2 tsp sugar
- 150 g all-purpose flour
- 4 eggs
- 2 cups milk (for cream)
- 2 eggs (for cream)
- ⅔ cup sugar (for cream)
- 50 g cornstarch
- 2 tsp vanilla extract
- ¾ cup unsalted butter (room temperature)
- Powdered sugar (for garnish)
Instructions
- Preheat your oven to 375°F (190°C). Line two baking sheets with parchment paper.
- In a saucepan, combine milk, water, butter, salt, and sugar over medium heat until melted and simmering.
- Add flour all at once and stir vigorously until a dough forms that pulls away from the pan.
- Allow the mixture to cool slightly before adding eggs one by one until smooth and glossy.
- Pipe two rectangles onto the baking sheets and bake for about 25–30 minutes until golden brown.
- For the cream filling, heat milk and sugar in a saucepan. Whisk cornstarch and egg yolks in a bowl, then temper with warm milk mixture before returning it all to the pan to thicken.
- Remove from heat and mix in room temperature butter until smooth.
- Once cooled, slice baked pastry layers horizontally, fill with cream, stack layers back together, and dust with powdered sugar.
Nutrition
- Serving Size: 1 slice
- Calories: 296
- Sugar: 22g
- Sodium: 173mg
- Fat: 18g
- Saturated Fat: 11g
- Unsaturated Fat: 6g
- Trans Fat: 0g
- Carbohydrates: 28g
- Fiber: 0g
- Protein: 4g
- Cholesterol: 107mg