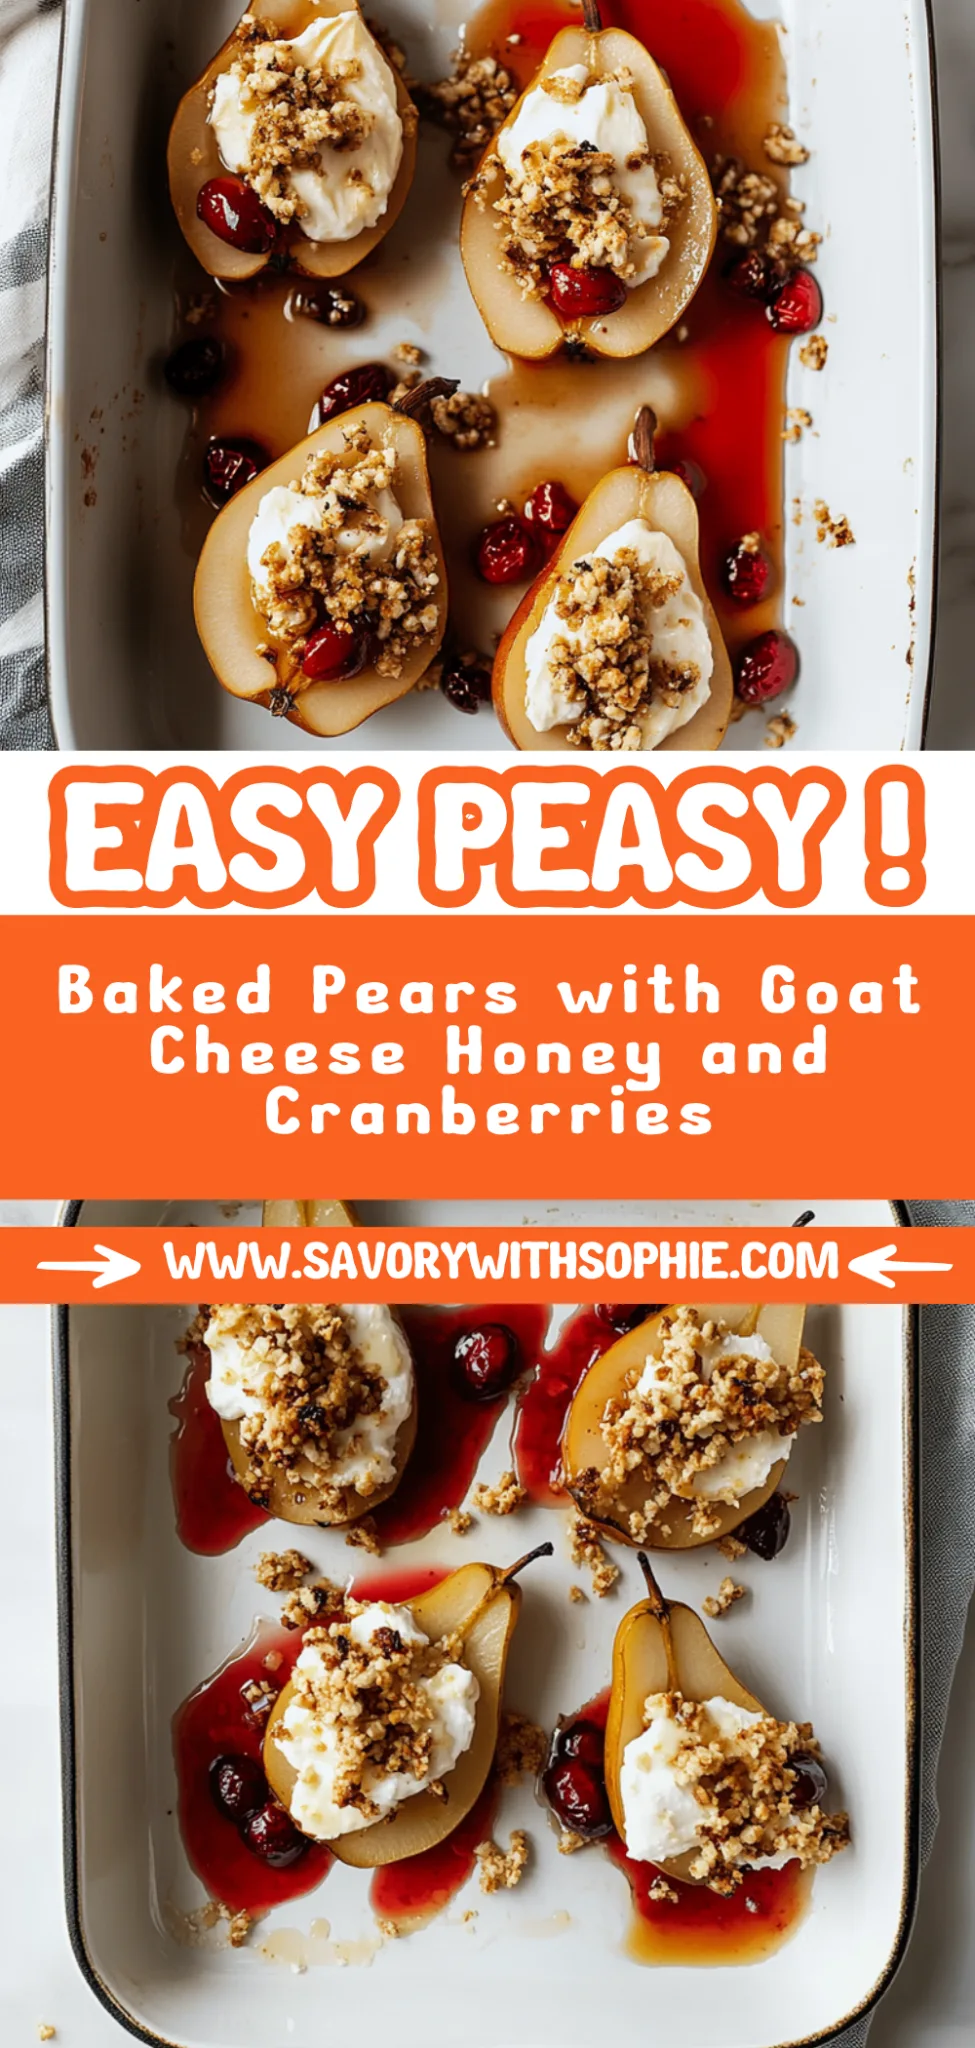
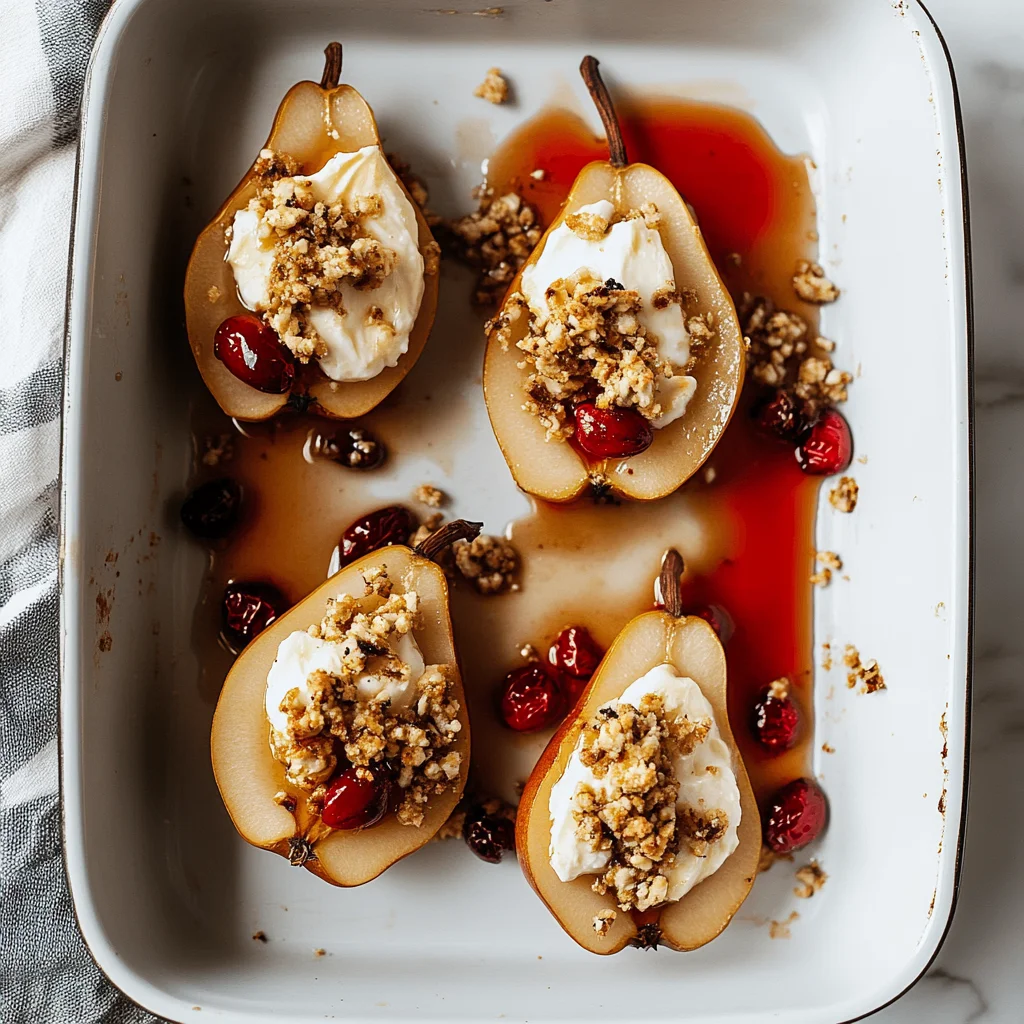
Baked Pears with Goat Cheese: A Sweet Surprise Treat
I first came across the idea of Baked Pears with Goat Cheese, Honey, and Cranberries at a charming little bistro during a cozy autumn evening out with friends. The moment I took my first bite, the sweet, buttery pear combined with the tangy goat cheese and a drizzle of honey was pure bliss. It was one of those “Oh wow, I need to recreate this at home” moments, fueled by both a desire to impress my guests and the realization that restaurant prices can be shockingly high for such simple ingredients. Plus, who doesn’t love making something elegant without breaking the bank?
After diving into my kitchen, I discovered that perfecting this dessert was no walk in the park. I must have attempted it five times before I finally got it right—each time tweaking the balance of flavors and experimenting with baking times. Let’s just say my initial attempts were less than Instagram-worthy; some were way too mushy while others had pears that resembled rubber balls. With each iteration, I was on a quest to achieve that perfect combination of soft yet firm fruit, creamy cheese, and just enough sweetness to make your taste buds dance.
But oh boy, was it all worth it in the end! The final dish is nothing short of a showstopper: tender baked pears stuffed with dreamy goat cheese, elegantly drizzled with honey and topped with tart cranberries that pop with flavor. The texture is sublime—creamy inside and slightly caramelized outside—and the flavors play together like they were meant to be best friends. I can’t wait for you to try making these Baked Pears with Goat Cheese, Honey, and Cranberries yourself; you’re going to absolutely love how easy yet impressive they are!
These Baked Pears with Goat Cheese, Honey, and Cranberries are…
….a stunning dessert that elevates any occasion into something truly special!
1. They deliver an exceptional flavor profile that perfectly balances sweet and savory. The natural sweetness of ripe pears enhances the creamy tang of goat cheese, creating a harmonious bite that’s both refreshing and indulgent—especially when topped with tart cranberries for a delightful contrast.
2. Irresistible texture – soft, tender pears enveloping a rich filling. The gentle baking process transforms the pears into a warm, juicy treat while ensuring the goat cheese filling remains creamy and smooth, making each spoonful melt in your mouth.
3. This recipe showcases a simple yet effective technique: roasting the pears. By baking them until just tender, you not only enhance their sweetness but also concentrate their flavors, allowing the dish to shine without needing complicated steps or ingredients.
4. A great value — this elegant dessert is surprisingly affordable to make at home! Using just four medium ripe pears and pantry staples like goat cheese and honey means you can create a restaurant-quality dish without breaking the bank.
PS These baked pears are best served warm for that cozy comfort food experience while still being easy to prepare ahead of time!
Ingredients for the Baked Pears with Goat Cheese, Honey, and Cranberries
Each ingredient in this dish plays an essential role in flavor and texture. Here’s what you’ll need:
4 medium ripe pears: These provide a sweet and juicy base for the dish.
8 oz goat cheese (softened): Contributes a creamy richness that complements the pears.
1/2 cup dried cranberries (chopped): Adds tartness and a chewy texture for contrast.
1/4 cup walnuts (chopped): Offers a crunchy element and nutty flavor that enhances the filling.
1 tbsp fresh rosemary (chopped): Introduces an aromatic herbal note that brightens the overall taste.
1/4 cup honey (for drizzling): Adds natural sweetness and a glossy finish to the baked pears.
- 1 tbsp butter (for greasing the baking dish): Ensures easy release from the dish and adds a hint of richness.
You Must Scoop Out the Pears. No Shortcuts!
I’ll be honest with you: scooping out the pears to create that perfect hollow center feels a bit like extra work, and I tried to skip it once. Spoiler alert: it didn’t end well. The filling just sat awkwardly on top, and let’s be real — no one wants an unstuffed pear for dessert!
Now, here’s why this step is essential: think of it like carving a pumpkin for Halloween. If you don’t scoop out the insides, all your hard work decorating won’t matter because there’s nowhere for the light (or in this case, the delicious filling) to shine through. Hollowing out the pears allows the creamy goat cheese, tart cranberries, and crunchy walnuts to nestle snugly inside, creating a mouthwatering burst of flavor with each bite.
What Does Scooping Out the Pears Do?
- Improves Flavor Integration — The filling melds beautifully with the pear, allowing each bite to deliver a harmonious mix of sweet and savory.
- Enhances Texture — The creamy filling contrasts perfectly with the tender baked pear, providing a delightful mouthfeel that would be missing if left whole.
- Promotes Even Cooking — Scooping creates more surface area, ensuring that every part of the pear cooks evenly and absorbs flavors from the honey and filling.
- Encourages Caramelization — The exposed flesh caramelizes nicely in the oven, adding depth of flavor that enhances the overall taste experience.
- Elevates Presentation — Hollowed-out pears look elegant on a plate, making this dish not only delicious but also visually stunning for entertaining.
Different Scooping Times
- Quick Scoop (1 minute) (good) — You’ll get some hollowing done; however, you might miss some critical flavor pockets which could lead to less delicious stuffing.
- Thorough Scoop (2-3 minutes) (better) — A bit more time spent here means more room for filling and better integration of flavors.
- ⭐️ Perfect Scoop (5 minutes)⭐️ — Ideal! This ensures you’ve created enough space for all that luscious goat cheese goodness while maintaining the structural integrity of the pear.
- Over-Scooped (6+ minutes) (risky) — Too much hollering can lead to weak pear halves that might collapse when baked.
Just a heads up: one of the most common mistakes is being too conservative when scooping out those pears. If you don’t create enough space for your stuffing, you’ll end up with an awkwardly stuffed dessert that lacks flavor and texture. So go ahead, scoop generously!
How to make Baked Pears with Goat Cheese, Honey, and Cranberries
Are you ready to see how straightforward it is to make the Baked Pears with Goat Cheese, Honey, and Cranberries of your dreams??
1. PREPARE THE PEARS
Let’s start by prepping our beautiful pears for baking!
1. Preheat – Preheat the oven to 350°F (175°C). This ensures that your pears will bake evenly and come out perfectly tender.
2. Cut and Scoop – Cut the pears in half lengthwise and scoop out the core to create a hollow center. This step is crucial as it allows room for all that delicious filling!
3. Grease – Grease a baking dish with butter and place the pear halves cut side up in the dish. The butter helps prevent sticking and adds a lovely richness to the final dish.
HANDY TIPS
- Choose ripe pears for the best flavor; they should yield slightly when pressed.
- If using Bosc pears, keep their skins on for extra texture!
2. MAKE THE FILLING
Now let’s whip up that scrumptious filling!
1. Combine – In a mixing bowl, combine the softened goat cheese, chopped cranberries, walnuts, and rosemary. Mix until well combined. The creaminess of the goat cheese pairs beautifully with the tart cranberries and crunchy walnuts!
HANDY TIPS
- Soften your goat cheese by leaving it at room temperature for about 30 minutes before mixing; this makes blending super easy.
- For an extra flavor kick, consider adding a dash of cinnamon or nutmeg!
3. STUFF THE PEARS
Time to fill those pears with cheesy goodness!
1. Spoon – Spoon the goat cheese mixture into the hollowed-out centers of the pear halves. Make sure to pack it in well so every bite is full of flavor!
HANDY TIPS
- Don’t be shy with the filling! A generous amount ensures a delightful experience in every bite.
- You can prepare these stuffed pears ahead of time; just cover them tightly and refrigerate until you’re ready to bake.
4. BAKE THE PEARS
Let’s get these beauties baked!
1. Drizzle – Drizzle honey over the stuffed pears and cover the baking dish with foil. The honey will caramelize during cooking, creating a delicious glaze.
2. Bake – Bake in the preheated oven for 25 minutes. Remove the foil and bake for an additional 10 minutes until the pears are tender and slightly caramelized. You’ll know they’re ready when they are fragrant, golden-brown, and soft enough to pierce easily with a fork.
HANDY TIPS
- Keep an eye on them during that last 10 minutes! You want them perfectly caramelized but not mushy.
- If you prefer a firmer texture, reduce baking time by a few minutes.
5. SERVE
The moment we’ve been waiting for has arrived!
1. Cool – Remove from the oven and let cool slightly before serving. Drizzle with additional honey if desired for an extra touch of sweetness!
Make these once, and I wager they will invade your dreams every night too! – Nagi x
FAQ – Baked Pears with Goat Cheese, Honey, and Cranberries
🥳 How long will these baked pears keep?
Baked pears with goat cheese are best enjoyed fresh, but they can be stored in the refrigerator for up to 3 days. After that, they start to lose their texture and flavor—about 80% as good on day 4 and 60% by day 5. To store them, simply place the pears in an airtight container. If you’re reheating them, I recommend warming them gently in the oven to maintain some of their original tenderness.
⏲️ Can I skip baking time or chill before serving?
No, you cannot skip the baking time! The baking process is crucial for softening the pears and allowing the flavors to meld beautifully. If you try to rush it, you might end up with hard, unappetizing pears. I suggest letting them cool for about 10 minutes before serving; this helps set the filling slightly and makes for a more pleasant eating experience.
❄️ Can I freeze baked pears for later?
You can freeze baked pears, but be aware that their texture may change after thawing. To freeze, allow the baked pears to cool completely. Then, place them in a freezer-safe container or bag, making sure to remove as much air as possible to prevent freezer burn. They should last about 2-3 months in the freezer. When you’re ready to enjoy them again, thaw overnight in the refrigerator and reheat gently in the oven.
🌿 Can I make this recipe dairy-free or vegan?
Unfortunately, this recipe relies heavily on goat cheese for its creamy texture and flavor profile. However, if you’re looking for a dairy-free alternative, you could try a vegan cream cheese or cashew cheese spread mixed with some herbs (like rosemary). Keep in mind that while it won’t taste exactly like goat cheese, it will still provide a nice creamy filling!
🔄 What can I substitute if I don’t have goat cheese?
If you don’t have goat cheese on hand (or if you’re just not a fan), cream cheese is your best bet—it’s creamy and mild but won’t have that tangy flavor of goat cheese. You could also use ricotta cheese mixed with a bit of lemon juice for added tanginess. If you’re feeling adventurous, a blue cheese could give it an interesting twist!
🤔 Why do we scoop out the pear core?
Scooping out the core creates space for that delicious filling! This step not only makes room for the goat cheese mixture but also allows the flavors from the stuffing to penetrate deeper into the pear as they bake. It’s all about maximizing flavor here! Skipping this step would leave you with less deliciousness—trust me; I tested it!
🍯 Can I add other fruits or nuts into the filling?
Absolutely! Feel free to mix things up with dried fruits like apricots or figs instead of cranberries for a sweeter touch. Nuts are also flexible; pecans would work beautifully too! Just remember to adjust quantities based on your preferences but keep proportions similar so that everything fits nicely into those pear halves—happy experimenting!
Troubleshooting
I will continue to add more to this Troubleshooting section as I start seeing questions coming through from people who have made the recipe.
Troubleshooting tips
“My pears turned out too mushy! 😭”
- Overripe pears can lead to a mushy texture after baking. Make sure your pears are ripe but not overly soft; they should yield slightly to pressure but still feel firm.
- Baking them for too long can also cause them to lose their structure. Keep an eye on the time, especially when you remove the foil; they should be tender but not falling apart.
I bet they were still YUM though!
“My baked pears weren’t caramelized at all! 🤔”
- If your oven temperature was lower than 350°F (175°C), that could prevent proper caramelization. Always use an oven thermometer to ensure accurate temperatures.
- Not drizzling enough honey over the pears before baking can also lead to less caramelization. Be generous with that golden goodness!
I bet they were still YUM though!
“The filling overflowed and made a mess! 😳”
- Stuffing the pears too full with the goat cheese mixture can cause overflow during baking. Try leaving a little space at the top of each pear for the filling to expand.
- Mixing in too many cranberries or walnuts can also lead to a bulging filling. Stick to the recommended quantities for a perfect fit.
I bet they were still YUM though!
“My pears baked unevenly and some were way darker! 🔥”
- If your pears vary significantly in size, smaller ones will bake faster than larger ones. Try to select pears that are similar in size for even cooking.
- Positioning your baking dish too close to the heating element can result in uneven browning. Make sure it’s placed in the center of your oven for balanced heat distribution.
I bet they were still YUM though!
Baked Pears with Goat Cheese, Honey, and Cranberries
Ingredients
Method
- Preheat the oven to 350°F (175°C). Cut the pears in half lengthwise and scoop out the core to create a hollow center.
- Grease a baking dish with butter and place the pear halves cut side up in the dish.
- In a mixing bowl, combine the softened goat cheese, chopped cranberries, walnuts, and rosemary. Mix until well combined.
- Spoon the goat cheese mixture into the hollowed-out centers of the pear halves.
- Drizzle honey over the stuffed pears and cover the baking dish with foil.
- Bake in the preheated oven for 25 minutes. Remove the foil and bake for an additional 10 minutes until the pears are tender and slightly caramelized.
- Remove from the oven and let cool slightly before serving. Drizzle with additional honey if desired.