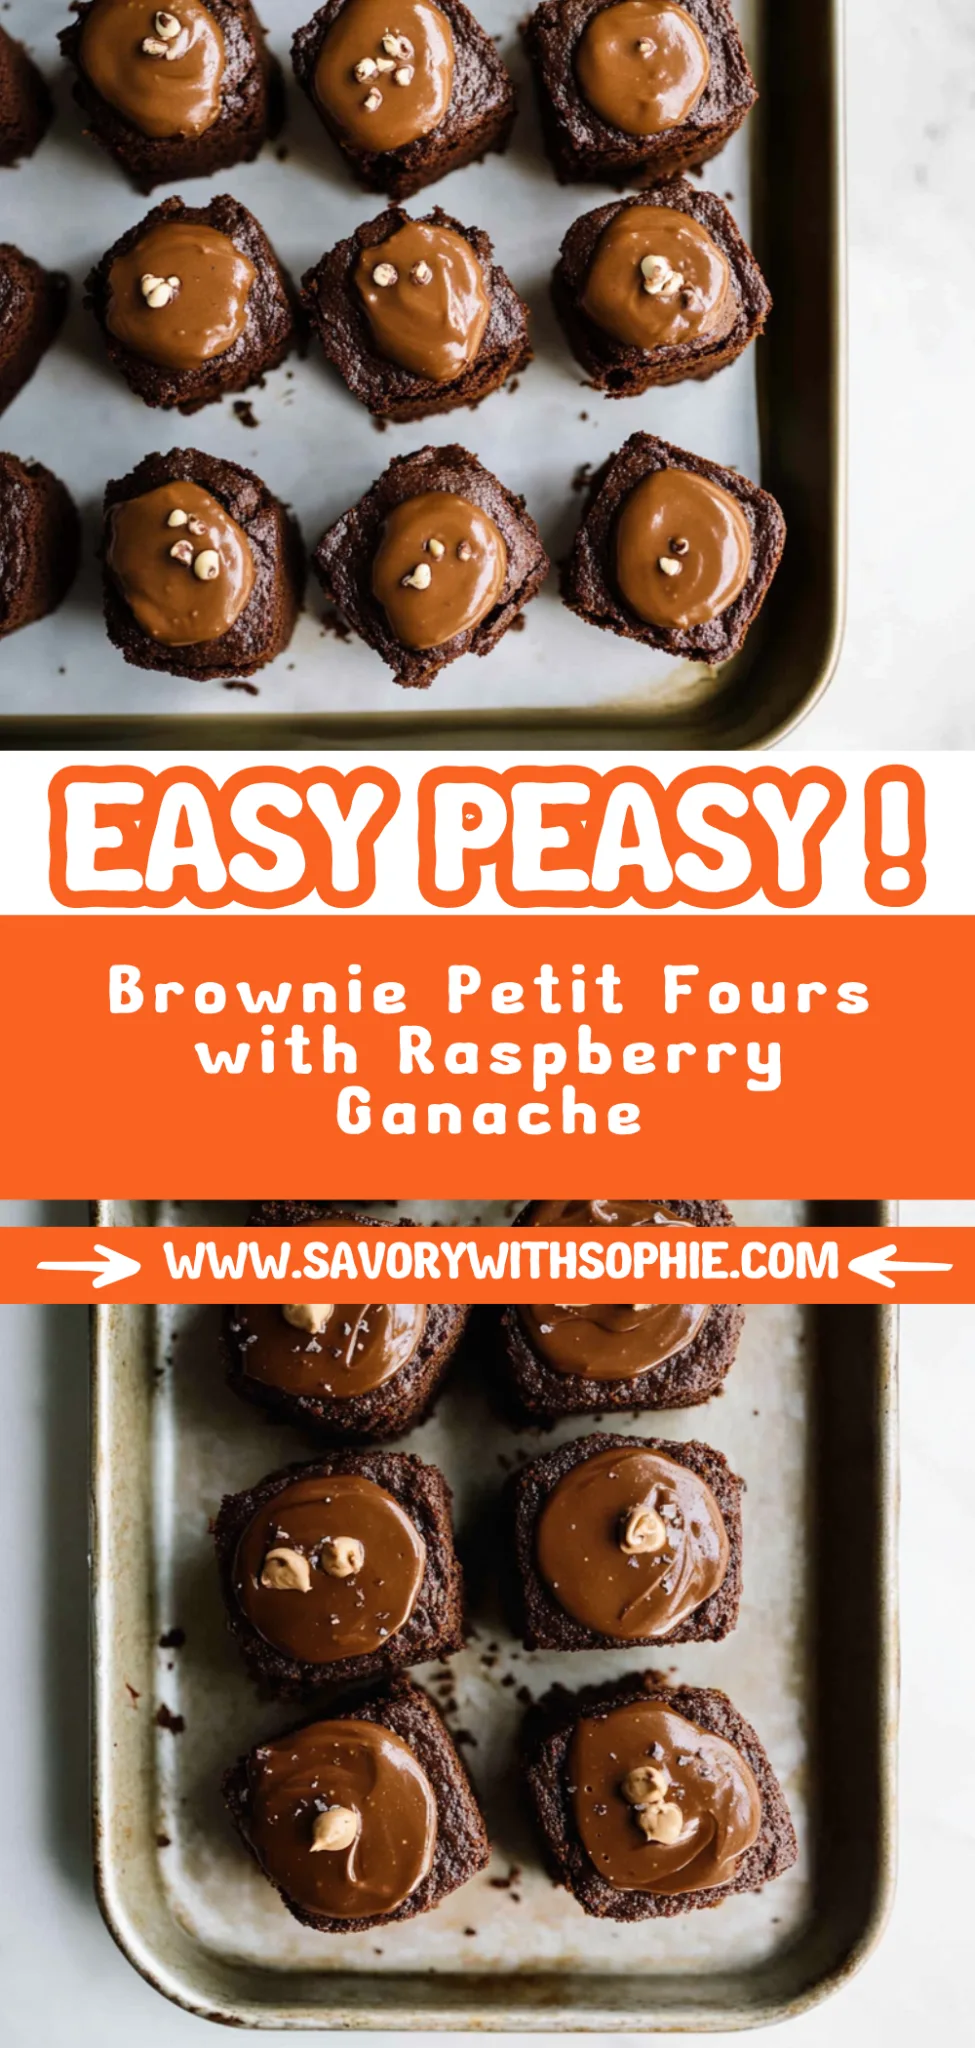
Brownie Petit Fours: A Decadent Delight at Home
I first stumbled upon the idea of Brownie Petit Fours during a dessert tasting at a charming little café in Paris. The moment I took a bite of those rich, fudgy squares topped with a glossy chocolate glaze and adorned with delicate edible flowers, I was hooked. It was like a tiny piece of heaven on a plate! As much as I loved that café, the thought of shelling out for these little beauties every time I had a craving didn’t sit well with me — so I decided to bring that exquisite experience home and recreate it myself.
Let me tell you, perfecting my Brownie Petit Fours was no walk in the park. After what felt like an embarrassing number of attempts (seriously, my kitchen looked like a chocolate bomb exploded), I finally honed in on the right balance of gooeyness and structure that I was aiming for. Each iteration taught me something new — whether it was adjusting baking times or perfecting that silky glaze — and I certainly learned how not to take myself too seriously when an entire batch turned into brownie crumbs instead of cute little squares!
But oh boy, was it worth every failed attempt! The final result is nothing short of spectacular: deliciously rich brownie petit fours that are so decadent they practically melt in your mouth. The glossy chocolate glaze shines like a trophy atop each square, while the edible flowers add that charming touch that makes them almost too pretty to eat (almost!). Trust me, you’re going to want to dive into these delightful treats as soon as you make them — I can’t wait for you to try this recipe!
These Brownie Petit Fours are…
…the perfect indulgence for any occasion, combining elegance and decadence in every bite!
1. They deliver an intense chocolate flavor that will leave you craving more. The blend of unsweetened cocoa powder and granulated sugar creates a rich depth of taste, making each petit four a chocolate lover’s dream come true. I find that the quality of cocoa really elevates the overall flavor, and sifting it ensures maximum smoothness.
2. Expect a delightfully fudgy texture that melts in your mouth. The combination of melted butter and eggs gives these brownie petit fours their signature dense yet tender consistency, providing a satisfying chew that balances perfectly against the glossy chocolate glaze.
3. The one-bowl method used in this recipe simplifies the process without sacrificing quality. By whisking together the ingredients directly after melting the butter, I’ve found it creates a seamless batter with minimal cleanup—a game changer for busy bakers who still want delicious results.
4. Cost-effective indulgence – these brownie petit fours are easy to make at home without breaking the bank. With basic pantry staples like flour, sugar, and cocoa, you can whip up a batch that rivals any fancy bakery’s offering while enjoying the satisfaction of homemade treats.
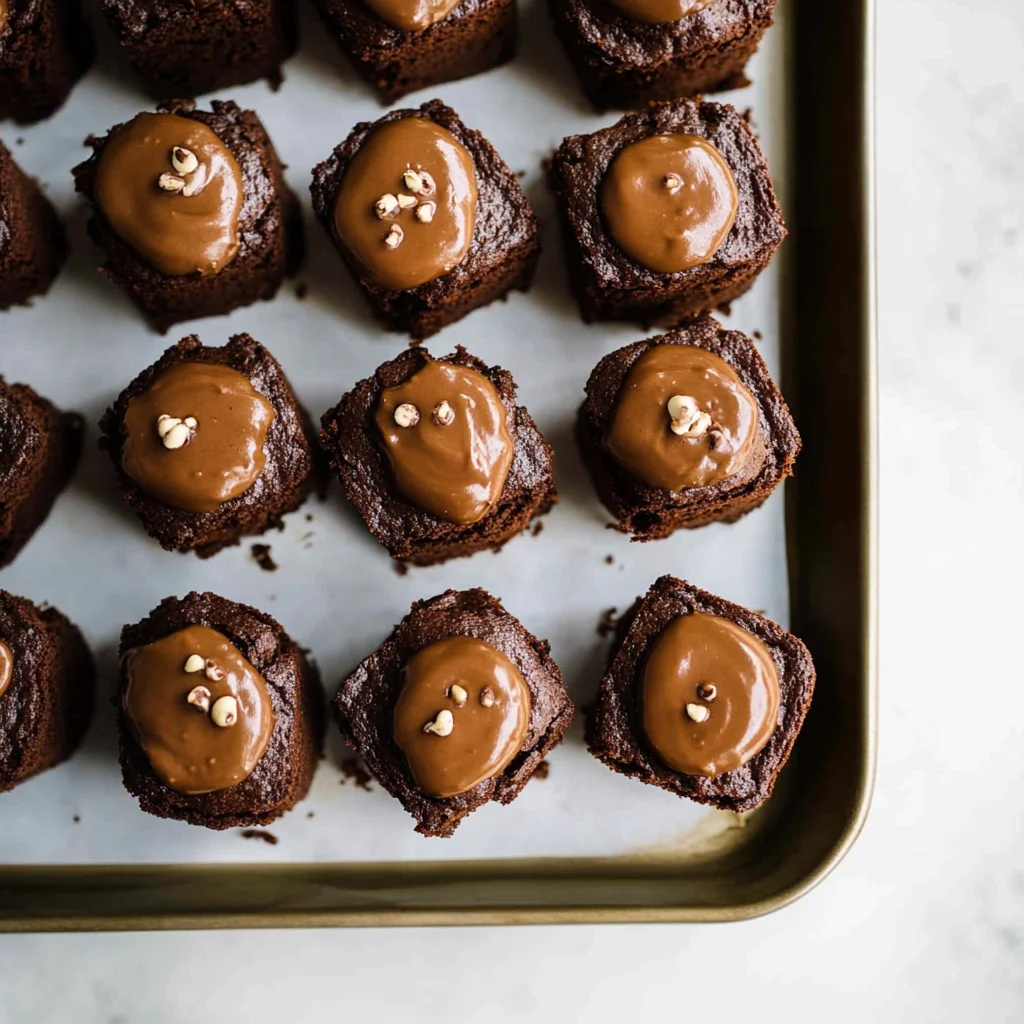
PS These brownie petit fours are cut into elegant little squares, making them perfect for sharing or serving at gatherings!
Ingredients You’ll Need
Each ingredient in this dish plays an essential role in flavor and texture. Here’s what you’ll need:
- 1 cup unsalted butter (melted): Provides a rich, moist base for the brownies.
- 2 cups granulated sugar: Sweetens the brownies and contributes to their fudgy texture.
- 4 large eggs: Acts as a binder, helping to create a light and airy structure.
- 1 cup all-purpose flour (sifted): Adds structure while keeping the brownies tender.
- 1 cup unsweetened cocoa powder (sifted): Delivers deep chocolate flavor without added sweetness.
- 1 teaspoon vanilla extract: Enhances the overall chocolate flavor with a hint of warmth.
- 1/2 teaspoon salt: Balances sweetness and intensifies the chocolate taste.
- 1 cup semi-sweet chocolate chips: Melts into a luscious glaze that coats the petit fours beautifully.
- 1/2 cup heavy cream: Creates a smooth, glossy finish for the chocolate glaze.
- 1/4 cup edible flowers (for garnish): Adds a touch of elegance and visual appeal to your dessert.
You MUST let the brownies cool completely. No shortcuts!
I have to admit, I once thought I could skip the cooling step after baking my brownie base—after all, who has the patience to wait? Well, after a disastrous attempt that resulted in a gooey mess instead of beautiful petit fours, I learned my lesson the hard way. Trust me when I say that this step is crucial for achieving that perfect brownie texture.
Cooling the brownies completely allows them to set properly, which is essential for creating a clean cut when you slice them into petite pieces. Think of it like letting a cake rest before frosting; if you don’t allow it to firm up, all your effort goes to waste as the layers slip and slide apart. The high fat content from the melted butter and eggs needs time to stabilize, ensuring your brownie base becomes dense and fudgy—exactly what makes these petit fours so irresistible!
What does cooling do?
- Texture — Cooling allows the brownies to firm up, resulting in a chewy and dense texture that’s vital for petit fours.
- Flavor — As they cool, the flavors meld together more harmoniously, enhancing that rich chocolatey goodness.
- Cutting — A cooled brownie cuts more cleanly without crumbling or tearing, giving you those perfectly shaped pieces.
- Presentation — The glossy top surface sets better when cooled, making it easier for you to achieve that beautiful finish after glazing.
- Moisture retention — Proper cooling prevents excess moisture from escaping too quickly, helping maintain that fudgy center without becoming dry.
Different cooling times
- 30 minutes (fair) — The brownies will be slightly warm and can still crumble a bit when cutting; not ideal for neat petit fours.
- 1 hour (good) — Better results with improved firmness but still not quite optimal; edges may still be a touch soft.
- 2 hours (very good) — Brownies are adequately set and easier to cut with minimal crumbling; flavor starts to deepen nicely.
- ⭐️ 4 hours or overnight ⭐️ — Best results! Perfectly firmed up brownies ready for cutting and glazing; rich flavor at its peak.
Don’t even think about cutting into those brownies while they’re still warm! The most common mistake I see is impatience leading to messy cuts and sad-looking petit fours. Trust me—waiting is worth it!
How to make Brownie Petit Fours
Are you ready to see how straightforward it is to make the Brownie Petit Fours of your dreams??
1. PREPARE THE BROWNIE BASE
Let’s kick things off with a rich brownie base that will be the star of your petit fours!
1. Preheat – Preheat the oven to 350°F (175°C). Grease and line an 8×8 inch baking pan with parchment paper. This ensures easy removal of the brownies once baked.
2. Whisk – In a mixing bowl, whisk together the melted butter and sugar until well combined. The melted butter helps dissolve the sugar quickly, leading to a smooth batter.
3. Add Eggs – Add the eggs one at a time, mixing well after each addition. Stir in the vanilla extract. This gradual incorporation helps maintain the structure and airiness of the brownies.
4. Sift and Fold – Sift together the flour, cocoa powder, and salt. Gradually fold the dry ingredients into the wet mixture until just combined. Overmixing can lead to dense brownies, so be gentle!
5. Pour and Spread – Pour the brownie batter into the prepared pan and spread evenly with a spatula for uniform baking.
6. Bake – Bake for 25 minutes or until a toothpick inserted into the center comes out with a few moist crumbs. You want them fudgy but not gooey—this is crucial for petit fours.
7. Cool – Allow the brownies to cool completely in the pan before transferring to a wire rack. Cooling properly lets them set up perfectly for cutting.
HANDY TIPS
- Make sure your butter is not too hot when mixed with sugar; it should be warm but not scalding!
- If you want even richer brownies, consider adding an extra egg yolk!
2. MAKE THE CHOCOLATE GLAZE
Now it’s time to create that glossy chocolate glaze that makes these petit fours swoon-worthy!
8. Combine – In a double boiler, combine the chocolate chips and heavy cream. Stir until the chocolate is melted and the mixture is smooth. The steam from boiling water gently melts the chocolate without burning it.
9. Cool Slightly – Remove from heat and let cool slightly before using to ensure it doesn’t melt away your beautifully cut brownies!
HANDY TIPS
- Use high-quality chocolate chips for a more decadent glaze!
- If you want an extra shine, add a tablespoon of light corn syrup while melting!
3. ASSEMBLE THE PETIT FOURS
Finally, let’s bring everything together! The best part about this recipe is decorating those adorable little treats!
10. Cut Brownies – Once the brownies are cool, cut them into small squares or rectangles using a sharp knife for clean edges.
11. Glaze – Place the brownie pieces on a wire rack and pour the chocolate glaze over each piece, allowing excess to drip off for that beautiful finish.
12. Garnish – Garnish with edible flowers while the glaze is still wet; they’ll stick perfectly! Plus, they add a pop of color that elevates presentation.
13. Set Glaze – Let the glaze set before serving so that it firms up nicely on each petite treat.
HANDY TIPS
- For perfect cuts on brownies, use a warm knife; dip it in hot water then wipe dry before cutting!
- Experiment with different edible flowers for unique looks—just ensure they are safe for consumption!
Make these once, and I wager they will invade your dreams every night too! – Nagi x
FAQ – Brownie Petit Fours
🍰 How long will these brownie petit fours keep?
Brownie petit fours can be stored at room temperature for up to 3 days. After day 1, I find they still taste about 97% as good, but by day 3, they start to lose their freshness and the glaze can become a bit dull. If you want to extend their shelf life, consider refrigerating them, where they’ll last for about a week. Just know that refrigeration can slightly alter the texture, making them denser.
❄️ Can I freeze brownie petit fours?
Absolutely! You can freeze the brownie petit fours before glazing. To do this, cut them into squares or rectangles and place them in an airtight container separated by parchment paper to avoid sticking. They’ll keep well in the freezer for up to 2 months. When you’re ready to enjoy them, simply thaw them in the fridge overnight or at room temperature for a couple of hours, then glaze them fresh!
🌾 Can these be made gluten free?
Yes, you can make these brownie petit fours gluten-free! Substitute all-purpose flour with a high-quality gluten-free flour blend that measures cup-for-cup like Bob’s Red Mill or King Arthur Gluten-Free Measure for Measure Flour. I’ve tested it this way, and while the texture might be slightly different—just as fudgy and rich—you won’t miss the gluten at all!
🥛 What can I use instead of heavy cream in the chocolate glaze?
If you need a substitute for heavy cream in the chocolate glaze, you can use coconut cream or full-fat coconut milk for a dairy-free alternative. Both options provide a similar richness; however, coconut cream will impart a subtle coconut flavor which can complement the chocolate nicely. Alternatively, you could use evaporated milk if you prefer something lighter but expect it to be less rich than heavy cream.
🔄 Can I reduce the sugar in this recipe?
No, you cannot reduce the sugar in this recipe—trust me on this one! I tried reducing it by various amounts during my testing (yes, multiple times), and it consistently resulted in brownies that were too dense or dry. The sugar not only sweetens but also contributes to the fudgy texture. If you’re looking for a less sweet version, consider using dark chocolate chips instead of semi-sweet; they have lower sugar content!
🤔 Why do I have to sift the flour and cocoa powder?
Sifting both flour and cocoa powder is crucial because it aerates these ingredients and removes any lumps that could result in uneven texture or dryness in your brownies. Sifting helps create that luscious fudgy consistency we are aiming for! It may seem like an extra step (and yes, it’s possible I grumbled when doing it), but trust me—it makes a difference!
🌸 What kind of edible flowers should I use for decoration?
You can use various edible flowers such as pansies, violets, or nasturtiums to decorate your brownie petit fours. These flowers not only add visual appeal but also a slight peppery or sweet flavor depending on your choice. Just ensure that any flowers used are truly edible—avoid ones treated with pesticides! Honestly, it’s like giving your dessert a beautiful little crown!
Troubleshooting
I will continue to add more to this Troubleshooting section as I start seeing questions coming through from people who have made the recipe.
Troubleshooting tips
“My brownies came out too dry! 😭”
- You may have overbaked them. Baking for too long causes moisture to evaporate, leading to dry brownies. To prevent this, keep an eye on them and check for moist crumbs with a toothpick around the 25-minute mark.
- Another possibility is that you used too much flour. If you didn’t sift or aerate your flour before measuring, it could result in adding too much, which makes for a dense texture. Always sift first!
- Lastly, if you skipped the cooling step before cutting, they can dry out quickly after being exposed to air. I bet they were still YUM though!
“My brownies are too thin! 🔥”
- If your brownie batter was spread too thin in the pan, they won’t rise properly and end up thin and flat. Make sure you’re using the correct 8×8 inch pan and spreading the batter evenly.
- It’s also possible that you didn’t use enough eggs. Eggs help bind the ingredients and provide structure, so always stick to the 4 large eggs specified in the recipe!
- Lastly, if you whipped the batter too much during mixing, it could incorporate excess air and cause them to deflate while baking. I bet they were still YUM though!
“The surface of my brownies cracked! 😱”
- Overmixing your batter can cause cracks on the surface as air bubbles expand during baking. Mix until just combined for a smoother finish.
- Baking at too high of a temperature can also lead to cracking; ensure your oven is preheated correctly to 350°F (175°C). An oven thermometer can help with accuracy!
- If your brownies were not cooled completely before cutting, this could cause cracking when slicing into them. I bet they were still YUM though!
“My chocolate glaze didn’t set properly! 😩”
- This might be due to not letting the glaze cool slightly before pouring it over the brownies; it should be thick but pourable. If it’s too hot, it may run off instead of setting nicely on top.
- Alternatively, if you didn’t use enough chocolate chips compared to cream, it can yield a thinner glaze that doesn’t set well. Stick to the specified measurements for best results!
- Lastly, if you didn’t let the glazed brownies sit long enough before serving, they won’t have had time to firm up properly. I bet they were still YUM though!
Brownie Petit Fours
Ingredients
Method
- Preheat the oven to 350°F (175°C). Grease and line an 8x8 inch baking pan with parchment paper.
- In a mixing bowl, whisk together the melted butter and sugar until well combined.
- Add the eggs one at a time, mixing well after each addition. Stir in the vanilla extract.
- Sift together the flour, cocoa powder, and salt. Gradually fold the dry ingredients into the wet mixture until just combined.
- Pour the brownie batter into the prepared pan and spread evenly.
- Bake for 25 minutes or until a toothpick inserted into the center comes out with a few moist crumbs.
- Allow the brownies to cool completely in the pan before transferring to a wire rack.
- In a double boiler, combine the chocolate chips and heavy cream. Stir until the chocolate is melted and the mixture is smooth.
- Remove from heat and let cool slightly before using.
- Once the brownies are cool, cut them into small squares or rectangles.
- Place the brownie pieces on a wire rack and pour the chocolate glaze over each piece, allowing excess to drip off.
- Garnish with edible flowers while the glaze is still wet.
- Let the glaze set before serving.