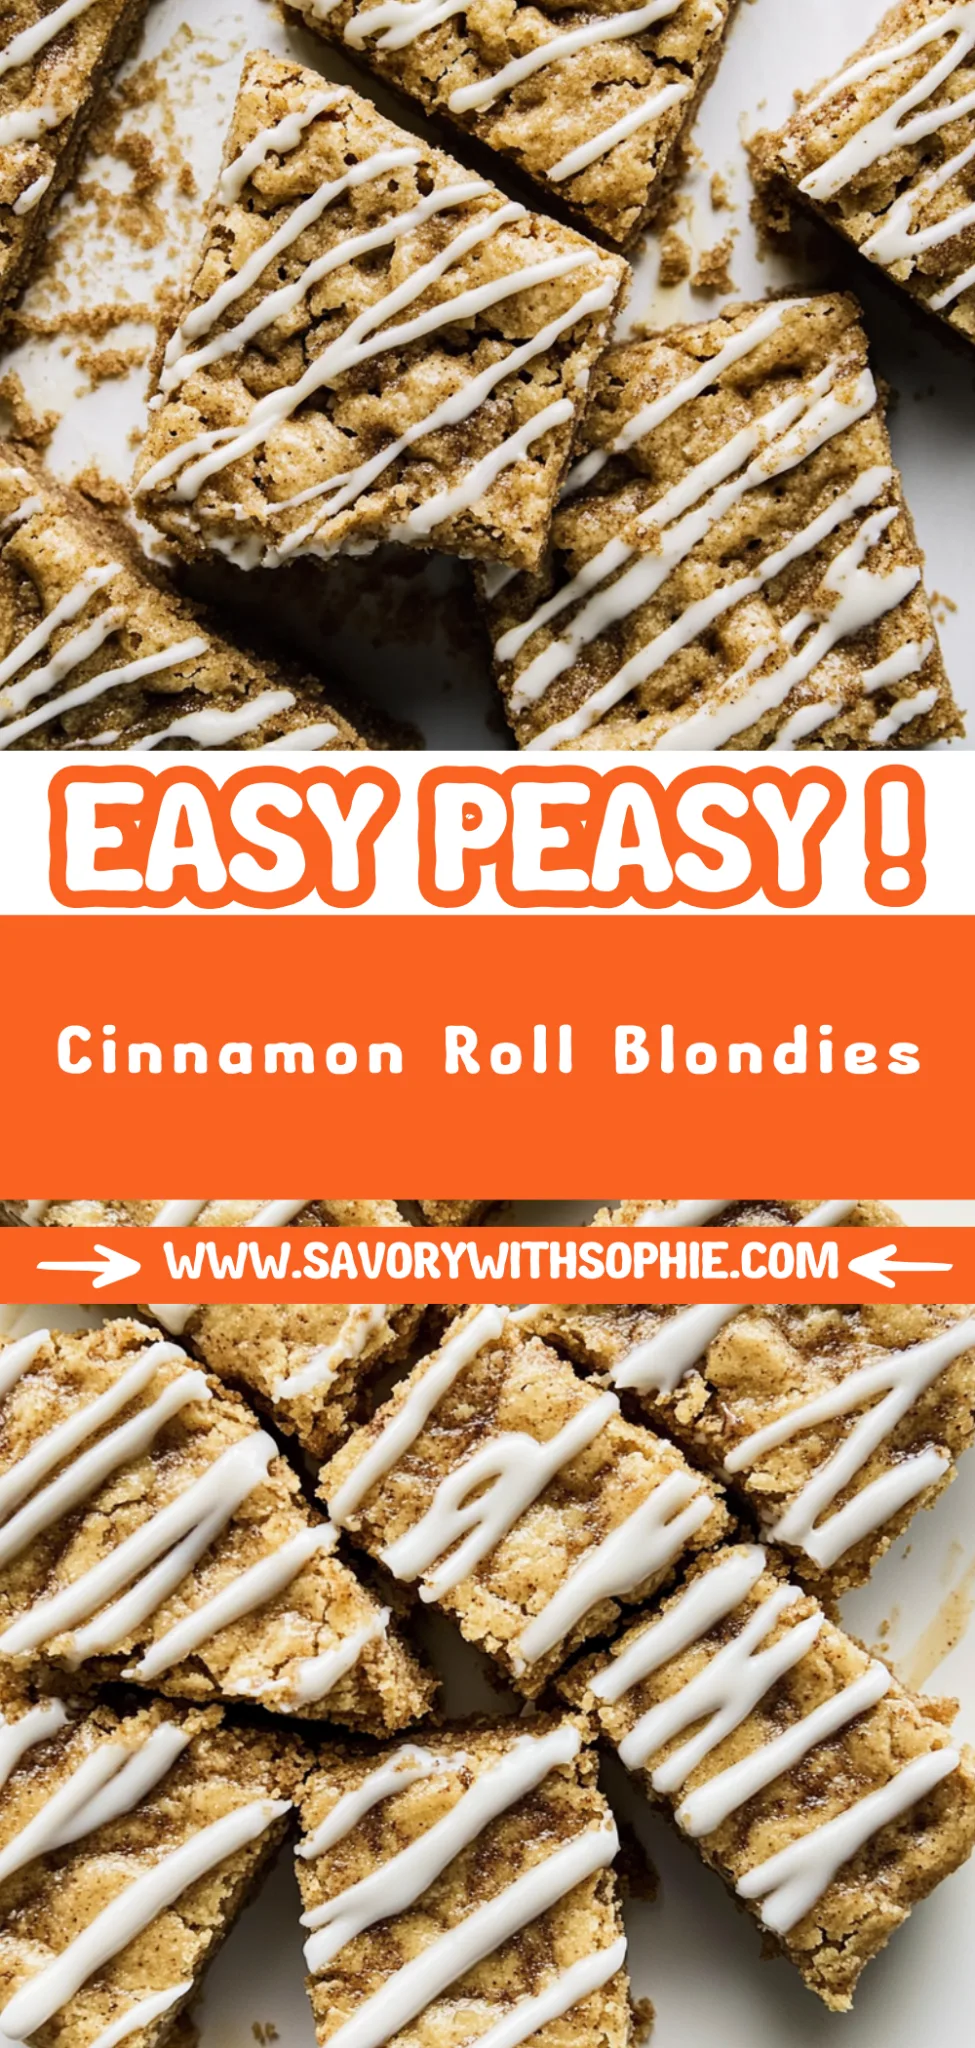
Cinnamon Roll Blondies: Gooey and Irresistibly Easy Treats
I first stumbled upon the idea of Cinnamon Roll Blondies during a late-night craving for something sweet that wouldn’t require me to slave over a complicated recipe. I had just left a cozy café that served the most heavenly cinnamon rolls, and as I savored each bite, I thought, “What if I could capture all that gooey cinnamon goodness in a blondie?” The beauty of blondies is that they’re quick to whip up and usually far less expensive than those fancy pastries. Plus, there’s something deeply satisfying about creating a beloved treat in my own kitchen that’s not only easy but also better than the original!
After several attempts—and by several, I mean enough to make me question my baking skills—I finally nailed my version of Cinnamon Roll Blondies. It took me about a week of trial and error (and possibly a few too many late-night baking sessions), trying to find the perfect balance between soft chewiness and that delightful cinnamon flavor. At one point, I ended up with a batch that resembled brick more than blondie—let’s just say my kitchen resembled a flour tornado! But each failed attempt taught me something new, and eventually, I knew I’d achieved the ideal texture and flavor combination.
The payoff was absolutely worth every mishap! The final result is nothing short of dreamy: deliciously soft and chewy blondies infused with warm cinnamon and topped with a sweet glaze that would make any cinnamon roll jealous. They’ve got that perfect balance of sweetness with just enough spice to keep you coming back for more—seriously, you’ll want to eat the whole pan! So grab your mixing bowl and get ready for an adventure; these Cinnamon Roll Blondies are about to become your new favorite treat!
These Cinnamon Roll Blondies are….
….the ultimate treat that combines the best of both worlds: the rich flavor of blondies and the warm, comforting aroma of cinnamon rolls!
1. They deliver a decadent flavor explosion that’s hard to resist, thanks to the combination of brown sugar and cinnamon. The brown sugar not only adds sweetness but also infuses each bite with deep, caramel-like undertones, creating a rich backdrop that complements the warm spices beautifully.
2. Expect a divine texture that strikes the perfect balance between chewy and soft. With a generous amount of melted butter and eggs in the base, these blondies achieve an irresistibly moist interior while maintaining a slightly crisp edge—just like your favorite bakery cinnamon roll!
3. The cinnamon swirl technique elevates these blondies beyond ordinary desserts. By mixing brown sugar with ground cinnamon and swirling it into the batter, you create those iconic ribbons of flavor that mimic classic cinnamon rolls, ensuring every bite is packed with sweet spice goodness.
4. They provide unbeatable value for such an indulgent treat. With simple ingredients you probably already have at home, these Cinnamon Roll Blondies come together effortlessly and yield a generous batch that’s perfect for sharing—or savoring alone if you’re feeling indulgent!
PS These blondies cut beautifully into squares and are perfect for enjoying warm out of the oven or later as a delightful snack!
Ingredients for the Cinnamon Roll Blondies
Each ingredient in this dish plays an essential role in flavor and texture. Here’s what you’ll need:
- 1 cup unsalted butter (melted): Provides rich flavor and a moist texture.
- 1 cup brown sugar (packed): Adds deep caramel notes and moisture.
- 1/2 cup granulated sugar: Balances sweetness and contributes to a light texture.
- 2 large eggs: Binds the ingredients together and adds richness.
- 2 teaspoons vanilla extract: Enhances the overall flavor with warmth.
- 2 cups all-purpose flour: Forms the base structure of the blondies.
- 1 teaspoon baking powder: Helps the blondies rise for a soft texture.
- 1/2 teaspoon baking soda: Works with acidity to create a tender crumb.
- 1/2 teaspoon salt: Enhances all the sweet flavors for balance.
- 1 tablespoon ground cinnamon: Infuses warm, aromatic spice throughout.
You Must Whisk Until Smooth. No Skipping!
I’ll be honest: I tried to shortcut this step. Who has time for endless whisking when you’re just craving that sweet, cinnamon-infused goodness? But after my blondies came out with a lumpy texture that looked more like a science experiment than a dessert, I realized my mistake. Trust me, whisking until smooth is non-negotiable if you want to achieve that heavenly blondie base.
Whisking the melted butter with the sugars until completely smooth is critical because it helps create a homogenous batter that ensures even distribution of ingredients. Think of it like mixing dough for pizza; if you don’t properly combine your ingredients, you’ll end up with pockets of flour or sugar rather than a beautifully cohesive creation. For these Cinnamon Roll Blondies, a well-whisked batter means every bite will deliver the perfect blend of sweetness and flavor.
What does whisking until smooth do?
- Texture — It creates a uniform batter, resulting in buttery, chewy blondies without any lumps or dry pockets.
- Even Mixing — Ensures that the sugars are fully dissolved, leading to an even sweetness throughout.
- Incorporation of Air — Whisking adds air into the batter, contributing to a lighter blondie that’s not overly dense.
- Flavor Distribution — Guarantees that all flavors, especially the warming cinnamon and rich vanilla, are evenly spread across every square.
- Moisture Retention — A well-mixed batter retains moisture better during baking, preventing dry blondies.
Different whisking times
- 30 seconds (mediocre) — Just enough to combine, but expect some lumps and uneven sweetness.
- 1 minute (good) — A fair mix that starts to break down clumps; still not optimal for texture or flavor integration.
- 2 minutes (great) — The sugars begin to dissolve fully; you’re on the right track to achieve a lovely chewiness!
- 3 minutes or more (excellent) — Perfectly smooth and airy batter, leading to perfectly blended flavors and textures.
Be warned: under-whisking is the most common mistake here. If you skip this step or rush through it, you’ll end up with blondies that are uneven in sweetness and texture—definitely not what we’re aiming for!
How to make Cinnamon Roll Blondies
Are you ready to see how straightforward it is to make the Cinnamon Roll Blondies of your dreams??
1. PREPARE THE BLONDIE BASE
Get ready to whip up a deliciously soft and chewy blondie base that will have everyone coming back for more!
1. Preheat – Preheat the oven to 350°F (175°C) and line a 9×13 inch baking pan with parchment paper. This ensures your blondies bake evenly and won’t stick to the pan, making for easy removal later on.
2. Whisk – In a mixing bowl, whisk together melted butter, brown sugar, and granulated sugar until smooth. The melted butter helps dissolve the sugars quickly, ensuring a rich flavor throughout the batter.
3. Add – Add eggs and vanilla extract, whisking until fully combined. This step adds moisture and sweetness, key elements in creating that perfect chewy texture!
4. Mix – In a separate bowl, mix flour, baking powder, baking soda, salt, and cinnamon. This helps evenly distribute the leavening agents and spices for consistent rise and flavor in each bite!
5. Combine – Gradually add the dry ingredients to the wet ingredients, stirring until just combined. Be careful not to over-mix; this keeps your blondies tender!
HANDY TIPS
- Make sure your butter is not too hot when mixing with sugars; it should be warm but not boiling to prevent cooking the eggs.
- For an extra depth of flavor, try adding a pinch of nutmeg along with the cinnamon!
2. ADD CINNAMON SWIRL
This is where the magic happens! The cinnamon swirl transforms simple blondies into something extraordinary.
6. Mix – In a small bowl, mix together the brown sugar and cinnamon for the swirl. This simple mixture creates pockets of sweet cinnamon goodness throughout your blondies!
7. Layer – Pour half of the blondie batter into the prepared pan and spread evenly. This base layer will act as a canvas for your delightful swirl!
8. Sprinkle – Sprinkle the cinnamon sugar mixture over the batter, then dollop the remaining batter on top. Don’t worry about it being perfect; those swirls will be deliciously messy!
9. Swirl – Use a knife to swirl the batter and cinnamon mixture together gently. Aim for just enough swirling to create beautiful ribbons without fully combining everything.
HANDY TIPS
- For an extra gooey center, you can reserve a bit of batter before layering—just drop it randomly on top after swirling!
- If you prefer more pronounced cinnamon flavors, increase the ground cinnamon in this step by an extra half tablespoon.
3. BAKE AND GLAZE
The final phase where you’ll experience that heavenly aroma wafting through your kitchen!
10. Bake – Bake in the preheated oven for 25-30 minutes or until a toothpick inserted in the center comes out clean. Keep an eye on them—overbaking can lead to dry blondies!
11. Cool – Allow the blondies to cool in the pan for 10 minutes, then transfer to a cooling rack. This cooling time allows them to set properly while retaining that soft texture we all love!
12. Whisk – For the glaze, whisk together powdered sugar, milk, and vanilla extract until smooth. The glaze should be thick but pourable; adjust with more milk if necessary!
13. Drizzle – Drizzle the glaze over the cooled blondies before cutting into squares for serving—a sweet finishing touch that takes these blondies over-the-top!
HANDY TIPS
- To avoid messy drizzling, use a spoon or squeeze bottle for controlled application.
- These blondies taste even better after resting overnight—so feel free to make them ahead of time!
Make these Cinnamon Roll Blondies once, and I wager they will invade your dreams every night too! – Nagi x
FAQ – Cinnamon Roll Blondies
🍰 How long will these blondies keep?
Cinnamon Roll Blondies are best enjoyed fresh, but you can store them for up to 4 days at room temperature in an airtight container. On day 1, they’ll be at their peak softness and flavor. By day 3, expect them to still be about 97% as good — a tad firmer but still delicious. After day 4, the moisture may decrease significantly, and they might start to dry out. If you want to maintain their freshness longer, consider refrigerating them, where they’ll last about a week.
⏳ Can I skip chilling the batter?
Nope! You can’t skip chilling here! While this recipe doesn’t require an extended chill time like some cookie doughs do, allowing your batter to rest for just a few minutes after mixing helps the flavors meld together beautifully. Plus, if you let it sit while preheating your oven, you’ll ensure a more even bake and better texture in your blondies.
❄️ Can I freeze these blondies?
Absolutely! To freeze Cinnamon Roll Blondies, first allow them to cool completely after baking. Then cut them into squares and place them in a single layer on a parchment-lined baking sheet. Freeze until solid (about 2 hours), then transfer to an airtight container or freezer bag for up to 3 months. When you’re ready to enjoy them, just thaw in the fridge overnight or at room temperature for a couple of hours — reheat briefly in the microwave for that fresh-out-of-the-oven feel!
🌾 Can I make these blondies gluten-free?
Yes, you can! To make gluten-free Cinnamon Roll Blondies, substitute regular all-purpose flour with a gluten-free all-purpose blend that contains xanthan gum—this will help achieve the right texture. I’ve tested it successfully with brands like Bob’s Red Mill or King Arthur Flour. Just keep in mind that results may vary slightly depending on the specific blend you use; sometimes they might turn out a bit denser but still delicious!
🥄 Can I reduce the sugar or substitute it with sweeteners?
Nope, you cannot reduce the sugar in this recipe without affecting the overall structure and texture of the blondies — trust me, I tested this many times! The brown sugar is crucial for moisture and chewiness. However, if you’re looking to use alternatives for dietary reasons, consider using coconut sugar as a one-to-one substitute for brown sugar; it adds a nice caramel flavor without compromising too much on texture!
🔄 Can I add nuts or chocolate chips?
Definitely! Feel free to customize your Cinnamon Roll Blondies by adding about 1 cup of semi-sweet chocolate chips or chopped nuts like pecans or walnuts into the batter before baking. This will add delightful texture and richness. Just make sure not to overmix when folding these extras in; we want those lovely swirls of cinnamon bliss to shine through!
🤔 Why do we swirl instead of mix thoroughly?
Swirling helps create those beautiful ribbons of cinnamon throughout your blondies while retaining some distinct layers of batter. If you mix thoroughly instead of swirling gently with a knife, you’ll end up with a uniform color rather than those gorgeous swirls that mimic classic cinnamon rolls! Trust me; it’s all about that visual appeal and burst of flavor in every bite!
Troubleshooting
I will continue to add more to this Troubleshooting section as I start seeing questions coming through from people who have made the recipe.
Troubleshooting tips
“My blondies came out too dry! 😭”
- You may have overbaked them. Baking for too long can cause moisture loss, making the blondies dry instead of soft and chewy.
- Another cause could be using too much flour. If you packed your flour or mismeasured, it can lead to dense, dry blondies.
- I bet they were still YUM though!
“My cinnamon roll blondies are way too thick!”
- This might happen if you didn’t spread the batter evenly in the pan. A thicker layer will result in a longer baking time and a denser texture.
- Additionally, if you added too much flour, it can also contribute to a thicker consistency. Make sure to spoon and level your flour for accurate measuring!
- I bet they were still YUM though!
“My blondies are super flat! 😩”
- If your butter was melted but too hot when mixed with sugars, it could cause the batter to spread too much in the oven.
- You might not have incorporated enough air into the batter while mixing; whisking until just combined is key for some lift!
- I bet they were still YUM though!
“The tops of my blondies cracked and look uneven! 😬”
- If you mixed the batter too vigorously after adding the dry ingredients, it could develop gluten, leading to cracks on top while baking.
- Alternatively, if your oven temperature was too high, it can cause rapid rising and subsequent cracking. Always use an oven thermometer for accuracy!
- I bet they were still YUM though!