Moist Strawberry Bread (One Bowl)
There’s something truly magical about the first bite of warm, freshly baked bread, especially when it’s infused with the sweetness of ripe strawberries. The moment you slice into this Moist Strawberry Bread (One Bowl), you’re greeted by a vibrant burst of color and an intoxicating aroma that fills your kitchen, wrapping around you like a cozy hug. This recipe isn’t just about the ingredients; it’s an experience that bridges childhood memories of summer picnics with the simple joy of baking at home. Each slice is a symphony of flavors, where the moistness of the bread meets the natural sweetness of fresh strawberries, creating a delightful treat that’s perfect for breakfast or dessert. I promise you, once you try this recipe, it will become a beloved staple in your home.
What makes this Moist Strawberry Bread (One Bowl) so special isn’t just its enticing flavor but also how approachable and forgiving it is. You can whip it up in one bowl—yes, you heard me right! No complicated steps or extensive cleanup here—just pure joy. Perfect for sharing with friends or savoring on a quiet afternoon with a cup of tea, this bread captures that quintessential essence of comfort food. And let’s not forget about the gorgeous strawberry glaze that crowns each slice; it’s like the cherry on top! This recipe beautifully melds tradition with innovation, making it suitable for any occasion, whether you’re celebrating spring’s arrival or simply indulging on a Wednesday afternoon.
Ingredients:
As we embark on this delightful culinary journey together, let’s explore each ingredient that plays a crucial role in crafting this lovely Moist Strawberry Bread (One Bowl). Each component not only adds flavor but also contributes to the overall texture and richness of our creation.
-
3/4 cup Granulated sugar. Sugar is more than just sweetness; it acts as a tenderizer in our bread, creating that wonderfully moist crumb we adore. It caramelizes during baking, adding depth to both flavor and color. When selecting sugar, opt for granulated white sugar for its purity and consistent results. If you’re looking to experiment with natural sweeteners, note that they may alter the moisture balance slightly.
-
1 Egg. The egg is an essential building block in our recipe—it provides structure and stability while also enriching the flavor. It works in harmony with other ingredients to create that perfect rise and tenderness in your loaf. Always use room-temperature eggs; they incorporate more easily into your batter and help create an even texture throughout.
-
1/3 tsp Kosher salt. Salt may seem minor, but it’s absolutely paramount for enhancing all those beautiful flavors at play here! It balances sweetness and elevates the overall taste profile of your bread. Kosher salt is preferred for its coarse grains, which dissolve well without overwhelming; however, if you’re using table salt, be mindful to reduce the quantity slightly.
-
2 tsp Vanilla extract. Ahh, vanilla—the liquid gold of baking! Its aromatic qualities are transformative; they add warmth and depth to our Strawberry Bread that ties all other flavors together beautifully. Choose high-quality pure vanilla extract over imitation for the best results; it truly makes all the difference.
-
1/2 cup Vegetable oil. This ingredient keeps our bread moist and tender while allowing it to rise beautifully without becoming greasy or heavy. Vegetable oil has a neutral flavor profile which means it won’t compete with our star ingredient—those luscious strawberries! If you’re looking for alternatives due to dietary preferences or allergies, melted coconut oil or applesauce could work wonders.
-
1 tsp Lemon zest. Zest is where all those fragrant oils reside! Adding lemon zest brightens up our loaf and enhances the strawberry flavor—a little acidity goes a long way in balancing sweetness and providing complexity to every bite.
-
3/4 cup Milk. Milk hydrates our dry ingredients while contributing richness to the batter. For extra flavor and creaminess, whole milk is ideal; however, if you’re looking for dairy-free options, unsweetened almond milk or oat milk can seamlessly replace it without sacrificing taste.
-
1/3 tsp Cinnamon. This warm spice brings warmth and nostalgia; it complements strawberries beautifully while adding depth to the overall flavor profile of our bread. Just remember: don’t overdo it! A hint is what we want here—enough to enhance but not overpower.
-
2 cups Flour. Flour serves as the backbone of our bread—it gives structure while allowing those glorious strawberries to shine through without sinking completely during baking. All-purpose flour works best here; however, if you’re gluten-sensitive or seeking healthier options, consider using a gluten-free blend designed for baking.
-
2 tsp Baking powder. This leavening agent is responsible for making our bread rise beautifully! It reacts with liquids in our mixture to produce carbon dioxide bubbles that lift our batter as it bakes—creating that light texture we crave when biting into this delicious loaf!
-
2 cups Strawberries (chopped). Fresh strawberries are undoubtedly the star of this show! Their natural sweetness and vibrant color elevate this simple loaf into something truly extraordinary. Make sure to choose ripe berries—flavorful and juicy—as they will infuse every bite with summer goodness!
-
1/3 cup Strawberries (for topping). These chopped beauties are optional but highly recommended as they create an enchanting presentation atop your loaf before baking—who doesn’t love a picturesque finish? Plus, they bake down wonderfully into their own tangy-sweet gems within each slice!
-
1 1/2 cups Powdered sugar. For our glaze, powdered sugar provides that silky-smooth finish everyone loves! It dissolves quickly when mixed with liquid components like milk or vanilla extract—creating an irresistible topping that’s both visually appealing and deliciously sweet.
-
1/2 tsp Vanilla extract (for glaze). Just like before, vanilla enriches our glaze by adding layers of warmth beneath its sugary surface—it’s non-negotiable!
-
1-2 tbsp Milk (for glaze): The key here is adjusting consistency! Starting with less milk allows us control over thickness—we want something pourable yet thick enough to coat without running off entirely!
Equipment You’ll Need:
Before we dive into making this scrumptious Moist Strawberry Bread (One Bowl), let’s ensure you have everything ready at hand because having the right tools makes all the difference in creating something wonderful together! While these items aren’t ingredients, they are essential partners in ensuring success throughout each step.
-
9 by 5-inch loaf pan – This size is ideal for achieving an even bake while creating perfectly shaped slices—a must-have tool for any bread lover’s kitchen! If you don’t have one on hand yet? No problem—a round cake pan can work too—but keep an eye on bake time since shapes affect cooking duration!
-
Parchment paper – A true lifesaver when it comes to ease of removal after baking! Line your loaf pan with parchment so there’s no wrestling match involved later—it creates less friction against crusty edges allowing effortless lifting out once cooled down!
-
Large mixing bowl – Opt for one spacious enough to accommodate whisking ingredients vigorously without spilling everywhere—that’s crucial here since we’re working within just one bowl throughout all steps!
-
Whisk – A sturdy whisk will help combine wet ingredients effortlessly—it aerates them beautifully resulting in lighter textures upon mixing dry elements afterward! Look for one that’s comfortable in hand so whisking feels enjoyable rather than laborious!
Now that we’ve gathered our ingredients and equipment together let’s create some magic through cooking—the next step brings us closer than ever before!
Preparing the Moist Strawberry Bread (One Bowl)
Step 1: Preheat & Prepare
First things first—let’s get our oven preheated so it’s hot and ready when we need it most! Set your oven temperature to 180°C (350°F) while you prepare your loaf pan by lining it generously with parchment paper along both bottom edges as well as up two sides—that way removing your lovely creation afterwards becomes second nature rather than frustration-inducing gymnastics later down line! When you’ve got everything prepped nicely ahead-of-time like this? It feels oh-so-rewarding knowing everything’s set up perfectly before diving headfirst into mixing bliss!
Step 2: Combine Wet Ingredients
In your large mixing bowl—a vessel filled not only with ingredients but also potential joy—add together vegetable oil along with egg followed closely behind by lemon zest granulated sugar milk plus vanilla extract too! Whisk these until combined thoroughly; aim for smoothness rather than lumps since having uniformity yields better integration later on when dry elements join forces within same bowl too—all those delightful flavors will meld harmoniously thanks largely due diligence put forth now during initial stages rather than rushing past them haphazardly!
Step 3: Incorporate Dry Ingredients
Next up comes adding flour kosher salt baking powder cinnamon directly atop wet mixture already waiting patiently below—it might seem daunting at first glance but trust me when I say simplicity reigns supreme here because combining everything gently ensures no overmixing occurs which can lead toward denser loaves instead fluffy ones full air pockets giving rise upon baking process happening shortly thereafter once heat envelops every corner evenly throughout entire surface area alike creating delightful golden crusts surrounding soft interiors bursting fresh fruit accents waiting patiently inside!
Step 4: Add Strawberries
Now comes arguably my favorite part—the moment where fresh strawberries enter stage left ready play starring roles amidst all flavors dancing around today’s performance—they bring such vibrancy life deepen connections amongst other components existing already within batter blending seamlessly yielding richness unparalleled anywhere else found previously elsewhere outside culinary realms embraced wholeheartedly today onward forth from here onwards forward together united forevermore forevermore amidst laughter shared amongst friends family members alike gathered round table enjoying homemade treats couldn’t ask anything more fulfilling life rewarding experience truly worth celebrating time again whenever strawberries beckon calling forth sweet memories past present future waiting eagerly next adventures await ahead…
Stay tuned because there’s so much more deliciousness coming up as we continue crafting this beautiful Moist Strawberry Bread (One Bowl)!
Step 5: Pouring Your Beautiful Batter
Now that you have a wonderfully mixed batter, it’s time for the crucial step of pouring it into your prepared loaf pan. This is where the magic begins! Carefully take your mixing bowl and use a spatula to scrape down the sides, ensuring that every last bit of that luscious mixture finds its way into the pan. Trust me, those little bits are packed with flavor and moisture, and you wouldn’t want to waste any of that potential! As you pour the batter into the 9 by 5-inch loaf pan lined with parchment paper, spread it evenly with an offset spatula or a simple butter knife. This ensures that your bread bakes uniformly.
Don’t rush this step; take a moment to admire the vibrant flecks of strawberry peeking through the creamy batter. It’s like a promise of what’s to come! Before sliding it into the oven, sprinkle some extra chopped strawberries on top—this not only adds a beautiful aesthetic but also gives your bread an even more intense strawberry flavor right from the first bite. The visual appeal is absolutely paramount here; those bright red pieces will caramelize slightly as they bake, adding both texture and sweetness.
Step 6: Baking to Perfection
With your batter safely in the oven, it’s time for patience—an ingredient often overlooked but utterly essential in baking! Set your timer for about 60 minutes, but keep an eye on it as every oven has its own personality. You’ll know it’s almost done when your kitchen starts to fill with an intoxicating aroma; it’s a mix of warm vanilla and fresh strawberries that will make anyone nearby swoon with anticipation. When you insert a toothpick into the center of the loaf after about 50 minutes and it comes out clean (or with just a few moist crumbs), you’ll know your bread is ready to be taken out.
But why wait until then? It’s important not to open that oven door too early! Every time you peek, you let heat escape, which can lead to uneven baking or sinking in the middle—what we call “the dreaded loaf collapse.” So trust me on this one: resist the urge! Once that toothpick test passes, carefully remove your loaf from the oven and place it on a wire rack to cool slightly before transferring it to room temperature. This cooling phase is crucial because it allows all those lovely flavors and textures to settle beautifully.
Step 7: The Art of Glazing
While your strawberry bread cools down to room temperature (and trust me; this is one step you don’t want to skip), let’s talk glaze! A glaze can elevate any baked good from delightful to downright extraordinary, and this one is no exception. In a clean mixing bowl, combine 1½ cups of powdered sugar with ½ teaspoon of vanilla extract and start adding milk slowly—about one tablespoon at a time—until you achieve that perfect drizzling consistency. You’re looking for something smooth yet thick enough to cling delightfully to each slice without running off entirely.
The beauty of this glaze lies in its simplicity; it ties everything together while enhancing those sweet strawberry notes without overwhelming them. Remember, even though powdered sugar seems quite sweet on its own, when combined with tart strawberries in our bread, it creates an incredible balance that’s truly harmonious! I recommend letting your glaze sit for about ten minutes after mixing; this resting period allows air bubbles to escape so you’ll have a perfectly silky finish when you’re ready to drizzle.
Step 8: The Grand Finale – Drizzling Your Creation
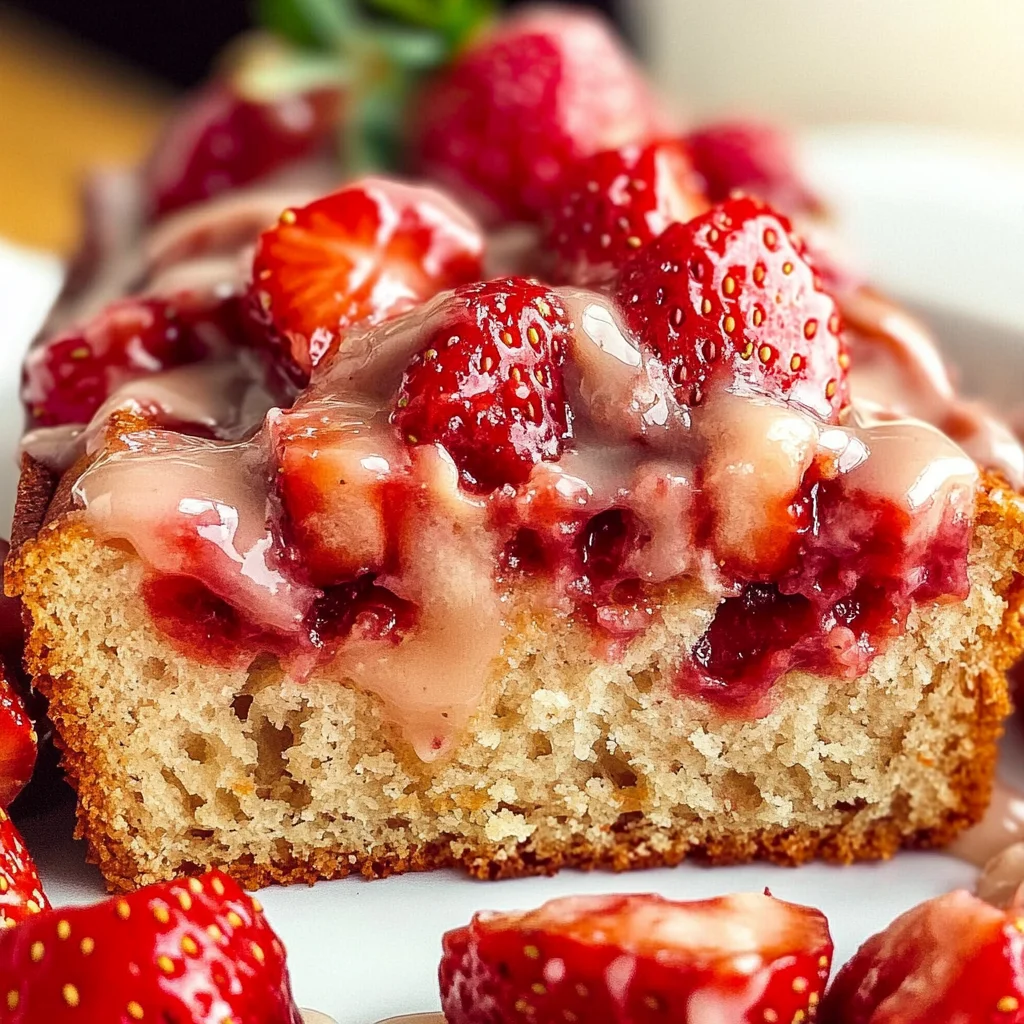
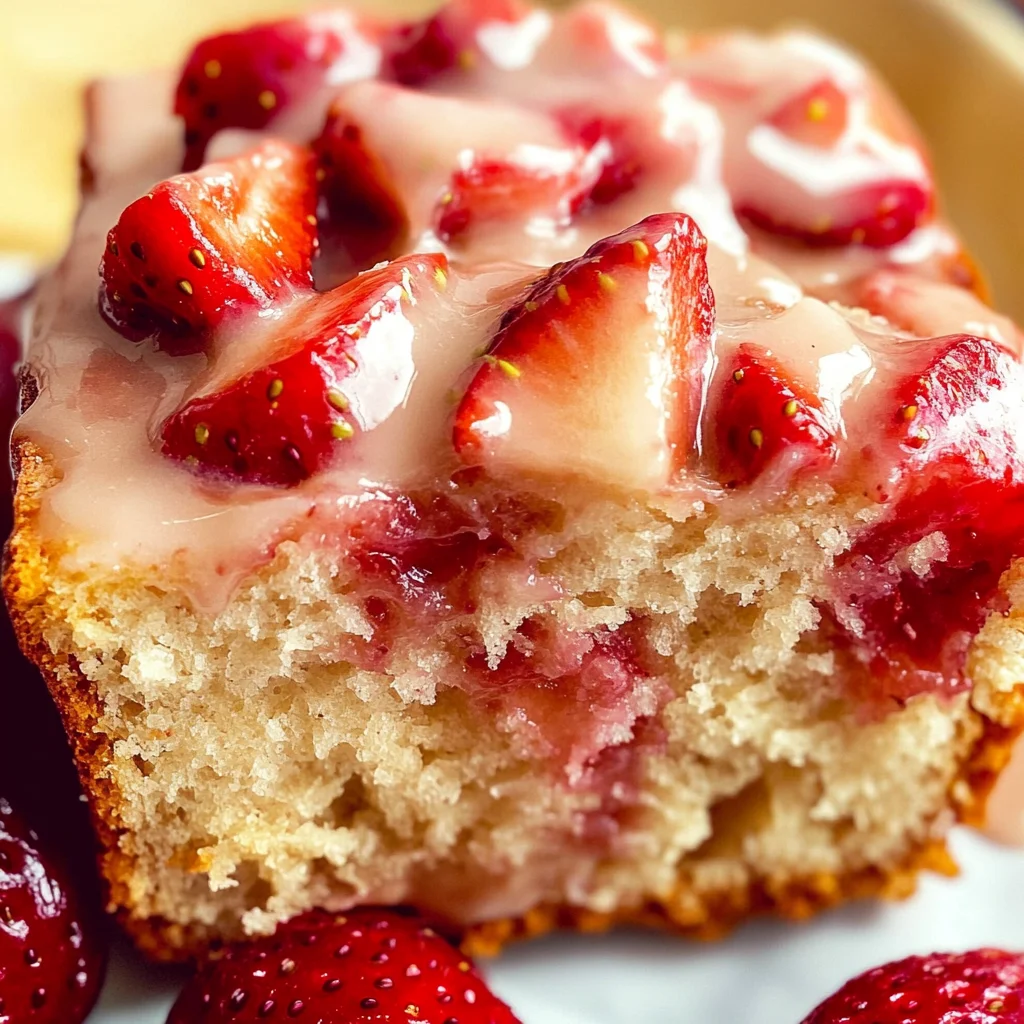
Once your strawberry bread has completely cooled (and I cannot stress enough how important this is—allowing it time ensures that all those beautiful flavors meld together), it’s time for the grand finale: drizzling on that glorious glaze! Using either a spoon or piping bag (if you’re feeling fancy), start at one end of the loaf and allow the glaze to cascade down like liquid gold over each slice waiting below. And oh—the sight alone is enough to make hearts flutter!
As you drizzle, watch as each layer absorbs some of that sweet glaze, making each slice look like an art piece crafted with love. Don’t be afraid if some excess glaze pools around; think of it as extra deliciousness waiting for someone brave enough to dive in! Now take a moment—just breathe in that intoxicating scent—and allow yourself to feel proud because you’ve just created something truly special from scratch.
Final Touches
Your Moist Strawberry Bread (One Bowl) is now complete—a true labor of love filled with freshness and joy! Slice yourself a piece and watch as those vibrant strawberries glisten under their sugary veil. Each bite is like indulging in summer itself—a symphony of flavors dancing on your palate while delivering profound satisfaction in every morsel. Whether served warm for breakfast or as an afternoon treat paired with tea or coffee, I promise you this recipe will become an instant favorite among friends and family alike.
So go ahead and share this delightful creation with others—or keep it all for yourself (no judgment here!). Whatever you choose, remember each slice carries not just ingredients but heartfelt moments waiting to be savored together. Happy baking!
Storage and Enjoyment Tips for Your Moist Strawberry Bread (One Bowl)
Now that your kitchen is filled with the intoxicating scent of fresh-baked strawberry bread, it’s time to talk about how to revel in every last slice! Whether you’re enjoying this masterpiece warm from the oven or saving some for later, I’ve got you covered with all the tips you need to keep that heavenly moisture and flavor intact. Trust me, there’s nothing quite like indulging in a piece of this delightful bread, especially when you know how to store it properly so it stays just as moist and delicious as the day you baked it.
Storing Leftover Moist Strawberry Bread (One Bowl)
To ensure that your Moist Strawberry Bread (One Bowl) remains a treat for days to come, start by wrapping it in plastic wrap or placing it in an airtight container. This is crucial! Keeping out air is what helps maintain that tender crumb and luscious taste that makes your bread so irresistible. You can store it at room temperature for about 3-4 days, and if you’re lucky enough to have leftovers beyond that, pop it in the fridge where it can last up to a week. However, I promise you—this bread rarely lasts long! One little trick I’ve learned is to place a slice of bread inside the container with your loaf; not only does this help retain moisture, but it also keeps things soft and fluffy. And don’t worry too much if you do find yourself needing to store some; while the flavors might mellow slightly over time, I assure you they will still be utterly delightful when enjoyed fresh!
Freezing Moist Strawberry Bread (One Bowl) for Later
If you want to take your preservation game up a notch, freezing is an excellent option for keeping your Moist Strawberry Bread (One Bowl) ready at a moment’s notice. Cut the loaf into slices before freezing; this way, you can easily grab just what you need without thawing the entire loaf. Wrap each slice tightly in plastic wrap and then place them into a freezer-safe bag or container. Trust me on this: doing so will keep your slices fresh for up to three months! When you’re ready to indulge again, simply take out your desired number of slices and let them thaw at room temperature or pop them into the toaster or microwave for a quick warm-up. The convenience of having homemade strawberry goodness stashed away in your freezer is absolutely wonderful; it’s like having a little surprise waiting for you on those busy mornings or lazy afternoons.