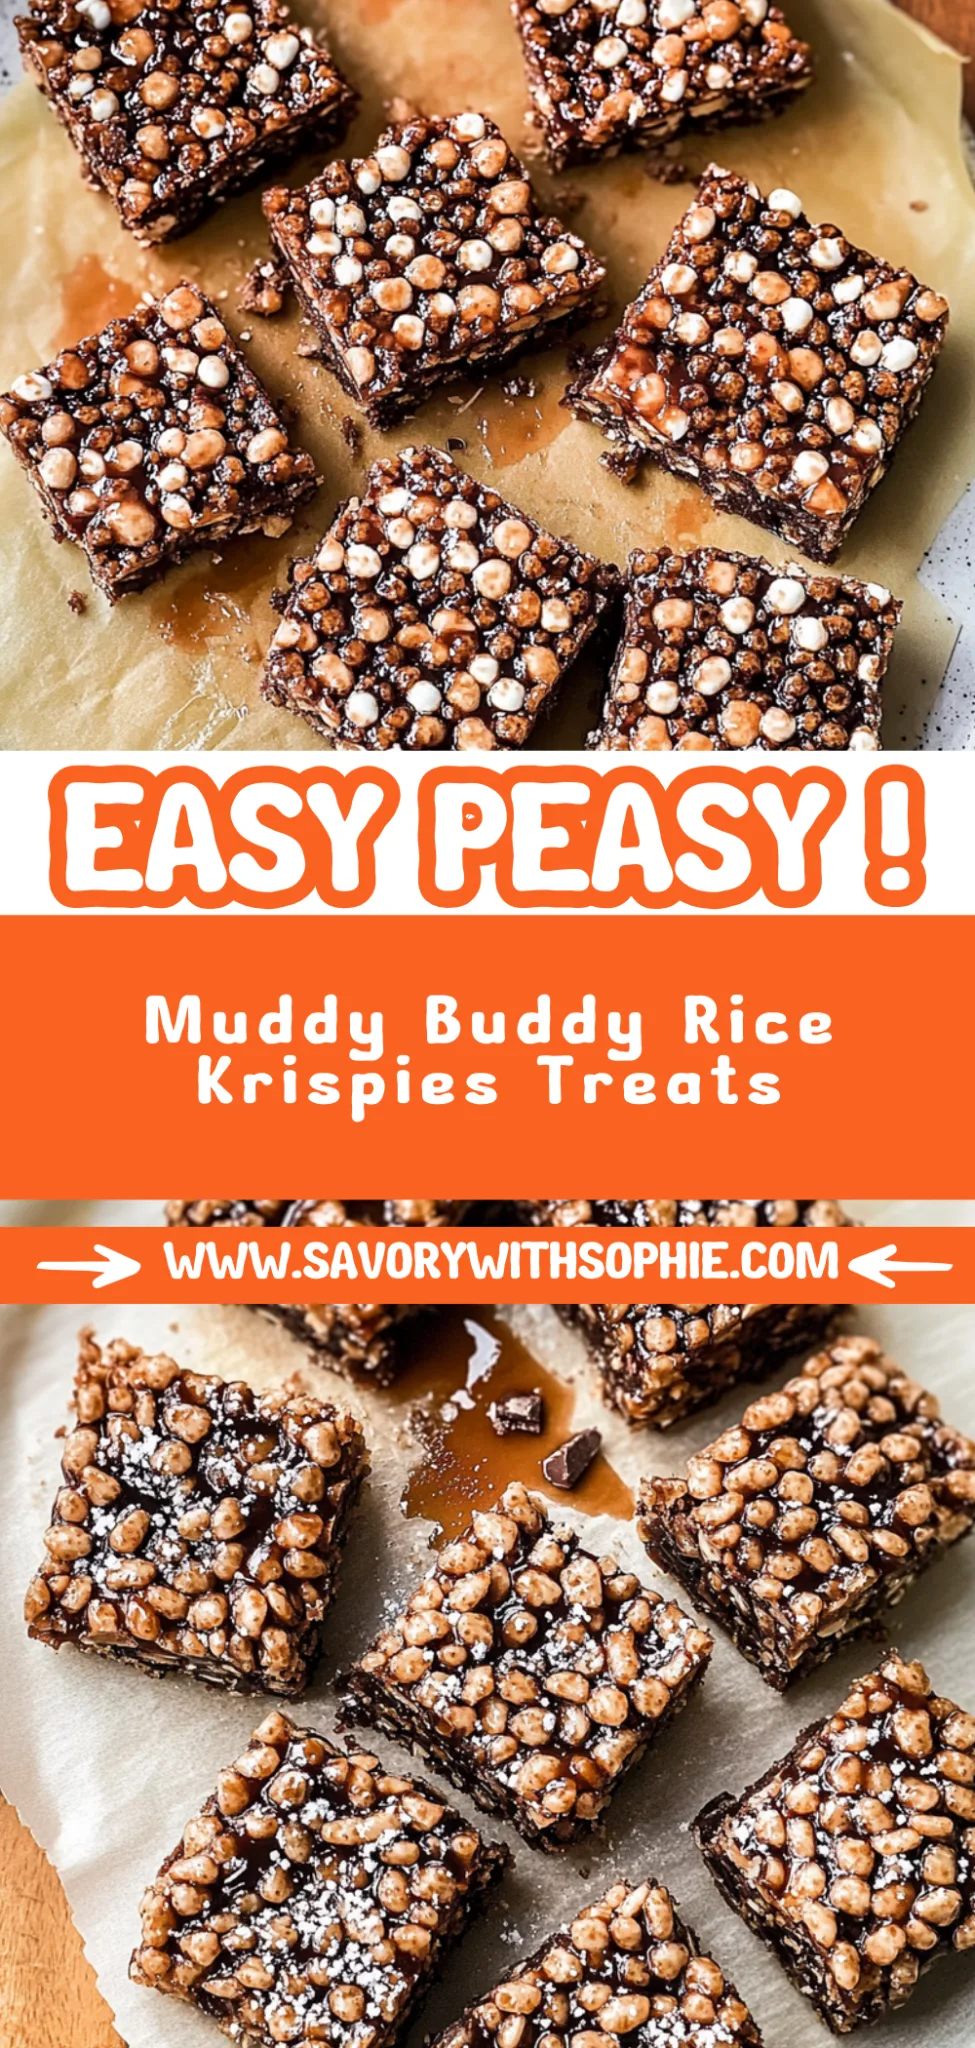
Muddy Buddy Rice Krispies: A Sweet Sensation You Need!
I first stumbled upon the idea of Muddy Buddy Rice Krispies while browsing through a charming little café that had an impressive selection of sweet treats. The moment I took a bite of their version, I was hooked—the combination of crispy Rice Krispies, rich chocolate, and creamy peanut butter coated in a generous dusting of powdered sugar sent my taste buds into overdrive! It struck me then that I had to recreate this at home, not only because it would save me some cash but also because I wanted to make it even better. After all, who doesn’t love a good no-bake treat that’s as easy on the wallet as it is on the palate?
Let me tell you, perfecting this recipe was quite the journey! I think I made at least five different attempts—some batches were too dry, others too gooey, and let’s not even talk about the time I accidentally used unsweetened cocoa powder (yikes!). Each time, I was on a mission to strike the right balance of crunchiness and flavor. With every trial, I learned something new about how the ingredients worked together until finally, after what felt like an eternity in my kitchen lab (also known as my tiny apartment), I nailed it.
And oh boy, was it worth every minute! The final result is a delightful blend of textures—the crispness of the Rice Krispies, the lusciousness of the chocolate and peanut butter, all enveloped in that heavenly powdered sugar coating. Each bite is a symphony of flavors that dances on your tongue, making it hard to stop at just one piece (or three… or maybe five). Trust me when I say you’re going to want to make these Muddy Buddy Rice Krispies ASAP—they’re not just a snack; they’re an experience! Happy snacking!
These Muddy Buddy Rice Krispies are….
….the ultimate no-bake treat that will have you reaching for seconds!
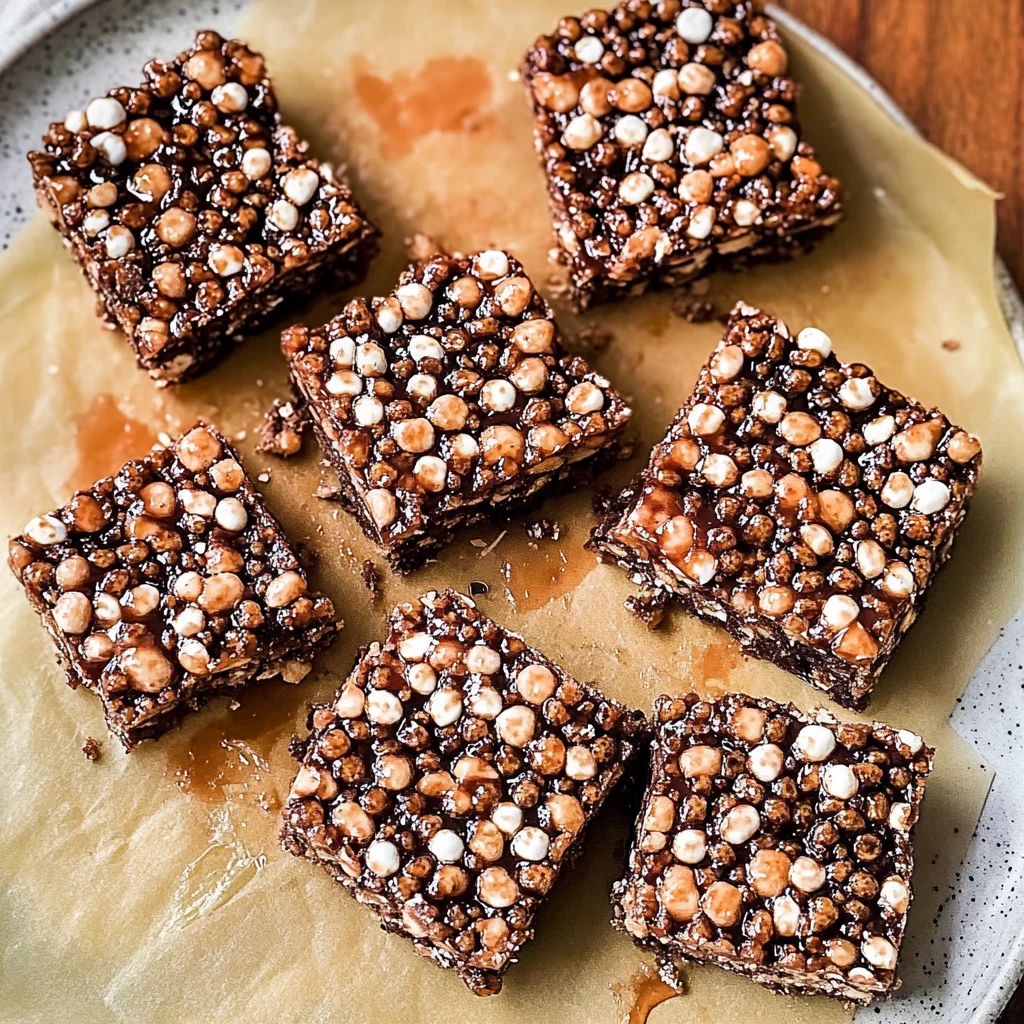
1. They deliver an irresistible chocolate-peanut butter flavor that hits all the right notes. The combination of semi-sweet chocolate chips and creamy peanut butter creates a rich, decadent taste experience that is both nostalgic and indulgent, making these treats a favorite for kids and adults alike.
2. Their crunchy yet chewy texture offers a satisfying eating experience. With 6 cups of Rice Krispies at the base, you get that perfect balance of crispy crunch from the cereal combined with the gooeyness of the melted chocolate and peanut butter mixture, ensuring each bite is delightfully varied.
3. A key no-bake technique makes this recipe simple and quick, allowing anyone to whip up these delights in no time. By melting together chocolate, peanut butter, and butter, you create a smooth, cohesive mixture that perfectly coats each Rice Krispie without requiring an oven—ideal for hot days or a last-minute dessert!
4. They provide incredible value as a homemade snack that’s both cost-effective and easy to assemble. Using pantry staples like Rice Krispies and chocolate chips means you can whip up these Muddy Buddy Rice Krispies anytime without breaking the bank, plus they store well for days—perfect for snacking throughout the week.
PS These treats yield about 24 delightful squares, making them great for sharing (or not!). Just be ready to keep your hands clean because they’re seriously addictive!
Ingredients for the Muddy Buddy Rice Krispies
Each ingredient in this dish plays an essential role in flavor and texture. Here’s what you’ll need:
6 cups Rice Krispies: Provides a delightful crunch that forms the base of this treat.
1 cup semi-sweet chocolate chips: Adds rich chocolate flavor that binds everything together.
1/2 cup creamy peanut butter: Contributes a smooth, nutty taste that enhances the overall sweetness.
1/4 cup unsalted butter: Ensures a silky texture and helps to melt the chocolate mixture smoothly.
- 1 cup powdered sugar: Coats the treats with a sweet finish, creating that iconic muddy appearance.
You Must Melt the Chocolate Mixture Properly. No Skipping This Step!
I’ll admit it—I tried to rush through this crucial step of melting the chocolate mixture, thinking I could just throw everything in the microwave and hope for the best. Spoiler alert: I was wrong! The result was a sticky mess that clung to the Rice Krispies like a bad first date. So trust me when I say, take your time with this step; it’s essential.
Why is melting the chocolate mixture properly so important? Think of it like making a fantastic pizza: if the cheese isn’t melted well, you end up with clumps that don’t adhere to the crust. In our case, if you don’t get that chocolate-peanut butter-butter mix perfectly smooth and blended, your Rice Krispies won’t get coated evenly, leading to dry patches and an uneven crunch in your Muddy Buddies.
What does properly melting the chocolate mixture do?
- Flavour enhancement — When melted smoothly, the chocolate and peanut butter blend seamlessly, creating a rich flavor profile that hugs each Rice Krispie.
- Texture improvement — A properly melted mixture results in a creamy coating that envelops the cereal perfectly, preventing any grainy or chalky bits.
- Even coating — Smooth melting ensures every Rice Krispie gets an even layer of chocolate, leading to that signature Muddy Buddy crunch without any naked cereal.
- Better adhesion — When melted thoroughly, the mixture sticks better to the Rice Krispies, ensuring every bite is deliciously coated rather than having some rogue pieces slipping through.
- Visual appeal — A glossy finish from a well-melted mixture means your Muddy Buddies will look more appetizing and inviting on display.
Different melting times
- 15 seconds (fair) — Some chocolate chips may still be solid; not enough time for a smooth texture.
- 30 seconds (good) — The mixture starts to melt but may require more stirring; results in some lumps.
- 45 seconds (very good) — Most chips are melted but might need a bit more stirring for full incorporation.
- 60 seconds (⭐️ perfect ⭐️) — The chocolate mixture is fully melted and silky smooth, ensuring an excellent coating for your Muddy Buddies.
Don’t let impatience get the best of you! The most common mistake is rushing through this melting process and ending up with clumpy chocolate. Take those extra few seconds—your Muddy Buddies will thank you!
How to make Muddy Buddy Rice Krispies
Are you ready to see how straightforward it is to make the Muddy Buddy Rice Krispies of your dreams??
1. PREPARE THE CHOCOLATE MIXTURE
Let’s start with that luscious chocolate mixture that brings everything together!
1. COMBINE – In a microwave-safe bowl, combine the semi-sweet chocolate chips, creamy peanut butter, and unsalted butter. Microwave in 30-second intervals, stirring in between each interval until everything is melted and smooth. This method prevents overheating, allowing you to achieve a silky texture without burning the chocolate.
2. STIR – Once melted, give the mixture a good stir until fully combined and smooth. This ensures that the peanut butter and butter blend seamlessly with the chocolate for maximum flavor.
HANDY TIPS
- Use high-quality semi-sweet chocolate chips for a richer taste.
- If you prefer a touch of saltiness, consider using salted butter instead of unsalted!
2. COMBINE WITH RICE KRISPIES
Now it’s time to mix in those delightful Rice Krispies for that signature crunch!
3. ADD – In a large mixing bowl, add the 6 cups of Rice Krispies cereal. Pour the melted chocolate mixture over the cereal and stir gently but thoroughly until all the cereal is evenly coated. This step is crucial—make sure every piece gets its fair share of that gooey goodness!
HANDY TIPS
- For an extra crunch, let the Rice Krispies sit for a minute before adding the chocolate mixture.
- If you want to add some fun textures, consider folding in some mini marshmallows or chopped nuts at this stage!
3. COAT WITH POWDERED SUGAR
Sweeten that crunchy goodness with a snowy dusting of powdered sugar!
4. TRANSFERRING – Transfer the coated cereal mixture onto a baking sheet lined with parchment paper. Sprinkle 1 cup of powdered sugar over the mixture and gently toss it to coat evenly. This not only adds sweetness but also helps prevent sticking!
HANDY TIPS
- If you want a more uniform coating, place the mixture in a large zip-top bag with powdered sugar and shake it up!
- Adjust the amount of powdered sugar based on your sweetness preference—feel free to use more or less as desired.
4. SET AND SERVE
The final step before indulging in these tasty treats!
5. LET SET – Allow your Muddy Buddies to sit for about 10 minutes to set properly. Once set, break into pieces and serve them up! You’ll love how they come together into perfectly snackable bites.
Make these once, and I wager they will invade your dreams every night too! – Nagi x
FAQ – Muddy Buddy Rice Krispies
🥄 How long will these treats keep?
Muddy Buddy Rice Krispies can last up to a week when stored properly. After day 1, they remain about 97% as good, with a gradual decline in texture due to exposure to air. To maintain their crunchiness, store them in an airtight container at room temperature. Avoid refrigeration, as this can make them soggy. If you notice any moisture or if they start to clump together, it’s time to say goodbye!
⏳ Do I need to let the mixture set before serving?
Yes, you really do need to let the Muddy Buddies set for about 10 minutes after coating them with powdered sugar. This allows the chocolate mixture to firm up slightly, making it easier to break into pieces without creating a melty mess. Trust me; skipping this step will leave you with sticky fingers and a less enjoyable snacking experience!
❄️ Can I freeze Muddy Buddy Rice Krispies?
Absolutely! You can freeze these treats for up to 2 months. To do so, place them in an airtight container or freezer bag, ensuring as much air as possible is removed. When you’re ready to enjoy them again, simply thaw at room temperature for about 30 minutes. However, be aware that freezing might affect their crunchiness a bit—though they’ll still taste delicious!
🌾 Are these treats gluten-free?
Yes! Muddy Buddy Rice Krispies can easily be made gluten-free by using gluten-free Rice Krispies cereal. Just check the label on your cereal box to ensure it meets your dietary needs. The rest of the ingredients—chocolate chips, peanut butter, and butter—are generally gluten-free too, but it’s always good practice to verify that there are no hidden gluten sources.
🥜 Can I substitute the creamy peanut butter?
Yes, you can absolutely substitute creamy peanut butter with other nut butters like almond or cashew butter for a different flavor profile. Just ensure that whatever nut butter you choose has a similar consistency; otherwise, it may affect the melting process and texture of your Muddy Buddies. If you’re looking for an allergy-friendly option, sunflower seed butter works well too!
🔍 Why do I need to microwave in intervals when melting chocolate?
Microwaving chocolate in short intervals prevents it from burning or seizing up—a common mistake many make! By microwaving in 30-second bursts and stirring between each interval, you allow the heat to distribute evenly across the chocolate chips and peanut butter mixture. This technique results in a smooth and creamy blend without any graininess or lumps.
🍫 Can I add extra mix-ins or flavors?
Definitely! Feel free to get creative by adding mix-ins like mini marshmallows, chopped nuts, or even some crushed pretzels for an added crunch. If you’re feeling adventurous, consider drizzling melted white chocolate on top or mixing in some cocoa powder for a richer chocolate flavor. The possibilities are endless—just remember not to overdo it; balance is key!
Troubleshooting
I will continue to add more to this Troubleshooting section as I start seeing questions coming through from people who have made the recipe.
Troubleshooting tips
“My Muddy Buddies are too flat! 😩”
- You might not have added enough Rice Krispies. The recommended 6 cups help to give the mixture structure, so using less will result in a flatter snack.
- If you stirred the chocolate mixture too vigorously, it can break down the Rice Krispies and lead to a flatter texture. Gentle folding is key!
- I bet they were still YUM though!
“They turned out way too dry! 😨”
- This could happen if you overcooked the chocolate mixture during melting. Keep an eye on it and stop microwaving as soon as it’s smooth.
- Not enough peanut butter or butter can also contribute to dryness. Be sure to measure out 1/2 cup of peanut butter and 1/4 cup of unsalted butter for the best consistency.
- I bet they were still YUM though!
“My Muddy Buddies look pale and unappetizing! 😕”
- If your chocolate mixture didn’t melt properly, it may not have mixed well with the Rice Krispies, leading to a lighter color. Make sure to microwave in short bursts and stir until fully blended.
- Using white or milk chocolate instead of semi-sweet will also result in a paler appearance, so stick with those semi-sweet chips for that rich color!
- I bet they were still YUM though!
“The coating isn’t sticking properly! 🤔”
- You may have let the coated mixture sit too long before adding powdered sugar. The warm chocolate helps the sugar adhere, so aim to coat while it’s still slightly warm.
- If you used too much powdered sugar without tossing gently, it can create clumps that won’t stick well. A light hand when tossing is essential!
- I bet they were still YUM though!
Muddy Buddy Rice Krispies
Ingredients
Method
- In a microwave-safe bowl, combine the semi-sweet chocolate chips, creamy peanut butter, and unsalted butter. Microwave in 30-second intervals, stirring in between, until melted and smooth.
- Once melted, stir until fully combined and smooth.
- In a large mixing bowl, add the Rice Krispies. Pour the melted chocolate mixture over the cereal and stir until all the cereal is evenly coated.
- Transfer the coated cereal mixture onto a baking sheet lined with parchment paper. Sprinkle powdered sugar over the mixture and gently toss to coat evenly.
- Let the Muddy Buddies sit for about 10 minutes to set. Once set, break into pieces and serve.