Apple and Brie Stuffed Chicken: An Incredible Ultimate Re…
It all started one chilly autumn evening when I wandered into a quaint little bistro that had these incredible apple and brie stuffed chicken breasts on the menu. The combination of creamy brie and sweet, tart apples nestled within juicy chicken was nothing short of heavenly. After my first bite, I was hooked; it wasn’t just a meal, it was a cozy hug on a plate! However, with restaurant prices being what they are, I figured it was time to tackle this delicious dish at home—plus, I wanted to add my own twist to make it even better.
Let me tell you, perfecting my Apple and Brie Stuffed Chicken: An Incredible Ultimate Recipe was no walk in the park. I think I lost count after about five attempts—my kitchen looked like a war zone more often than not! Each try was an experiment in balancing the gooeyness of the brie with the crunch of the apples without having everything spill out onto the baking tray. Spoiler alert: there were more than a few moments where I wondered if I’d bitten off more than I could chew (pun intended), but each failure brought me closer to that “aha!” moment.
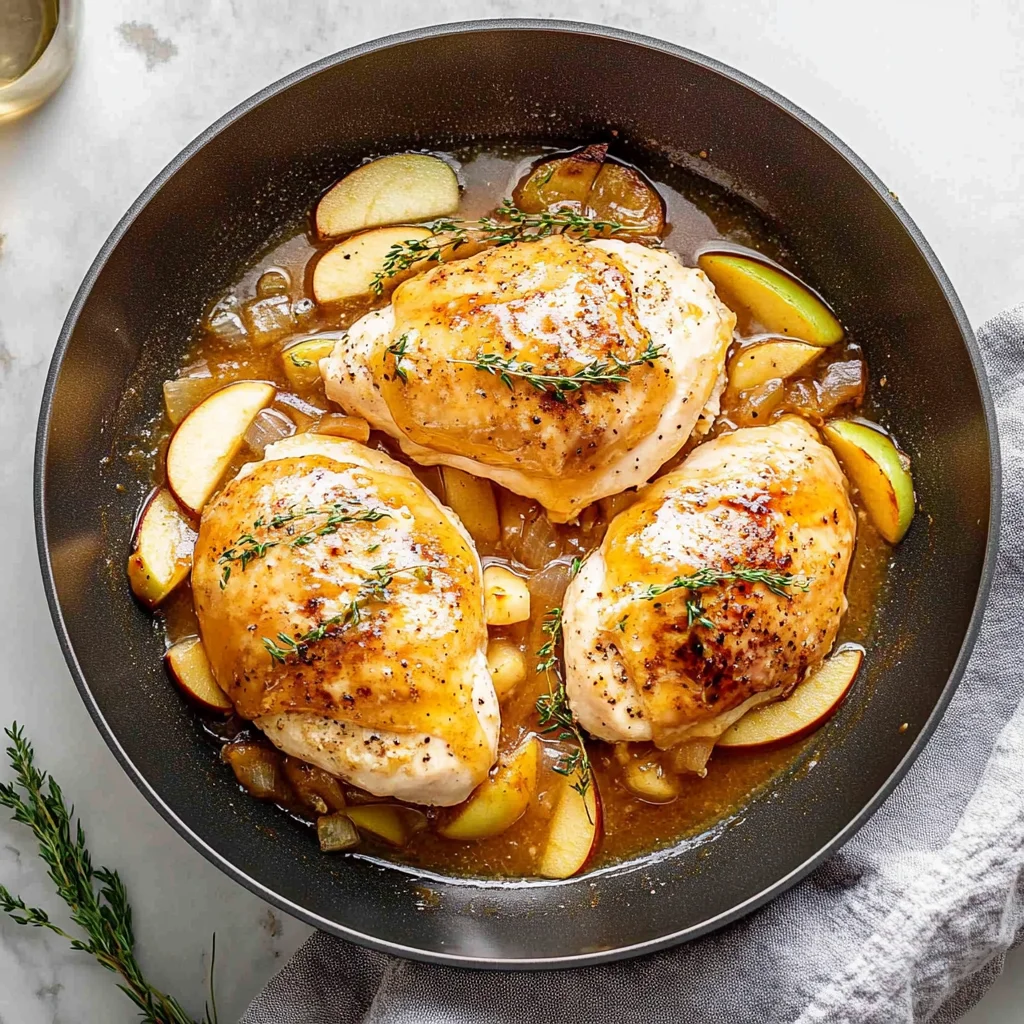
And boy, was it worth every messy minute! The final result is nothing short of spectacular—a golden-brown chicken breast bursting with rich creaminess and sweet apple goodness. It’s got a beautiful contrast of textures: crispy on the outside while being tender and juicy on the inside. The flavors dance together in such harmony that I can’t help but feel proud every time I serve it up. Trust me, you’re going to want to whip this up for your next dinner party or cozy night in; I can’t wait for you to experience this culinary delight!
These Apple and Brie Stuffed Chicken are….
….the ultimate showstopper for any dinner occasion!
1. They deliver a sweet and savory explosion of flavor that’s simply irresistible. The combination of creamy brie and tart Granny Smith apples creates a beautifully balanced filling that elevates the chicken to new heights, making each bite an adventure in taste.
2. Incredible juiciness – each chicken breast remains tender and moist throughout the baking process. By using boneless, skinless chicken breasts, I ensure that they absorb all the flavorful juices from the stuffing, resulting in a mouthwatering dish that’s bursting with flavor.
3. A game-changing technique is achieved with a simple but effective method of stuffing the chicken. By carefully slicing pockets into the breasts and securing them with toothpicks, I found this not only maximizes the filling but also keeps it from spilling out during cooking, ensuring you get every delicious morsel.
4. Exceptional value – this dish brings gourmet dining to your kitchen without breaking the bank. With just four chicken breasts and easily sourced ingredients like brie and apples, you can impress guests or family with a restaurant-quality meal at home for a fraction of the price.
PS These Apple and Brie Stuffed Chicken yield 4 generous servings, making them perfect for family dinners or meal prep for the week ahead!
Ingredients for the Apple and Brie Stuffed Chicken
Each ingredient in this dish plays an essential role in flavor and texture. Here’s what you’ll need:
4 pieces boneless, skinless chicken breasts: These provide a juicy and tender base for the stuffing.
1 cup brie cheese, cubed (rind removed): Offers a creamy richness that perfectly complements the apples.
1 cup apple, diced (preferably Granny Smith): Adds a sweet and tart crunch that balances the creaminess of the brie.
1 tablespoon fresh thyme (chopped): Infuses the dish with earthy herbal notes that elevate the overall flavor.
1 tablespoon honey: Brings a touch of natural sweetness to harmonize with the savory ingredients.
1 teaspoon salt: Enhances all the flavors, ensuring each bite is deliciously seasoned.
1 teaspoon black pepper: Adds a subtle warmth and depth to the dish.
1 tablespoon olive oil: Helps keep the chicken moist while contributing a rich flavor during baking.
You Must Pound the Chicken Breasts! No Shortcuts!
I know, I know—pounding chicken breasts sounds like an extra step that we could skip to save time. Believe me, I tried to find a shortcut! I thought maybe just slicing them or leaving them thick would do the trick, but I quickly learned that if you want juicy, perfectly cooked chicken with that creamy brie and sweet apple filling, you absolutely cannot skip this part.
Pounding the chicken to an even thickness isn’t just for aesthetics; it’s essential for cooking. Think of it like making pizza dough: if you don’t roll it out evenly, some parts will burn while others stay raw. Similarly, uneven chicken breasts lead to dry edges and undercooked centers. By pounding them out, you ensure they cook uniformly, resulting in a tender and juicy bite every time.
What does pounding the chicken do?
- Juiciness — Even thickness means the chicken cooks uniformly, preventing overcooking of thinner areas and ensuring maximum juiciness throughout.
- Tenderness — Pounding breaks down muscle fibers, which leads to a more tender texture that makes each bite melt in your mouth.
- Flavor absorption — Thinner pieces allow for better seasoning penetration, meaning every morsel is infused with flavor from the olive oil and spices.
- Presentation — A flat piece of chicken gives you a beautiful canvas for stuffing and allows for even browning in the oven, making your dish look as good as it tastes.
- Consistent cooking time — When all pieces are the same thickness, you can rely on accurate cooking times without worrying about some parts being undercooked.
Different pounding times
- No pounding (poor) — Chicken is unevenly cooked; dry on the edges and potentially raw inside. Not ideal!
- 1 minute per breast (fair) — Slightly better than no pounding but still uneven; some parts may be thicker than others.
- 2 minutes per breast (good) — Better consistency; most areas are even but may still have a few thicker spots.
- 3 minutes per breast (excellent) — Perfectly flattened chicken with even thickness throughout; ensures optimal juiciness and tenderness.
Don’t make the common mistake of skipping this step or rushing through it! If you don’t pound the chicken properly, you’re setting yourself up for disappointment with dry edges and a filling that just doesn’t shine as it should. Trust me—spend those extra minutes to get it right!
How to make Apple and Brie Stuffed Chicken

Are you ready to see how straightforward it is to make the Apple and Brie Stuffed Chicken of your dreams??
1. PREPARE THE CHICKEN
First things first, let’s get our chicken ready for its delicious transformation!
1. Preheat – Preheat the oven to 375°F (190°C). This temperature is perfect for baking the chicken evenly and ensuring it remains juicy inside while developing a lovely golden exterior.
2. Pound – Using a meat mallet, gently pound the chicken breasts to an even thickness. This helps the chicken cook uniformly, reducing the risk of dry spots and ensuring that every bite is tender and juicy.
HANDY TIPS
- If you don’t have a meat mallet, a rolling pin or even a heavy pan can work in a pinch!
- Aim for about ½ inch thickness; this will help with even cooking.
2. MAKE THE FILLING
Now, let’s whip up that delectable stuffing that will elevate our chicken!
3. Combine – In a bowl, combine the brie cheese, diced apple, chopped thyme, and honey. Mixing these sweet and savory ingredients together creates a creamy filling that perfectly complements the chicken’s flavor.
HANDY TIPS
- For extra flavor, consider using baked apples instead of raw. Just sauté them lightly before mixing into the filling.
- Make sure to remove the rind from the brie; it can be tough and not as enjoyable in the stuffing!
3. STUFF THE CHICKEN
It’s time for the fun part—stuffing our chicken!
4. Place – Place a portion of the filling in the center of each chicken breast. Be generous but ensure you leave enough space at the edges to seal them properly.
5. Fold – Fold the chicken over the filling and secure with toothpicks if necessary. This step ensures that all that cheesy goodness stays inside while baking—no one wants a cheese explosion in their oven!
HANDY TIPS
- If you find it’s difficult to fold without spilling, try using larger pieces of chicken or less filling.
- Toothpicks can be easily removed after cooking; just remember where they are!
4. SEASON AND BAKE
Let’s bring this dish home with some seasoning and baking!
6. Rub – Rub the outside of the chicken with olive oil, salt, and pepper. This not only adds flavor but also promotes browning on the outside for an appetizing look!
7. Bake – Place the stuffed chicken breasts in a baking dish and bake for 25-30 minutes, or until the chicken is cooked through (internal temperature should reach 165°F/74°C). You’ll know they’re done when they are golden brown on top and no longer pink inside.
HANDY TIPS
- If your chicken breasts are particularly large, they may take closer to 30 minutes or slightly more to cook through.
- Consider covering with foil initially if you notice browning too quickly; this allows for thorough cooking without burning.
5. SERVE
We are almost there—time to enjoy our creation!
8. Remove – Remove toothpicks and let the chicken rest for a few minutes before slicing. Resting allows juices to redistribute for maximum tenderness in every bite!
9. Serve – Serve warm with your choice of side dishes like roasted vegetables or a simple salad for a balanced meal.
What an accomplishment! You’ve just created Apple and Brie Stuffed Chicken that’s bursting with flavor and sure to impress anyone at your dinner table—all in just 45 minutes! Make these once, and I wager they will invade your dreams every night too! – Nagi x
FAQ – Apple and Brie Stuffed Chicken
🥗 Can I make this recipe gluten-free?
Yes, you can easily make this Apple and Brie Stuffed Chicken gluten-free! The primary ingredients in this recipe are naturally gluten-free. Just ensure that any additional products you use, such as honey or seasonings, are certified gluten-free. If you plan to serve it with a side dish, opt for gluten-free grains like quinoa or rice. I often pair it with roasted vegetables for a wholesome meal.
❄️ How do I store leftovers and how long will they keep?
Leftovers of the stuffed chicken can be stored in an airtight container in the refrigerator for up to 3 days. On day 1, the chicken remains 100% tasty; by day 3, you’re looking at about 85% quality. After that, it might start to dry out or lose some flavor. When reheating, add a splash of chicken broth to keep it moist — no one wants dried-out chicken!
⏳ Do I need to let the chicken rest after baking?
Absolutely! Letting the chicken rest for at least 5 minutes after baking is crucial. This allows the juices to redistribute throughout the meat, ensuring every bite is juicy and tender. If you skip this step, you’ll end up with a drier chicken as those precious juices rush out when you slice into it.
❄️ Can I freeze the stuffed chicken before cooking?
Yes, you can definitely freeze these stuffed chicken breasts before cooking! Prepare them up until the baking step, then wrap them tightly in plastic wrap and place them in a freezer bag. They’ll keep well for about 2-3 months. To cook from frozen, bake at 375°F (190°C) for an additional 10-15 minutes — just ensure they reach an internal temperature of 165°F (74°C) before serving.
🥛 What can I substitute for brie cheese if I don’t have any?
If you’re not a fan of brie or don’t have it on hand, there are great alternatives! Cream cheese works surprisingly well for a similar creamy texture — just use about 1 cup. Other options include goat cheese or even mozzarella for a milder flavor. Keep in mind that using different cheeses may alter the flavor profile slightly, but they’ll still be delicious!
🔪 Why do I have to pound the chicken breasts to an even thickness?
Pounding the chicken breasts ensures they cook evenly throughout. If some parts are thicker than others, you’ll risk having dry areas while waiting for thicker sections to cook through properly. Trust me—taking the time to flatten them out will result in perfectly cooked chicken every time!
🌿 Can I add other ingredients to the stuffing?
Absolutely! You can customize your stuffing however you’d like! Feel free to add nuts like walnuts or pecans for crunch, or dried fruits like cranberries for added sweetness. For a savory twist, sautéed onions or spinach would also work beautifully. Just remember not to overstuff; you want to maintain that lovely balance between flavors without risking a messy explosion during baking!
Troubleshooting
I will continue to add more to this Troubleshooting section as I start seeing questions coming through from people who have made the recipe.
Troubleshooting tips
“My chicken is way too thick and taking forever to cook! 😩”
- You might not have pounded the chicken breasts evenly. If they are too thick in some areas, it will take longer for the inside to cook through, leading to possible overcooking on the outside.
- It’s also possible that your oven temperature is off, meaning it’s not heating at the set 375°F (190°C). A quick oven thermometer check can help with this!
I bet they were still YUM though!
“Why does my stuffed chicken look so wonky? 🤔”
- If you didn’t fold the chicken over the filling tightly enough or used too much filling, it can lead to uneven shapes. Too much stuffing can make it difficult to secure without bursting out.
- Using toothpicks improperly or not at all can also cause the chicken to fall apart during baking.
I bet they were still YUM though!
“My chicken came out dry and tough! 😭”
- Overbaking is likely the culprit here; if you left it in for longer than 30 minutes or didn’t check the internal temperature (should reach 165°F/74°C), it can dry out quickly.
- Also, not pounding your chicken breasts evenly could leave them too thick in spots, making it easy to accidentally overcook those areas.
I bet they were still YUM though!
“The outside of my chicken is too dark while the inside is still pink! 🔥”
- You may have had your oven rack too close to the heating element, causing excessive browning on the outside before the inside has fully cooked.
- Alternatively, if you didn’t rub enough olive oil over your chicken, it may lead to uneven cooking and browning as well.
I bet they were still YUM though!
Apple and Brie Stuffed Chicken
Ingredients
Method
- Preheat the oven to 375°F (190°C).
- Using a meat mallet, gently pound the chicken breasts to an even thickness.
- In a bowl, combine the brie cheese, diced apple, chopped thyme, and honey.
- Place a portion of the filling in the center of each chicken breast.
- Fold the chicken over the filling and secure with toothpicks if necessary.
- Rub the outside of the chicken with olive oil, salt, and pepper.
- Place the stuffed chicken breasts in a baking dish and bake for 25-30 minutes, or until the chicken is cooked through.
- Remove toothpicks and let the chicken rest for a few minutes before slicing.
- Serve warm with your choice of side dishes.