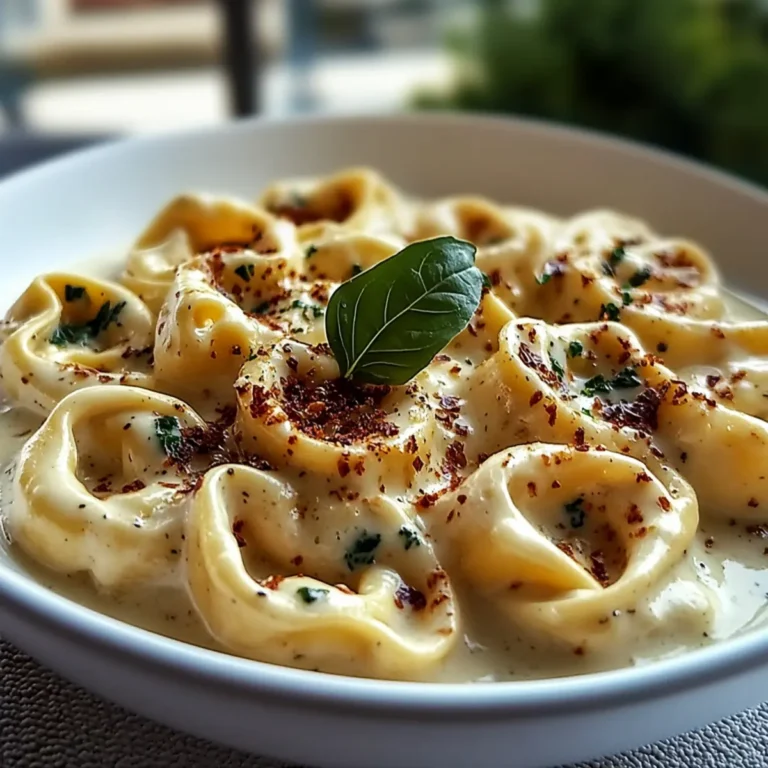
Million Dollar Baked Ziti: Comforting and Cheesy Bliss
It all started with a craving for that creamy, cheesy baked ziti I used to order at my favorite Italian restaurant. Each bite was like a warm hug, making me feel like I was dining in the comfort of my own home. But let’s be real—taking a trip to the restaurant every time I wanted this indulgence wasn’t exactly practical (or budget-friendly). So, I set myself the challenge of recreating what I affectionately dubbed my “Million Dollar Baked Ziti” right in my own kitchen, hoping to capture that same magic without the hefty price tag.
Let me tell you, perfecting this recipe was no small feat. It took me five attempts and more than a few late-night taste tests (thanks to my perpetually hungry friends who were always willing to help!). Each time, I found myself tweaking the cheese blend or adjusting the sauce until I finally hit that sweet spot of creaminess and flavor. There were moments when I thought I’d never get it just right, and you can bet there were several less-than-stellar batches that made their way to the trash. Who knew baked ziti could be so finicky?
But oh boy, was it worth it! The final result is a Million Dollar Baked Ziti that’s not just visually stunning but also bursting with rich flavors and comforting textures that make every forkful feel like pure joy. With layers of gooey cheese, a velvety sauce, and perfectly cooked pasta, it’s everything you want in a cozy meal and then some. Trust me when I say you’re going to want to dive into this dish headfirst—so grab your ingredients and let’s get cooking!
These Million Dollar Baked Ziti are…
….the ultimate comfort food that will have everyone begging for seconds!
1. They deliver an explosion of flavors with a rich and savory meat sauce that combines ground beef, onions, garlic, and Italian seasoning. This blend creates a depth of flavor that makes every bite feel indulgent, ensuring your taste buds are treated to a symphony of mouthwatering notes.
2. Delightfully creamy texture – each forkful is a perfect balance of gooey cheese and tender pasta. The combination of ricotta, mozzarella, and Parmesan cheeses creates a luscious creaminess that envelops the ziti, making it impossible to resist.
3. A key layering technique elevates this dish beyond the ordinary: baking the ziti with the meat sauce before topping it with cheese. This method allows the flavors to meld beautifully while giving the top layer a deliciously golden crust, adding both visual appeal and a satisfying crunch.
4. Incredible value for money – with ingredients you can easily find at any grocery store, this recipe serves 6-8 people for about the same price as one restaurant serving! It’s not just delicious; it’s also budget-friendly, making it an ideal choice for family gatherings or weeknight dinners.
PS This Million Dollar Baked Ziti is perfect for feeding a crowd and is even better as leftovers! Don’t be surprised if it disappears in no time!
Ingredients for the Million Dollar Baked Ziti
Each ingredient in this dish plays an essential role in flavor and texture. Here’s what you’ll need:
- 12 oz Ziti pasta: Provides the perfect shape to hold the creamy sauce.
- 1 lb Ground beef (Or Italian sausage): Adds rich, savory depth to the meat sauce.
- 1 cup Onion (Chopped): Contributes sweetness and aromatic flavor to the base.
- 2 cloves Garlic (Minced): Infuses the sauce with a fragrant, robust kick.
- 1 can Crushed tomatoes (28 oz): Forms the luscious, tangy foundation of the sauce.
- 1 can Tomato sauce (15 oz): Enhances the overall tomato flavor and consistency.
- 2 tbsp Italian seasoning: Delivers a blend of herbs that elevates the dish’s taste profile.
- 1 tsp Salt: Essential for enhancing all the flavors in the recipe.
- 1 tsp Black pepper: Adds a subtle heat and depth to the meat sauce.
- 15 oz Ricotta cheese: Brings creaminess and a mild flavor that balances the dish.
- 1 cup Mozzarella cheese (Shredded): Melts beautifully for a gooey, comforting texture.
- 1/2 cup Parmesan cheese (Grated): Offers a salty, nutty flavor that complements other cheeses.
- 1 large Egg: Acts as a binder to help hold the cheese mixture together.
- 2 tbsp Parsley (Chopped): Adds a fresh touch and brightens up the overall flavor.
You MUST Cook the Ziti Pasta Al Dente. No Exceptions!
I know, I know — cooking pasta al dente takes a little extra effort, and it might feel tempting to just boil it until soft. Believe me, I tried to find shortcuts (because who really enjoys waiting for water to boil?), but every time I did, the dish suffered. The texture turned mushy, and we all know that nobody wants a baked ziti that resembles an overcooked blob!
So why is this step so crucial? Think of al dente pasta as the sturdy foundation of your baked ziti. Just like a good pizza crust needs to be firm enough to hold its toppings without falling apart, your ziti must maintain some bite. This not only creates a delightful contrast with the creamy cheese and savory meat sauce but also helps prevent the pasta from becoming overly soggy during baking.
What does cooking pasta al dente do?
- Texture: Al dente pasta retains a pleasant firmness, providing a satisfying chew that complements the creamy cheese mixture.
- Structure: By keeping the pasta slightly undercooked, it holds its shape during baking, preventing it from disintegrating into mush.
- Flavor absorption: When cooked properly, al dente pasta better absorbs the flavors of the meat sauce and cheese mixture, enhancing each bite.
- Moisture control: Less cooked pasta will absorb some liquid from the sauce while baking without losing its own structure, creating a perfect balance in moisture.
- Preventing clumping: Cooking pasta al dente reduces starch release, minimizing the risk of clumping in your baked ziti.
Different cooking times for pasta
- 5 minutes (good) — This results in slightly overcooked pasta which may start to lose its shape when baked.
- 8 minutes (better) — A decent option; however, there’s still a risk of slight mushiness after baking.
- 10 minutes (ideal) — Perfectly cooked al dente ziti that stands up beautifully against the rich sauces and cheeses.
- Beyond 12 minutes (not recommended) — Overcooked pasta that will turn to mush in your baked ziti. It’s a soggy disappointment waiting to happen!
Don’t even think about skipping the al dente step! The most common mistake is cooking it too long because you’re worried it won’t be done after baking. Trust me — if you want your Million Dollar Baked Ziti to shine with perfect texture and flavor, cook that ziti just right!
How to make Million Dollar Baked Ziti

Are you ready to see how straightforward it is to make the Million Dollar Baked Ziti of your dreams??
1. PREPARE THE PASTA
Start with perfectly cooked ziti for a solid foundation!
1. Preheat – Preheat your oven to 375°F (190°C). This will ensure that your baked ziti cooks evenly and gets that delightful golden top.
2. Boil – Boil the ziti pasta according to package instructions until al dente, which means it should be tender yet firm when bitten. This will prevent the pasta from becoming mushy during baking. Once done, drain and set aside.
HANDY TIPS
- 💡 TIP: For extra flavor, add a pinch of salt to the boiling water when cooking the ziti.
- ⚠️ Be careful not to overcook the pasta; you want it slightly underdone since it’ll continue cooking in the oven!
2. MAKE THE MEAT SAUCE
The heart of this dish is its robust meat sauce!
3. Cook – In a skillet over medium heat, cook the ground beef (or Italian sausage) until browned, breaking it up with a wooden spoon as it cooks. This step adds flavor and texture.
4. Add – Add the chopped onion and minced garlic, cooking until softened and fragrant—about 3-5 minutes.
5. Stir – Stir in crushed tomatoes, tomato sauce, Italian seasoning, salt, and pepper. Let this simmer for about 10 minutes until slightly thickened.
HANDY TIPS
- 💡 TIP: If you prefer a spicier kick, consider adding red pepper flakes when mixing in the meat sauce!
- ❓ Why does simmering matter? Because it helps meld all those delicious flavors together.
3. MIX THE CHEESE FILLING
This creamy cheese layer is what makes this dish truly “million dollar!”
6. Combine – In a mixing bowl, combine ricotta cheese, half of the mozzarella cheese, Parmesan cheese, egg, and parsley. Mix until smooth and creamy; this will be your luscious filling that brings everything together.
HANDY TIPS
- 💡 TIP: Using room temperature eggs helps create a smoother mixture—so consider taking them out of the fridge ahead of time!
- ⚠️ Ensure you mix well so there are no lumps—nobody wants a surprise chunk of ricotta!
4. ASSEMBLE THE DISH
Layering is key to achieving that perfect bite!
7. Layer – In a baking dish, layer half of the meat sauce on the bottom followed by half of the cooked ziti. Next, spread all of the cheese mixture over this layer.
8. Top – Add the remaining meat sauce on top and finish with the rest of the mozzarella cheese for that gooey goodness.
HANDY TIPS
- 💡 TIP: If you’re feeling adventurous, you can sprinkle some extra Italian seasoning on each layer for added flavor!
- ❓ Why layer? Each bite should have an equal balance of pasta, cheese, and sauce for maximum enjoyment!
5. BAKE
The final step is where all your hard work pays off!
9. Cover – Cover the baking dish with foil and bake for 20 minutes; this allows everything to warm through without drying out.
10. Uncover & Bake Again – Remove the foil and bake for an additional 10 minutes or until the cheese is bubbly and golden brown on top.
HANDY TIPS
- 💡 TIP: Letting it cool for about 10 minutes before serving allows everything to set up nicely—no one likes a sloppy slice!
Nothing beats pulling this cheesy masterpiece out of the oven—it’s pure comfort food at its finest! You’ve just created a delicious Million Dollar Baked Ziti that’s sure to impress family and friends alike! Make this once, and I wager they will invade your dreams every night too! – Nagi x
FAQ – Million Dollar Baked Ziti
🍝 How long will leftovers keep in the fridge?
Leftovers of Million Dollar Baked Ziti can be stored in the refrigerator for up to 3–4 days. However, I recommend consuming them within the first 2 days for the best flavor and texture—about 95% as good on day 2! Make sure to store them in an airtight container to prevent drying out. If you notice any moisture loss after a few days, consider adding a bit of marinara sauce when reheating to revive that creamy goodness.
⏳ Can I skip letting it rest before serving?
No, you cannot skip letting the baked ziti rest! I know it’s tempting, but allowing it to sit for about 10-15 minutes after baking helps all those cheesy layers set properly. If you cut into it too soon, you’ll end up with a delicious mess rather than perfect slices. Just think of it as giving yourself a moment to savor the anticipation!
❄️ Can I freeze Million Dollar Baked Ziti?
Absolutely! You can freeze this dish either before or after baking. If freezing unbaked, assemble the ziti in your baking dish, cover tightly with plastic wrap and then foil, and pop it in the freezer for up to 3 months. To bake from frozen, remove the plastic wrap and cover with foil; bake at 375°F (190°C) for about 50-60 minutes. If freezing baked ziti, let it cool completely before wrapping it well. It’ll hold its quality for about 2-3 months in the freezer. Just thaw overnight in the refrigerator before reheating.
🌾 Is there a gluten-free option for this recipe?
Yes! You can easily make Million Dollar Baked Ziti gluten-free by using gluten-free ziti pasta instead of regular wheat-based pasta. There are many great brands available now that cook up nicely without compromising on texture or flavor. Just follow package instructions for cooking time, as gluten-free pasta can vary.
🧀 Can I substitute ricotta cheese with something else?
While ricotta adds that creamy texture and unique flavor to this dish, you can substitute it with cottage cheese if you’re looking for a lighter option. Just blend cottage cheese until smooth before mixing it with the other ingredients. If you’re aiming for dairy-free, try using tofu blended with nutritional yeast and lemon juice as a replacement—though it will lack some creaminess.
🔥 Why do I need to mix the cheese filling so thoroughly?
Mixing the cheese filling until smooth is essential because it ensures even distribution of flavors and prevents clumps when you assemble your baked ziti. Trust me; nobody wants a mouthful of ricotta alone! A well-mixed filling also contributes to that signature creamy consistency throughout every layer of your dish.
🥗 What are some good add-ins or variations I can try?
I love experimenting with different add-ins! You can toss in sautéed vegetables like spinach or mushrooms for added nutrition and flavor. For a spicy kick, consider adding red pepper flakes or swapping half of the ground beef for Italian sausage. You could even layer in some fresh basil or sun-dried tomatoes if you’re feeling fancy—just be sure not to overload it too much so that every layer still shines through!
Troubleshooting
I will continue to add more to this Troubleshooting section as I start seeing questions coming through from people who have made the recipe.
Troubleshooting tips
“My ziti came out too dry! 😩”
- You may have overcooked your pasta. If the ziti is cooked beyond al dente, it can absorb too much sauce during baking and end up dry.
- Another cause could be if you didn’t add enough sauce to the layers. The meat sauce needs to be spread generously to keep everything moist while baking.
- I bet it was still YUM though!
“The cheese on top turned out too dark! 🔥”
- If your oven runs hot or if you used a dark-colored baking dish, the cheese can brown faster than the rest of the dish.
- Removing the foil too early can also lead to excessive browning, as it allows direct heat onto the cheese.
- I bet it was still YUM though!
“My baked ziti is all mushy! 😱”
- Overcooking the pasta before baking can lead to a mushy texture. Be sure to cook your ziti just until al dente, as it will continue cooking in the oven.
- Additionally, using too much liquid in your meat sauce can contribute to excess moisture, making everything soggy.
- I bet it was still YUM though!
“My layers are all mixed up and wonky! 🤦♀️”
- This might happen if you didn’t let each layer settle properly before adding the next one. Make sure to take your time when layering so that each component stays put.
- Not allowing the meat sauce to cool slightly before assembly can also make it harder for the layers to hold their structure.
- I bet it was still YUM though!