Quinoa Enchilada Casserole
There’s something profoundly comforting about a dish that brings together the warmth of traditional flavors with a healthy twist, and that’s exactly what you’ll find in this Quinoa Enchilada Casserole. Each forkful is like a hug from an old friend, rich in textures and bursting with vibrant colors that make your heart sing. Imagine the enticing aroma of spices wafting through your kitchen, mingling with the cheesy goodness melting into every layer of this casserole, creating a symphony of flavors that dance playfully on your palate. This dish doesn’t just fill your stomach; it nourishes your soul, inviting you to gather around the table with loved ones and share stories over warm servings of deliciousness. I promise you, once you take that first bite, you’ll understand why this recipe has nestled itself in my heart as a true favorite.
What makes this Quinoa Enchilada Casserole truly special is not just its delectable taste but also its ability to bring people together—whether it’s a cozy family dinner or a potluck with friends. It’s a perfect blend of hearty quinoa, black beans, and gooey cheese, all draped in luscious enchilada sauce that wraps everything together beautifully. This casserole is more than just another way to enjoy enchiladas; it’s an invitation to explore healthier ingredients without sacrificing flavor. The layers unfold like a story, each one contributing to the whole experience while keeping things light yet satisfying. Trust me when I say that once you’ve shared this meal with those you cherish, it will become part of your culinary repertoire—a beloved tradition waiting to happen.
Quinoa Enchilada Casserole: A Wholesome Twist on a Classic
This Quinoa Enchilada Casserole is not just another meal; it’s an adventure in flavor and health! Packed with protein-rich quinoa and black beans, combined with fresh vegetables and topped off with ooey-gooey cheese, it’s everything you want in comfort food without the guilt. You can enjoy every bite knowing you’re making nourishing choices while delighting in every mouthful of cheesy goodness.

Ingredients:
Let’s embark on this culinary journey together! Each ingredient plays a vital role in creating this delightful dish, so let’s take a moment to appreciate what they bring to our Quinoa Enchilada Casserole.
- 1 cup quinoa. Quinoa is the star of our show here! This tiny seed is packed with protein and fiber while being gluten-free, making it an excellent base for our casserole. When cooked properly—fluffy and light—it absorbs all the surrounding flavors beautifully. Be sure to rinse it thoroughly under cold water before cooking; this removes any bitter saponins that can detract from its natural nutty flavor. Look for organic quinoa if possible; it tends to have superior taste and quality.
- 1 (10-ounce) can red enchilada sauce. This liquid gold transforms our casserole into something truly special! Red enchilada sauce adds depth and richness to each bite while providing the perfect balance of acidity and spice. If you’re feeling adventurous, consider making your own sauce from scratch using roasted tomatoes and spices; however, store-bought works wonderfully too—just check for options without added sugars or preservatives.
- 1 (4-ounce) can diced green chiles (drained). These little peppers are essential for adding that delightful kick we crave in Mexican cuisine! They infuse our dish with subtle heat without overwhelming the other flavors—perfect for those who might be sensitive to spice but still want some zest.
- 1/2 cup corn kernels (frozen, canned or roasted). Corn adds sweetness and texture that contrasts beautifully against the savory elements in our casserole. If using frozen corn, there’s no need to thaw it beforehand; just toss it directly into the mix! Roasted corn can elevate this dish even further by introducing caramelized notes that deepen its flavor profile.
- 1/2 cup canned black beans (drained and rinsed). These protein-packed beauties are not only filling but also provide creaminess against the crunchy quinoa! Rinsing them helps remove excess sodium from the canning process while ensuring they’re clean and ready for incorporation into our dish.
- 2 tablespoons chopped fresh cilantro leaves. Fresh herbs are like music notes for cooking—they elevate everything they touch! Cilantro adds brightness and freshness that cuts through the richness of cheese wonderfully. Trust me on this: don’t skip out on fresh herbs when possible—they make all the difference!
- 1/2 teaspoon cumin. Cumin is an aromatic spice that brings warmth and earthiness to our casserole—it’s absolutely paramount for achieving authentic Mexican flavors! Just remember: toast it lightly in your pan before mixing to unlock its full aromatic potential!
- 1/2 teaspoon chili powder. Another essential component for bringing warmth into our dish—chili powder adds both flavor complexity and mild heat without overwhelming anyone’s palate. Feel free to adjust according to your taste preferences!
- Kosher salt and freshly ground black pepper (to taste). Seasoning is key! These two staples will enhance every single ingredient within our casserole—don’t underestimate their power! Always season gradually as you go along so you can control how much flavor is added.
- 3/4 cup shredded cheddar cheese (divided). Cheddar cheese melts beautifully while offering sharpness that complements other ingredients perfectly—this creamy goodness ties everything together! Using freshly shredded cheese instead of pre-packaged varieties ensures optimal melting qualities.
- 3/4 cup shredded mozzarella cheese (divided). Mozzarella brings stretchiness—a glorious melty texture we all adore—and balances out cheddar’s sharpness nicely! Opt for whole-milk mozzarella if available; it has richer flavor compared to part-skim versions.
- 1 avocado (halved, seeded, peeled and diced). Avocado provides creaminess reminiscent of sour cream but packed full of healthy fats instead! Plus, its vibrant green color adds visual appeal alongside nutritional benefits—it’s like nature’s butter!
- 1 Roma tomato (diced). Fresh tomatoes contribute juicy brightness at serving time—they’re refreshing against all these hearty elements inside our casserole! Use ripe fruit for maximum sweetness—those little bursts are what we’re after!
Equipment You’ll Need:
Before we dive into creating our masterpiece, let’s take stock of essential tools that’ll help us along this culinary path! Having the right equipment makes everything smoother—the joy comes not only from cooking but also from enjoying the process!
- Large saucepan – A sturdy saucepan is necessary for cooking our quinoa properly; look for one with a tight-fitting lid to trap steam effectively during cooking time—this keeps moisture locked in while ensuring fluffy results.
- 9 x 13 baking dish – A classic rectangular baking dish lets us layer up all those beautiful ingredients evenly so everyone gets their fair share at serving time! Glass or ceramic options work best since they hold heat well while allowing easy monitoring during baking.
- Mixing bowls – A couple of good-sized mixing bowls will be indispensable here—for combining ingredients before transferring them into our baking dish smoothly!
- Measuring cups & spoons – Precision matters when creating lovely dishes like these; having accurate measuring tools ensures every layer turns out perfect—be sure they’re levelled off when measuring dry goods!
Preparing the Quinoa Enchilada Casserole / Making Our Flavorful Masterpiece
Step 1: Cooking Those Tiny Powerhouses
First things first – we need perfectly cooked quinoa as our foundation! In a large saucepan over medium heat, combine 2 cups water with 1 cup rinsed quinoa (remember how crucial rinsing was?). Bring this mixture up until boiling then reduce heat low enough so it simmers gently; cover tightly during cooking for about 15 minutes or until liquid has completely absorbed leaving behind fluffy grains full of life—and trust me on this: don’t lift that lid prematurely because steam needs time trapped inside!
Once cooked through, remove from heat allowing resting time covered for about five minutes before fluffing gently using fork tines—this step helps separate any clumps formed during boiling bringing back its light texture ready for incorporation later!
Step 2: Prepping Our Oven & Dish
While awaiting those glorious grains’ transformation upstairs above simmering pots below let’s prepare ourselves down below by preheating oven at 375°F (190°C). Simultaneously grab yourself either nonstick spray or oil & lightly coat bottom/sides inside your chosen baking dish preventing any sticking issues later on when digging into those delicious layers post-baking bliss awaits us ahead!
Step 3: Mixing Up Our Magical Ingredients
Now onto mixing—the fun part where aromas begin swirling around inviting everyone nearby closer due irresistible scents rising high above kitchen countertops filled vibrant colors reflected sunbeams shining bright across surfaces around us bringing smiles everywhere hearts beat faster anticipating joyful bites await soon enough too… In large bowl combine together cooked quinoa along red enchilada sauce making sure grains soak deeply capturing essence wrapped within every drop thoroughly blended throughout mixture adding drained green chiles frozen/canned corn black beans chopped cilantro cumin chili powder finishing touches salt pepper adjust seasoning per preference enhancing overall experience enjoying each mouthful later down road ahead before stirring half amount cheddar mozzarella added last bit richness required throughout bake evenly distributed across entire surface area spreading love everywhere around us…
Step 4: Assembling Layers With Care
With everything mixed well together now comes time layering process begins spreading half mixture evenly across bottom prepared baking dish followed by remaining topping sprinkling rest cheeses generously covering top layer ensuring delicious melty gooey crust forms magical connection bringing forth memories cherished forever shared meals laughter warmth hugs sitting gathered close sharing stories family friends alike surrounded love coziness enveloping hearts souls nurtured blessed moments created forever treasured always remembered fondly…
As you dive deeper into these steps ahead know excitement builds anticipation keeps growing stronger as layers form create harmony resonating through kitchen surroundings wrapping arms warmly around each person present nurturing bonds strengthened flavors tasted savor months years pass until next round revisiting cherished recipes made love passion remains alive forever…
Step 5: Layering the Flavors
Now that our quinoa is perfectly cooked, it’s time to bring everything together in a beautiful harmony of flavors. In a large mixing bowl, you’ll want to combine your warm quinoa with the vibrant red enchilada sauce. This sauce is truly the heart of our dish; it adds a depth of flavor that’s both rich and tangy, enveloping each grain of quinoa in its luscious embrace. As you stir, take a moment to appreciate the intoxicating aroma wafting up—trust me, this is just the beginning! Next, fold in the diced green chiles, which will introduce a subtle kick and an exciting texture that complements the creamy nature of the cheeses we’ll add later.
Don’t forget to sprinkle in those sweet corn kernels and black beans! These ingredients are not just nourishing but also add an element of fun and color to your casserole. The corn brings a hint of sweetness while the beans contribute protein and fiber, making this dish not only delicious but well-rounded. As you mix everything together, season generously with cumin and chili powder. These spices are absolutely paramount—they provide that warm, earthy tone that enchiladas are known for. A touch of kosher salt and freshly ground black pepper will elevate all these flavors even further. Once your mixture is well-combined, fold in half of the shredded cheddar and mozzarella cheese; this will create pockets of gooey goodness throughout your dish.
Step 6: Spreading Love into the Baking Dish
With your delightful filling ready to go, it’s time to transfer this beautiful mixture into a lightly greased 9 x 13 baking dish. Using a spatula or the back of a spoon, spread it evenly across the bottom of the dish; make sure every corner gets some love! The goal here is to create an even layer so that every bite offers that perfect balance of flavors and textures. Don’t rush this step; taking your time ensures that each spoonful will be equally satisfying when it comes out of the oven.
Once your mixture is spread out nicely, let’s talk about layering on those remaining cheeses—a crucial step for achieving that ooey-gooey goodness we all crave. Sprinkle the rest of your shredded cheddar and mozzarella over the top with abandon! This cheesy layer not only acts as a delicious topping but also creates a protective blanket that traps moisture within during baking. The result? A beautifully bubbly casserole with golden-brown edges and melting cheese stretching like liquid gold when you serve it up. Trust me on this—this final cheese layer is non-negotiable if you want that classic enchilada experience.
Step 7: Baking Your Casserole to Perfection
Now comes one of my favorite parts—baking! Preheat your oven to 375 degrees F (190 degrees C), allowing it to reach that perfect temperature where magic happens. Gently slide your prepared casserole into the oven and set your timer for about 15 minutes. During this time, something truly extraordinary will occur: as heat circulates around our casserole, it will bubble merrily away while transforming those lovely layers into a cohesive dish bursting with flavor.
While it bakes, keep an eye on it through the oven window if you can—watch as those cheeses melt beautifully into one another while little bubbles rise from beneath like they’re celebrating their union! You’ll know it’s done when you see golden edges forming around the sides and the center is bubbling vigorously; it’ll be hard not to dive right in at this point because it smells utterly intoxicating! But hold on—this step is crucial for ensuring everything melds together seamlessly.
Step 8: Letting It Rest (This Is Key!)
Once you pull your Quinoa Enchilada Casserole from the oven—a sight both mesmerizing and mouthwatering—you might be tempted to serve it immediately. I get it; I really do! But here comes an essential part: let it rest for about 5-10 minutes before diving in. Allowing it to cool slightly isn’t just about patience—it’s about giving those flavors time to settle and intensify together in an extraordinary way.
During this resting phase, all those rich components have a chance to meld together fully while ensuring easier serving without turning into a messy pile on your plate. You’ll also notice how much easier it becomes when you’re ladling out portions; each scoop will hold its shape beautifully instead of collapsing into mushy chaos—a visual feast as well as a culinary one! So take deep breaths while you wait—this is all part of savoring what you’ve created!
Final Touches: Garnishing Your Masterpiece
As our casserole rests quietly on the countertop, let’s prepare for what I believe makes every meal feel special—the garnishes! Grab an avocado; its creamy richness provides such a delightful contrast against our hearty casserole base. Halve it, remove the pit carefully (watch those fingers!), peel off the skin gently, and dice it into perfectly sized pieces that can be sprinkled liberally atop individual servings later on.
And what about our Roma tomato? Dicing this juicy beauty adds not just color but also freshness—a bright pop amidst all those warm flavors waiting patiently underneath. When it’s time to serve up portions, place some diced avocado and tomato right on top for a visual treat that’s equally delicious; they provide not only beautiful aesthetics but also complement each bite with varied textures and tastes as you enjoy each forkful.
So there you have it—a Quinoa Enchilada Casserole that’s bursting with flavor yet lightened-up enough for guilt-free indulgence! Serve hot straight from your oven or allow guests to help themselves at gatherings—either way promises joyfully satisfied faces all around as they dig into this symphony of flavors!
Storage and Enjoyment Tips for Your Quinoa Enchilada Casserole
Now that your Quinoa Enchilada Casserole has emerged from the oven, bubbling with cheesy goodness and adorned with fresh avocado and vibrant tomatoes, it’s time to dive into this guilt-free delight! But wait—before you dig in, let me share some essential tips on how to store those delightful leftovers so that every bite remains as mouthwatering as the first. This dish is not only a feast for today but also a treasure trove of flavors waiting to be enjoyed later!
Storing Leftover Quinoa Enchilada Casserole
To keep your leftover Quinoa Enchilada Casserole fresh and flavorful, transfer it to an airtight container after it has cooled slightly. This step is crucial because it locks in moisture and prevents any drying out. If you’re feeling particularly nostalgic, consider using a glass container; they can be quite lovely when stored in the fridge, reminding you of the delicious meal you had just enjoyed! Generally, your casserole will stay good for up to 3-4 days in the refrigerator. However, if you’re looking to maintain its quality longer, try placing a slice of bread on top of the casserole before sealing it up. I promise you—the bread will absorb any excess moisture, keeping your casserole perfectly tender. When reheating, simply pop it back into the oven or microwave until it’s heated through. The beauty of this dish is that even after a few days in the fridge, it tastes just as comforting and satisfying as when it was freshly baked!
Freezing Quinoa Enchilada Casserole for Later
If you find yourself with more than you can eat right away—or if you’re just planning ahead for those busy weeknights—freezing this Quinoa Enchilada Casserole is an excellent option! To freeze properly, allow the casserole to cool completely before transferring it into a freezer-safe container or wrapping it tightly in plastic wrap followed by aluminum foil. This double-layered approach ensures that no pesky freezer burn sneaks its way in! You can safely store your casserole in the freezer for up to 3 months without sacrificing flavor or texture. When you’re ready to enjoy it again, simply thaw it overnight in the refrigerator and then reheat in the oven until bubbly and golden. Trust me on this—having a homemade meal at your fingertips is not only convenient but brings such joy on those hectic days when you’d rather not cook!
Now that we’ve covered how to store and savor every bite of this delicious casserole, I can’t help but feel excited for all the moments you’ll create around this dish!
Quinoa Enchilada Casserole
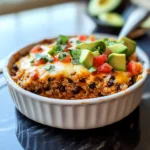
Delight in this healthy Quinoa Enchilada Casserole packed with flavor! Try making it today and savor every delicious bite guilt-free.
- Prep Time: 20 minutes
- Cook Time: 15 minutes
- Total Time: 35 minutes
- Yield: Serves 8
- Category: Dinner
- Method: Baking
- Cuisine: Mexican
Ingredients
- 1 cup quinoa
- 10 oz red enchilada sauce
- 4 oz diced green chiles
- ½ cup corn kernels
- ½ cup canned black beans
- 2 tablespoons chopped fresh cilantro
- ¾ cup shredded cheddar cheese (divided)
- ¾ cup shredded mozzarella cheese (divided)
- 1 avocado (diced)
- 1 Roma tomato (diced)
Instructions
- Preheat oven to 375°F (190°C).
- In a large saucepan, cook rinsed quinoa with 2 cups water over medium heat until liquid is absorbed (about 15 minutes). Fluff with a fork and set aside.
- In a mixing bowl, combine cooked quinoa, red enchilada sauce, green chiles, corn, black beans, cilantro, cumin, chili powder, salt, pepper, and half each of the cheddar and mozzarella cheeses.
- Transfer half the mixture into a greased 9 x 13 baking dish. Layer remaining mixture on top and sprinkle with remaining cheeses.
- Bake for 15 minutes until bubbly and golden. Let rest for 5-10 minutes before serving.
- Garnish with diced avocado and tomatoes before enjoying.
Nutrition
- Serving Size: 1 serving
- Calories: 290
- Sugar: 3g
- Sodium: 480mg
- Fat: 12g
- Saturated Fat: 6g
- Unsaturated Fat: 6g
- Trans Fat: 0g
- Carbohydrates: 36g
- Fiber: 8g
- Protein: 12g
- Cholesterol: 30mg