Karpatka – Polish Carpathian Mountain Cream Cake Delight
I first stumbled upon Karpatka – Polish Carpathian Mountain Cream Cake during a trip to a quaint little café in the heart of Poland. The moment I took my first bite, I was transported to a world of fluffy choux pastry layered with dreamy vanilla cream that perfectly resembled the majestic Carpathian Mountains. It was love at first taste, and I knew I had to recreate it at home—not just for the nostalgia but also because let’s face it, who wouldn’t want this glorious dessert on demand? Plus, making it myself meant I could tweak it to my liking, ensuring every bite was as rich and creamy as I remembered without breaking the bank!
Of course, perfecting this recipe was no walk in the park. I spent an embarrassing number of attempts—let’s just say it involved several failed batches resembling sad, deflated pancakes rather than the lofty peaks they were supposed to be. Each trial brought its own set of challenges: too dense here, too runny there. But with every misstep (and a few choice words directed at my oven), I learned what worked and what didn’t. In the end, I aimed for that light-as-air texture and luscious filling that would make my taste buds sing—and boy, did it take some serious kitchen gymnastics to get there!
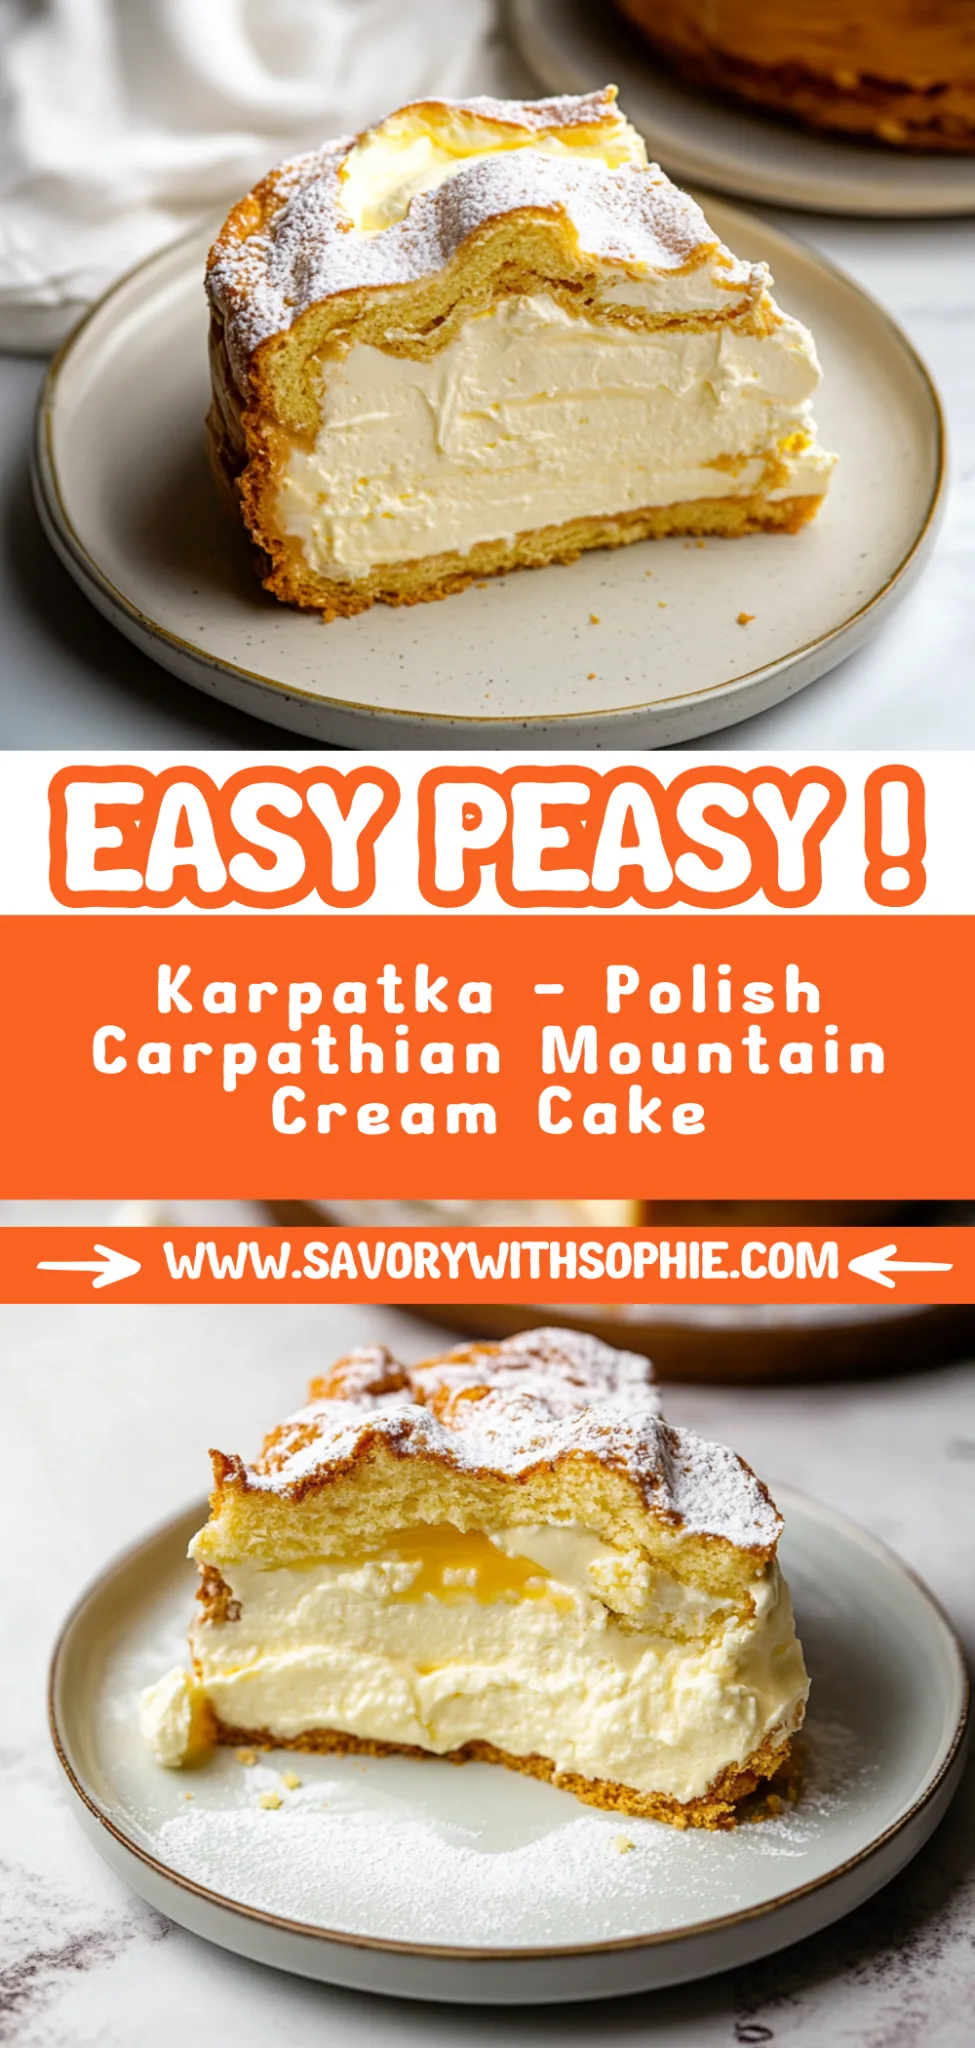
But trust me when I say all those trials were worth it! The final result is nothing short of spectacular: two layers of golden-brown choux pastry cradling a velvety vanilla cream that dances on your palate like a gentle breeze through the mountains. With each bite, you’ll experience that perfect contrast between crispy and creamy, along with an enchanting flavor that lingers just long enough to keep you coming back for more. So grab your apron and let’s dive into this delicious adventure together—I can’t wait for you to try Karpatka!
These Karpatka – Polish Carpathian Mountain Cream Cake are…
….a heavenly indulgence that truly embodies the spirit of Polish desserts!
1. They deliver a luxurious vanilla flavor that elevates each bite, courtesy of high-quality vanilla extract and a rich cream filling. This combination creates a delightful depth that lingers on the palate, making every slice an irresistible treat reminiscent of traditional Polish flavors.
2. Irresistible texture – the choux pastry boasts a perfect balance of crispiness and softness. The outer layers form a delicate golden crust while the insides remain light and airy, creating a satisfying contrast that keeps you coming back for more.
3. A key technique in making this cake is the careful preparation of the choux pastry, which requires cooking the flour and butter mixture before adding eggs. This crucial step ensures that the pastry puffs beautifully in the oven, resulting in layers that are not only visually stunning but also structurally sound for holding the luscious cream filling.
4. Incredible value – this Karpatka recipe allows you to create a stunning dessert at home for a fraction of what you’d pay at a bakery. With simple ingredients like flour, eggs, and butter readily available in your pantry, you can whip up this show-stopping cake without breaking the bank.
PS This recipe yields enough for a generous serving of 8-10 people, making it perfect for gatherings or special occasions!
Ingredients for the Karpatka – Polish Carpathian Mountain Cream Cake
Each ingredient in this dish plays an essential role in flavor and texture. Here’s what you’ll need:
Choux Pastry
1 cup water: Essential for creating steam that helps the pastry rise.
1/2 cup butter (unsalted): Adds richness and flavor to the pastry.
1 cup all-purpose flour: Provides structure and stability to the choux.
4 large eggs (beaten): Contributes moisture and helps the pastry puff up.
1 pinch salt: Enhances overall flavor balance.
Vanilla Cream Filling
2 cups milk (whole milk): Forms a creamy base for the filling.
1 cup heavy cream (whipped): Adds lightness and a luxurious texture.
1/2 cup granulated sugar: Sweetens the cream to complement the pastry.
1/4 cup cornstarch: Acts as a thickening agent for a stable filling.
4 large egg yolks: Enriches the filling with flavor and creaminess.
1 tbsp vanilla extract: Infuses a warm, aromatic sweetness into the cream.
1 tbsp butter (unsalted): Gives a silky finish to the filling.
Topping
1 cup powdered sugar: Provides a sweet dusting to enhance presentation.
1 tbsp cocoa powder (optional for decoration): Adds a touch of elegance and color.
This choux pastry must be beaten like it owes you money. Trust me!
I have to confess, I tried to cut corners with the choux pastry for this Karpatka. I thought, “Surely there’s a shortcut here!” But after several less-than-stellar attempts, I realized that properly beating the eggs into the dough is absolutely non-negotiable. There’s no way around it—if you want that glorious rise and texture, you simply must put in the effort.
Why is this step so critical? When you add the beaten eggs gradually while mixing the dough, you’re incorporating air into the mixture. Think of it like inflating a balloon; without enough air (or egg), your choux pastry won’t puff up properly in the oven. This means your Karpatka will lack that light, airy texture we all love and expect from a perfect cream cake.
What does beating the choux pastry do?
- Texture — Properly beaten dough results in a lighter, airier pastry that puffs beautifully when baked.
- Rise — Incorporating enough air creates steam during baking, which is essential for that glorious rise.
- Stability — A well-beaten choux holds its shape better, preventing collapse after cooling.
- Chewiness — The right egg incorporation gives a pleasantly chewy interior rather than a dense one.
- Golden Colour — Air helps achieve a more even golden-brown colour on your pastry.
Different beating times
- 1 minute (fair) — Minimal incorporation of air; dough will puff but may be dense and heavy.
- 3 minutes (good) — Some aeration achieved; results in moderately puffy and decent texture.
- 5 minutes (great) — Well-beaten dough with good air incorporation; you’ll get a nice rise and chewiness.
- ⭐️6 minutes or more⭐️ (best) — Maximum aeration leading to beautifully puffy pastries that are light and airy.
Be warned: The most common mistake is not beating the eggs enough. If you skip or rush this step, your Karpatka will come out flat and sad—not what we’re aiming for! Don’t let your hard work go to waste because you skipped this crucial technique!
How to make Karpatka – Polish Carpathian Mountain Cream Cake
Are you ready to see how straightforward it is to make the Karpatka – Polish Carpathian Mountain Cream Cake of your dreams??
1. PREPARE THE CHOUX PASTRY
Get ready for a delicious dough that will puff up beautifully in the oven!
1. BOIL – In a saucepan, bring 1 cup of water and 1/2 cup of unsalted butter to a rolling boil. As soon as the butter has melted, add 1 cup of all-purpose flour and a pinch of salt all at once, stirring vigorously with a wooden spoon. Keep stirring until the mixture pulls away from the sides and forms a ball. This step is crucial because it helps create that perfect choux pastry texture!
2. COOL – Remove the saucepan from heat and let it cool slightly for about 5 minutes. This prevents the eggs from cooking when added. Then, add the 4 large beaten eggs one at a time, mixing well after each addition until the dough is smooth and glossy. Your arm might get tired, but it’s worth it!
3. DIVIDE – Once combined, divide the dough in half. Spread each half onto a baking sheet lined with parchment paper, creating two rectangular shapes that will be your cake layers.
4. BAKE – Bake in a preheated oven at 400°F (200°C) for 25-30 minutes until golden brown and puffed up. You’ll know they’re ready when they are firm to touch and have risen dramatically—just like those Carpathian peaks!
HANDY TIPS
- For an even puffier pastry, ensure your oven is fully preheated before baking.
- If you want uniform layers, use an offset spatula to smooth out the tops before baking.
2. MAKE THE VANILLA CREAM FILLING
Now let’s whip up that luscious vanilla cream filling—it’s what makes this dessert truly irresistible!
5. HEAT – In a saucepan over medium heat, pour in 2 cups of whole milk and heat until steaming but not boiling. This step helps to incorporate flavors without curdling the eggs when mixed together later on.
6. WHISK – In a separate bowl, whisk together 1/2 cup granulated sugar, 1/4 cup cornstarch, and 4 large egg yolks until smooth and pale in color. Slowly pour the hot milk into this mixture while whisking constantly to temper the eggs. Return everything back to the saucepan and cook over medium heat until thickened—this should take about 5-7 minutes; it should coat the back of your spoon nicely! ❓ Why does this matter? Because thickening gives your cream that luxurious texture we crave in desserts!
7. COMBINE – Remove from heat and stir in 1 tablespoon of vanilla extract and 1 tablespoon of unsalted butter until melted and incorporated fully into the mixture. Let it cool completely at room temperature so it can set properly when assembled later on!
8. FOLD – Once cooled, gently fold in 1 cup of whipped cream until just combined—this adds an airy lightness that balances out richness.
HANDY TIPS
- Always cool your cream filling completely before folding in whipped cream to maintain its fluffiness.
- For extra flavor depth, consider adding a splash of rum or almond extract along with the vanilla.
3. ASSEMBLE THE CAKE
Let’s put it all together for a stunning presentation that tastes as good as it looks!
9. CUT – Once your choux pastry layers are baked and cooled down (don’t rush this!), carefully cut each layer in half horizontally using a serrated knife to create four layers total—two bottoms and two tops for your cake structure!
10. FILL – Spread an even layer of the vanilla cream filling over one bottom layer of choux pastry using an offset spatula for neatness—you want every bite filled with deliciousness! Place another choux layer on top then repeat until finished with both layers on top—all that creamy goodness sandwiched between crunchy pastry! Dust generously with powdered sugar and sprinkle cocoa powder if desired for that elegant touch!
11. CHILL – Chill in the refrigerator for at least 1 hour before serving; this allows flavors to meld beautifully together!
HANDY TIPS
- If you like more chocolatey notes, consider drizzling some melted dark chocolate over your assembled cake before chilling!
- Make sure to store leftovers covered in the fridge; they’re still delightful straight from there!
Now you’ve crafted this magnificent Karpatka cake that’s not just visually stunning but also delightfully decadent! I hope you’re as excited as I am to taste this masterpiece—it’s bound to impress anyone lucky enough to indulge! Make these once, and I wager they will invade your dreams every night too! – Nagi x
FAQ – Karpatka – Polish Carpathian Mountain Cream Cake
How long will Karpatka keep in the fridge?
Karpatka can be stored in the refrigerator for up to 3 days, but I find that its quality diminishes over time. On day 1, it’s at its best, retaining a moist cream filling and perfectly crisp pastry. By day 2, it’s still enjoyable, about 90% as good. However, by day 3, the choux pastry starts to lose its texture and can become soggy—around 75% as good. If you’re planning to serve this for a gathering, I recommend making it closer to the serving date for optimal freshness.
❄️ Can I freeze Karpatka?
Yes, you can freeze Karpatka! However, I suggest freezing only the choux pastry layers separately without the cream filling. Wrap them tightly in plastic wrap and then place them in an airtight container or freezer bag. They can be frozen for up to 2 months. To thaw, simply transfer them to the refrigerator overnight before assembling with the vanilla cream filling. ⚠️ Just remember that once assembled with the filling, it’s best enjoyed fresh.
🌾 Can I make this recipe gluten-free?
Absolutely! You can substitute the all-purpose flour with a gluten-free all-purpose flour blend that contains xanthan gum; my personal favorite is Bob’s Red Mill 1-to-1 Gluten Free Baking Flour. Keep in mind that while I’ve tested this swap successfully, the texture may differ slightly—still delicious but perhaps not as airy as traditional choux pastry. 💡 For an even lighter version, consider adding a teaspoon of baking powder to help with leavening.
Can I reduce the sugar in the vanilla cream filling?
No, you cannot reduce the sugar in this particular recipe. I’ve tried lowering it multiple times (even down to half), and each time, it resulted in a runny filling that didn’t set properly—definitely not what we want here! The sugar is crucial for both flavor and texture of the cream filling. If you’re looking to cut back on sugar overall, consider serving smaller portions instead!
Why is it important to let the choux pastry cool before adding eggs?
Letting your choux pastry cool slightly before adding eggs is crucial because if you add them when hot, they’ll cook immediately instead of incorporating smoothly into the mixture. This step ensures you achieve that perfect consistency needed for puffing up beautifully during baking. I usually give it about 5 minutes to cool down after removing from heat before adding my eggs one at a time—trust me, it’s worth that extra patience!
😋 Can I customize my vanilla cream filling?
Definitely! While classic vanilla cream is delightful, there are many ways you could elevate its flavor profile. For instance:
- Chocolate: Replace half of the milk with melted dark chocolate for a decadent twist.
- Lemon: Add lemon zest and a tablespoon of lemon juice for a refreshing citrus flair.
- Coffee: Mix in some espresso powder or brewed coffee into your milk for a coffee-flavored filling.
Feel free to experiment based on your preferences; just ensure any additional ingredients don’t alter the overall liquid ratio too much!
Did you really test this recipe multiple times?
Yes! I’ve made Karpatka at least 10 times during my testing phase because nailing down that perfect balance between crispy pastry and rich cream was essential. Each batch taught me something new—what works best and what doesn’t! It’s been quite the delicious journey (and yes, my friends have been thoroughly spoiled)!
Troubleshooting
I will continue to add more to this Troubleshooting section as I start seeing questions coming through from people who have made the recipe.
Troubleshooting tips
“My choux pastry didn’t puff up like yours! 😭”
- You might not have boiled the water and butter mixture long enough before adding the flour. The steam from the boiling liquid helps create that lift, so make sure it reaches a rapid boil.
- If you added all the eggs at once instead of one at a time, your dough could become too wet, preventing proper rising. Mix in each egg completely before adding the next to achieve the right consistency.
- Lastly, if your oven was not preheated properly or opened during baking, it could cause temperature fluctuations leading to flat pastries. Check that your oven is fully heated before popping them in!
I bet they were still YUM though!
“My choux pastry came out too dry and crumbly!”
- This could happen if you cooked the dough too long after adding the flour. Overcooking can dry it out, making it difficult for moisture to develop. Stir just until a ball forms and then remove from heat right away!
- If you added too much flour by measuring incorrectly, that can also lead to dryness. Make sure you’re using the right amount by spooning flour into your measuring cup without packing it down.
- Lastly, if your eggs were on the smaller side or not fully beaten, that could lead to less moisture in your dough. Ensure you’re using large eggs and beat them well before mixing in!
I bet they were still YUM though!
“The top of my choux pastry cracked open while baking!”
- If you opened the oven door during baking, this sudden change in temperature can cause cracks. Avoid opening the door until they are almost done!
- Using an incorrect size of piping or spreading your dough too thin can also lead to cracking as they bake unevenly. Aim for a thickness of about 1cm (0.4 inches) for uniform results!
- Lastly, if your oven temperature was too high or uneven, it may have caused rapid baking which leads to cracks on top. Use an oven thermometer to ensure accuracy next time!
I bet they were still YUM though!
“My vanilla cream filling turned out lumpy!”
- This often occurs if you poured hot milk into the egg mixture too quickly without whisking continuously, leading to curdling. Always add hot liquid slowly while whisking vigorously!
- If you didn’t whisk your cornstarch and sugar mixture well with the egg yolks before adding milk, lumps can form easily as it thickens when heated. Make sure everything is combined smoothly beforehand!
- Finally, cooking at too high a temperature after adding milk can cause clumping as well. Keep it on medium heat and stir gently until thickened for a silky texture!
I bet they were still YUM though!