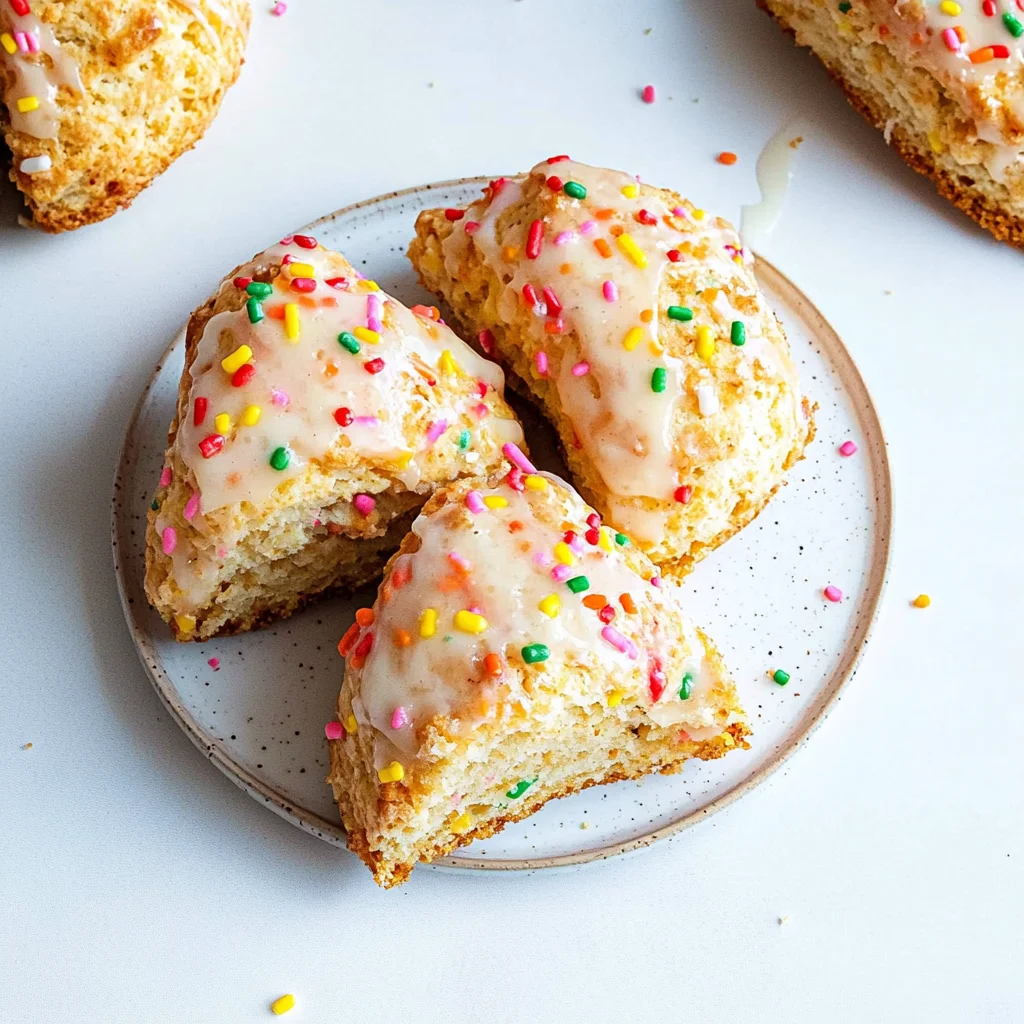
Birthday Cake Scones: Celebrate with Every Bite
I’ve always had a soft spot for birthday cake — the sprinkles, the frosting, the sheer joy it brings. A while back, I stumbled upon a charming little café that served these delightful birthday cake-flavored scones, and I was instantly hooked. It felt like a celebration in every bite, and I thought to myself, “Why not bring that festive joy into my kitchen?” Plus, let’s be honest; making them at home meant I could indulge without breaking the bank or waiting for someone’s birthday to roll around!
After several attempts (okay, maybe more than I care to admit), I finally nailed down this recipe for Birthday Cake Scones. We’re talking about a solid week of baking and an alarming amount of flour dust in my kitchen! Each batch was a lesson learned — too dry here, not sweet enough there — but with each trial, I got one step closer to the fluffy, flavorful perfection I envisioned. Honestly, it was a bit of a comedy show at times; there were scones that looked like they’d been in a fight with the oven, but hey, sometimes you’ve got to make a mess to create magic!
And let me tell you, all those failed attempts were totally worth it! These Birthday Cake Scones turned out to be deliciously fluffy with just the right amount of sweetness and that unmistakable cake flavor that dances on your taste buds. They’re light yet indulgent and perfect for any celebration (or for when you just want to treat yourself). So grab your apron and get ready to whip up a batch — trust me, your taste buds will thank you!
These Birthday Cake Scones are….
…a delightful celebration of flavor and texture that will make any occasion feel special!
1. They deliver an irresistible birthday cake flavor that brings joy to every bite, thanks to a perfect blend of granulated sugar and vanilla extract. This combination not only adds sweetness but also infuses the scones with that nostalgic aroma reminiscent of childhood birthday parties.
2. Incredibly fluffy texture – each scone boasts a soft, tender crumb that melts in your mouth. By incorporating cold, cubed butter into the dry ingredients, I achieved that signature lift and lightness, allowing these scones to rise beautifully while maintaining a delicate structure.
3. A key technique for success is the careful mixing of ingredients, which prevents overworking the dough. I found that gently folding the flour mixture with heavy cream results in a light dough that produces perfectly baked scones without becoming tough.
4. These scones provide exceptional value, easily surpassing store-bought versions in both taste and cost-effectiveness. With simple pantry staples like flour and baking powder, you can whip up a batch of Birthday Cake Scones at home for a fraction of the price, making them accessible for any celebration.
PS These scones yield about 8 generous servings, making them perfect for sharing at your next gathering or enjoying throughout the week!
Ingredients for the Birthday Cake Scones
Each ingredient in this dish plays an essential role in flavor and texture. Here’s what you’ll need:
2 cups all-purpose flour: Provides the structure and base for fluffy scones.
1 tablespoon baking powder: Ensures a light and airy rise during baking.
1/4 cup granulated sugar: Adds sweetness and enhances the cake-like flavor.
1/2 teaspoon salt: Balances sweetness and elevates overall flavor.
1/2 cup unsalted butter (cold, cubed): Contributes richness and flaky texture.
1 large egg: Acts as a binder while adding moisture and richness.
1/2 cup heavy cream: Creates a tender crumb and adds a luxurious mouthfeel.
1 teaspoon vanilla extract: Infuses a warm, sweet aroma reminiscent of birthday cake.
1/2 cup rainbow sprinkles: Provides festive color and a playful crunch.
1/4 cup white chocolate chips: Adds creamy sweetness that complements the scone.
You must cut in the butter. No shortcuts!
I’ll be honest: I tried to skip this step, thinking, “How much difference could it really make?” Spoiler alert: a LOT! After a few rounds of testing (and some rather sad scones), I learned that cutting in the cold butter is the key to fluffy, tender scones. Trust me; it’s worth the extra effort!
The reason this technique is crucial lies in how it affects the texture of your scones. By cutting in cold butter, you create little pockets of fat throughout the dough that melt during baking, resulting in a light and airy crumb. Think of it like making pie crust—those flaky layers come from similar techniques. The combination of all-purpose flour, baking powder, and butter needs that cold approach to ensure your Birthday Cake Scones rise perfectly while remaining tender and delicious.
What does cutting in the butter do?
- Fluffiness — Cold butter helps create steam during baking, which leads to a lighter texture that makes each bite feel airy.
- Tenderness — By breaking up the flour’s gluten formation with small bits of butter, you keep your scones soft instead of dense.
- Flavor distribution — The fat from the butter coats the flour particles, enhancing flavor absorption and creating a richer taste throughout.
- Browning — The small pieces of butter promote even caramelization on the outside of your scones, giving them a beautiful golden hue.
- Moisture retention — Butter holds moisture better than other fats or oils, ensuring your scones stay fresh and moist for longer after baking.
Different cutting-in techniques
- Using a pastry cutter (excellent) — This method ensures even distribution of fat without overworking the dough, leading to perfectly fluffy scones.
- Fork method (good) — While effective, it may not cut the butter as evenly as a pastry cutter; you might get slightly denser scones.
- Food processor (okay) — Quick but requires careful monitoring; too much blending can lead to over-mixed dough that loses its fluffiness.
- Hands method (mixed results) — Rubbing butter into flour can work if done quickly; however, it’s easy to overheat the butter and ruin that desired flakiness.
Don’t underestimate this step! The most common mistake is not using cold butter or overmixing once it’s cut in. If you don’t keep that butter cold or mix too much, you’ll end up with scones that are more like hockey pucks than fluffy delights! Trust me; I learned the hard way 😅
How to make Birthday Cake Scones

Are you ready to see how straightforward it is to make the Birthday Cake Scones of your dreams??
1. PREPARE THE OVEN
Let’s get that oven ready for some fluffy goodness!
1. Preheat – Preheat the oven to 400°F (200°C). This temperature is key for achieving the golden brown exterior and fluffy interior that we all crave in scones.
2. MIX DRY INGREDIENTS
Time to combine those dry ingredients for a solid base!
2. Whisk – In a mixing bowl, whisk together the flour, baking powder, sugar, and salt until well combined. This will ensure that your leavening agent is evenly distributed, which is vital for uniform rising!
3. CUT IN BUTTER
Now, let’s bring in the butter for that flaky texture!
3. Add – Add the cold, cubed butter to the dry ingredients. Using a pastry cutter, mix until the mixture resembles coarse crumbs with pea-sized butter pieces throughout. This step helps create those delightful flaky layers in your scones! ❓ Why does this matter? Because cold butter creates steam when baked, resulting in a light and airy texture.
4. COMBINE WET INGREDIENTS
Let’s add some moisture and flavor!
4. Whisk – In a separate bowl, whisk together the egg, heavy cream, and vanilla extract. Make sure everything is well incorporated; this will be the binding agent that holds your scone dough together.
5. FORM THE DOUGH
It’s time to bring it all together!
5. Pour – Pour the wet mixture into the dry ingredients and gently stir until just combined; be careful not to overmix! Fold in the rainbow sprinkles and white chocolate chips gently so they are evenly distributed without breaking apart.
6. SHAPE AND BAKE
Almost there—let’s shape those scones!
6. Turn – Turn the dough onto a floured surface and pat it into a circle about 1 inch thick. Use a sharp knife or bench scraper to cut into wedges, then place them on a baking sheet lined with parchment paper.
7. Bake – Bake for 15-20 minutes or until golden brown on top and fragrant throughout your kitchen! You’ll know they’re ready when they have risen nicely and you see a lovely golden hue.
7. COOL AND SERVE
The final touch before devouring these beauties!
8. Cool – Allow the scones to cool slightly before serving so you don’t burn your mouth on that delightful warm white chocolate chip! Enjoy your birthday cake scones while they’re still warm!
HANDY TIPS
- For extra height, avoid overworking your dough during mixing.
- If you prefer smaller scones, simply scoop out portions using an ice cream scoop instead of cutting wedges.
- Feel free to swap out white chocolate chips with dark chocolate chips if you’re feeling adventurous!
Make these once, and I wager they will invade your dreams every night too! – Nagi x
FAQ – Birthday Cake Scones
🎉 How long will these scones keep?
These Birthday Cake Scones are best enjoyed fresh, but they can be stored in an airtight container for up to 3 days. After that, they will start to lose their fluffiness and flavor, becoming about 80% as good on day 4 and only 60% by day 5. If you want to maintain their deliciousness, I recommend enjoying them within the first couple of days. If you have leftovers, just reheat them in the oven at a low temperature for a few minutes to bring back some of that original texture!
🥶 Can I freeze these scones for later?
Absolutely! You can freeze the scones before or after baking. If freezing unbaked dough, shape the scones, place them on a baking sheet lined with parchment paper, and freeze until solid. Then transfer them to a zip-lock bag; they’ll keep well for up to 3 months. When you’re ready to bake, just pop them straight from the freezer into a preheated oven, adding an extra 5 minutes to the baking time. If you’ve already baked them, let them cool completely before freezing; reheat in a 350°F (175°C) oven for about 10-15 minutes.
🌾 Can I make these scones gluten-free?
Yes, you can! To make gluten-free Birthday Cake Scones, use a high-quality gluten-free all-purpose flour blend that contains xanthan gum. I recommend brands like Bob’s Red Mill or King Arthur Flour since they’ve worked well in my tests. The texture might be slightly different—more delicate—but they will still be deliciously flavorful with that birthday cake essence! Just remember that gluten-free flours can sometimes absorb more liquid, so you might need to adjust the amount of heavy cream slightly.
🍯 Can I substitute the white chocolate chips?
Definitely! While I love the sweetness of white chocolate chips combined with sprinkles, you could swap them out for dark chocolate chips or even butterscotch chips if you’re feeling adventurous! Just keep in mind that dark chocolate will add a rich bitterness that contrasts nicely with the sweetness of the scone. If you’re looking for something lighter, consider using dried fruits like cranberries or apricots instead—they’ll offer a chewy texture and a burst of flavor.
⏲️ Do I really need to chill the dough?
Nope! Chilling isn’t necessary for this recipe. I’ve tested it both ways: with chilled dough and without. The difference was negligible in terms of fluffiness and rise! The key is using cold butter when cutting it into your dry ingredients; this ensures those lovely flaky layers form while baking, which is what we want in a perfect scone.
🔍 How many times did you test this recipe?
I tested these Birthday Cake Scones a whopping ten times—yes, I’m a little mad like that! 😅 Each iteration helped me refine the balance between sweetness and fluffiness until I hit the jackpot. This is definitely one of those recipes where precision matters—especially with ingredient ratios—to achieve that light and fluffy texture we all crave in a good scone!
🎈 Can I customize these scones with different add-ins?
You absolutely can customize these scones based on your preferences! You could add nuts (like chopped pecans or walnuts) for crunch or even different flavored extracts—try almond extract instead of vanilla for an interesting twist! Just keep your total add-ins around 3/4 cup so they don’t overwhelm the dough. The beauty of this recipe is its versatility; feel free to get creative while keeping that birthday cake spirit alive!
Troubleshooting
I will continue to add more to this Troubleshooting section as I start seeing questions coming through from people who have made the recipe.
Troubleshooting tips
“My scones turned out too flat! 😩”
- You may have not added enough baking powder. The 1 tablespoon should create enough lift, but if it’s old or expired, it won’t activate properly.
- If your butter was too warm when you mixed it in, it can cause the dough to lose its structure and spread out instead of rising.
I bet they were still YUM though!
“My scones are way too dry! 😢”
- Overmixing your dough after adding the wet ingredients can lead to tough, dry scones. Mix just until combined!
- Using too much flour can also result in dryness. Make sure to measure accurately, as 2 cups should be leveled off and not packed down.
I bet they were still YUM though!
“My scones have a weird texture! What did I do wrong? 🤔”
- If your butter wasn’t cold enough when cutting into the dry ingredients, it could lead to a gummy texture instead of the desired fluffiness. Aim for very cold butter!
- Not folding in the sprinkles and white chocolate chips gently might have caused uneven distribution, leading to clumps that affect texture.
I bet they were still YUM though!
“Why are my scones so pale? They look undercooked! 😱”
- If your oven isn’t at the correct temperature (400°F), your scones might not brown properly. An oven thermometer can help ensure accuracy!
- Baking for less than 15 minutes could lead to underbaked scones that don’t get that lovely golden color on top. Keep an eye on them towards the end of baking time!
I bet they were still YUM though!
Birthday Cake Scones
Ingredients
Method
- Preheat the oven to 400°F (200°C).
- In a mixing bowl, whisk together the flour, baking powder, sugar, and salt.
- Add the cold, cubed butter to the dry ingredients and use a pastry cutter to mix until the mixture resembles coarse crumbs.
- In a separate bowl, whisk together the egg, heavy cream, and vanilla extract.
- Pour the wet mixture into the dry ingredients and stir until just combined. Fold in the sprinkles and white chocolate chips.
- Turn the dough onto a floured surface and pat it into a circle about 1 inch thick. Cut into wedges and place on a baking sheet.
- Bake for 15-20 minutes or until golden brown.
- Allow the scones to cool slightly before serving. Enjoy your birthday cake scones!