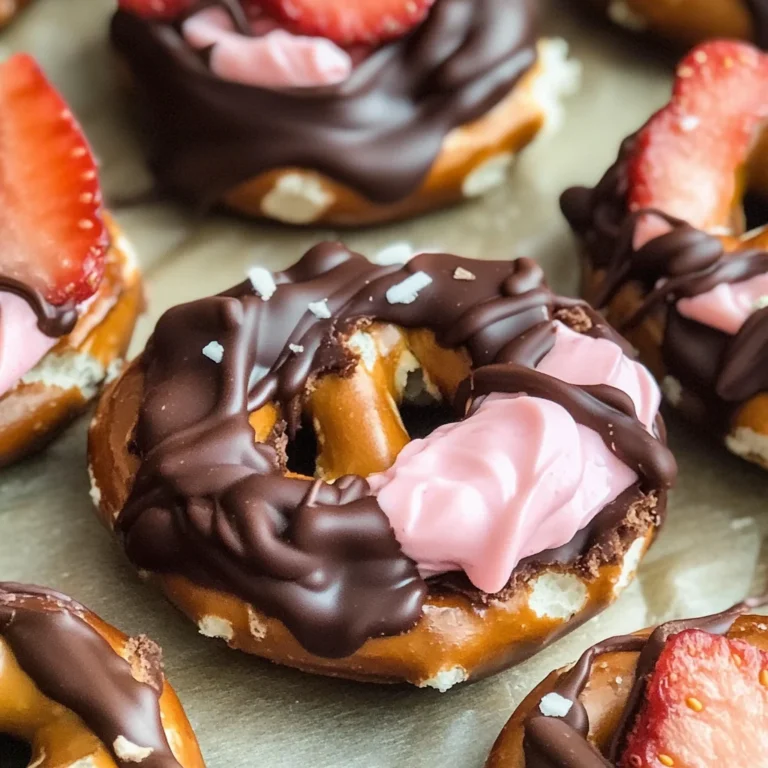
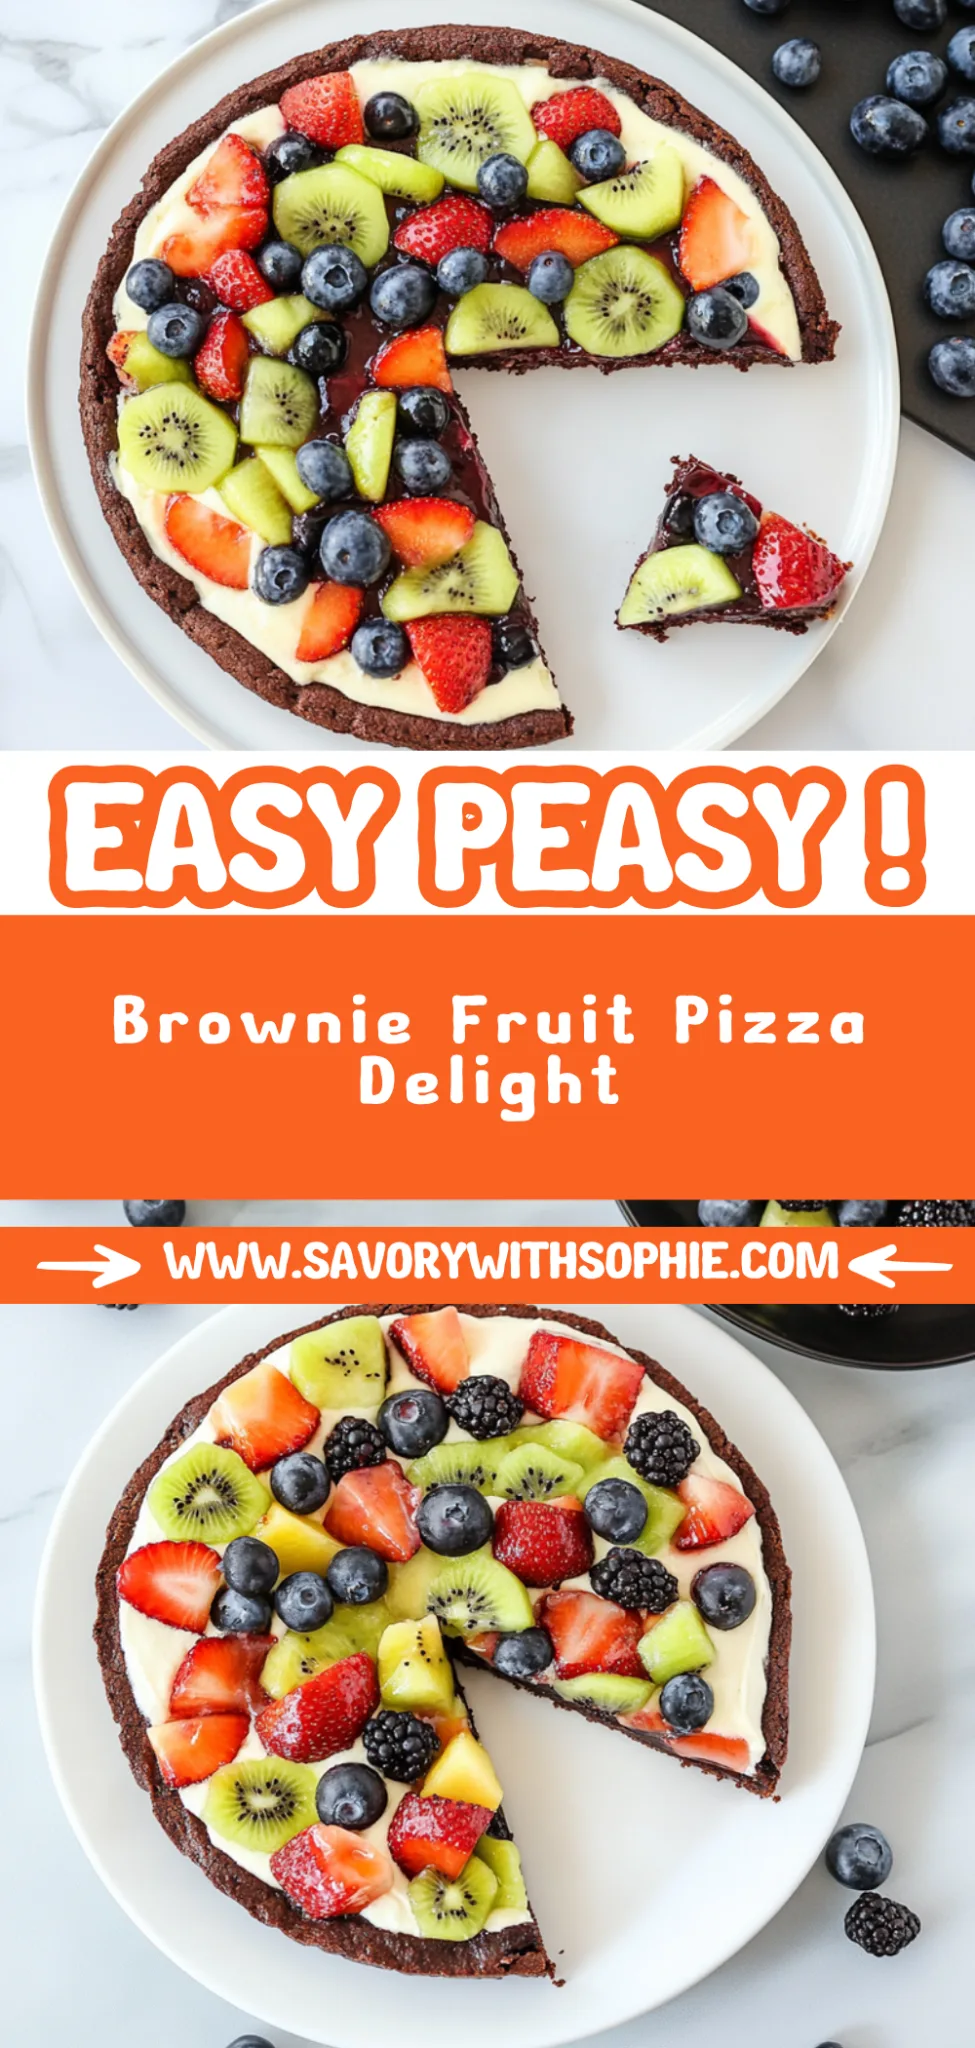
Brownie Fruit Pizza: A Deliciously Fudgy Treat at Home
I first stumbled upon the idea of a Brownie Fruit Pizza at a quaint little café during a road trip. The moment I took a bite of that rich, fudgy brownie base topped with vibrant fresh fruits and a luscious creamy layer, it was like fireworks went off in my mouth! I couldn’t help but think how amazing it would be to recreate that indulgence at home. Plus, let’s be real—who doesn’t want to save a few bucks while making something even more delicious than what you’d find at a café?
After returning home, I dove headfirst into my kitchen for what can only be described as an epic testing journey. I lost count after my fifth attempt, trying to perfect the brownie base without turning it into a brick and figuring out how to balance the creaminess with just the right amount of sweetness. Let’s just say there were some unfortunate ‘experiments’ that ended up in the bin. But each iteration brought me closer to that heavenly combination I was aiming for—trust me, I wasn’t going to settle for anything less!
But oh, was it worth every messy minute! The final result is nothing short of spectacular—a Brownie Fruit Pizza that boasts an irresistibly chewy brownie base topped with an explosion of fresh fruit and a creamy topping that’ll make your taste buds dance. It’s got this perfect balance of rich chocolate flavor and refreshing fruity goodness, plus it looks stunning on any dessert table! So grab your apron and get ready to impress—this dessert is bound to steal the show!
These Brownie Fruit Pizza are….
…a delightful fusion of indulgent chocolate and vibrant fresh fruit that you simply can’t resist!
1. They deliver a decadent chocolate flavor that will have you swooning with every bite. The rich cocoa powder and the melted butter work together beautifully to create a deep, luscious taste that makes these brownies the perfect base for any dessert.
2. Irresistibly fudgy texture – each slice offers a satisfyingly soft and chewy interior, achieved through the careful balance of eggs and flour. This combination ensures that while the edges may have a slight crispness, the center remains delightfully gooey, making it an unforgettable treat.
3. A crucial baking technique is using melted butter instead of softened butter, which I found elevates both moisture and richness in the brownie base. This method infuses a deeper flavor profile and allows for that melt-in-your-mouth experience everyone craves from a brownie.
4. Incredible value – making these Brownie Fruit Pizza at home means you can enjoy an extravagant dessert without breaking the bank. With accessible ingredients like granulated sugar and all-purpose flour, this recipe not only saves money compared to store-bought options but also allows you to customize your toppings to suit your taste.
PS These brownies yield a generous 12-inch pizza, perfect for sharing at gatherings or parties!
Ingredients for the Brownie Fruit Pizza
Each ingredient in this dish plays an essential role in flavor and texture. Here’s what you’ll need:
- 1 cup granulated sugar: Sweetens the brownie base and enhances its richness.
- 1/2 cup unsalted butter (melted): Provides moisture and a luscious texture.
- 2 large eggs: Binds the ingredients together while adding richness.
- 1 teaspoon vanilla extract: Infuses a warm, aromatic flavor to the brownies.
- 1/3 cup unsweetened cocoa powder: Delivers deep chocolate flavor essential for brownies.
- 1 cup all-purpose flour: Creates structure and stability in the brownie base.
- 1/4 teaspoon salt: Balances sweetness and enhances all flavors.
- 1/4 teaspoon baking powder: Helps the brownie rise slightly for a lighter texture.
- 1 cup cream cheese (softened): Forms a creamy and tangy layer atop the brownie.
- 1/2 cup powdered sugar: Sweetens the cream cheese topping for a delightful contrast.
- 1 teaspoon vanilla extract: Adds an extra layer of flavor to the creamy topping.
- 1 cup mixed fresh fruits (such as strawberries, blueberries, and kiwi): Provides freshness and vibrant color that brighten the dessert.
You Must Let the Brownies Cool Completely. Trust Me!
I know, I know—waiting is the hardest part, and it can feel like torture when you’re just itching to dive into that decadent brownie fruit pizza. I tried to cut corners before, thinking I could just rush the cooling process, but the results were a melted mess that even my dog wouldn’t touch. So trust me when I say: patience is key.
Letting your brownies cool completely in the pan is crucial for achieving that perfect texture. Imagine trying to slice a hot cake; it crumbles and tears apart instead of forming those lovely clean edges we all want. The same goes for brownies! Cooling allows them to set properly, resulting in a rich, fudgy base that holds together beautifully once topped with that creamy layer and fresh fruit.
What does cooling do?
- Texture — As brownies cool, they firm up, creating a chewy, fudgy texture that’s melt-in-your-mouth delicious instead of a gooey disaster.
- Ease of slicing — A cooled brownie allows for clean cuts, giving you those perfect wedges ready for serving without falling apart.
- Flavor development — Cooling enhances the deep chocolate flavor as it allows the sugars to settle and meld together, resulting in a more complex taste experience.
- Stability — A well-cooled brownie provides a sturdy base for your cream cheese topping and fresh fruits, preventing any sogginess or slippage.
- Presentation — Cool brownies look much more appealing when plated. You want your dessert to be eye-catching as well as tasty!
Different cooling times
- 30 minutes (mediocre) — They’re still warm and may fall apart when you slice. Not ideal if you want to impress!
- 1 hour (good) — Better than 30 minutes, but still slightly soft in the center; edges may hold up better while the middle remains gooey.
- 2 hours (great) — Perfectly set, easy to slice without any mess, giving you beautifully defined edges on each piece.
- Overnight (⭐️ best ⭐️) — This is where magic happens! The flavors deepen and the texture becomes incredibly rich and fudgy; plus, they are super easy to handle.
But here’s the kicker: don’t even think about slicing into them while they’re still warm! The most common mistake people make is trying to rush this step and ending up with a crumbly mess. No shortcuts here—let them cool completely!
How to make Brownie Fruit Pizza
Are you ready to see how straightforward it is to make the Brownie Fruit Pizza of your dreams??
1. PREPARE THE BROWNIE BASE
Let’s start with the foundation of this delicious dessert!
1. Preheat – Preheat the oven to 350°F (175°C). This ensures your brownies will bake evenly and rise beautifully.
2. Mix – In a mixing bowl, combine melted butter and sugar, and mix well until fully blended. This step helps create a rich base by dissolving the sugar into the buttery goodness.
3. Add – Add eggs and vanilla extract, and stir until combined. The eggs will provide structure while the vanilla adds a lovely aroma!
4. Whisk – In a separate bowl, whisk together cocoa powder, flour, salt, and baking powder. This step ensures that your dry ingredients are evenly distributed, which is crucial for consistent baking.
5. Combine – Gradually add dry ingredients to the wet mixture, stirring until just combined. Be careful not to overmix; you want those brownies fudgy!
6. Pour – Pour the brownie batter into a greased baking pan and spread evenly. Using a spatula helps to achieve an even layer.
7. Bake – Bake in the preheated oven for 20-25 minutes or until a toothpick comes out clean. The edges should look set while the center remains slightly soft — this is the perfect texture!
8. Cool – Allow the brownies to cool completely in the pan before topping them. This will help prevent any melting of your cream cheese topping.
HANDY TIPS
- For extra fudginess, consider reducing the flour by a tablespoon or two; it makes all the difference!
- Make sure not to overbake! You’ll know they’re done when they’re set but still slightly soft in the center.
2. PREPARE THE TOPPING
Now let’s elevate those brownies with a creamy topping!
9. Beat – In a mixing bowl, beat the softened cream cheese until smooth. This helps to create that luscious texture we all love in cream cheese frosting.
10. Mix – Add powdered sugar and vanilla extract, and mix until well combined. The powdered sugar sweetens your topping while also providing that perfect frosting consistency.
11. Spread – Spread the cream cheese mixture evenly over the cooled brownie base using an offset spatula for smoothness.
12. Top – Top with mixed fresh fruits, arranging them as desired for a colorful presentation! Feel free to get creative here — it’s part of the fun!
13. Slice – Slice into wedges and serve immediately or refrigerate until ready to serve for a refreshing treat.
HANDY TIPS
- For an extra touch of flavor, try adding a dash of lemon zest to your cream cheese mixture!
- Make sure your fruit is fresh — ripe strawberries, blueberries, and kiwi add both flavor and vibrant color!
You’ve just created a stunning Brownie Fruit Pizza that’s perfect for any gathering or simply as a delightful treat for yourself! With just 45 minutes from start to finish, you’ve managed to whip up something truly special — deliciously rich brownies topped with creamy sweetness and juicy fruits! I can’t wait for you to dig in! – Nagi x
FAQ – Brownie Fruit Pizza
🍰 How long will these brownies keep?
The Brownie Fruit Pizza is best enjoyed fresh, but if you have leftovers, they can be stored in the refrigerator for up to 3 days. I found that the brownie base remains about 90% as good on day 2 and still 80% as good by day 3 — though the fruits might lose a bit of their vibrant freshness. To store, simply cover it tightly with plastic wrap or place it in an airtight container to prevent drying out.
⏲️ Do I really need to let the brownies cool completely?
Yes, please cool those brownies completely! Skipping this step might result in a gooey mess when you spread the cream cheese topping. I recommend allowing them to cool for at least 30 minutes in the pan after baking. If you’re short on time (and let’s be honest, who isn’t?), try transferring them to a wire rack after about 10 minutes to speed up the cooling process.
❄️ Can I freeze the Brownie Fruit Pizza?
Absolutely! To freeze, make sure the brownie base is completely cooled and topped with the cream cheese mixture. Wrap it tightly in plastic wrap and then aluminum foil to prevent freezer burn. It can be frozen for up to 2 months. When you’re ready to enjoy it, simply thaw it overnight in the refrigerator and add fresh fruits right before serving for that delightful crunch!
🌾 Is there a gluten-free option for this recipe?
Yes! You can easily make this dessert gluten-free by swapping out the all-purpose flour with a gluten-free flour blend. I’ve tested it with both almond flour and a 1: 1 gluten-free blend, and both worked wonderfully! Just keep in mind that using almond flour may result in a slightly denser texture. 💡 Also, make sure your cocoa powder is certified gluten-free if you’re sensitive!
🥛 Can I substitute cream cheese with something else?
If you’re looking for a dairy-free option or simply don’t like cream cheese, you can substitute it with coconut cream or a vegan cream cheese alternative. Just ensure that whatever substitute you choose is thick enough to hold its shape when spread across the brownie base. Personally, I prefer using coconut cream because it adds a lovely tropical twist!
🔍 Why do I need to whisk dry ingredients separately before combining?
Whisking your dry ingredients separately — like cocoa powder, flour, salt, and baking powder — ensures that they are evenly distributed throughout your batter. This helps avoid clumps of cocoa or baking powder in your brownies. Trust me; I’ve tested various methods and found that taking this extra step leads to a more consistent texture throughout the brownie base.
😋 Can I add nuts or other toppings to customize my pizza?
Definitely! Feel free to get creative with your toppings. Chopped nuts like walnuts or pecans can add a wonderful crunch alongside your fresh fruits. You could also drizzle some chocolate ganache over the top for an indulgent touch! Just remember not to overload it too much; you want each slice to hold together nicely while still being packed with flavor.
Troubleshooting
I will continue to add more to this Troubleshooting section as I start seeing questions coming through from people who have made the recipe.
Troubleshooting tips
“My brownie base is too thin! 😩”
- If you didn’t use the specified amount of flour (1 cup), the batter might not have enough structure, resulting in a thinner brownie. Flour is essential for providing stability.
- Overmixing the batter after adding the dry ingredients can lead to a runny texture, as it incorporates too much air and causes the brownies to spread too much during baking.
- I bet they were still YUM though!
“My brownies came out dry and crumbly! 😢”
- If you overbaked your brownies beyond the recommended 20-25 minutes, they could become dry. Always check with a toothpick a minute or two before the time is up.
- Not measuring the melted butter properly (1/2 cup) can cause dryness. If there’s not enough fat, the brownies won’t be moist and fudgy.
- I bet they were still YUM though!
“The top of my brownies cracked! 😱”
- Overmixing your batter, especially after adding eggs, can introduce too much air, leading to cracks while baking. Mix until just combined!
- Baking at too high of a temperature can cause rapid rising and cracking. Make sure your oven is set to 350°F (175°C) for optimal results.
- I bet they were still YUM though!
“My brownie pizza looks uneven and wonky! 🤔”
- If you didn’t spread the brownie batter evenly in the pan before baking, it could rise unevenly, leading to an unattractive shape. Use a spatula to spread it out smoothly!
- Not greasing your pan sufficiently can cause sticking in some areas, resulting in an uneven top when you remove it from the pan.
- I bet they were still YUM though!