Easy Peanut Butter Fudge
There’s something truly magical about making fudge, isn’t there? It’s like capturing a moment of joy and sweetness in a piece of candy, a delightful treat that evokes nostalgia and warmth. I can vividly remember the first time I indulged in a rich, creamy slice of peanut butter fudge. The way it melted on my tongue, the sweet and nutty flavors dancing together—it was an experience that felt almost sacred. This Easy Peanut Butter Fudge is not just a recipe; it’s an invitation to create those same cherished moments in your own kitchen. With only three simple ingredients and just a few minutes of your time, you’ll find yourself crafting a dessert that will leave friends and family begging for more.
What makes this Easy Peanut Butter Fudge so special is its simplicity paired with its indulgent flavor profile. Imagine the smoothness of peanut butter mingling with the sweetness of vanilla frosting and the irresistible crunch from Reese’s peanut butter baking chips. Each bite is like a warm hug on a chilly day, enveloping you in comfort and satisfaction. I promise you, once you make this fudge, it becomes your go-to treat for any occasion—birthdays, holidays, or even just because you deserve something sweet today! So let’s roll up our sleeves and dive into this delightful confection that I know will soon hold a special place in your heart as it does in mine.
Ingredients:
As we embark on this delicious culinary journey together, let’s take a moment to appreciate each ingredient that plays a vital role in our Easy Peanut Butter Fudge. They may seem simple at first glance, but each one contributes uniquely to the final product.
- 16 oz vanilla frosting. This is where the magic really begins! Using vanilla frosting as our base provides an incredibly creamy texture that is absolutely crucial for achieving that melt-in-your-mouth quality we all crave in fudge. It adds sweetness without overwhelming the palate; think of it as the canvas upon which our flavors will dance. When selecting frosting, look for high-quality brands that use real sugar instead of corn syrup for the best taste. The frosting acts as both a binder and flavor enhancer, bringing everything together beautifully.
- 3/4 cup smooth peanut butter. Ahh, peanut butter—nature’s liquid gold! Its rich creaminess is non-negotiable for this recipe; we want that silkiness to shine through every bite of fudge. Plus, smooth peanut butter ensures that we have a luscious mouthfeel rather than chunks interrupting our experience. When choosing your peanut butter, opt for varieties with minimal ingredients—just peanuts and salt are perfect—to keep things pure and delicious. This ingredient not only enhances flavor but also gives our fudge an appealing richness that’s simply irresistible.
- 10 oz Reese’s peanut butter baking chips. These little gems add an extra layer of indulgence that takes our Easy Peanut Butter Fudge to another level entirely! The chocolatey exterior combined with creamy peanut butter inside creates an utterly intoxicating experience with every mouthful. If you can’t find Reese’s chips specifically (though they’re quite popular), feel free to substitute with another brand or even semi-sweet chocolate chips if you’re feeling adventurous—just make sure they’re specifically made for baking so they melt perfectly within our mixture.
Equipment You’ll Need:
Now before we get started mixing our flavors together, let’s talk about the essential tools you’ll need to ensure your fudge-making adventure goes off without a hitch! Having the right equipment makes all the difference in creating something wonderful without unnecessary stress.
- 9-inch square baking pan – This trusty pan is key for shaping your fudge into those perfect squares we all love. A square pan allows for even cooling and slicing later on; if it’s too large or small, you might end up with unevenly cooked fudge! If you don’t have one handy, any similar-sized dish will work—just adjust your chilling time accordingly.
- Microwave-safe bowl – This bowl will be your best friend throughout this process! A microwave-safe bowl ensures safe melting of our ingredients without any mess or fuss. Choose one that’s large enough to hold all three ingredients comfortably so they can blend together seamlessly when melted.
- Wax paper – While it may seem like an afterthought, lining your baking pan with wax paper is absolutely crucial for easy removal once your fudge has set! Not only does it prevent sticking (which would lead to heartbreak when trying to slice), but it also keeps cleanup quick and easy—a true win-win situation!
With all these elements prepped and ready to go, let’s delve into preparing this scrumptious Easy Peanut Butter Fudge!
Step 1: Line Your Baking Pan with Love
First things first: grab that trusty 9-inch baking pan and line it with wax paper. Trust me on this—this step is essential because it provides a barrier between your fudge and the pan itself, preventing any sticky disasters when you’re ready to slice into those luscious squares later on! Make sure to leave some overhang on two sides; this will act as handles when lifting out your beautiful creation post-chill!
Step 2: Combine Your Ingredients
Next up is where the excitement begins! In a microwave-safe bowl (remember how important that was?), dump in all three ingredients: the vanilla frosting, smooth peanut butter, and Reese’s peanut butter baking chips. Yes—just throw them all together without hesitation! Microwaving them allows everything to meld beautifully into one harmonious mixture that’s simply delightful.
Step 3: Microwave Until Melted
Now comes the fun part—microwaving! Pop your bowl into the microwave on High for one minute. As you wait those long seconds (I know—it feels like forever!), envision how glorious your fudge will be once it’s ready. Once done, check it out; give it a good stir until everything melts down into silky perfection. If some chips are stubbornly hanging around unmelted after stirring, don’t fret! Simply return them to the microwave for an additional 20 seconds—stir again until smooth.
Step 4: Spread It Evenly
Once you’ve achieved that luxurious molten consistency (swoon!), pour your mixture directly into the prepared baking pan. Don’t be shy here; spread it evenly across so every piece has consistent thickness when sliced later on! Use a spatula if needed to get those edges nice and tidy—it’s worth taking time here because uniformity means gorgeous slices full of flavor!
Stay tuned as we move forward into chilling mode where patience truly pays off…
Easy Peanut Butter Fudge: A Journey to Sweet Satisfaction
I can hardly contain my excitement as we dive deeper into the world of Easy Peanut Butter Fudge! This is not just any fudge; it’s a delightful concoction that melts in your mouth, leaving you with a creamy, nutty aftertaste that lingers like a warm hug. Now that we’ve combined our three magical ingredients, let’s explore the next steps to ensure that everything comes together perfectly.
Step 5: Melting Magic in the Microwave
Now comes one of the most thrilling moments in our fudge-making journey: melting those luscious peanut butter baking chips! You’ll want to take a microwave-safe bowl and toss in your measured 16 ounces of vanilla frosting, 3/4 cup of smooth peanut butter, and 10 ounces of Reese’s peanut butter baking chips. Trust me on this—each ingredient plays a crucial role in creating that silky texture we all crave. The frosting acts as the sweet foundation, while the peanut butter adds creaminess and depth. The baking chips? They add an utterly intoxicating punch of roasted peanut flavor.
Microwave everything on high for one minute, but don’t just walk away! This step is about coaxing the ingredients into a blissful union rather than forcing them. When your timer goes off, grab a spatula and give it a good stir. You’ll find some of those baking chips might still be holding their shape—no worries! Just pop it back in for another 20 seconds if needed. You want to achieve a smooth mixture where every last bit is melted and seamlessly blended; this is absolutely paramount for achieving that melt-in-your-mouth experience later on.
Step 6: Spreading Happiness
Once you’ve reached that velvety consistency—oh, the aroma wafting through your kitchen will be nothing short of heavenly—you’re ready for the next exciting step: pouring your fudge mixture into the prepared baking pan lined with wax paper. But here’s where you need to channel your inner artist; spread that mixture evenly with your spatula, making sure it fills every corner of the pan. Don’t rush this part! Taking your time ensures each bite will be equally satisfying when you finally slice into it.
As you spread it out, you’ll notice how glossy and decadent it looks—it’s truly a sight to behold! This even distribution is important because it guarantees uniform thickness throughout your fudge pieces. Imagine biting into one square only to find it thicker than another; that imbalance would be downright tragic! So take a moment here to savor not just the smell but also the anticipation building up inside you—this fudge is going to be extraordinary!
Step 7: The Waiting Game
Now we reach one of those pivotal moments in cooking where patience becomes our best friend—the chilling process! Place your pan filled with fudge in the refrigerator and allow it to chill for at least an hour. I know waiting can feel challenging when you’re so close to tasting something divine, but trust me on this—the chill time allows all those beautiful flavors to marry together while firming up the texture.
Why is chilling crucial? Well, when you let your fudge set properly, you’re allowing sugars to crystallize and fats to solidify. This results in a fudgy texture that’s both creamy yet firm enough to hold its shape when sliced. Keep an eye on the clock—after about an hour, you’ll start getting fidgety (believe me, I’ve been there!). But I promise you, if you can hold out just a little longer, what awaits you will be profoundly satisfying.
Step 8: The Grand Reveal
After what feels like an eternity (but really was just an hour), it’s finally time for the grand reveal! Carefully lift your chilled fudge from the baking pan using those handy wax paper edges; feeling that first tug as you pull it out is pure joy! Set it down on a cutting board and behold—it has transformed into a beautiful block of indulgence waiting to be sliced into perfect squares.
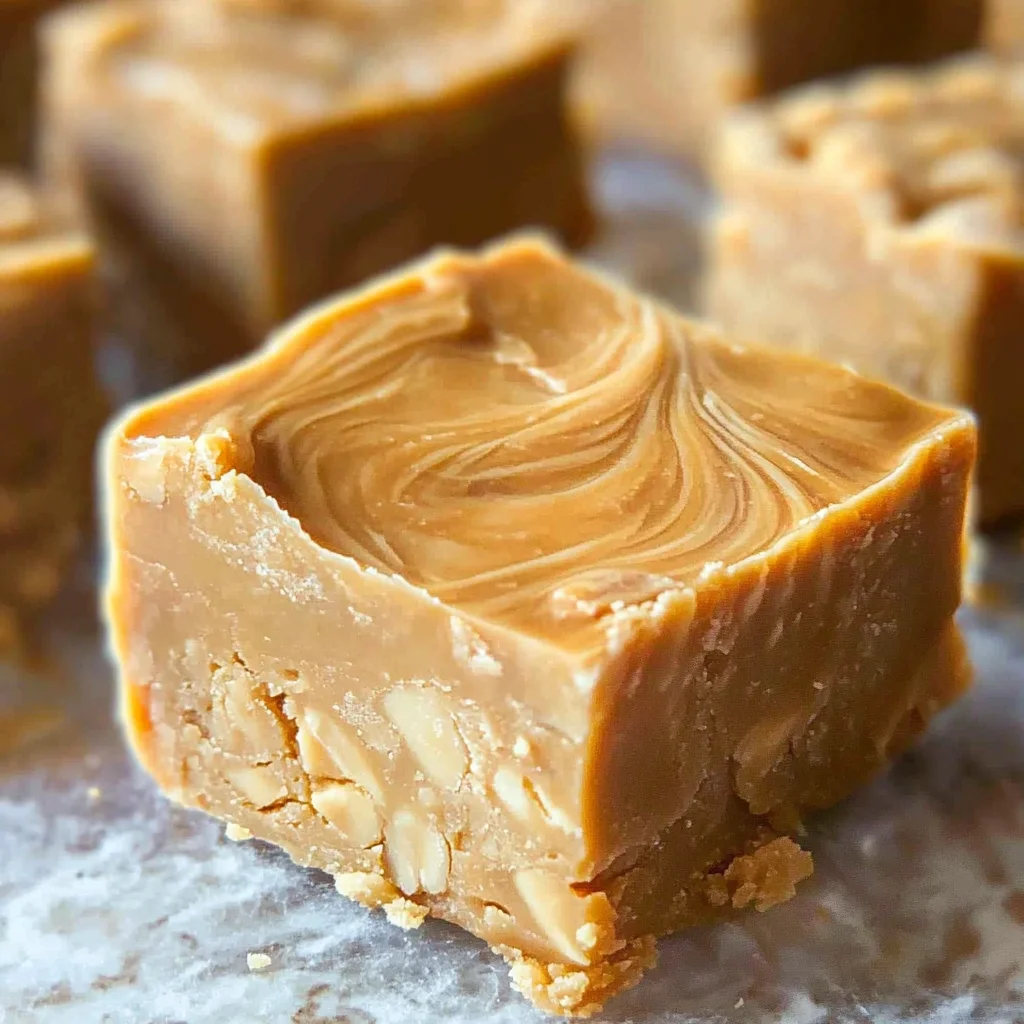
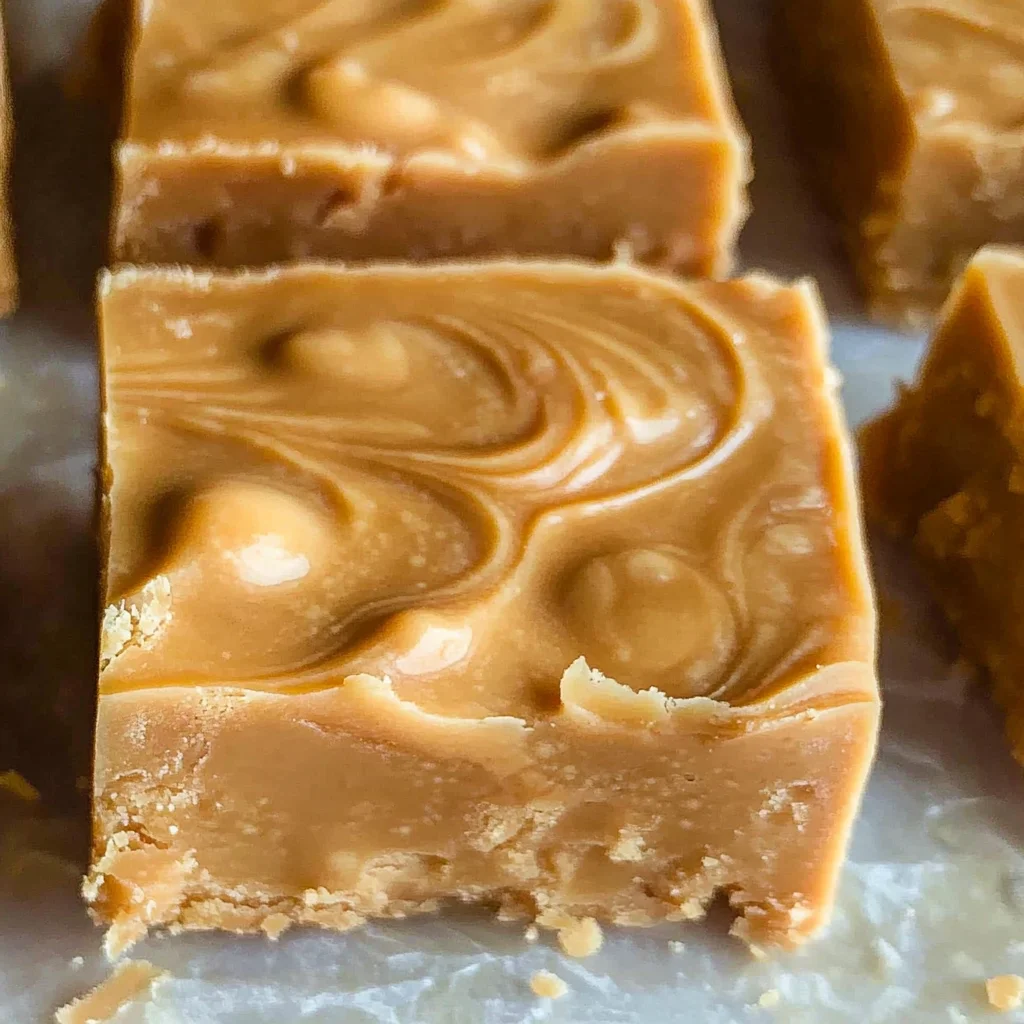
Now comes another critical moment—slicing! Use a sharp knife (a warm knife works wonders for clean cuts) and gently cut through the fudge into 36 delightful pieces. As you slice through that creamy layer, notice how smooth and luscious each piece looks; it’s almost too beautiful to eat! But don’t let aesthetics fool you; these bites are meant for enjoyment. If at any point during slicing you notice resistance or crumbling, don’t panic—it just means your fudge may need more chill time next time around.
Final Touches: Indulge Your Senses
To relish these morsels fully, serve them on a lovely platter where they can shine like stars at your dessert table or simply stash them in an airtight container for snacking later (though trust me, they won’t last long!). Each bite will take you back to childhood memories of sweet treats shared with friends and family—a nostalgic journey wrapped up in flavors that feel familiar yet exhilaratingly new.
So there you have it—the complete saga of Easy Peanut Butter Fudge from start to finish! I can’t wait for you all to try this delectable treat at home and share it with everyone around you—it’s bound to bring smiles and happy hearts wherever they go!
Storage and Enjoyment Tips for Your Easy Peanut Butter Fudge
Now that your Easy Peanut Butter Fudge has set into a blissful, creamy confection, it’s time to dive into the delightful world of storage and enjoyment. Trust me when I say that this fudge isn’t just a treat for today; it can be your go-to sweet indulgence for days to come. The rich aroma of peanut butter melded with the sweetness of vanilla frosting creates a symphony of flavors that will have you reaching for another piece long after the first one has melted in your mouth. But let’s talk about how to keep this deliciousness fresh and ready for whenever those fudge cravings strike!
Storing Leftover Easy Peanut Butter Fudge
To preserve the integrity of your Easy Peanut Butter Fudge, I recommend storing it in an airtight container. This simple yet crucial step will help maintain its texture and flavor while preventing it from drying out. If you’re planning to enjoy your fudge within a week, storing it at room temperature is perfectly fine. However, if you want to keep it longer—up to two weeks—you might consider placing it in the refrigerator. Just remember, cold temperatures can dull the flavor slightly, so allow it to sit at room temperature for about 10-15 minutes before indulging again! Oh, and here’s a fun pro tip: if you place a slice of bread in the container with your fudge, it can help retain moisture and keep everything wonderfully soft. When stored properly, this fudge develops a deeper flavor over time, becoming even more profoundly satisfying as each day passes.
Freezing Easy Peanut Butter Fudge for Later
If you find yourself with an abundance of fudge (which is hard to imagine), or want to prepare ahead for a special occasion, freezing is an excellent option! To freeze your Easy Peanut Butter Fudge properly, first slice it into individual pieces and wrap each piece tightly in plastic wrap or parchment paper. Then place all those little bundles of joy into a freezer-safe bag or container—this keeps them secure from freezer burn. When frozen correctly, your fudge can last up to three months without losing any of its luscious charm! When you’re ready to indulge again, simply pull out as many pieces as you like and let them thaw in the fridge or at room temperature. The convenience factor here is absolutely paramount; having homemade fudge ready at your fingertips means spontaneous celebrations or cozy nights in just got sweeter!