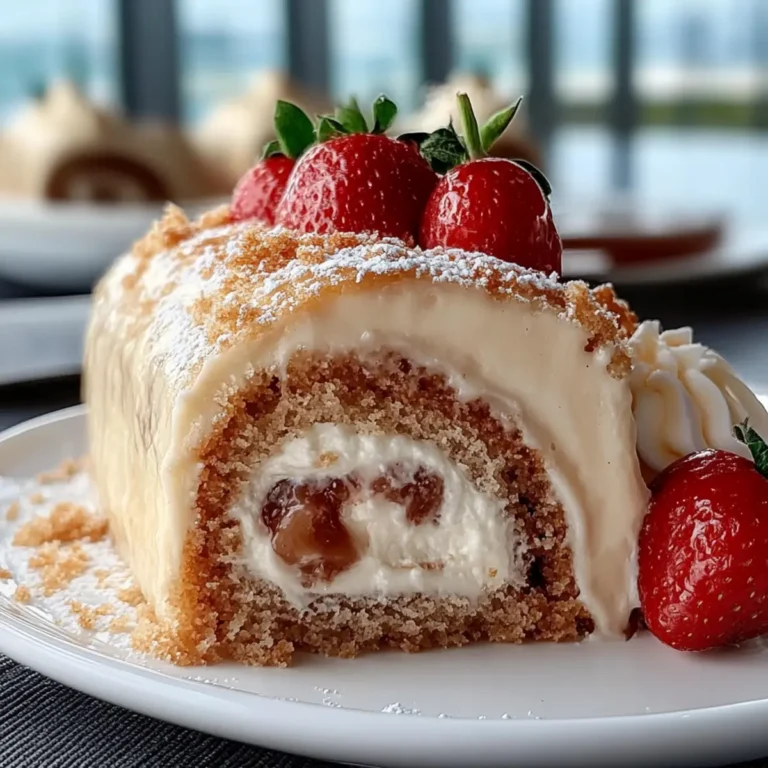
Decadent Hawaiian Guava Cake: A Slice of Paradise
There’s something utterly magical about baking a cake that not only satisfies your sweet tooth but also transports you to a sun-kissed paradise. I’ve always been captivated by the vibrant flavors of Hawaii, and this Decadent Hawaiian Guava Cake: A Slice of Paradise is like a warm hug from the islands themselves. Imagine the rich aroma of coconut mingling with the sweet, tropical notes of guava as you whip up this delightful dessert. It’s more than just a cake; it’s an experience that fills your kitchen with joy and creates memories with every slice shared among loved ones. Each bite reveals a symphony of flavors, taking you on a journey straight to sandy beaches and swaying palm trees. Trust me when I say, once you try this cake, it will hold a special place in your heart—just like it does in mine.
This recipe holds dear significance, intertwining tradition with a modern twist that makes it accessible for any home baker. The use of strawberry cake mix serves as the perfect canvas for the lush guava nectar and creamy coconut oil, creating an incredibly moist cake that is both easy to prepare and profoundly satisfying. Whether you’re celebrating a birthday, hosting a summer barbecue, or simply indulging in a sweet treat after dinner, this Decadent Hawaiian Guava Cake is perfect for all occasions. Its vibrant colors and tropical flavors will have your guests eagerly lining up for seconds, leaving them enchanted by its charm. What could be better than sharing slices of paradise while making unforgettable memories?
Decadent Hawaiian Guava Cake: A Slice of Paradise: An Invitation to Tropical Bliss
Let’s embark on this culinary journey together! Preparing this Decadent Hawaiian Guava Cake is not just about following steps; it’s about immersing yourself in the process and letting the ingredients lead you to something truly extraordinary. With each addition, you’ll feel like you’re crafting magic right in your own kitchen.
Ingredients:
As we prepare to create this tropical delight, let’s take a moment to appreciate each ingredient that plays a vital role in our Decadent Hawaiian Guava Cake. This isn’t just about throwing things into a bowl; it’s about understanding how these elements come together to create something truly special.
- 1 box Strawberry Cake Mix. This convenient ingredient acts as our foundation for flavor and texture, ensuring that we achieve that light, fluffy crumb we all crave in a cake. While it may seem like an easy shortcut, don’t underestimate its potential; it brings sweetness and moisture while harmonizing beautifully with our tropical additions. If you’re feeling adventurous or want to make it from scratch, look for recipes that incorporate similar ratios of flour and sugar to create your own base.
- 1 cup Guava Nectar or Guava Juice (For batter). This liquid gold is where the magic begins! Guava nectar infuses our cake with its sweet-tart flavor and vibrant color—think bright sunsets over crystal-clear waters! When selecting guava nectar or juice at the store, opt for brands without added sugars or preservatives to keep those authentic tropical vibes intact. This ingredient will ensure every bite bursts with refreshing flavor.
- 3 large Eggs (Room temperature). Room temperature eggs are crucial here because they blend seamlessly into the batter, creating an even texture without lumps or cold pockets. Eggs function as both binding agents and leavening agents; their proteins provide structure while their fats add richness. Remember to take them out of the fridge ahead of time so they can reach room temperature—this really makes a difference!
- 1/2 cup Coconut Oil (Melted). Coconut oil is not only deeply aromatic but also adds moisture and richness to our cake without overwhelming sweetness—making it absolutely paramount for achieving that tropical essence we’re aiming for! Be sure to melt your coconut oil gently so it doesn’t solidify again when mixed with cooler ingredients. The result? A tender crumb that feels indulgent yet light.
- 8 oz Cream Cheese (Room temperature). Cream cheese brings lusciousness and depth to our frosting layer while elevating the overall flavor profile of our cake; its tangy notes perfectly balance out the sweetness from other ingredients. Ensure it’s softened before use—cold cream cheese will clump instead of blending smoothly into that heavenly frosting we crave!
- 1/2 cup Granulated Sugar. Sugar is essential—not only for sweetness but also for creating that beautiful golden crust as our cake bakes! Don’t skip or reduce this ingredient; trust me when I say it transforms the texture into something divine!
- 1 tsp Vanilla Extract. Never underestimate vanilla extract’s power! This humble ingredient enriches the overall flavor without overpowering other components—it acts like an invisible handshake between all flavors involved in our cake-making adventure! Always choose pure vanilla extract over imitation—it’s worth every penny!
- 8 oz Cool Whip (Thawed). For frosting this beauty, Cool Whip provides lightness and fluffiness that enhances rather than masks flavors within our decadent creation! It’s light yet indulgent—a true crowd-pleaser topping that’s simple yet effective!
- 2 1/2 cups Guava Nectar or Guava Juice (For glaze). We’ll revisit guava here! Using guava nectar again creates continuity in flavor throughout layers while adding a glossy finish that makes each slice glisten enticingly under light—who wouldn’t want seconds?
- 1/2 cup Granulated Sugar (for glaze). Just like earlier mentioned sugar serves dual purposes here; it helps thicken up our glaze while contributing sweetness without overshadowing guava’s natural brightness!
- 2 tbsp Cornstarch. This ingredient acts as our thickening agent; corn starch allows us to achieve just-right consistency in glaze without compromising flavor integrity—it’s non-negotiable if we want smooth results!
- 1/4 cup Water (For slurry). Water helps dissolve cornstarch easily before incorporating into hot liquids—it ensures no lumps remain during cooking process!
- 1 cup Sweetened Coconut Flakes (For garnish). Finally—this delightful addition not only adds visual appeal but also introduces textural contrast against soft layers beneath! Choose medium flakes for best results—they toast beautifully if desired!
Equipment You’ll Need:
Before diving into baking bliss, let’s gather our essential tools! Having the right equipment makes everything smoother and more enjoyable—think of them as trusty sidekicks on this culinary adventure.
- Mixing Bowls – A good set of mixing bowls in various sizes is indispensable for separating wet from dry ingredients efficiently while preventing messes along way! Opt for glass or stainless steel options—they’re sturdy enough against vigorous mixing techniques!
- Electric Mixer – While you could mix manually using elbow grease alone… why would you? An electric mixer speeds up blending processes significantly—especially important when creaming butter with sugar until fluffy perfection!
- Measuring Cups & Spoons – Precision matters immensely in baking; invest in reliable measuring tools—both dry AND liquid sets—to ensure accurate ratios are adhered too throughout entire recipe process!
- Rubber Spatula – This tool allows us scrape down sides effectively during mixing stages ensuring no bits go unnoticed plus folding delicate mixtures together seamlessly later on too!
- 9×13-inch Baking Pan – A classic choice suitable for cakes alike; choose one made from lightweight aluminum offering even heat distribution across surface allowing perfect rise once baked through nicely without burning edges prematurely
Preparing the Decadent Hawaiian Guava Cake: A Slice of Paradise
Step 1: Preheat Your Oven & Prepare Your Pan
To kick off this delightful journey into decadent baking bliss, start by preheating your oven to 350°F (175°C). Trust me when I say this step is crucial because an adequately heated oven ensures even baking throughout your cake—not just on top or bottom! While waiting for those magical temperatures to reach their peak glory, grab your trusty 9×13-inch baking pan and prepare it by greasing generously with coconut oil or nonstick spray before lightly dusting flour over surface area (if desired). This simple act prevents any sticky surprises upon removal later on—the last thing we want after putting all this love into making our cake is having half stick within pan walls!
Step 2: Mixing Wet Ingredients
Once you’ve got your oven humming away happily behind you, let’s move onto mixing those vibrant wet ingredients together! In one large mixing bowl combine your room-temperature eggs (remember those?), melted coconut oil, guava nectar intended for batter use alongside vanilla extract—and whisk vigorously until everything melds together beautifully into one cohesive mixture full excitement bubbling beneath surface ready explode forth soon enough once baked away within warm oven air—how exciting is THAT? Take care not rush through step though—for optimal results allow at least two minutes whisking time which helps incorporate air into batter leading towards puffier end result compared skipping over crucial moments spent whisking well enough beforehand.
Step 3: Blending Dry Ingredients
Now that we’ve created such wonderful harmony among wet elements let’s shift focus towards blending dry components next starting off by adding strawberry cake mix directly atop previous mixture slowly folding gently using rubber spatula instead aggressive stirring motions since we wouldn’t want deflate precious air bubbles incorporated earlier—you’ll notice batter gradually transforming hues bright pinkish-red shades almost reminiscent sunsets seen afar along coastlines—they hint at deliciousness awaiting us once baked golden brown shortly thereafter so keep folding carefully until no lumps remain visible before moving forward confidently onto next exciting phase ahead…
Step 4: Baking Time!
With batter now fully blended together flawlessly let’s pour it lovingly into prepared baking pan ensuring even distribution across entire surface area followed closely behind by gentle smoothing out top using spatula if necessary so everything bakes evenly throughout process ahead hereafter—we’re finally ready slide pan inside preheated oven where chemistry unfolds transformed magic takes place within next twenty-five minutes approximately! Keep watch though—as ovens vary so check around halfway mark inserting toothpick through center should come out clean indicating readiness achieved otherwise continue another few minutes longer until firm yet springy texture presents itself upon touch signals completion success has been reached here today friends rejoice because paradise awaits us soon enough!
This adventure has only just begun—you’ll be amazed at how easily everything comes together when guided step-by-step through process ahead filled joy discovery love shared amongst friends family alike gathering around table ready indulge enjoy life’s sweetest moments captured within each slice served forth generously plated beautiful arrangement awaiting devourment soon thereafter… So stay tuned my dear friend—we have much more deliciousness left ahead yet!!
Step 5: Mixing the Cake Batter — A Symphony of Flavors
Now that we have our dry ingredients ready, it’s time to bring them to life by mixing our cake batter. In a large mixing bowl, combine the box of strawberry cake mix with one cup of guava nectar or juice – this is where that dreamy tropical flavor begins. The guava nectar offers a beautiful balance of sweetness and acidity, which will elevate your cake from simple to sensational. Whisk these two ingredients together until it’s smooth and well incorporated; you want to ensure there are no lumps left behind because every bite should be a heavenly experience. Next, crack in those three large eggs, ensuring they’re at room temperature for the best results. This is crucial as room-temperature eggs incorporate more easily into the batter, leading to a lighter texture.
Once you’ve added the eggs, introduce the melted coconut oil and whisk again until everything is combined into a luscious batter. The coconut oil not only adds moisture but also infuses that irresistible coconut essence that pairs so beautifully with guava. Trust me on this — if you can smell it now, just wait until it’s baking! You should have a velvety mixture; it should slide off your spatula effortlessly when you lift it. Don’t rush this step; take your time to really mix it well because this is where the magic begins, and a well-mixed batter ensures an even rise during baking.
Step 6: Preparing the Cream Cheese Frosting — A Creamy Dream
While our cake batter takes center stage, let’s turn our attention to creating that utterly intoxicating cream cheese frosting that will elevate your Decadent Hawaiian Guava Cake: A Slice of Paradise to new heights. Start by placing eight ounces of cream cheese in a medium bowl and allow it to soften at room temperature for about 30 minutes if you haven’t done so already. This step is absolutely paramount as softened cream cheese blends seamlessly with sugar and other components, resulting in a creamy texture that’s spreadable and delightful.
Using a hand mixer or a stand mixer fitted with the paddle attachment, beat the softened cream cheese until it’s smooth and fluffy – about two minutes should do the trick. Then gradually add half a cup of granulated sugar while continuing to blend; watch how the mixture transforms into a glossy cream! This sweetness complements the tanginess of the cream cheese perfectly, creating an irresistible contrast. Finally, add in that teaspoon of vanilla extract for warmth and depth – this little touch makes all the difference in flavor profile. Once everything is combined smoothly, fold in eight ounces of thawed Cool Whip gently using a spatula; this step gives your frosting that airy lightness that melts in your mouth.
Step 7: Baking Your Decadent Hawaiian Guava Cake — Patience Makes Perfect
With our cake batter mixed and our frosting prepared, it’s time for perhaps one of the most exciting parts: baking! Preheat your oven to 350°F (175°C) as we prepare our cake pans. Grease two nine-inch round cake pans with coconut oil or non-stick spray – don’t skip this step! Proper greasing ensures that your cakes release effortlessly once baked, which means less frustration and more joy when serving.
Pour equal amounts of batter into each pan; you’ll want them filled about halfway up since they will rise beautifully as they bake. Slide those pans into your preheated oven with anticipation—this is where aromas start wafting through your kitchen like an island paradise! Bake for approximately 25 minutes or until golden brown on top and a toothpick inserted into the center comes out clean. Keep an eye on them because every oven behaves differently; if you notice them browning too quickly, cover with foil for the last few minutes to prevent burning while allowing them to finish cooking inside – we want moist cakes here!
After taking them out of the oven, let those beauties rest in their pans for about ten minutes before transferring them onto wire racks. This resting period allows steam to escape without making your cakes soggy—a vital step for achieving that perfect crumb texture!
Step 8: Crafting the Glaze — Liquid Gold Awaits
Now comes one of my favorite parts: crafting the glaze that will drape over each layer like liquid gold! In a medium saucepan over medium heat, combine two-and-a-half cups of guava nectar or juice with half a cup of granulated sugar and bring it to a gentle simmer while stirring occasionally—watch as it starts bubbling softly like magic! In a small bowl, create a slurry by mixing those two tablespoons of cornstarch with one-quarter cup water until smooth; adding this slurry will help thicken our glaze beautifully.
Once your nectar mixture reaches a gentle boil (this usually happens after about five minutes), slowly pour in your cornstarch slurry while continuously whisking. It’s important to keep whisking because we want an even consistency—no lumps allowed! Allow this mix to cook for another minute or so until it thickens slightly; you’ll know it’s ready when it coats the back of a spoon nicely—what you’re looking for is that glossy finish reminiscent of tropical sunsets.
Letting this glaze cool slightly before pouring it over your cooled cakes is essential—it allows flavors to settle down while ensuring it adheres perfectly without making everything soggy. Remember—the patience required here truly pays off when every bite bursts with refreshing guava goodness!
Final Touches: Assembling Your Decadent Hawaiian Guava Cake
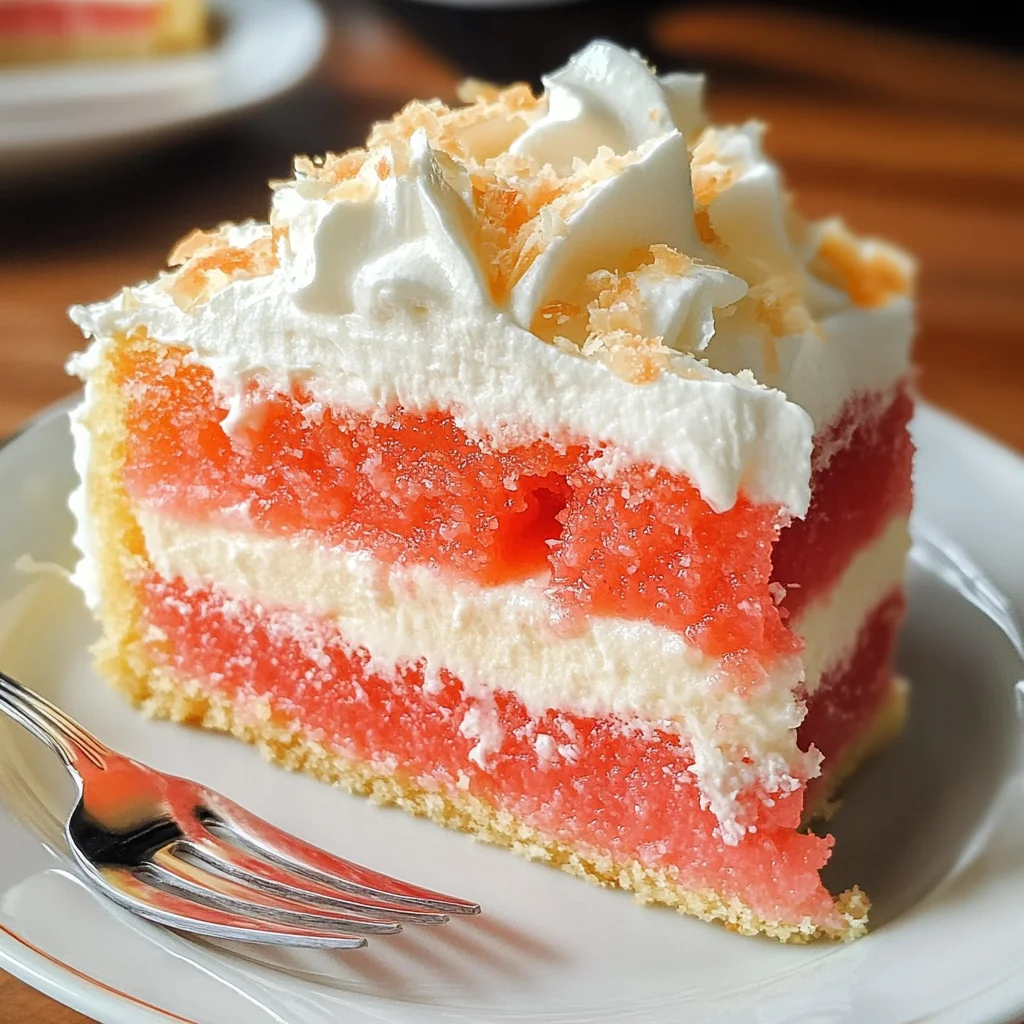
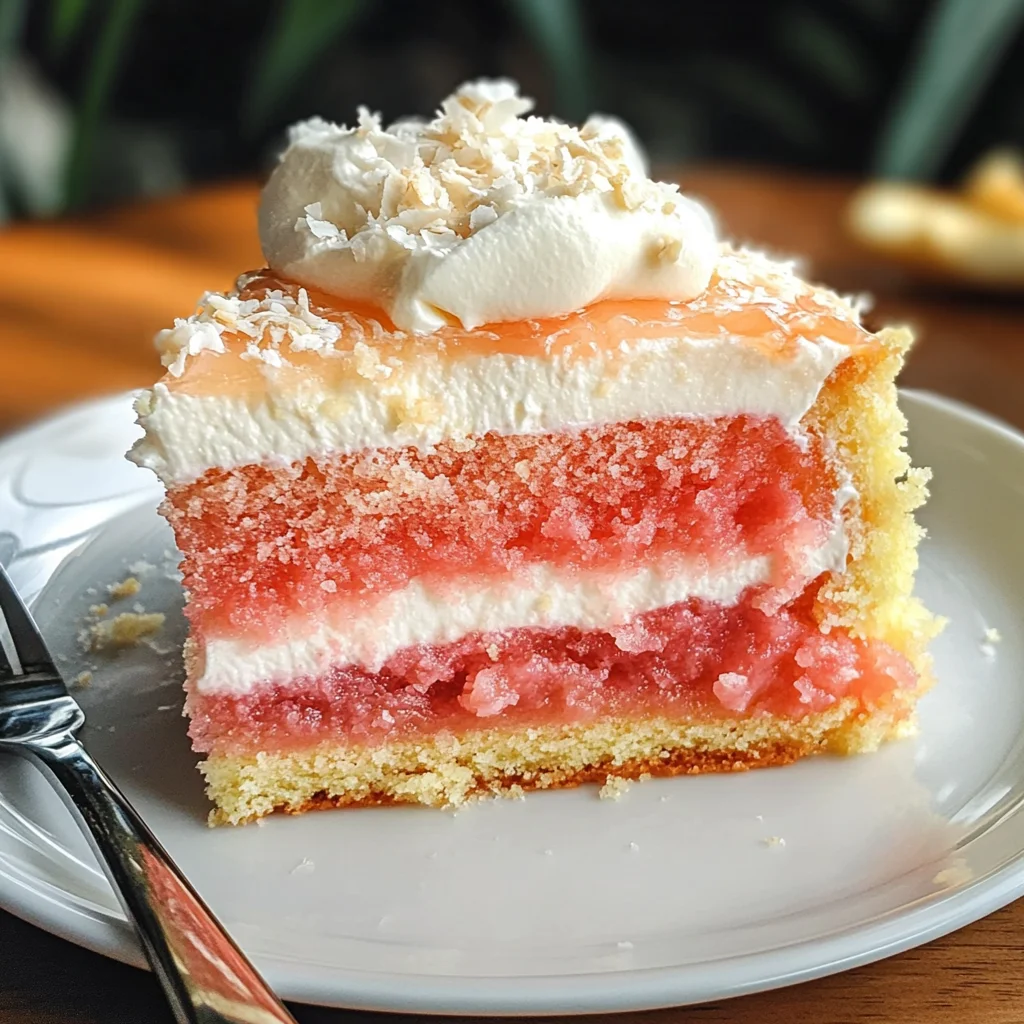
At last, we’re nearing our delicious destination! To assemble your Decadent Hawaiian Guava Cake: A Slice of Paradise, carefully place one layer on your serving platter or cake stand. Generously spread half of that creamy frosting over the top—don’t be shy here; this luscious layer adds richness that’ll make each slice unforgettable!
Next, place the second layer on top and repeat by slathering more frosting across its surface and sides—this part can get messy but trust me when I say it’s worth every effort! And now—the pièce de résistance—gently drizzle that glorious guava glaze over both layers allowing some to cascade down along the edges for dramatic effect; feeling like an artist yet? Finally sprinkle sweetened coconut flakes generously around the edges as garnish—this added texture brings not only visual appeal but also enhances flavor profiles further transporting us straight to Hawaii with each bite!
After all those efforts come together harmoniously unfolding before you like paradise on earth itself… Don’t forget to take photos before slicing into what promises to be an extraordinary celebration piece at any gathering! Enjoy every slice knowing you’ve crafted something truly special filled with love—and maybe even share some memories along with sharing this delightful treat!
Storage and Enjoyment Tips for Your Decadent Hawaiian Guava Cake: A Slice of Paradise
Now that you’ve poured your heart into baking this stunning Decadent Hawaiian Guava Cake, it’s time to relish every glorious slice of paradise! Whether you’re indulging alone or sharing with friends, this cake is bound to be a showstopper. But if you find yourself with leftovers (which I highly doubt because it’s so delightful!), there are some fabulous ways to preserve its magic and enjoy it later. Trust me, the flavors only deepen with time, making each bite a little piece of heaven.
Storing Leftover Decadent Hawaiian Guava Cake: A Slice of Paradise
To keep your Decadent Hawaiian Guava Cake fresh and tantalizingly moist, I recommend storing it in an airtight container at room temperature. This helps to maintain the cake’s soft texture while keeping those vibrant flavors intact. If you’re looking to extend its life a bit more, you can pop it in the refrigerator, where it will stay delicious for up to five days. Here’s a little pro tip: placing a slice of bread inside the container can help absorb excess moisture and keep that cake delightfully fluffy—just think of it as a little insurance policy for your sweet creation! The taste after storage is still utterly enchanting; the guava flavor becomes even more pronounced as it mingles overnight, making each slice feel like a charming reunion. When you’re ready to serve, simply let it sit at room temperature for about 15 minutes before enjoying; this allows those luscious flavors to bloom again beautifully.
Freezing Your Decadent Hawaiian Guava Cake for Later
If you want to save some slices for future indulgence (because who wouldn’t want a taste of paradise waiting in their freezer?), freezing is an excellent option! To freeze your Decadent Hawaiian Guava Cake properly, wrap each slice tightly in plastic wrap and then place them in a freezer-safe container or zip-top bag—this double layer ensures they remain free from freezer burn. You can keep them frozen for up to three months without losing any of that heavenly charm. When you’re ready to enjoy your frozen treasure, simply pull a slice out and let it thaw in the fridge overnight or at room temperature for about an hour before serving. The convenience factor here is absolutely fantastic—you can whip out a slice whenever you’re craving something sweet, allowing you to savor that tropical escape anytime!
Decadent Hawaiian Guava Cake: A Slice of Paradise

Decadent Hawaiian Guava Cake: A Slice of Paradise is your ticket to a tropical getaway, right from your kitchen! This vibrant cake combines the luscious flavors of sweet guava and rich coconut for a dessert that is not just delicious but also visually stunning. With its moist texture and creamy frosting, this cake brings joy to any occasion—from summer barbecues to birthday celebrations. Each bite delivers a burst of tropical bliss, making it impossible to resist. Perfect for sharing with friends and family, this cake will quickly become a favorite in your dessert repertoire.
- Prep Time: 20 minutes
- Cook Time: 25 minutes
- Total Time: 45 minutes
- Yield: Serves approximately 12 1x
- Category: Dessert
- Method: Baking
- Cuisine: Hawaiian
Ingredients
- 1 box Strawberry Cake Mix
- 1 cup Guava Nectar or Juice (for batter)
- 3 large Eggs (room temperature)
- 1/2 cup Coconut Oil (melted)
- 8 oz Cream Cheese (room temperature)
- 1/2 cup Granulated Sugar
- 1 tsp Vanilla Extract
- 8 oz Cool Whip (thawed)
- 2 1/2 cups Guava Nectar or Juice (for glaze)
- 1/2 cup Granulated Sugar (for glaze)
- 2 tbsp Cornstarch
- 1/4 cup Water (for slurry)
- 1 cup Sweetened Coconut Flakes (for garnish)
Instructions
- Preheat the oven to 350°F (175°C). Grease a 9×13-inch baking pan with coconut oil.
- In a large mixing bowl, whisk together the eggs, melted coconut oil, guava nectar, and vanilla extract until smooth.
- Gradually add the strawberry cake mix and mix gently with a rubber spatula until no lumps remain.
- Pour the batter into the prepared baking pan and smooth the top.
- Bake for about 25 minutes or until a toothpick inserted comes out clean. Allow cooling on a wire rack.
- For the frosting, beat room temperature cream cheese with sugar until creamy; fold in Cool Whip.
- For the glaze, simmer guava nectar and sugar in a saucepan. Mix cornstarch with water in a separate bowl, then stir into the simmering mixture until thickened.
- Once cooled, frost the cake and drizzle with guava glaze. Garnish with coconut flakes.
Nutrition
- Serving Size: 1 slice (85g)
- Calories: 310
- Sugar: 28g
- Sodium: 180mg
- Fat: 18g
- Saturated Fat: 9g
- Unsaturated Fat: 7g
- Trans Fat: 0g
- Carbohydrates: 36g
- Fiber: 0g
- Protein: 3g
- Cholesterol: 35mg