Strawberry Yogurt Bark
There’s something profoundly satisfying about creating a dish that marries simplicity with indulgence, and that’s exactly what this Strawberry Yogurt Bark embodies. Imagine a canvas of creamy Greek yogurt, delicately sweetened and kissed with vanilla, topped with luscious strawberries and drizzled with rich dark chocolate. It’s not just a recipe; it’s an experience — one that invites you to savor every bite while basking in the joy of fresh flavors and vibrant colors. Each piece is a small celebration, a reminder that dessert can be both delightful and nourishing. I promise you, once you dive into this strawberry yogurt bark, it will quickly become one of your go-to treats for any occasion.
This recipe holds a special place in my heart as it beautifully captures the essence of summer fruits at their peak. The strawberries, fresh from the market or your garden, burst with sweetness and color, evoking memories of sun-soaked picnics and lazy afternoons spent outdoors. The blend of tangy Greek yogurt offers a wonderful contrast to the sugary strawberries while providing a creamy texture that is utterly intoxicating. Whether you’re looking for a healthy snack for the kids or something refreshing to satisfy your sweet tooth after dinner, this Strawberry Yogurt Bark checks all the boxes. It’s versatile enough to be enjoyed year-round but shines particularly bright during those warm months when strawberries are at their best.
Strawberry Yogurt Bark: A Sweet Symphony of Flavor
Let’s embark on this delightful culinary journey together! This Strawberry Yogurt Bark recipe is perfect for anyone who loves to mix health with pleasure in their desserts. Not only is it easy to prepare — taking just 15 minutes of active time — but it also offers an explosion of flavors and textures that will leave you craving more. Plus, it’s an excellent opportunity to get creative; feel free to swap out ingredients based on what you have on hand or mix in your favorite fruits!
Ingredients:
As we gather our ingredients, let each one remind us that they play a vital role in crafting this delicious treat. The quality and freshness of your ingredients can transform a simple dish into something truly extraordinary.
- 1 1/2 cups Greek yogurt: This ingredient is absolutely paramount because it serves as the base for our bark, lending creaminess and protein that makes each bite satisfying without being overly heavy. When choosing Greek yogurt, opt for plain varieties without added sugars—this allows us to control sweetness better while ensuring we capture that rich texture. The tanginess of Greek yogurt beautifully balances the sweetness from honey and strawberries, creating a symphony of flavors that’ll keep you coming back for more.
- 2 tablespoons honey (or maple syrup): Honey acts like liquid gold in this recipe! It’s not just about sweetness; its floral notes enhance the overall flavor profile while also acting as a natural thickening agent when combined with Greek yogurt. If you’re looking for an alternative, maple syrup works wonderfully here too—just keep in mind it’ll impart its own unique flavor twist! This touch of sweetness is essential because it harmonizes beautifully with the tartness from our strawberries.
- 1 teaspoon vanilla extract: Vanilla is often referred to as the secret ingredient in baking because it elevates everything it touches! Adding vanilla extract introduces warmth and depth to our yogurt mixture; it’s like giving each bite an embrace of comfort. Always choose pure vanilla extract over imitation if possible—it truly makes all the difference and transforms our humble bark into something remarkable.
- 1 cup sliced fresh strawberries: Strawberries are the stars of this show! Their bright red hue not only makes your bark visually stunning but brings an incredible burst of flavor that sings summer vibes no matter what season it is. Look for ripe strawberries at your local market—these will be fragrant and firm yet slightly yielding when gently pressed. Slicing them thin allows them to distribute evenly over the yogurt base, ensuring each piece has its fair share of fruity goodness.
- 1/3 cup dark chocolate chips: Chocolate is love—there’s no denying that! In this recipe, dark chocolate chips add a rich contrast against the creamy yogurt and sweet strawberries. When melted, they create an irresistible drizzle that unites all components together into one glorious treat! I recommend opting for high-quality chocolate with at least 60% cocoa content; this bitterness perfectly offsets the natural sweetness from our other ingredients.
Equipment You’ll Need:
Having the right tools can make all the difference when preparing our Strawberry Yogurt Bark. These essential partners ensure everything goes smoothly from start to finish!
- Mixing bowl: A sturdy mixing bowl is crucial for combining our ingredients seamlessly without making a mess. Choose one that’s large enough so there’s ample space to stir thoroughly without splashing any mixture out—trust me, no one wants sticky countertops!
- Parchment-lined rimmed sheet pan: This piece of equipment acts as both canvas and mold for our bark masterpiece! Lining your sheet pan with parchment paper prevents sticking and makes cleanup effortless afterward. I highly recommend using a rimmed pan too; it contains any spills during freezing and catches any drips from melting chocolate later on.
- Microwave-safe bowl: We’ll need this bowl for melting our dark chocolate gently; using microwave-safe glass or ceramic ensures even heating without overheating or burning those precious chips. Just remember to check on them frequently as we melt in short increments!
- Spatula or spoon: Whether you prefer using a spatula or spoon ultimately depends on what feels comfortable in your hands—but either way, you’ll want something sturdy enough to fold ingredients together smoothly without losing airiness.
Now that we have gathered everything we need let’s dive into preparing this delightful Strawberry Yogurt Bark!
Step 1: Whisking Together Our Base
Start by combining the Greek yogurt, honey (or maple syrup), and vanilla extract in your mixing bowl. Using either a whisk or spatula—not only do these tools allow us to blend everything together smoothly but they also encourage air incorporation into our mixture—this creates lightness that contrasts beautifully against denser pieces later on! Be sure to mix until thoroughly combined—the goal here is uniformity so every bite delivers consistent flavor throughout! Trust me when I say taking your time here pays off; rushing might lead to uneven sweetness which would detract from those heavenly bites later on!
Step 2: Spreading Out Our Canvas
Once you’ve achieved smooth consistency within your yogurt mix, grab your prepared sheet pan lined with parchment paper! Pour out this luscious mixture onto its surface—starting at one corner works well—and gently spread using either spatula or spoon until evenly distributed across the entire area (aiming for around half an inch thick). This step allows us ample room later on for toppings while ensuring proper freeze-set during chilling time—a non-negotiable aspect if we want delightful texture!
Step 3: Dressing Up With Strawberries
Now comes one of my favorite parts—the addition of fresh sliced strawberries atop our spread-out yogurt layer! Gently sprinkle them over evenly across its surface—you want each piece filled with fruity goodness after cutting later on so don’t skimp here! As these lovely gems nestle themselves into their creamy bed below they will infuse extra flavor once frozen too—it’s like nature’s candy added right into our dessert masterpiece!
Step 4: Melting Our Dark Chocolate
To elevate things further let’s focus on melting those dark chocolate chips now—you’ll find doing so carefully ensures optimal results rather than burnt bits left behind which would ruin everything else created thus far! Place chips into microwave-safe bowl then heat at medium power (50%) starting off with thirty-second intervals checking consistently until melted completely smooth enough for drizzling over previous layers lovingly arranged already waiting beneath them below…
I can’t wait for you to try this delightful recipe—stay tuned as we continue bringing this beautiful Strawberry Yogurt Bark together next!
Crafting Your Strawberry Yogurt Bark: The Culinary Journey Continues
Step 5: Melting the Chocolate – A Decadent Drizzle
Now, let’s talk about that luscious dark chocolate drizzle that ties everything together in our Strawberry Yogurt Bark. This step is where your kitchen transforms into a divine sanctuary of aromas and warmth, as you melt the dark chocolate. Start by taking your dark chocolate chips—choose high-quality ones because they will make all the difference here. In a microwave-safe bowl, place your chocolate chips and pop them into the microwave. Set it to medium power and heat them in 30-second increments. Trust me on this one; patience is key! You’ll want to stir the chocolate after each interval until it’s just about melted but not completely so. It’s perfectly normal for it to still have some little chunks at this stage because residual heat will do its magic and transform those bits into a smooth, velvety liquid gold.
Why do we melt chocolate in short bursts instead of just zapping it all at once? Well, chocolate is sensitive to heat, and if it gets too hot too quickly, it can seize up into a gritty mess, which nobody wants! By melting it slowly, you’re allowing the cocoa butter to release its oils gradually, creating that luxurious texture we all crave. Once you’ve achieved a silky-smooth consistency with no lumps in sight, remove the bowl from the microwave and let it cool slightly before drizzling. This cooling period is crucial because if you drizzle piping hot chocolate over your yogurt, it could start melting away your hard work! So take a moment to appreciate the rich aroma wafting through your kitchen—it’s utterly intoxicating.
Step 6: The Art of Drizzling – A Beautiful Finish
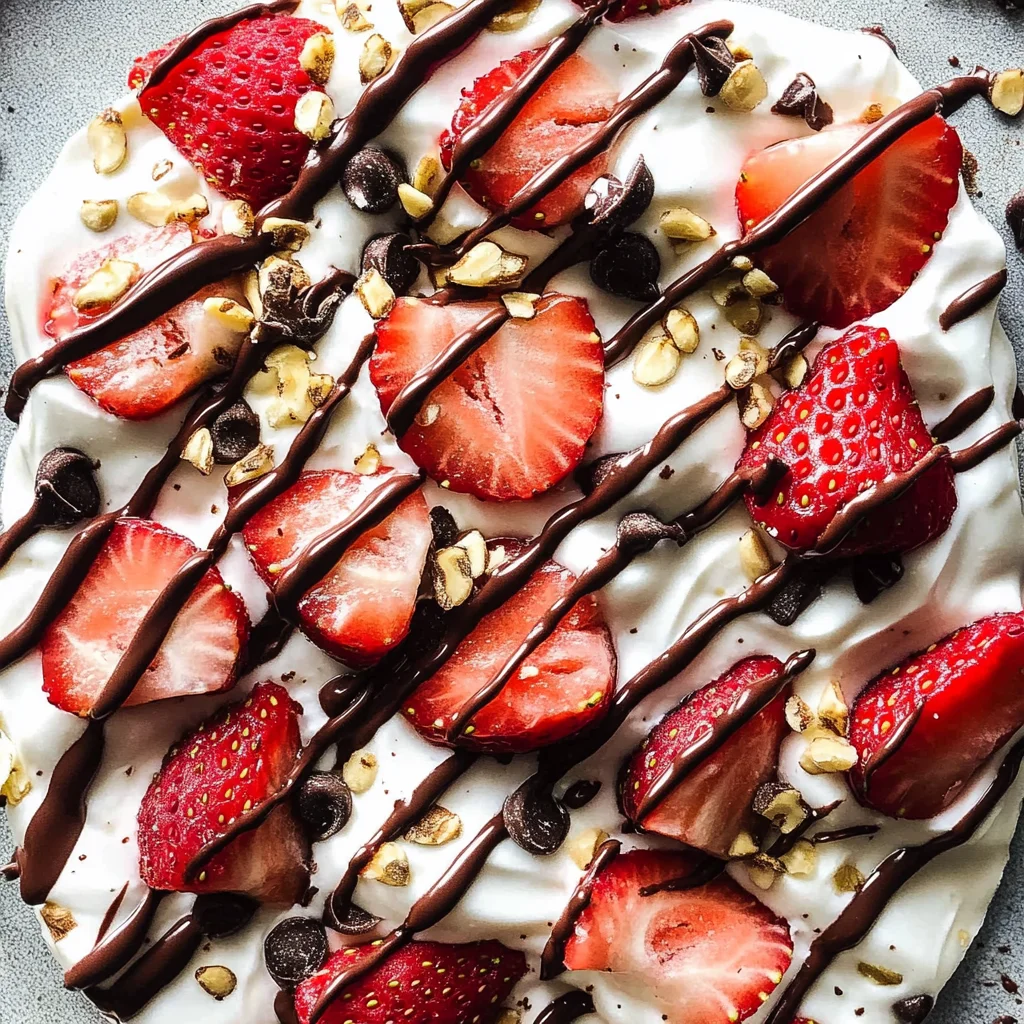
Now comes one of my favorite parts: drizzling that melted chocolate over your yogurt and strawberries! Grab a spoon or use a piping bag if you’re feeling fancy (a ziplock bag with a tiny corner cut off works wonders too). Begin by gently swooping up some of that luscious melted chocolate and drizzling it over the yogurt mixture in an elegant fashion—think of creating beautiful patterns, perhaps zigzags or spirals. This isn’t just about aesthetics; it’s about ensuring every bite has that decadent burst of chocolate flavor alongside the refreshing strawberry notes. Imagine taking a bite where the creamy yogurt meets sweet strawberries and then surprises you with a touch of rich dark chocolate—it’s seriously heavenly!
Remember to be generous with your drizzle but also mindful not to drown out the strawberries’ vibrant color and freshness. You want each piece of bark to be visually appealing as well as delicious! This balance is absolutely paramount; after all, we eat with our eyes first. Once you’ve drizzled liberally yet artfully across your creation, give yourself a moment to admire your work—it deserves appreciation before heading into the freezer!
Step 7: Freezing – The Transformation Phase
Here comes the big moment—the freezing! Once you’ve completed your delightful assembly with yogurt, strawberries, and that tantalizing drizzle of dark chocolate, it’s time for this beauty to chill out in the freezer for about two hours. Yes, two whole hours might feel like an eternity when you’re eagerly anticipating that first taste, but trust me on this one—the waiting is what elevates this dessert from good to extraordinary.
During this freezing phase, water content in the yogurt freezes solid while allowing those flavors to meld beautifully together in harmony. The Greek yogurt becomes firmer while maintaining its creamy texture—think about how satisfying each bite will be! When you remove it from the freezer after two hours (or longer if you can resist!), you’ll find that you’ve created something truly special—a treat that’s both healthy and indulgent at once. As tempting as it may be to rush through this step by checking on it constantly or trying to sneak a piece early (I get it; I really do!), allow those flavors enough time to marry fully; it’s worth every minute.
Step 8: Cutting Your Bark – The Sweet Reward
After patiently waiting for what feels like ages (but really is just two hours), it’s finally time for that sweet reward—cutting or breaking apart your frozen strawberry yogurt bark! Carefully remove your baking sheet from the freezer and let it sit for about five minutes at room temperature before cutting; this little pause allows for easier slicing without compromising texture too much—all those beautiful layers deserve gentle handling!
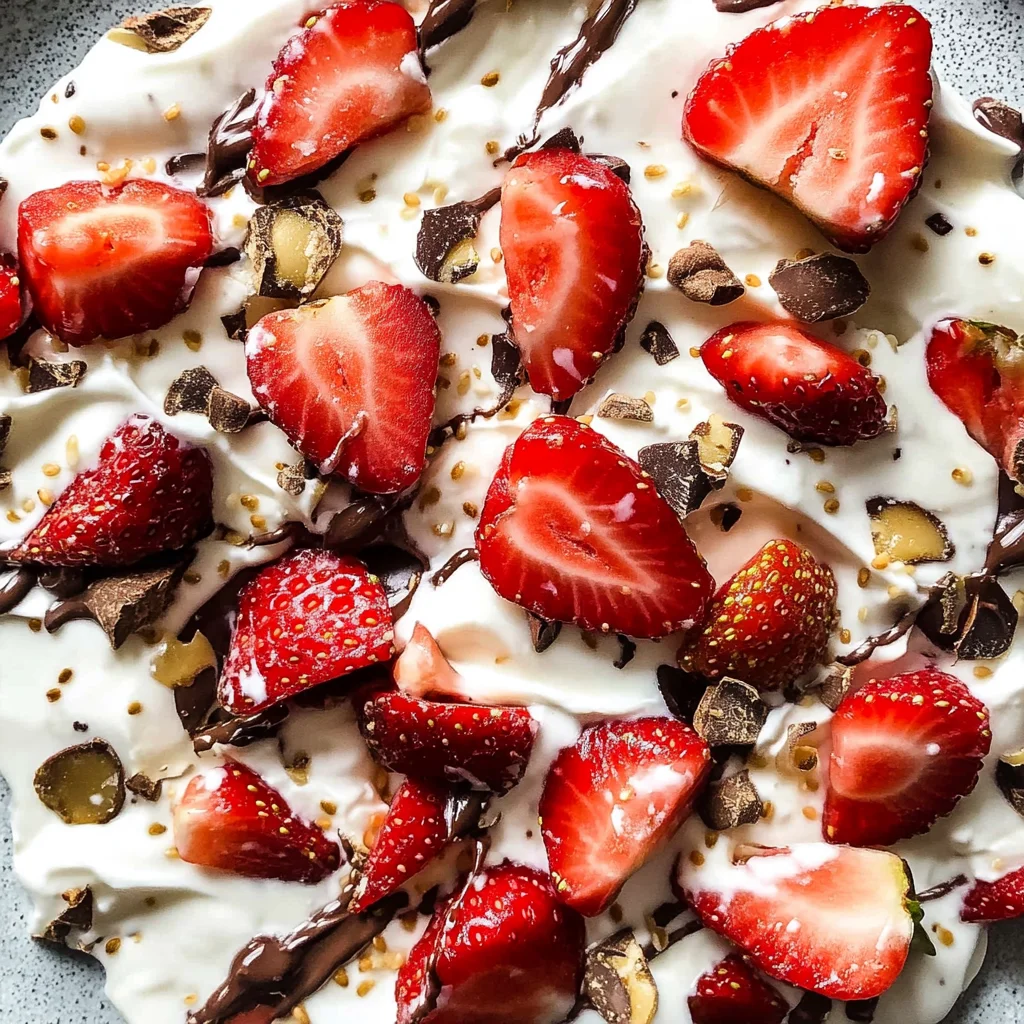
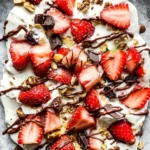
Using a sharp knife or simply breaking apart pieces with your hands (which can be much more fun!), cut or break them into bite-sized squares or rectangles—whatever suits your fancy! You’ll notice how beautifully they hold their shape while still being soft enough to melt upon first contact with your tongue. Each piece showcases colorful strawberry bits peeking through creamy white yogurt adorned with glossy ribbons of dark chocolate—a true feast for both the eyes and palate!
Make sure to store any leftovers (if there are any!) in an airtight container in the freezer where they’ll keep perfectly for up to one month—though I promise they won’t last nearly that long once family or friends get wind of them.
Final Touches: Savoring Every Moment
As we wrap up this delightful journey of making Strawberry Yogurt Bark together, I hope you’re as excited as I am about indulging in these delectable creations! Whether you enjoy them straight out of the freezer on a warm afternoon or share them during a gathering with friends and family, each bite will remind you why homemade treats are so profoundly satisfying.
So gather around with loved ones when it’s time to serve; there’s something magical about sharing food made with love. As everyone takes their first bites—and trust me, they will be grinning from ear to ear—you’ll see how something so simple can spark joy and create lasting memories. Enjoy every moment together because food isn’t just sustenance; it’s connection—a beautiful symphony of flavors celebrating life itself.
And there you have it—a truly extraordinary Strawberry Yogurt Bark recipe that’s not only easy but encourages creativity and joy in every step! Happy snacking! 🍓
Storage and Enjoyment Tips for Your Strawberry Yogurt Bark
Ah, the moment has come! You’ve crafted this delightful Strawberry Yogurt Bark, and now it’s time to relish in your sweet creation. As you gaze at those vibrant layers of strawberries peeking through the creamy yogurt, I can almost taste the tantalizing combination of flavors dancing on my palate. But before we dive into that blissful experience, let’s talk about how to preserve these little gems so you can savor them more than just today.
Storing Leftover Strawberry Yogurt Bark
To keep your Strawberry Yogurt Bark as fresh as the day it was made, I recommend using an airtight container. This is absolutely paramount because it helps maintain that perfect texture and prevents any freezer burn from stealing away its glory. Ideally, you want to store it in the freezer where it will stay good for up to a month—though I promise you, it might not last that long! If you’re worried about keeping it fresh beyond that timeframe, consider placing a slice of bread in the container; this little tip works wonders for absorbing excess moisture and maintaining quality. When you finally go back to enjoy a piece after a few days, you’ll find it’s just as delectable as when you first made it—smooth, creamy yogurt infused with sweet strawberries and that luscious chocolate drizzle still intact. No reheating is necessary; simply pop it out of the freezer and let it sit at room temperature for a few minutes before indulging.
Freezing Strawberry Yogurt Bark for Later
Now, if you’re looking to make a big batch of this delightful treat ahead of time—or if you’ve got leftovers (lucky you!)—freezing is an excellent option! Just make sure to cut your bark into pieces before freezing them individually on parchment paper until solid. Once they’re frozen, transfer them into that trusty airtight container or even some freezer bags for easy access later on. This way, your Strawberry Yogurt Bark can last up to a month in the freezer without losing its charm. The convenience of having such a refreshing and healthy snack ready at your fingertips is incredibly exciting! Whenever those sweet cravings strike or when you’re hosting friends unexpectedly, simply grab a piece from the freezer and enjoy the joy of homemade goodness anytime you desire.
Strawberry Yogurt Bark
Indulge in the refreshing delight of Strawberry Yogurt Bark, a no-bake treat that perfectly balances health and indulgence. This vibrant dessert combines creamy Greek yogurt with the natural sweetness of honey, fresh strawberries, and a decadent drizzle of rich dark chocolate. Ideal for warm summer days or as a satisfying snack any time of the year, this easy-to-make bark is not only visually appealing but also packed with nutrients.
- Prep Time: 15 minutes
- Cook Time: 0 minutes
- Total Time: 15 minutes
- Yield: Approximately 8 servings (16 pieces) 1x
- Category: Dessert
- Method: No-Bake
- Cuisine: American
Ingredients
- 1 1/2 cups Greek yogurt (plain)
- 2 tablespoons honey (or maple syrup)
- 1 teaspoon vanilla extract
- 1 cup sliced fresh strawberries
- 1/3 cup dark chocolate chips
Instructions
- In a mixing bowl, whisk together the Greek yogurt, honey, and vanilla extract until smooth.
- Spread the yogurt mixture evenly onto a parchment-lined rimmed sheet pan to about half an inch thick.
- Evenly sprinkle the sliced strawberries over the yogurt layer.
- Melt the dark chocolate chips in a microwave-safe bowl in short increments until smooth. Drizzle over the strawberry layer.
- Freeze for about two hours or until solid.
- Once frozen, cut or break into pieces and serve.
Nutrition
- Serving Size: 2 pieces (90g)
- Calories: 120
- Sugar: 9g
- Sodium: 30mg
- Fat: 4g
- Saturated Fat: 2g
- Unsaturated Fat: 2g
- Trans Fat: 0g
- Carbohydrates: 18g
- Fiber: 1g
- Protein: 6g
- Cholesterol: 10mg