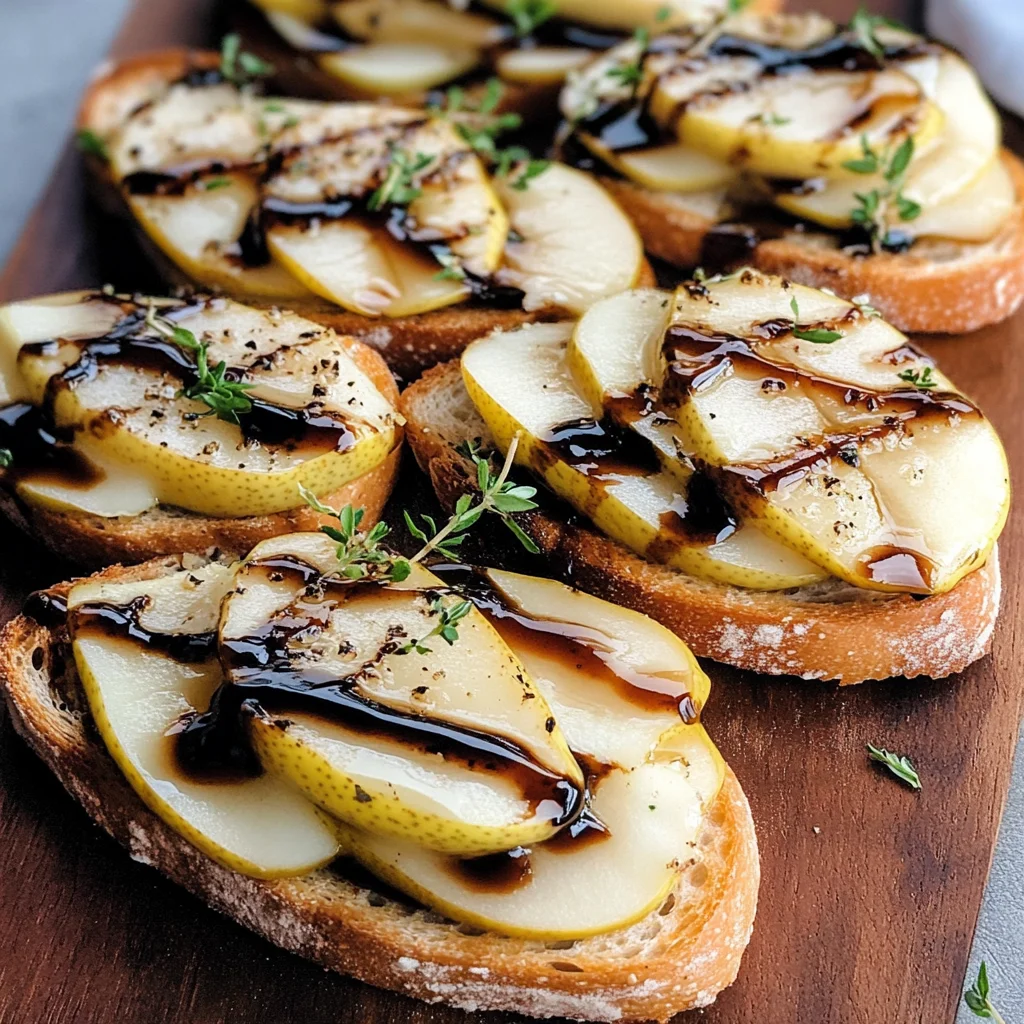
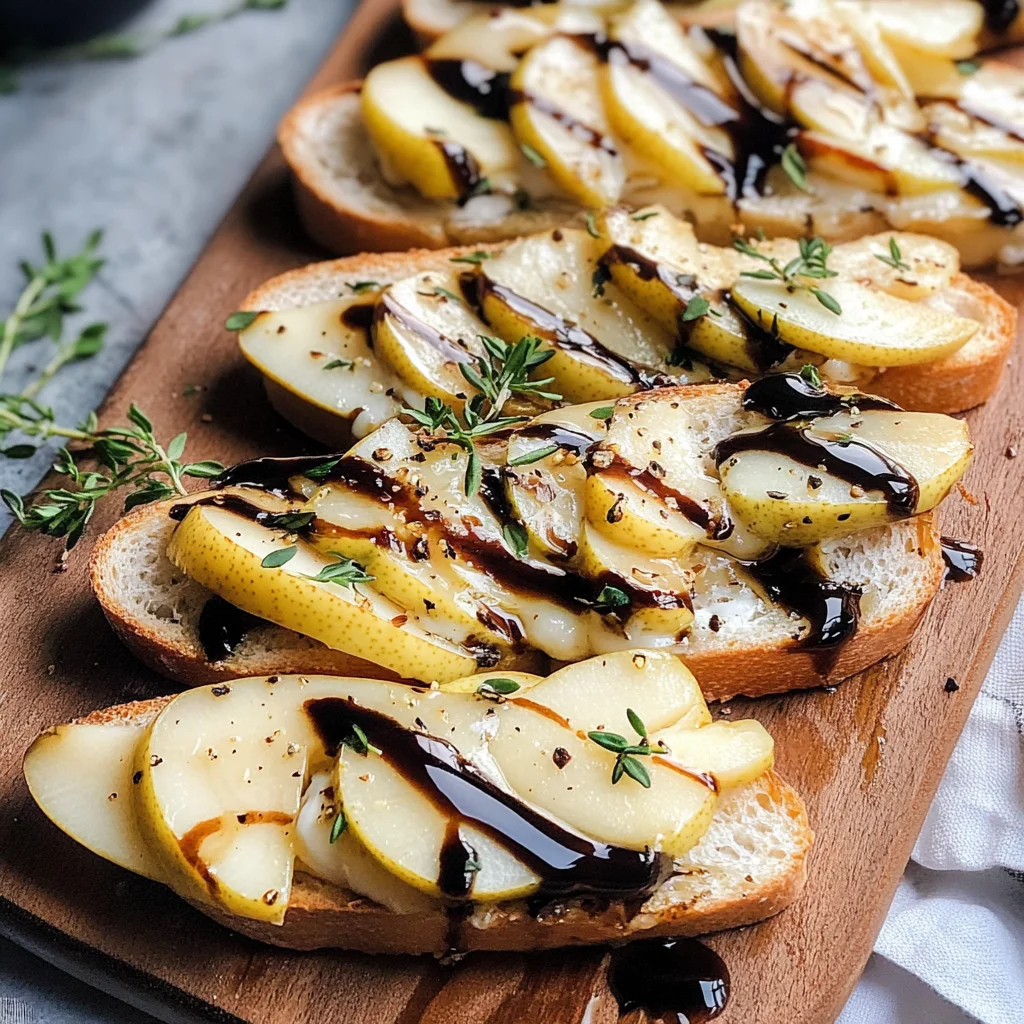
Pear and Brie Crostini
It’s not just about cooking; it’s about creating moments that linger in our hearts and minds. The Pear and Brie Crostini is one of those enchanting recipes that bridges the gap between simple ingredients and extraordinary experiences. Picture this: a soft, crusty baguette, fresh from the oven, its warm aroma wrapping around you like a comforting hug. Each slice is adorned with creamy brie that melts into a gooey embrace, while sweet, juicy pears add a burst of freshness. To top it all off, a drizzle of balsamic reduction brings a tangy depth that dances on your palate. This is not merely food; this is a celebration of flavors and textures that beckons you to gather friends and family around the table.
Every time I prepare these crostini, I feel a rush of joy as I anticipate the smiles they will bring. They are perfect for any occasion—be it an intimate dinner party or a casual get-together with friends. The balance of sweet and savory invites conversation and laughter, making them not just an appetizer but an experience that connects us through taste. My friends often ask for this recipe, and I promise you, once you try them, you’ll understand why! The Pear and Brie Crostini is more than just a delicious bite; it’s an invitation to savor life’s beautiful moments.
Pear and Brie Crostini: A Delightful Harmony of Sweetness and Creaminess
This recipe offers a delightful combination of flavors that will make your guests swoon! With every crunchy bite topped with luscious cheese and fruit, it’s hard not to fall in love with this simple yet sophisticated dish. Let’s embark on this culinary journey together!
Ingredients:
As we dive into crafting these Pear and Brie Crostini, let’s take time to appreciate each ingredient’s role in creating this masterpiece. Every item contributes its own unique character to the final flavor profile.
- 1 Baguette (about 25 inches long). The baguette serves as the sturdy foundation for our crostini, offering the perfect balance of crunch and softness. When selecting your baguette, look for one with a golden-brown crust that promises a satisfying crunch when toasted. Freshness is key here—if possible, grab one from your local bakery or make sure it’s still within its prime at the grocery store. A stale baguette can lead to chewy bites instead of the crisp delight we’re after.
- 10 oz Brie. Ahh, brie—the rich, buttery cheese that seems almost like liquid gold when melted! Its creaminess adds an opulent touch to our crostini while harmonizing beautifully with the sweetness of the pears. When choosing brie, opt for high-quality varieties; look for ones with a soft rind and creamy interior. It should be at room temperature for easy slicing but firm enough to hold its shape before melting. If you can’t find brie or want to switch things up, camembert makes an excellent substitute!
- 1 Anju pear. This pear variety is particularly prized for its smooth texture and sweet flavor that complements the richness of brie wonderfully! When selecting your pear, choose one that yields slightly under gentle pressure; this indicates ripeness without being overly soft or mushy. If Anju pears aren’t available, feel free to substitute with Bartlett or Bosc pears—they’ll all lend their unique sweetness while keeping our crostini delightful.
- 2 Tbsp Olive oil. Here comes the olive oil—our trusty sidekick in achieving beautifully toasted bread! Brushing our baguette slices with olive oil before broiling helps create that golden crust we crave while adding flavor depth without overpowering the other ingredients. Always choose high-quality extra virgin olive oil—it enhances every aspect of your dish with its fruity notes and rich aroma.
- 1 Clove Garlic (crushed). Garlic infuses our crostini with aromatic warmth—think of it as adding depth to an already beautiful melody! Crushing garlic releases its essential oils and juices more fully than simply chopping it would do; trust me—this step is essential! If you’re sensitive to garlic’s sharpness but still want its essence, consider using garlic powder as a gentler alternative.
- 2 Tbsp Fresh rosemary (finely chopped) & 2 Tbsp Fresh thyme (finely chopped). These herbs are non-negotiable heroes in our dish; their fragrant oils elevate each bite into something truly special! Rosemary has an earthy pine-like flavor while thyme brings a subtle floral note—together they create an aromatic symphony that beautifully contrasts sweet pears and savory cheese. Always opt for fresh herbs over dried whenever possible; their vibrant flavors make all the difference!
- 2-3 Tbsp balsamic reduction. Finally, we have balsamic reduction—a drizzle of this glossy elixir transforms our crostini from delicious to utterly intoxicating! Its tangy sweetness ties everything together while adding both visual appeal and depth of taste. You can purchase balsamic reduction ready-made or make your own by simmering balsamic vinegar until it thickens—it’s surprisingly easy!
Equipment You’ll Need:
Having the right tools on hand can truly elevate your cooking experience! While these items may not be ingredients themselves, they play crucial roles in ensuring everything goes smoothly as we create our delicious Pear and Brie Crostini.
- Baking sheet – This versatile tool is essential for broiling our baguettes to perfection! A sturdy baking sheet ensures even heat distribution during cooking so every piece turns golden brown without burning easily.
- Sharp knife – Using a well-sharpened knife makes slicing through brie and pear smooth sailing! Dull knives require more force which could lead to uneven slices—definitely not what we want here!
- Pastry brush – A good pastry brush will help you evenly coat each slice of baguette with olive oil without soaking them too much—this precision ensures optimal crispness while keeping them from becoming soggy.
- Broiler – Your oven’s broiler will be our best friend during this recipe! Broiling creates intense heat from above which rapidly browns our bread while melting cheese beautifully in mere minutes—just keep an eye on it so nothing burns!
Now that we have all our ingredients primed and equipment ready, let’s dive into preparing these delectable Pear and Brie Crostini!
Step 1: Slice Your Baguette with Love
To begin our culinary adventure, take your freshly baked baguette—a true classic—and slice it diagonally into pieces about ½ inch thick. This slight angle creates more surface area for those flavorful toppings we’re going to pile on later! Don’t rush through this step; enjoy the rhythm as your knife glides through the crusty exterior into the soft center beneath it. Aim for uniformity in thickness so they toast evenly later—you want everyone at your gathering reaching for seconds!
Step 2: Prepare Your Toppings
Next up is slicing our beautiful brie cheese into thin rounds—aim for about ¼ inch thick slices so they melt beautifully atop the crostini later on! Follow suit by slicing up your Anju pear into similar-sized pieces so they complement each other visually as well as texturally once assembled on top of those lovely toasted slices.
Step 3: Infuse Olive Oil with Garlic Magic
Now let’s infuse some magic into our olive oil! Take your crushed garlic clove (remember how I said crushing releases those fabulous flavors?) and mix it lovingly into 2 tablespoons of olive oil in a small bowl or container—you want every drop rich with garlicky goodness when brushing onto those baguette slices later!
Step 4: Toast Those Slices
Preheat your oven’s broiler (if you haven’t already) because we’re ready to toast these beauties now! Lightly brush each side of those sliced baguettes generously using your garlic-infused olive oil mixture before laying them out flat on your baking sheet like soldiers ready for battle against blandness! Pop them under the broiler for around two minutes until they begin turning golden brown—you’ll know they’re ready when they start giving off that irresistible aroma wafting through your kitchen inviting everyone nearby!
Stay tuned because we’re just getting started—we still have plenty more exciting steps ahead as we assemble these delightful bites together!
Step 5: Toasting the Baguette to Perfection
Now, let’s talk about the baguette—this is where the magic begins. You’ll want to slice your baguette into pieces about ½ inch thick, cutting on a slight diagonal. This angle isn’t just for aesthetics; it increases the surface area of each slice, allowing for a more delightful crunch and making them perfect vessels for our toppings. Once you’ve cut your slices, it’s time to get those beauties ready for toasting! In this step, we’ll use a method known as broiling, which involves cooking the bread under high heat from above. This technique is crucial because it gives the crostini that irresistible golden-brown finish while preserving a soft center.
Next, you’ll brush both sides of each baguette slice with your garlic-infused olive oil. I can’t stress enough how this simple step elevates the flavor profile of the crostini—imagine that gorgeous aroma wafting through your kitchen! The garlic will infuse into the bread as it toasts, creating an utterly intoxicating base for our toppings. Once brushed, carefully place the slices on a baking sheet in a single layer to ensure even cooking. Pop them under the broiler for about 2 minutes. Keep a close eye during this process; broilers can have a mind of their own! You’re looking for that first hint of golden brown—the moment you see that happening, flip each piece and toast for another 2 minutes. Watch closely because no one wants burnt crostini!
Step 6: Melting Brie – A Creamy Dream
With your toasted baguettes ready to go, it’s time for what I consider one of the most indulgent steps in this recipe: melting the brie. Carefully take your beautifully toasted bread out of the oven and lay down generous slices of creamy brie on each piece. The key here is to use brie at room temperature if possible; this allows it to melt more evenly and become that luscious gooey goodness we all adore. Place these back under the broiler for just about 2 minutes—this step is all about patience and precision.
As you watch those lovely slices of brie begin to soften and bubble slightly, take a moment to appreciate how they transform before your eyes! This melting not only enhances the appearance but also deepens the flavor profile, creating a harmonious balance between creamy richness and crunchy texture. Just imagine biting into one of these heavenly bites—the warm brie oozing onto your tongue—it’s profoundly satisfying! But be vigilant; you want that cheese just melted without turning into a puddle—a light golden hue is what you’re aiming for here.
Step 7: Adding Fresh Pears – Sweetness Meets Savory
Now comes my favorite part—the addition of fresh pear slices! Once your crostini are out from under the broiler, it’s time to layer on those beautiful Anjou pear slices. Trust me when I say—this step is non-negotiable because those sweet, juicy pears provide such an incredible contrast to the rich brie and toasted bread. As you thinly slice your pear (aiming for about two slices per crostini), think about how each bite will offer layers of flavor; you’ve got creamy, savory brie intermingling with refreshing sweetness from the pear.
After adorning each piece with pear slices, sprinkle generously with freshly chopped rosemary and thyme. These aromatic herbs are not just garnishes—they bring an earthy note that balances out the dish’s richness beautifully! The smell will be absolutely mesmerizing as it wafts through your kitchen; I promise you can almost taste those flavors mingling together in harmony already! If you wanted to add some extra drama (and who doesn’t?), feel free to drizzle just a touch more olive oil before returning them briefly to the oven.
Step 8: The Finishing Touch – Aromatic Herb Infusion
This is where we take things one step further—bringing everything together with one last touch before serving. After layering on those pears and herbs, slide your tray back into the oven for just another minute or so, until you start smelling that tantalizing scent from your herbs wafting throughout your home. This short stint in heat allows those essential oils from rosemary and thyme to release into every nook and cranny of our crostini, intensifying their flavor without losing any freshness.
But beware—timing is essential here! You want just enough heat to awaken those aromas without overcooking anything else. Keep an eye on them as they bake; they should come out looking irresistibly fragrant and ready to impress anyone lucky enough to taste them! Visual cues are key; look for lightly browned edges around both cheese and pear slices while enjoying that delightful herbal aroma filling your space—it’s like setting up an event where every guest shows up at once!
Final Touches: Drizzling Liquid Gold
To finish off these stunning Pear and Brie Crostini like a true culinary artist, we must now introduce our balsamic reduction—a moment many might overlook but trust me when I say it transforms this dish into something extraordinary! Drizzle that liquid gold over each piece right before serving; its tangy sweetness contrasts marvelously with creamy brie and crisp pears while adding depth that rounds out every bite perfectly.
Once plated up on an elegant serving platter (you deserve nothing less!), consider giving them one final sprinkle of fresh herbs if desired—you want guests’ eyes wide open with anticipation at first glance alone! Trust me when I say these crostini will disappear quickly at gatherings because they’re not only visually stunning but also utterly delectable—perfectly embodying what makes food so joyful: sharing beautiful moments over delicious bites.
So there you have it—your very own Pear and Brie Crostini masterpiece ready to delight friends or family at any occasion! Enjoy every mouthful filled with love, laughter, and all those wonderful memories created around shared meals together—they’re truly extraordinary moments worth savoring forever!
Storage and Enjoyment Tips for Your Pear and Brie Crostini
Ah, the moment has arrived! Your Pear and Brie Crostini is ready to impress, and I can already picture the eager smiles around the table as you serve this delightful appetizer. But what if you find yourself with some leftovers? Fret not, my friend! These crostini are not just a one-time wonder; they can be preserved beautifully for future enjoyment.
Storing Leftover Pear and Brie Crostini
To ensure your leftover Pear and Brie Crostini remains as delicious as when it was first baked, I recommend placing them in an airtight container. This will create a cozy little environment that keeps out unwanted moisture while preserving that delightful crunch of the baguette. You can store them in the refrigerator for up to two days. However, let’s be real—these treats are so utterly intoxicating that they might not last that long! If you want to maintain their quality, consider separating the bread from the toppings; this way, you can enjoy that crispy texture without any sogginess. When you’re ready to indulge again, simply reheat them in the oven at 350°F (175°C) for about 5-7 minutes until they’re warmed through and the cheese is melting gloriously once more.
Freezing Components for Later
Now, let’s talk about freezing! If you want to prepare ahead of time or simply stash away some components for those busy days when a quick yet impressive appetizer is needed, you can freeze the sliced baguettes separately from the brie and pears. Wrap each slice of baguette tightly in plastic wrap or aluminum foil before placing them in a freezer-safe bag—this helps avoid freezer burn. The crostini will keep well in the freezer for about three months. When you’re ready to use them, allow them to defrost in the refrigerator overnight, then follow the same reheating instructions mentioned earlier. The convenience factor here is fantastic! Imagine having those delightful bites ready at your fingertips whenever guests drop by or when you need a special treat after a long day.
So there you have it—a perfect plan for savoring every bite of your Pear and Brie Crostini!
Pear and Brie Crostini

Indulge in the delightful experience of Pear and Brie Crostini—a perfect blend of savory and sweet that transforms simple ingredients into an elegant appetizer. These crostini feature crusty baguette slices topped with creamy brie and luscious Anjou pears, all drizzled with a tangy balsamic reduction. Ideal for gatherings or intimate dinners, this dish invites conversation and joy around the table. With each bite, enjoy the harmonious balance of flavors and textures that will leave your guests swooning.
- Prep Time: 15 minutes
- Cook Time: 5 minutes
- Total Time: 20 minutes
- Yield: Serves approximately 8 people 1x
- Category: Appetizer
- Method: Baking
- Cuisine: French
Ingredients
- 1 Baguette (about 25 inches long)
- 10 oz Brie cheese
- 1 Anjou pear
- 2 Tbsp Olive oil
- 1 Clove Garlic (crushed)
- 2 Tbsp Fresh rosemary (finely chopped)
- 2 Tbsp Fresh thyme (finely chopped)
- 2–3 Tbsp balsamic reduction
Instructions
- Preheat your oven's broiler.
- Slice the baguette diagonally into ½ inch thick slices.
- Mix crushed garlic with olive oil and brush this mixture on both sides of the baguette slices.
- Arrange the slices on a baking sheet and broil for about 2 minutes until golden brown, flipping halfway.
- Place sliced brie on top of the toasted baguettes and return to the broiler for another 2 minutes until melted.
- Add thinly sliced Anjou pears atop the melted brie, then sprinkle with fresh rosemary and thyme.
- Drizzle with balsamic reduction before serving.
Nutrition
- Serving Size: 2 crostini (50g)
- Calories: 210
- Sugar: 4g
- Sodium: 200mg
- Fat: 12g
- Saturated Fat: 6g
- Unsaturated Fat: 5g
- Trans Fat: 0g
- Carbohydrates: 22g
- Fiber: 1g
- Protein: 6g
- Cholesterol: 30mg