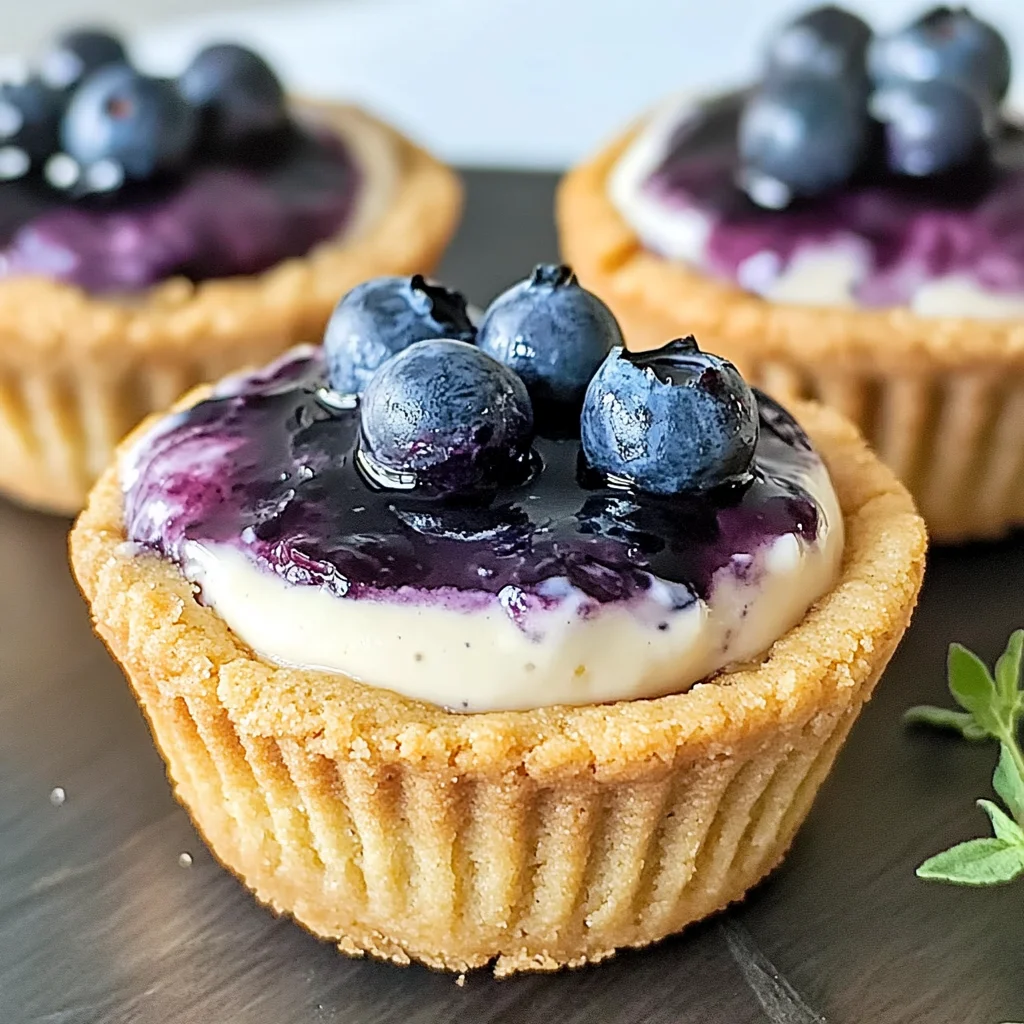
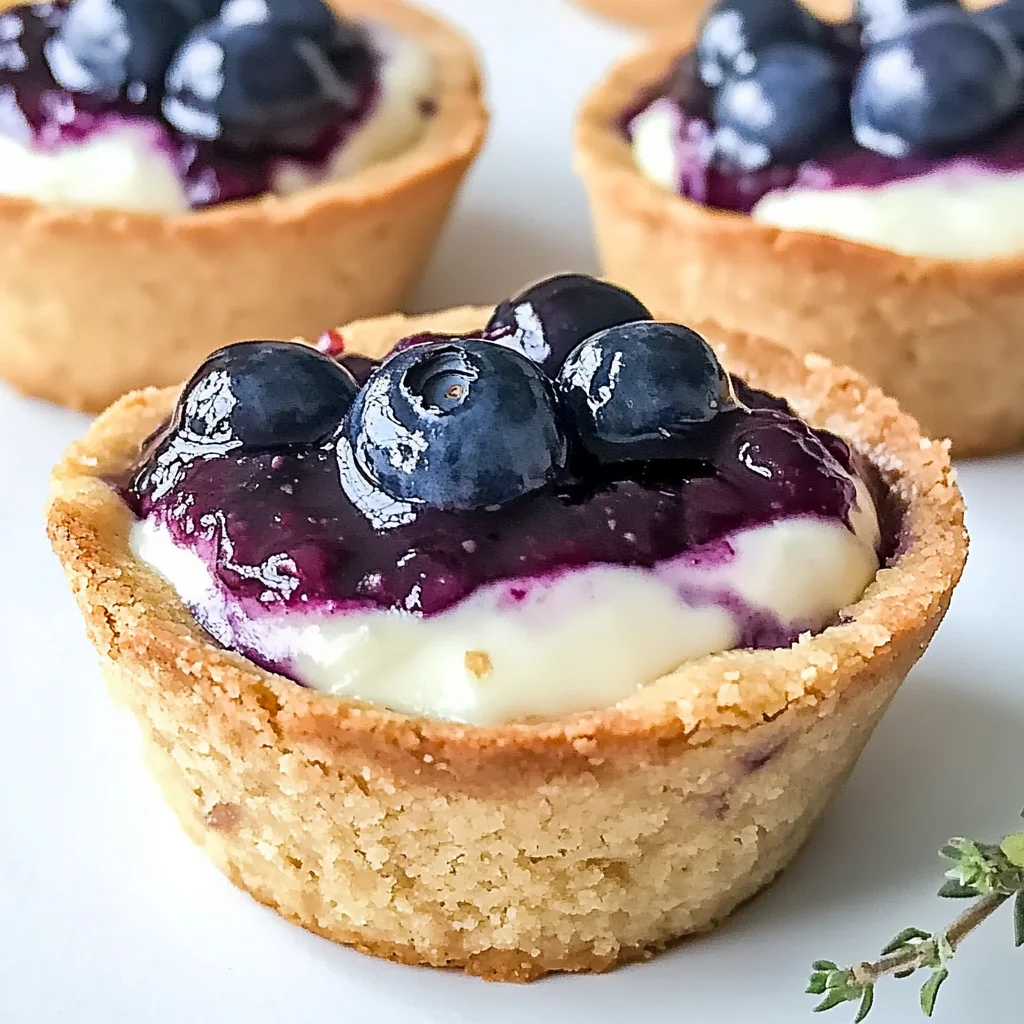
Blueberry Cheesecake Cookie Cups
There’s something profoundly enchanting about the moment you take a bite of a sweet treat that feels like a warm hug, isn’t there? These Blueberry Cheesecake Cookie Cups are just that—a delightful fusion of flavors and textures that transport you straight to a sun-drenched afternoon, where laughter and joy fill the air. Imagine buttery cookie cups cradling a rich and creamy cheesecake filling, all topped with luscious blueberry puree that bursts with summer’s sweetness. Each bite is an experience, truly! The combination of these elements creates what I can only describe as a symphony of flavors that resonates deeply with anyone who takes part in this culinary adventure. I promise you, once you make these, they will become your go-to dessert for gatherings, celebrations, or even a cozy night in.
What I love most about this recipe is how it seamlessly marries tradition with innovation. The classic cheesecake flavor we know and adore is made even more exciting by the cookie cup format—it’s like capturing the essence of summer in every tiny morsel! The blueberry topping not only adds a gorgeous pop of color but also brings a freshness that elevates the entire experience. Whether you’re sharing these with friends at a picnic or savoring them alone while watching your favorite show, they offer that perfect balance of nostalgia and novelty. So grab your mixing bowl and let’s dive into this delicious journey together!
Blueberry Cheesecake Cookie Cups: A Sweet Symphony of Flavor
These Blueberry Cheesecake Cookie Cups are bound to become your new favorite dessert! They’re simple yet sophisticated enough to impress anyone who tries them. With fresh summer blueberries taking center stage and a creamy cheesecake filling nestled within soft cookie cups, they embody everything we love about seasonal baking. Let me walk you through this delightful process so you can create your very own batch.
Ingredients:
Embarking on this culinary journey requires gathering some essential ingredients that will bring our Blueberry Cheesecake Cookie Cups to life! Each component plays an important role in crafting this perfect treat.
- 1 cup + 2 Tbsp (130g) all-purpose flour. This ingredient serves as the foundation for our cookie cups, providing structure while keeping them tender. The addition of those extra tablespoons helps achieve just the right thickness for holding all the tasty filling without collapsing under pressure. When measuring flour, be sure to spoon it into your measuring cup and level it off; scooping directly can compact it and result in dry cookies.
- 1/4 tsp baking soda. This little powerhouse is crucial for providing lift to our cookie cups. It reacts with the acidity in other ingredients to create carbon dioxide bubbles during baking, resulting in a light texture that’s essential for any successful cookie recipe. Just remember—too much baking soda can lead to bitterness, so stick to the recommended amount!
- 1/2 tsp salt. Salt may seem unassuming but trust me when I say it’s absolutely paramount! It enhances sweetness and balances flavors beautifully, creating depth in our cookie cups without making them taste salty at all. Always choose fine salt over coarse for even distribution throughout the dough.
- 1/2 cup (113g) unsalted butter (room temperature). The use of room-temperature butter is non-negotiable here; it’s crucial for achieving that light and airy texture we crave in cookies. Softened butter creams beautifully with sugar—this process creates tiny air pockets that expand during baking, giving us tender yet chewy results. Opt for high-quality butter when possible; it makes all the difference!
- 3/4 cup (150g) granulated sugar. Sugar not only sweetens but also contributes to moisture retention in cookies while aiding in browning during baking—a lovely caramelization effect! When combining sugar with butter during creaming, don’t rush; take your time until the mixture appears light and fluffy—this step lays down the groundwork for our delightful cookie cups.
- 1 large egg (room temperature). Eggs act as binders while adding richness to our dough; they help achieve that desirable chewy consistency we want from our Blueberry Cheesecake Cookie Cups. Using eggs at room temperature allows them to incorporate more easily into the batter—just let them sit out for about 30 minutes if you forgot to set them aside beforehand.
- 1 tsp vanilla extract. Vanilla is like liquid gold when it comes to enhancing flavors—it rounds out sweetness and adds warmth that complements both our cookies and cheesecake filling perfectly! Always opt for pure vanilla extract over artificial varieties; you’ll taste the difference immediately.
- 1/2 cup (120ml) heavy whipping cream (cold). Whipping cream adds richness to our cheesecake filling while contributing velvety smoothness! Make sure it’s nice and cold before whipping—it allows us to achieve maximum volume when blending it with cream cheese later on.
- 4 oz (113g) cream cheese (softened). Cream cheese is at the heart of any good cheesecake—it provides that signature tanginess paired with creaminess that makes every bite utterly intoxicating! Let it come to room temperature so it blends seamlessly into your whipped cream mixture—no one wants lumps ruining their creamy delight!
- 1/4 cup (50g) granulated sugar (for filling). Just like before, sugar works its magic by balancing out acidity from the cream cheese while adding sweetness to our filling without being overwhelming. This small amount is enough to create harmony among all flavors—we want every element singing together beautifully!
- *1/4 cup blueberry puree. This luscious topping elevates our dessert from ordinary to extraordinary! Made by simply blending fresh blueberries until smooth, this puree captures summer’s essence perfectly—it’s vibrant, refreshing, and oh-so-deliciously sweet-tart!
Equipment You’ll Need:
Cooking becomes truly enjoyable when you have the right tools at hand—they’re your partners in crafting something wonderful! While they may not be ingredients, each piece of equipment plays an essential role in ensuring your Blueberry Cheesecake Cookie Cups turn out flawlessly.
- Mixing bowls – having several sizes on hand will make your life easier, especially when working on different components like cookies versus fillings. Choose glass or stainless steel options as they resist staining and maintain temperature well—both critical factors during preparation!
- Electric mixer – this tool is indispensable for achieving perfect creamed butter and sugar mixtures quickly, saving time compared to manual mixing methods. Look for one with multiple speed settings; lower speeds allow better control over mixing delicate ingredients without splattering everywhere!
- Measuring cups & spoons – accuracy matters greatly in baking, so investing in quality measuring tools ensures consistency across batches while reducing frustration later on if things don’t turn out as expected.
- Rubber spatula – this tool helps scrape down bowl sides effectively, ensuring no stubborn bits remain unincorporated into batters or fillings—a small detail but one that significantly impacts final texture!
Now that we’ve gathered everything we need, let’s dive into preparing these delectable Blueberry Cheesecake Cookie Cups so you can share them with family and friends—or keep them all for yourself if they tempt you too much!
Step 1: Creaming Butter & Sugar Together
Begin by placing your softened unsalted butter into a large mixing bowl alongside the granulated sugar—this process known as creaming is fundamental because it creates air pockets essential for lightness in your cookies! Using an electric mixer fitted with beaters or paddle attachments on medium speed makes quick work of this step; mix until pale yellow-colored fluffy clouds form after about 3–5 minutes—the goal here is volume rather than just combining ingredients! Don’t rush this step; ample aeration leads directly toward those mouthwatering results we’re aiming for later on.
Step 2: Incorporating Egg & Vanilla
Once you’ve achieved fluffy perfection with your butter-sugar mixture, it’s time to add room-temperature egg along with vanilla extract—these two additions further enrich flavor profiles while boosting moisture content within doughs too! Beat everything together until fully combined—you’ll notice changes in consistency here as well: expect silky smoothness emerging from previously grainy textures due purely from careful incorporation techniques mastered earlier on! Keep monitoring closely—it shouldn’t take more than another minute or two before achieving harmonious bliss among these core elements present within batter base recipes everywhere!
Step 3: Mixing Dry Ingredients
In another medium-sized mixing bowl combine measured all-purpose flour along with baking soda plus salt using either whisk or fork until well blended throughout evenly distributed particles form uniformity required later down line whenever shaping doughs takes place ahead soon enough now too… Knowing how each component interacts chemically matters greatly since neglecting proper measurements could yield undesired outcomes during subsequent stages ahead instead better focus maintaining patience here rather than rushing through tedious parts now finally paying off overall success down road indeed…
Step 4: Combining Dry With Wet Ingredients
Now comes one pivotal moment where everything comes together beautifully: Slowly add dry mixture into wet components already prepared inside larger bowl earlier set aside waiting patiently throughout preceding steps taken thus far carefully fold gently employing rubber spatula allowing minimal disruption occurring within existing air pockets formed earlier ensuring maximum fluffiness retained throughout final results achieved eventually post-baking stage soon approaching too… Expect doughs thickening noticeably once fully mixed properly resembling soft slightly sticky texture inviting eager hands ready shaping awaiting next stages beyond mere preparation phase kicking off soon thereafter leading toward ultimate transformations occurring shortly thereafter…
Stay tuned as we continue building up these fantastic Blueberry Cheesecake Cookie Cups through further detailed steps ahead filled excitement anticipation surrounding delightful final product awaiting indulgence alongside loved ones nearby cheering encouragement throughout entire journey taken today involving such special endeavor crafted lovingly kitchen space shared memories created together lasting forevermore lasting impressions left behind hearts souls alike…
Step 5: Creating the Cookie Cups
Now that your dough is beautifully blended and ready, it’s time to shape it into those delightful cookie cups that will cradle our luscious cheesecake filling. Preheat your oven to 350°F (175°C), because we want to ensure it’s perfectly hot and ready to embrace these little gems as they bake. While the oven is heating up, grab a muffin tin—this is where the magic happens! Take about a tablespoon of your chilled cookie dough and roll it into a smooth ball. Place each ball into the cavity of the muffin tin, and then gently press down in the center with your thumb or the back of a measuring spoon to create a well for that creamy filling we’ve been dreaming about.
But wait, don’t rush this step! It’s crucial to make sure you press the dough evenly so that it forms a sturdy cup without any cracks, which could lead to leaks once we add our blueberry cheesecake batter. You want them to have just enough height around the edges to hold all that scrumptious filling while still being tender on the bite. Once you’ve formed all ten cups, pop them into your preheated oven and let them bake for about 10-12 minutes, or until they’re golden brown around the edges but still soft in the center. Keep an eye on them—every oven behaves differently, so look for that beautiful golden hue; it’s an indication that they’re ready!
Step 6: Preparing Your Cheesecake Filling
While those cookie cups are baking and filling your kitchen with an intoxicating aroma, let’s turn our attention to crafting that velvety cheesecake filling which is going to be utterly irresistible. In a large mixing bowl, combine 4 ounces of softened cream cheese with 1/4 cup of granulated sugar. Using an electric mixer or even a whisk if you’re feeling ambitious, blend these together until they’re completely smooth—aim for that luxuriously creamy texture that makes every bite feel like a dream. This step is paramount because it ensures there are no lumps in your filling; we want it silky smooth!
Next, slowly pour in 1/2 cup of cold heavy whipping cream and beat on medium speed until soft peaks begin to form. This process can take about 2-3 minutes; you’ll see those lovely peaks starting to emerge when you lift the whisk out of the bowl—it’s like fluffy clouds of happiness! The reason we use cold cream here is simple: it helps achieve those light peaks more easily and contributes to an airy texture in our final cheesecake cups. Once you’ve reached soft peaks, gently fold in your blueberry puree until everything is combined beautifully—a gorgeous swirl of purple against the creamy white filling will make your heart flutter with excitement!
Step 7: Assembling Your Blueberry Cheesecake Cookie Cups
With both components now prepared—the warm cookie cups fresh from the oven and that dreamy blueberry cheesecake filling—it’s finally time for assembly! Allow those cookie cups to cool in their tin for about five minutes before carefully transferring them onto a wire rack; this cooling phase is crucial because if they’re too warm when you fill them, they can melt away some of that luscious creaminess we just created. Once they’re cool enough to handle but still slightly warm, grab a piping bag or even a simple zip-top bag with one corner snipped off.
Now comes the fun part! Generously pipe or spoon that heavenly blueberry cheesecake mixture into each cookie cup, taking care not to overfill—trust me, I know how tempting it is! You want just enough filling so it rises slightly above the edge of each cup without spilling over. The contrast between the rich creaminess of the cheesecake and the sweet burst from those blueberries is what makes this treat so extraordinary—it creates a symphony of flavors in every bite!
Step 8: Chilling for Perfection
Once each cookie cup has been filled with its decadent treasure, it’s time for one last critical step: chilling! Place these delightful creations into the refrigerator for at least two hours—yes, I know waiting can be hard when they look this good—but trust me on this one; patience pays off big time. Chilling allows all those flavors to meld together beautifully while also setting up the cream cheese filling so it’s easy to slice through when you’re ready to indulge.
During this chilling period, something magical happens—the cookie cups firm up slightly while maintaining their delightful tenderness inside. Plus, letting them rest gives you time (as if you needed another excuse) to dream about how delicious they’ll be once you finally take that first bite. When you’re ready to serve them after their chill time, they’ll present themselves as elegant little desserts perfect for any occasion—a real showstopper at dinner parties or simply as a treat for yourself after a long day.
Conclusion:
As we wrap up this delightful journey through creating Blueberry Cheesecake Cookie Cups, I can’t help but feel a sense of joy knowing that you’ll soon be enjoying these delectable treats yourself. From the moment you mix together that buttery dough infused with sweet vanilla notes to the luscious cream cheese filling swirled with vibrant blueberry puree, each step is filled with love and anticipation. It’s not just about satisfying a sweet tooth; it’s about crafting memories that linger long after the last crumb has vanished.
Why should this recipe be on your must-try list? Well, beyond their irresistible taste and texture—the soft cookie base cradling that rich cheesecake filling—is the sheer joy of making them! Picture yourself whipping up a batch for birthday celebrations, summer picnics, or cozy evenings spent with friends over coffee. The aroma wafting through your kitchen will draw everyone in like moths to a flame; trust me when I say this experience isn’t just about eating—it’s about creating something extraordinary together.
Imagine savoring one of these scrumptious cookie cups alongside an afternoon cup of tea or coffee—it’s pure bliss! For an extra luxurious twist, consider serving it with a dollop of whipped coconut cream or alongside fresh berries drizzled with honey. Each bite offers an explosion of flavor that dances across your palate—a truly decadent experience worth relishing.
Feeling adventurous? This recipe is wonderfully adaptable! You could swap out blueberries for ripe strawberries or plump raspberries depending on what’s fresh and available. Or perhaps add some zesty lemon zest into the cheesecake filling for an invigorating citrus kick? The possibilities are endless! So go ahead—explore your creativity and make this recipe your own. I invite you not only to try these Blueberry Cheesecake Cookie Cups but also to share your experience with me! Let’s connect over our love for baking; I can’t wait to hear how yours turn out!
Blueberry Cheesecake Cookie Cups

Indulge in these Blueberry Cheesecake Cookie Cups—sweet bites bursting with flavor! Try this easy recipe today and bring joy to your kitchen!
- Prep Time: 25 minutes
- Cook Time: 12 minutes
- Total Time: 37 minutes
- Yield: Approximately 10 servings 1x
- Category: Dessert
- Method: Baking
- Cuisine: American
Ingredients
- 1 cup + 2 Tbsp all-purpose flour
- 1/4 tsp baking soda
- 1/2 tsp salt
- 1/2 cup unsalted butter, room temperature
- 3/4 cup granulated sugar
- 1 large egg, room temperature
- 1 tsp vanilla extract
- 1/2 cup heavy whipping cream, cold
- 4 oz cream cheese, softened
- 1/4 cup granulated sugar (for filling)
- 1/4 cup blueberry puree
Instructions
- Preheat oven to 350°F (175°C) and grease a muffin tin.
- In a mixing bowl, cream together butter and sugar until fluffy. Add egg and vanilla; mix well.
- In another bowl, combine flour, baking soda, and salt. Gradually add to the wet mixture until just combined.
- Roll dough into balls, place in muffin tin, and press down to form cups. Bake for 10-12 minutes until golden.
- For the filling, beat cream cheese with sugar until smooth. Whip cold heavy cream until soft peaks form; fold into the cream cheese mixture along with blueberry puree.
- Allow cookie cups to cool before filling them with the cheesecake mixture.
- Refrigerate for at least two hours before serving.
Nutrition
- Serving Size: 1 serving
- Calories: 180
- Sugar: 12g
- Sodium: 90mg
- Fat: 9g
- Saturated Fat: 5g
- Unsaturated Fat: 3g
- Trans Fat: 0g
- Carbohydrates: 23g
- Fiber: 0g
- Protein: 2g
- Cholesterol: 30mg