Red White Blue Chocolate Lasagna
There’s something about a dessert that can bridge generations, isn’t there? It’s not just about satisfying a sweet tooth; it’s about creating memories, sharing laughter, and celebrating moments that matter. When I think of summertime celebrations—like Memorial Day, the 4th of July, or Labor Day—I can almost hear the crackle of fireworks in the distance and feel the warmth of the sun on my skin. The Red White Blue Chocolate Lasagna is more than just a no-bake dessert; it’s a canvas painted with vibrant colors and flavors, a testament to the joy of gathering around the table with friends and family. Every layer whispers stories of togetherness and joy, transforming simple ingredients into a symphony of flavors that dance on your palate.
As you prepare to dive into this delightful creation, imagine how each bite will transport you back to those carefree summer days filled with laughter and love. The creamy layers juxtaposed against a crumbly chocolate crust create an experience that is not only visually stunning but also utterly intoxicating in taste. Trust me when I say that this dessert isn’t just a treat—it’s an invitation to celebrate life’s little moments. So let’s embark on this culinary journey together; I’ll be right here with you every step of the way!
Red White Blue Chocolate Lasagna: A Festive Sensation for Every Celebration
This Red White Blue Chocolate Lasagna is truly one of my favorite summer delights! With its vibrant layers of rich chocolate pudding and fluffy whipped cream, it captures the essence of festive gatherings beautifully. Perfect for any patriotic occasion or just as a sweet indulgence on a warm day, this dessert is sure to impress your family and friends alike. And the best part? It requires no baking! Just think about how easy it is to whip up this beauty without ever turning on the oven.
Ingredients:
As we embark on this delightful journey towards creating our Red White Blue Chocolate Lasagna, let’s take a moment to appreciate each ingredient we’ll be using. Each one plays an essential role in crafting this tantalizing dessert, bringing forth flavors and textures that harmonize beautifully.
- 1 pkg Oreo cookies. These beloved chocolate cookies serve as our crust—rich, crunchy, and utterly addictive! Their unique flavor adds depth to our lasagna while providing that delightful crunch we all crave. When picking your Oreos, look for freshness; they should snap when you break them apart. If you’re feeling adventurous or need a gluten-free option, consider substituting with gluten-free chocolate sandwich cookies—your guests will be none the wiser!
- 6 Tbsp butter melted. This ingredient acts as the glue that binds our Oreo crust together. Melting it allows it to mix evenly with the crushed cookies, ensuring every bite retains that delicious chocolatey flavor while holding its shape perfectly when chilled. Use unsalted butter for better control over flavor—you want to taste the sweetness of the Oreos without any overpowering saltiness.
- 1 8oz cream cheese softened. Cream cheese brings a luscious creaminess that balances out the richer chocolate layers above it. Make sure it’s softened to room temperature so it mixes smoothly without any lumps—a smooth filling is absolutely paramount in achieving that heavenly texture we desire in our lasagna.
- 1/4 cup granulated sugar. Sugar does more than just sweeten; it enhances flavors and balances out the richness of the cream cheese while contributing to that silky smooth feel on your tongue. When measuring your sugar, ensure it’s leveled off—too much could tip the balance toward overly sweet!
- 1 12 oz Cool Whip tub, divided. This fluffy topping adds lightness to our dish and creates an inviting contrast against denser layers below. By dividing it into two portions—one for mixing into our cream cheese layer and another for topping—I promise you’ll achieve both structure and delightful presentation!
- 2 (3.9 oz) boxes Chocolate Instant Pudding. Instant pudding is what makes this dessert so quick and effortless! Its rich chocolate flavor becomes an indulgent layer that melds beautifully with all other components as they chill together in harmony—a true showstopper!
- 3 1/4 cups milk. We need milk not only for making our pudding but also to mix just enough into our cream cheese filling for optimal consistency. I recommend using whole milk for its creamy richness—your tastebuds will thank you!
- 2 Tbsp milk (for cream cheese mixture). This small addition works wonders by helping our cream cheese blend smoothly with sugar before incorporating Cool Whip.
- 1 1/2 cups mini chocolate chips. These little morsels are like tiny treasures sprinkled throughout! They add bursts of rich chocolate goodness while providing delightful texture contrast against soft layers.
- Red, white & blue sprinkles. These festive decorations finish off our masterpiece with flair! Not only do they add fun visual appeal but their crunch complements our smooth layers perfectly—it’s like confetti for your taste buds!
Equipment You’ll Need:
Before we dive into making this stunning dessert, let me reassure you that having the right tools can elevate your cooking experience significantly! These essentials will make everything smoother as you create your Red White Blue Chocolate Lasagna.
- Food processor or ziplock bag – A food processor makes crushing Oreos quick and efficient—just pulse until they reach fine crumbs! If you don’t have one handy, using a ziplock bag works too; simply toss in those cookies and smash them gently with a rolling pin or mallet until finely crushed.
- Large mixing bowl – A good-sized bowl gives us ample space for mixing ingredients without overflow disasters! Look for sturdy options made from glass or stainless steel—they resist staining better than plastic.
- Mixer (hand or stand) – Whether you choose a handheld mixer or stand mixer depends on personal preference; however both are vital for achieving that light fluffy texture we want when whipping together our cream cheese filling!
- Spatula – A sturdy spatula comes in handy during layering—it helps spread fillings evenly across each layer without disturbing what’s underneath! Opt for silicone—the flexibility makes spreading easier.
- 9 x 13 inch baking dish – This size is ideal because it allows enough room for each component while giving us those beautiful layered visuals everyone loves showing off at gatherings!
Now that we’ve set up our kitchen with all these essentials—and gathered magnificent ingredients—we’re ready to get started on creating this fabulous Red White Blue Chocolate Lasagna! Trust me when I say every step will be worth it once you see those smiling faces indulging in your creation…
Step 1: Crushing Those Cookies
Let’s kick things off by transforming those Oreos into fine crumbs! If you’re using a food processor, simply toss them in whole—pulse until they resemble sand-like consistency—not too big nor too fine since we want some texture remaining in our crust! Alternatively, if opting for the ziplock bag method (which can be quite therapeutic), place all cookies inside before sealing tightly—then unleash your inner chef by smashing away until finely crushed! This process gives us not just flavor but also forms an irresistible base upon which all other creamy delights will rest comfortably.
Step 2: Bringing It All Together
Once you’ve achieved those glorious cookie crumbs, transfer them into your large mixing bowl before drizzling melted butter over top—we want every crumb coated evenly here since this binds everything together beautifully when pressed down firmly into your baking dish later on! Using clean hands or even spatula (if preferred), mix thoroughly until everything clumps beautifully like wet sand—it’s such satisfying work knowing each piece contributes toward something incredible ahead!
Step 3: Forming Our Crust
Next comes pressing down our crumb mixture firmly into prepared baking dish—a crucial step indeed because weak crusts lead straight toward soggy bottoms which nobody wants after putting so much effort forward! Use either hands (dampening slightly helps avoid sticking) or flat-bottomed glass measuring cup works wonders here—just ensure uniform pressure applied across entire surface area till well-packed while still keeping enough height along edges so layers above have room without spilling over later!
Step 4: Crafting That Creamy Filling
With crust complete time now shifts focus onto luscious cream cheese layer—the heart behind this dreamy dessert combination truly shines through once whipped up correctly! Begin by beating softened cream cheese alone until light & fluffy—this process aerates mixture allowing air pockets form within giving later results extra fluffiness upon eventual serving time arrival too… Add sugar gradually followed by milk stirring until smooth consistency reached (no lumps please!). Finally fold-in half portion Cool Whip softly like gentle clouds merging together seamlessly—we aim here not disrupt airy texture already introduced into play earlier steps ensuring silky delight awaits once layered atop cookie base below…
With these initial steps laid out before us like stepping stones leading toward delectable destination ahead—I hope you’re feeling inspired already just imagining what awaits once completed masterpiece unveiled proudly alongside friends & family gathered ‘round table ready indulge happily as summer sun sets softly beyond horizon… Keep going strong my friend—we’re nearly there!
Stay tuned as we continue crafting each delicious layer onward toward final assembly where magic truly happens revealing stunning visual treat worth celebrating together forevermore…
Crafting Your Delightful Red White Blue Chocolate Lasagna
Step 5: Whisking Up the Chocolate Magic
Now, let’s dive into the chocolate pudding layer, which is nothing short of a game-changer for our Red White Blue Chocolate Lasagna. In a medium-sized mixing bowl, take those two packets of chocolate instant pudding and add them to 3 1/4 cups of cold milk. It’s essential to use cold milk here because it helps the pudding mix come together in that beautifully smooth consistency we’re aiming for. Grab your whisk and start mixing vigorously—don’t rush this step! The goal is to incorporate air into the mixture while ensuring that there are no lumps. As you whisk, you’ll notice how the liquid begins to thicken almost magically before your eyes; this is due to the cornstarch in the pudding mix activating and absorbing the milk.
Once you’ve achieved a thickened consistency—think silky but still pourable—take a moment to admire your handiwork. This isn’t just any pudding; it’s going to elevate your dessert to an entirely new level. Carefully spread this luscious chocolate mixture over the cream cheese layer using a spatula, ensuring an even distribution that reaches all corners of your pan. Why is this step so crucial? It creates a delightful contrast between the creamy layers and the rich chocolate that will delight each person who digs in. Make sure you spread it evenly; nobody wants an uneven slice that leaves someone with only cream cheese or only chocolate! Let it rest for about 5 minutes—this brief pause allows everything to settle beautifully.
Step 6: The Cool Whip Crown
Now comes one of my favorite parts—the final layer of Cool Whip! Using a spatula, gently spread the remaining Cool Whip over the top of your assembled dessert. This fluffy topping acts like a cloud on top of a summer sky, providing lightness that balances out the creaminess below. It’s important to do this step carefully; you want to avoid disturbing those beautiful layers you’ve worked so hard on creating. A soft touch is key here; think of it as draping a delicate blanket over something precious.
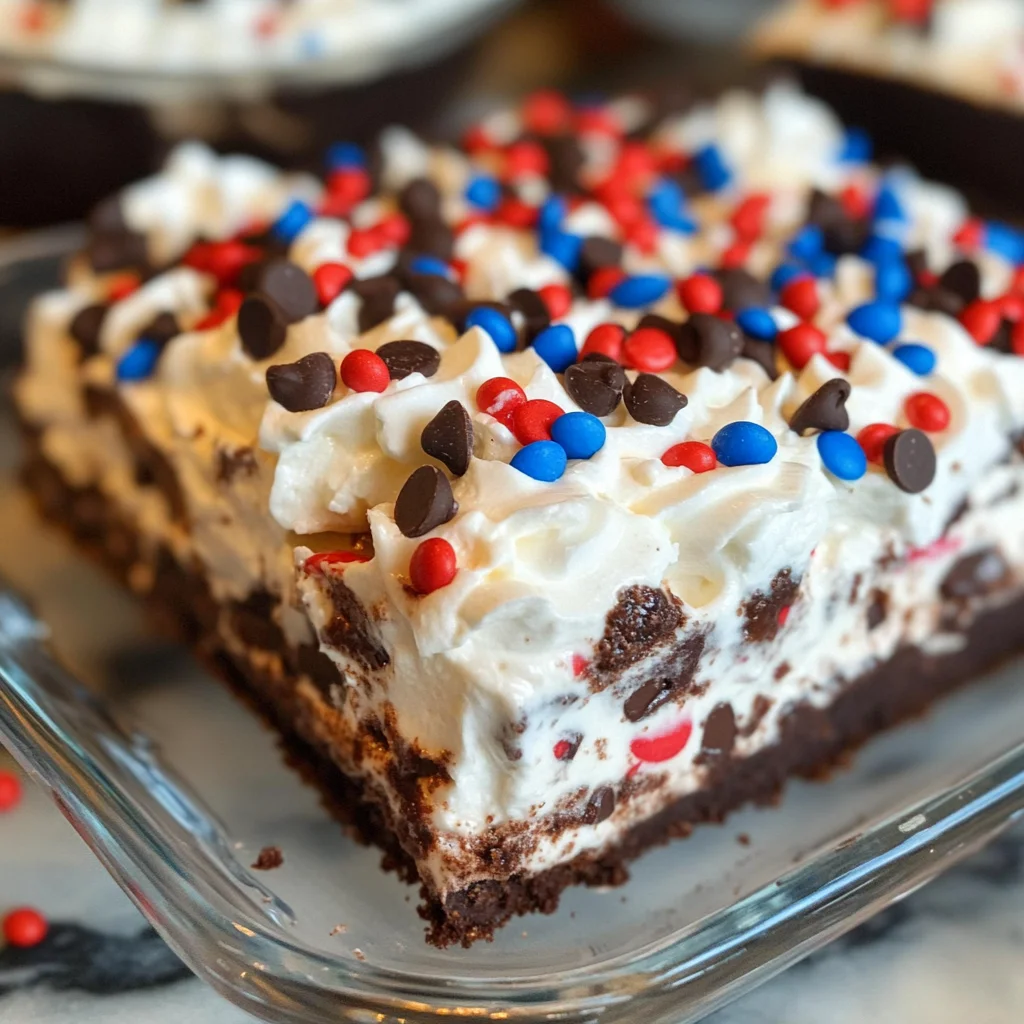
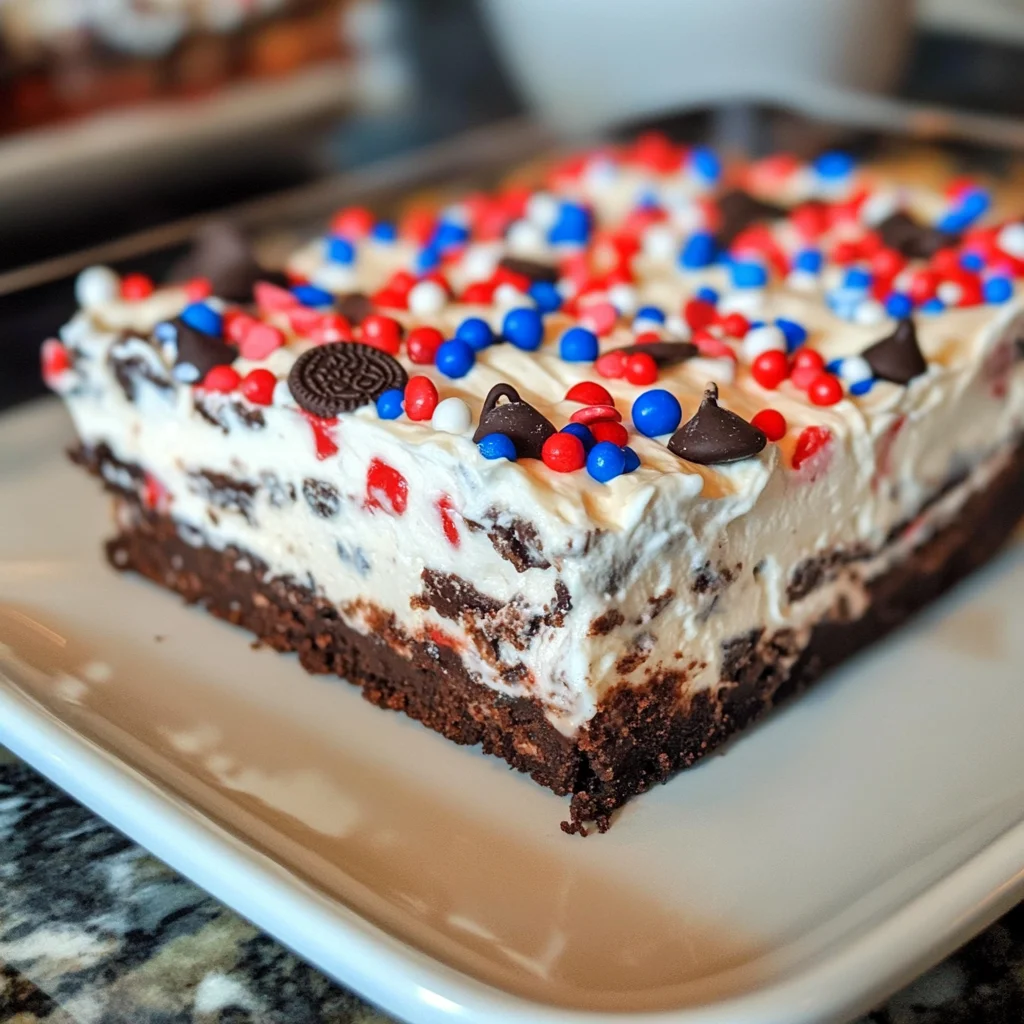
As you spread, take note of how each layer peeks through, creating a visually enticing dessert that promises deliciousness with every bite. Just imagine cutting into this confection and seeing those vibrant layers contrasting against each other! To enhance its festive nature, sprinkle mini chocolate chips across the top followed by those charming red, white, and blue sprinkles. This isn’t just about aesthetics (though they are undeniably gorgeous); these toppings add delightful textures and flavors that make every bite extraordinary. Trust me on this: those little bursts of sweetness from both the chocolate chips and sprinkles will bring joy not just to your palate but also visual delight!
Step 7: The Waiting Game – Chill Time
With your Red White Blue Chocolate Lasagna nearly complete, it’s time for patience—a virtue I know can be tough sometimes! Now we need to chill our masterpiece in either the freezer or refrigerator before serving. If you choose to pop it into the freezer, aim for about one hour; if you prefer taking your time in the fridge, allow it four hours or even overnight if you’re feeling particularly patient (but trust me, it’s worth it!).
Why is chilling so crucial? Cooling helps everything set properly while allowing those flavors to meld together beautifully into a cohesive dessert experience; think of it as letting all those ingredients get acquainted with one another at a cozy gathering. When chilled appropriately, slicing becomes effortless—you’ll end up with neat squares rather than an unmanageable gooey mess! Additionally, allowing time for firming up means each layer retains its structure while still being delectably soft when bitten into. So resist the urge to dive in right away; I promise you’ll be rewarded with something profoundly satisfying once you’ve waited!
Step 8: Serving Your Heavenly Creation
Finally! After all that anticipation, it’s time for everyone to indulge in a slice of your spectacular creation! Carefully remove your Red White Blue Chocolate Lasagna from its resting place—be it fridge or freezer—and place it on a cutting board or serving platter. Use a sharp knife dipped in warm water (this little trick prevents sticking) for slicing through all those layers smoothly without pulling apart any components. Aim for squares that showcase all three layers—each slice should reveal that creamy crust beneath followed by rich chocolate pudding and topped off with dreamy Cool Whip.
As you serve each piece, consider garnishing with extra patriotic sprinkles or perhaps some fresh berries if you’re feeling adventurous—that added freshness can really brighten up each bite! Remember to savor not just the taste but also the joy this dessert brings during gatherings with friends and family—it’s truly extraordinary how food can create memories and moments worth cherishing together.
Final Touches: Celebrate with Flavor!
Your Red White Blue Chocolate Lasagna is now more than just a dessert; it’s an experience waiting to happen at gatherings such as Memorial Day picnics or Fourth of July celebrations! Whether served during BBQs or summer parties under twinkling stars—you’ve crafted something stunningly beautiful while also deeply satisfying.
As everyone takes their first bites and exclaims over how incredible it tastes, sit back and soak in that happiness—it’s what cooking is all about! So grab your forks and dig in; enjoy every moment shared around this delightful dish! And don’t forget: if anyone asks for seconds (which they surely will!), know you’ve created not just any dessert—but one filled with love and joyous memories perfect for celebrating life’s sweetest moments!
Storage and Enjoyment Tips for Your Red White Blue Chocolate Lasagna
Oh, my friends, once you’ve assembled your stunning Red White Blue Chocolate Lasagna, the only thing left to do is dig in! But, if by chance you have some leftovers—though I doubt it will happen—you’ll want to make sure they’re stored properly so every luscious layer remains as delightful as the first bite. This dessert is not just a treat; it’s a celebration of flavors and textures that deserve to be savored even after the festivities end.
Storing Leftover Red White Blue Chocolate Lasagna
To keep your delicious creation fresh, transfer any leftovers into an airtight container. A glass dish works beautifully because it helps maintain the dessert’s integrity while allowing you to peek at those glorious layers. If you need to stack it, just place a piece of parchment paper between layers to prevent sticking. Stored this way in your refrigerator, your Red White Blue Chocolate Lasagna will stay delightful for about three to five days—though I must warn you, it might not last that long! The coolness from refrigeration allows the flavors to mingle even more beautifully, creating an utterly intoxicating experience with each spoonful. When you’re ready to serve again, simply pull it out and cut yourself a generous slice. Trust me on this: letting it sit for a few minutes at room temperature before serving enhances that creamy texture splendidly.
Freezing Red White Blue Chocolate Lasagna for Later
Now, if you find yourself with more than just a few leftovers—or if you want to plan ahead for those summer gatherings—freezing this dessert is an absolute game changer! To freeze properly, slice the lasagna into individual portions and wrap each piece tightly in plastic wrap before placing them in a freezer-safe bag or container. This method prevents freezer burn while keeping each portion intact. You can store these beauties in the freezer for up to two months without sacrificing flavor or texture. When you’re ready to enjoy, simply transfer a slice from the freezer to the fridge and let it thaw overnight—this way, you’ll wake up to a delightful treat waiting for you. Imagine how convenient that is on a busy weekday when you’re craving something sweet yet satisfying!
Red White Blue Chocolate Lasagna

Indulge in the festive delight of Red White Blue Chocolate Lasagna, a no-bake dessert that captures the essence of summer celebrations. With its vibrant layers of rich chocolate pudding, fluffy whipped cream, and a crunchy Oreo crust, this dessert is perfect for gatherings like Memorial Day or the 4th of July. Not only is it visually stunning, but every bite transports you to blissful summer days filled with laughter and joy. Easy to prepare and utterly delicious, this layered treat is an invitation to celebrate life’s sweet moments with family and friends.
- Prep Time: 30 minutes
- Cook Time: None
- Total Time: 0 hours
- Yield: Approximately 12 servings 1x
- Category: Dessert
- Method: No-Bake
- Cuisine: American
Ingredients
- 1 package Oreo cookies
- 6 tablespoons melted butter
- 1 (8 oz) package cream cheese, softened
- 1/4 cup granulated sugar
- 1 (12 oz) tub Cool Whip, divided
- 2 (3.9 oz) boxes chocolate instant pudding
- 3 1/4 cups cold milk
- 1 1/2 cups mini chocolate chips
- Red, white & blue sprinkles
Instructions
- Crush Oreo cookies in a food processor or ziplock bag until fine crumbs form.
- Combine crushed cookies with melted butter in a large mixing bowl and mix until evenly coated.
- Press the mixture firmly into a greased 9 x 13 inch baking dish to form the crust.
- Beat softened cream cheese with sugar and a little milk until smooth. Gently fold in half of the Cool Whip.
- Spread the cream cheese mixture over the crust.
- In another bowl, whisk together chocolate pudding mix and cold milk until thickened; spread over the cream cheese layer.
- Top with the remaining Cool Whip and sprinkle mini chocolate chips and festive sprinkles on top.
- Chill for at least four hours before serving.
Nutrition
- Serving Size: 1 square (approximately 100g)
- Calories: 300
- Sugar: 22g
- Sodium: 180mg
- Fat: 15g
- Saturated Fat: 7g
- Unsaturated Fat: 7g
- Trans Fat: 0g
- Carbohydrates: 39g
- Fiber: 2g
- Protein: 3g
- Cholesterol: 20mg