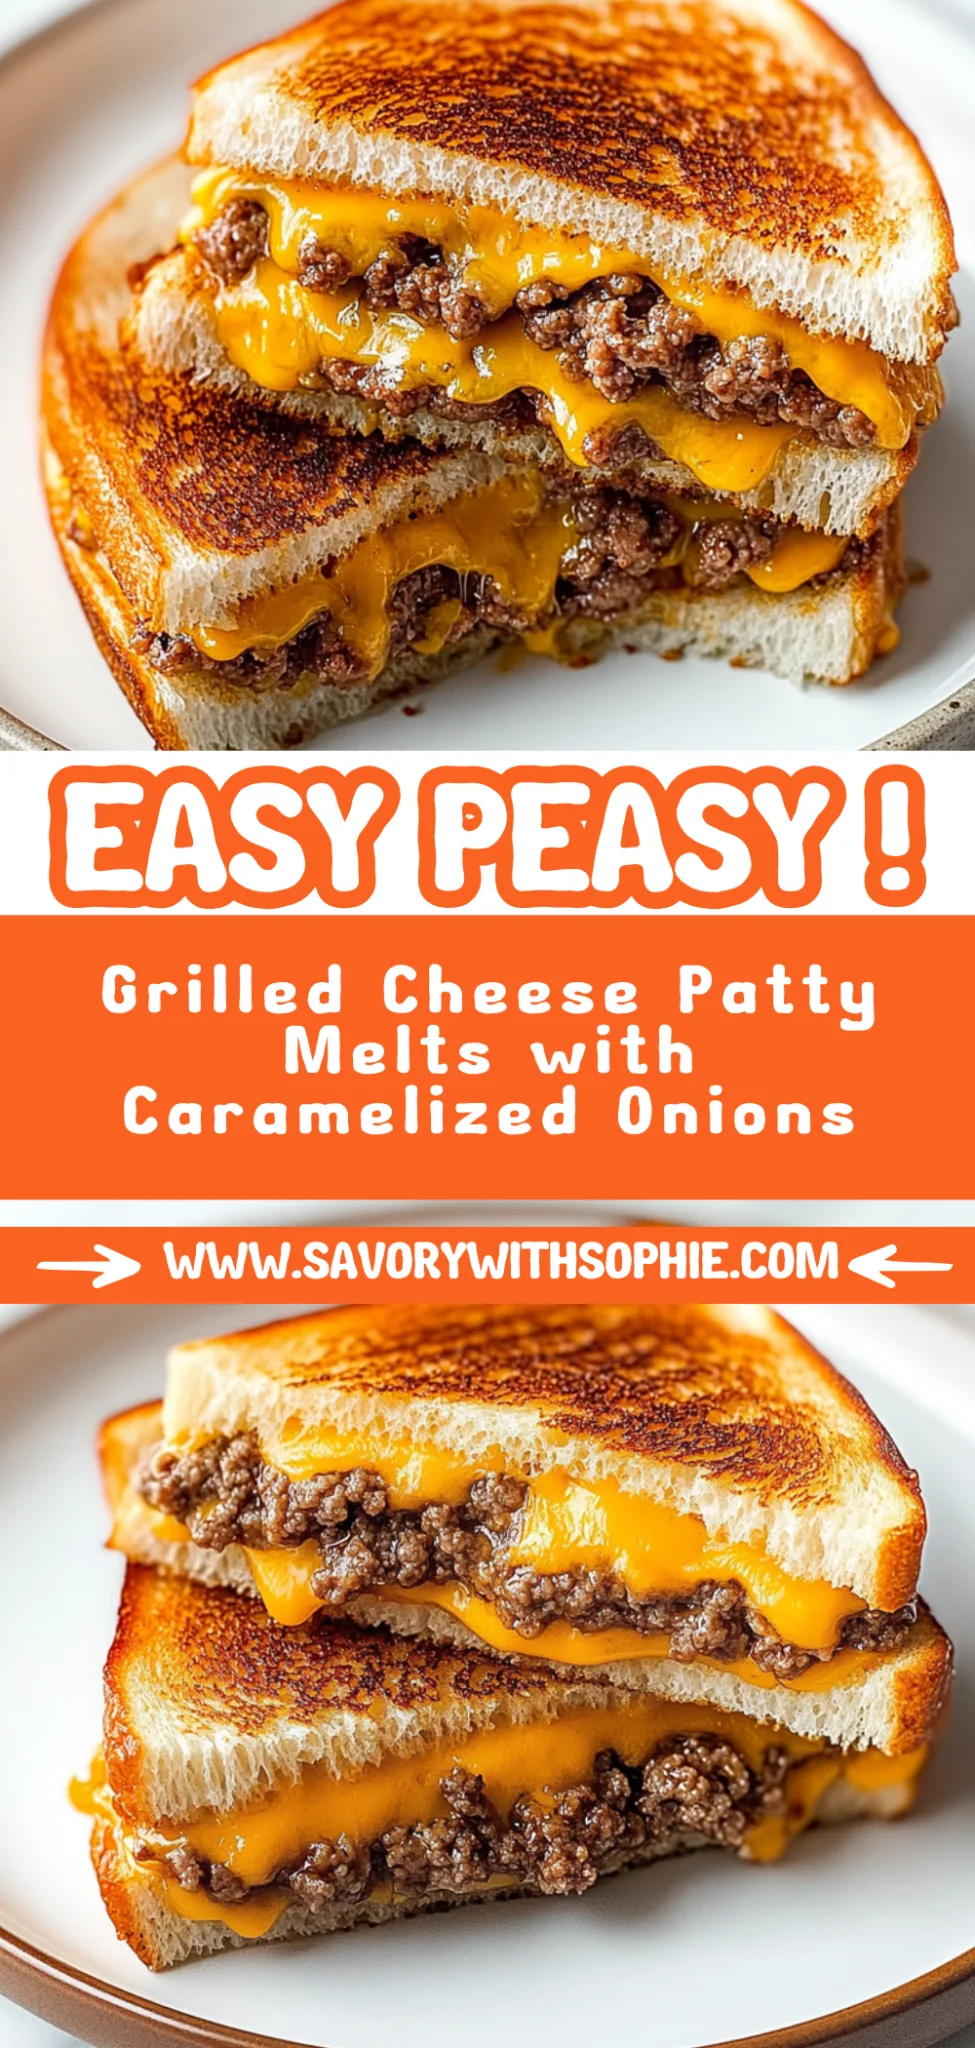
Grilled Cheese Patty Melts: A Decadent Twist on Comfort Food
I first stumbled upon the idea of Grilled Cheese Patty Melts during one of my late-night food escapades at a cozy diner. The moment I took that first bite of crispy, buttery bread encasing a juicy burger patty and oozing cheese, I was hooked! It was a glorious mashup that seemed so simple yet utterly decadent. As much as I loved indulging in this delightful dish at the diner, I found myself wanting to recreate it at home—partly to save some cash and partly because there’s something therapeutic about crafting comfort food in your own kitchen.
Let me tell you, perfecting this recipe wasn’t a walk in the park. I lost count after my fifth attempt (and trust me, my taste testers had their patience tested too). Each iteration brought its own challenges—I tried different types of cheese for that perfect melt, experimented with various bread crusts to achieve the ideal crunch, and even played around with seasoning the patties just right. My kitchen looked like a battleground of grilled cheese carnage, but hey, someone had to get it right!
But all those trials paid off in spades when I finally nailed it. The end result? A symphony of textures and flavors—crispy golden bread enveloping succulent beef patties and bubbling cheese that stretches gloriously with every bite. You’ve got the richness from the meat balancing with the creamy cheese, all wrapped up in that buttery crunch! Trust me when I say you’re going to want to whip these Grilled Cheese Patty Melts up ASAP—your taste buds will thank you later!
These Grilled Cheese Patty Melts are….
….the ultimate comfort food that elevates a classic to new heights!
1. They deliver an irresistible flavor explosion with each bite, thanks to the 80/20 blend of ground beef. This combination creates a juicy and flavorful patty that perfectly complements the rich, melted cheese and buttery bread, making every mouthful a delight.
2. Heavenly texture – a crispy outer layer gives way to soft, chewy bread and succulent burger patties inside. By using sourdough or rye, I found that the unique crumb structure enhances the crunch while keeping the insides perfectly tender.
3. The toasting technique is key to achieving that golden-brown crust. By spreading softened butter generously on the outside of the bread before grilling, it creates a beautifully crisp surface that locks in the juiciness of the patties and cheese, taking these grilled cheese patty melts up a notch.
4. A budget-friendly meal – this recipe serves four hearty sandwiches for the cost of just one at a diner! Using simple ingredients like ground beef, cheese, and bread, you can whip up this satisfying dish right at home without breaking the bank.
PS These Grilled Cheese Patty Melts are sizable sandwiches that will leave you feeling satisfied and craving more!
Ingredients You’ll Need
Each ingredient in this dish plays an essential role in flavor and texture. Here’s what you’ll need:
1 lb Ground beef (80/20 blend for best flavor): Provides a juicy and flavorful patty that complements the cheese perfectly.
1 tsp Salt (to taste): Enhances the natural flavors of the beef and cheese.
1 tsp Black pepper (to taste): Adds a subtle heat and depth to the overall flavor profile.
4 slices Cheddar cheese (or cheese of choice): Melts beautifully, creating a creamy layer that binds the sandwich together.
8 slices Bread (sourdough or rye recommended): Offers a sturdy base with a delicious crust that crisps up nicely when grilled.
4 tbsp Butter (softened for spreading): Ensures golden-brown toastiness while adding richness to each bite.
Forming the Perfect Patties is Non-Negotiable. Trust Me!
I’ll confess, I tried to skip the part where you form those patties correctly. I thought, “Hey, it’s just ground beef! How hard can it be?” But after a few sad, irregular burgers that cooked unevenly, I learned my lesson. So yes, taking the time to form your patties perfectly makes all the difference—no shortcuts here!
Here’s why this matters: when you form your patties evenly and with care, each one cooks uniformly, resulting in juicy centers and golden-brown exteriors. Think of it like rolling pizza dough; if it’s uneven, some parts will burn while others are undercooked. In this recipe for Grilled Cheese Patty Melts, those perfectly shaped patties are key to achieving that delightful contrast of crispy bread and gooey cheese hugging a juicy burger.
What does forming the perfect patties do?
- Flavor — Properly formed patties ensure an even distribution of seasoning throughout the meat, enhancing every bite with a consistent savory punch.
- Texture — Even thickness allows for uniform cooking, resulting in tender meat without any dry or overcooked edges.
- Cooking Time — Consistent patty size means they cook at the same rate; no guessing game on whether one’s done while another is still raw inside!
- Juiciness — A well-formed patty retains moisture better during cooking, leading to a juicy burger experience that complements the melted cheese.
- Presentation — Neatly shaped patties not only look more appetizing but also make for easier stacking between slices of bread without any awkward gaps.
Different Patty Forming Techniques
- Loose balls (poor) — If you just toss the ground beef into rough shapes, expect uneven cooking and a lack of structure that leads to crumbling.
- Slightly flattened patties (okay) — They’ll hold together better than loose balls but may still vary in thickness enough to cause inconsistent cooking.
- Perfectly formed 1/2-inch thick patties (good) — This is what we want! They cook evenly and maintain their juiciness while offering good surface area for browning.
- Chilled before cooking (best) — If you take the extra step to chill your formed patties for about 20 minutes before grilling, they hold their shape even better and offer an enhanced crust.
Be warned: The most common mistake is not forming your patties evenly. Trust me—this isn’t a “wing it” situation! Skipping this step leads to burgers that cook unevenly and can even fall apart during grilling. So take a moment to shape those beauties right!
How to make Grilled Cheese Patty Melts
Are you ready to see how straightforward it is to make the Grilled Cheese Patty Melts of your dreams??
1. PREPARE THE PATTIES
Let’s get those juicy burger patties ready for melting goodness!
1. MIX – In a bowl, mix the ground beef with salt and pepper until just combined. Don’t overwork it; you want the patties to stay tender. Form the mixture into 4 equal patties, making them slightly larger than the bread since they’ll shrink while cooking.
2. COOK – Heat a skillet over medium-high heat until it’s hot but not smoking. Add the patties and cook for about 4-5 minutes on each side, or until they reach your desired doneness. You’ll know they’re ready when they have a nice sear and are cooked through — aim for an internal temperature of 160°F (71°C) for safety!
HANDY TIPS
- Use an 80/20 blend of ground beef for maximum flavor and juiciness.
- If you like your burgers with a bit of spice, feel free to add crushed garlic or onion powder into the beef mixture!
2. ASSEMBLE THE PATTY MELTS
Now comes the cheesy part — assembling our delicious sandwiches!
3. ADD CHEESE – During the last minute of cooking, place a slice of cheese on each patty to melt beautifully as they finish cooking. Keep an eye on it; melted cheese is a sign that it’s time to move on!
4. BUTTER BREAD – Carefully remove the patties from the skillet and set them aside on a plate. Butter one side of each slice of bread generously; this will create that irresistible crispness when grilled.
5. BUILD SANDWICHES – In the same skillet, place 4 slices of bread, buttered side down. On each slice, top with a patty followed by another slice of cheese for extra melty goodness. Then cover with the remaining slices of bread, buttered side up.
HANDY TIPS
- Sourdough or rye bread adds a wonderful flavor that complements the beef and cheese perfectly!
- For added flavor, consider adding sautéed onions or mushrooms between the layers.
3. GRILL THE SANDWICHES
Let’s bring everything together by grilling our mouthwatering creations!
7. GRILL – Grill the sandwiches in the skillet for about 3-4 minutes on each side, or until they are golden brown and crispy. Press down gently with a spatula to ensure even grilling and perfect melty cheese inside!
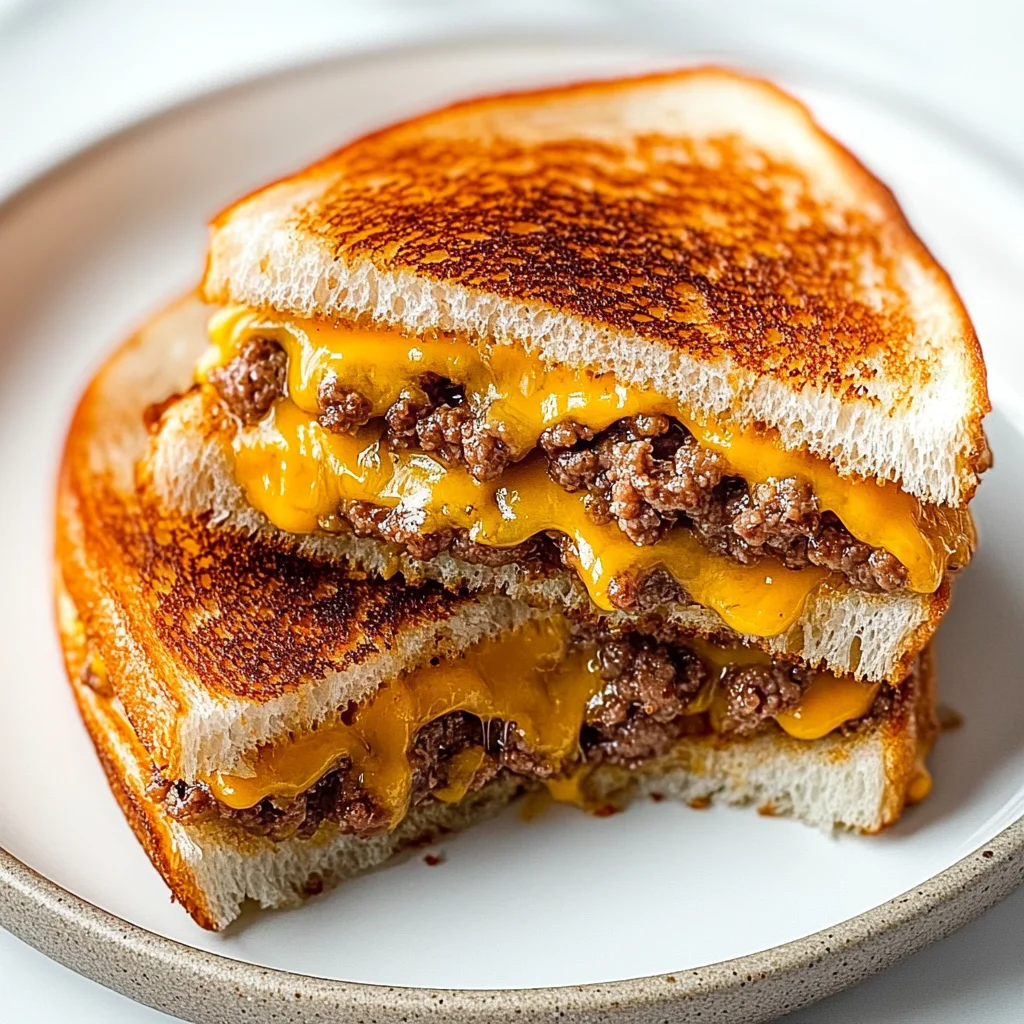
8. SERVE – Once golden brown, remove from skillet and slice in half to reveal that gooey cheese and juicy patty inside! Serve hot alongside pickles and ketchup if desired.
HANDY TIPS
- Keep your heat at medium so you don’t burn the bread before the cheese melts.
- For extra crunch, try using a panini press instead!
Making these Grilled Cheese Patty Melts is not only quick but incredibly satisfying — it’s like having a party in your mouth! With juicy beef patties nestled between perfectly toasted bread and oozing cheese, you’ll definitely want seconds (or thirds!). Make these once, and I wager they will invade your dreams every night too! – Nagi x
FAQ – Grilled Cheese Patty Melts
Can I make these patty melts ahead of time?
You can absolutely prepare the components ahead of time! You can cook the burger patties and store them in an airtight container in the fridge for up to 2 days. Just reheat them in a skillet or microwave before assembling your sandwiches. As for the bread and cheese, you can have those ready to go as well. Just remember, freshly grilled sandwiches are always best, so I recommend grilling them just before serving for that golden brown crunch!
How long will leftover patty melts keep in the fridge?
Leftover patty melts can be stored in the fridge for about 3 days, but they’ll be at their best quality on day one. On day two, they still taste pretty good — around 85% as good — but by day three, you might notice a drop to about 70%. To reheat, pop them into a skillet over medium heat to bring back some of that delicious crispiness!
❄️ Can I freeze grilled cheese patty melts?
Yes, you can freeze these delights! After grilling, allow the patty melts to cool completely. Wrap each sandwich tightly in plastic wrap and then place them in a freezer bag to prevent freezer burn. They’ll keep well for up to 3 months. When you’re ready to enjoy them, thaw in the fridge overnight and reheat in a skillet or toaster oven until warmed through and crispy. Just don’t microwave them unless you want soggy bread!
🌾 Can I make this recipe gluten-free?
Definitely! To make gluten-free grilled cheese patty melts, simply substitute regular bread with your favorite gluten-free bread. Just keep in mind that some gluten-free breads tend to be denser or drier, so choose one that has a soft texture for best results. Additionally, ensure that your cheese is also gluten-free (most are) and season your beef with gluten-free condiments if you’re adding sauces.
What if I want to use a different type of cheese?
Feel free to get creative with your cheese choice! While cheddar is classic and delicious, you could swap it out for:
- Swiss: For a nutty flavor.
- Provolone: For a creamier texture.
- Mozzarella: If you love stretchy cheese!
Just remember that some cheeses melt better than others — try to stick with semi-hard or hard cheeses for that perfect gooeyness.
Why do I need to butter the bread before grilling?
Buttering the bread serves two main purposes: it creates that beautiful golden-brown crust while also adding rich flavor! The fat from the butter helps conduct heat evenly across the surface of the bread, which is crucial for getting that crispy exterior while keeping everything inside warm and melty. If you’re feeling adventurous, try using garlic butter or herb-infused butter for an extra flavor kick!
Did you really test this recipe multiple times?
Yes, I really did test this recipe multiple times — around ten times, if I’m being honest! Each batch taught me something new about balancing flavors and achieving that perfect melt-in-your-mouth experience. I tinkered with cooking times and ingredient ratios until I was satisfied with every single bite. Trust me when I say this is not just another grilled cheese; it’s a game changer!
Troubleshooting
I will continue to add more to this Troubleshooting section as I start seeing questions coming through from people who have made the recipe.
Troubleshooting tips
“My burger patties came out too thin! 😩”
- You may have formed your patties smaller than the recommended size. Aim for about 4 ounces each, or roughly the size of a standard hamburger patty.
- If you pressed down too hard while shaping them, they could flatten out during cooking. Gentle hands are key here!
- I bet they were still YUM though!
“Why do my grilled cheese melts look burnt? 🔥”
- Cooking over high heat can lead to burnt bread while the insides remain undercooked. Try lowering the heat to medium for more even browning.
- If you used darker bread like rye, it might brown faster than lighter breads. Keep an eye on it and adjust cooking time accordingly!
- I bet they were still YUM though!
“The cheese didn’t melt properly and is all clumpy! 😭”
- If you didn’t place the cheese on the patties during the last minute of cooking, it won’t have had enough time to melt into gooey goodness.
- Using pre-shredded cheese can also result in clumping due to anti-caking agents. Freshly sliced cheese melts better!
- I bet they were still YUM though!
“My sandwich feels soggy on the inside! 😳”
- This can happen if your burger patties released too much juice while cooking. Ensure they’re cooked just right and not overdone to keep them juicy yet firm.
- If you buttered the bread too thickly or didn’t let it toast long enough, that can also lead to sogginess. Aim for a nice even layer of butter and golden brown toast.
- I bet they were still YUM though!
Grilled Cheese Patty Melts
Ingredients
Method
- In a bowl, mix ground beef with salt and pepper. Form into 4 equal patties.
- Heat a skillet over medium-high heat and cook the patties for about 4-5 minutes on each side, or until cooked to desired doneness.
- Place a slice of cheese on each patty during the last minute of cooking to melt.
- Remove patties from skillet and set aside. Butter one side of each slice of bread.
- In the same skillet, place 4 slices of bread, buttered side down. Top each with a patty and another slice of cheese.
- Cover with the remaining slices of bread, buttered side up.
- Grill the sandwiches in the skillet for about 3-4 minutes on each side, or until golden brown and crispy.
- Remove from skillet, slice in half, and serve hot with pickles and ketchup if desired.