Hot Buttered vanilla extract (alcohol-free) Apple Pie
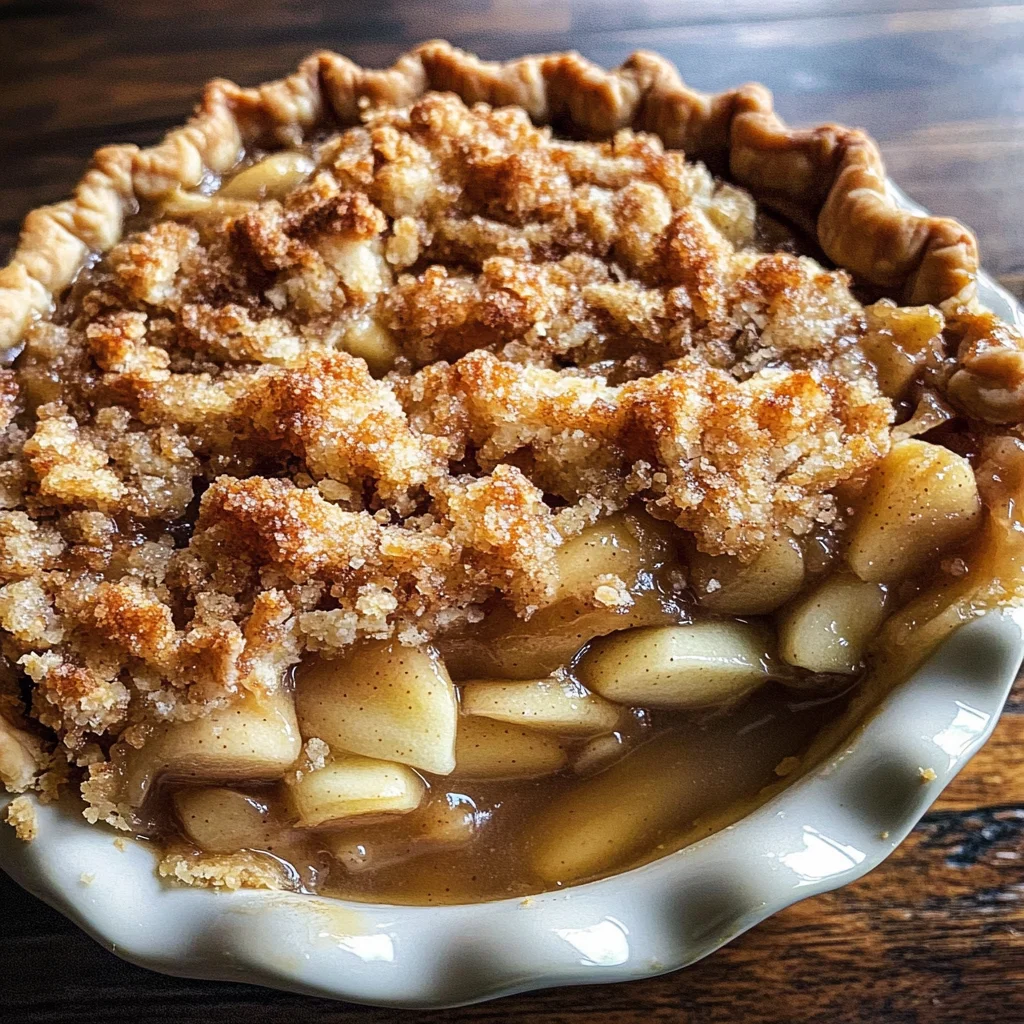
There’s something profoundly magical about the aroma of a freshly baked apple pie wafting through the air, isn’t there? It’s not just a dessert; it’s a heartfelt invitation to gather around the table and share stories, laughter, and warmth with those we hold dear. This Hot Buttered Vanilla Extract (Alcohol-Free) Apple Pie embodies all of that magic and more. With its flaky crust cradling tender apples, kissed by a touch of cinnamon and nutmeg, every slice is an experience that sparks joy and ignites nostalgia. The buttery crumb topping adds an irresistible crunch that pairs splendidly with the gooey filling beneath. I promise you, this pie is not merely food; it’s a bridge connecting us to cherished memories and traditions, wrapped in a golden crust.
As you embark on this culinary journey, you’ll find that each step is infused with love and intention. I’ve always been captivated by how baking can transform simple ingredients into something extraordinary—like alchemy in the kitchen! The key to creating this masterpiece lies not only in following the recipe but also in understanding the ‘why’ behind each ingredient and technique. So grab your apron, let’s roll up our sleeves, and create something truly special together!
Hot Buttered Vanilla Extract (Alcohol-Free) Apple Pie: A Slice of Home
Welcome to my kitchen! Today, we’re making a pie that is sure to become a cherished favorite in your home. With its rich flavors and delightful textures, this Hot Buttered Vanilla Extract (Alcohol-Free) Apple Pie will be the star of any gathering or simply a sweet treat for yourself after a long day. Trust me; once you taste it, you’ll understand why this recipe holds such a special place in my heart.
Ingredients:
Let’s dive into the wonderful world of ingredients! Each one plays a crucial role in crafting our delicious Hot Buttered Vanilla Extract (Alcohol-Free) Apple Pie.
-
2 cups all-purpose flour. This is the foundation of our pie crust. All-purpose flour strikes the perfect balance between tenderness and strength, ensuring our crust holds together while remaining flaky. When selecting flour, look for brands that are finely milled for the best texture. If you’re feeling adventurous or want to experiment with flavor, consider substituting half with whole wheat flour or even almond flour for added depth!
-
1/2 tsp salt. Salt may seem minor in baking, but it plays an absolutely paramount role in enhancing flavors across our pie. It balances sweetness and brings out the natural flavors of our ingredients. Always opt for fine sea salt as it dissolves quickly and blends seamlessly into your dough.
-
2 TBSP granulated sugar. Sugar does more than sweeten; it helps tenderize the crust by inhibiting gluten formation when combined with fat—an essential factor for achieving that melt-in-your-mouth texture we all adore.
-
2/3 cup chilled unsalted butter. The star player of any pie crust! Using unsalted butter allows you to control the saltiness of your dish better, while chilling it ensures that when we bake our crust, it creates those beautiful flaky layers as it melts during baking—think liquid gold bubbling up through cracks!
-
4 to 5 TBSP ice water. This is crucial for bringing our dough together without overworking it. The cold water helps keep the butter solid during mixing; this results in a flaky texture instead of tough dough due to over-glutenization.
For the Crumb Topping:
-
1/3 cup granulated sugar. Just like before, sugar here also plays multiple roles—it sweetens while contributing to caramelization as we bake our crumb topping.
-
3 tablespoons firmly packed dark-brown sugar. This sugar adds depth through its molasses content; it imparts an earthy richness that perfectly complements our apples.
-
1/2 tsp cinnamon. Cinnamon elevates our pie from ordinary to extraordinary! Its warm aroma dances beautifully with apples while providing comfort—a hallmark flavor synonymous with home-baked treats.
-
1/4 tsp salt. Just as before, salt enhances all these lovely flavors we’ve layered into our topping.
-
1/3 cup all-purpose flour. Flour here acts as a binder for our crumb topping while ensuring it achieves that delightful crispness when baked.
-
1/2 cup chilled unsalted butter. Similar to what we did for our crust—chilling is non-negotiable! Cold butter will create small pockets within your topping so that once baked, you get those delectable crunchy bits interspersed throughout the soft apple filling below.
For the Filling:
-
6 to 8 large apples or 3 1/2 pounds (I used a mix of Granny Smith and Honeycrisp). Choosing apples wisely can make or break your pie! Granny Smith provides tartness while Honeycrisp lends sweetness and crunch; together they create an exquisite balance that gives depth to each bite.
-
1/3 cup granulated sugar & 1/4 cup packed brown sugar—these sugars coax out juices from our apples during cooking while balancing acidity with sweetness necessary for any good apple pie.
-
4 tablespoons cold unsalted butter, cut into 1/4-inch dice—this will melt within our filling during baking adding richness without overwhelming flavor!
-
1 TBSP plus 1 tsp cornstarch & 1 tsp dry pectin or an extra 1/2 tsp cornstarch—both serve as thickeners ensuring we achieve just-right consistency without being soupy! Pectin adds an additional layer of structure if using fresh fruit too!
-
2 tsp vanilla extract (alcohol-free) & 1 TBSP spiced vanilla extract (alcohol-free)—vanilla enhances all flavors present while imparting warmth reminiscent of cozy gatherings around dessert tables!
-
1/2 tsp ground cinnamon, 1/4 tsp freshly grated nutmeg, & 1/4 tsp kosher salt—a symphony coming together harmoniously echoing warmth through spice while allowing flavors meld beautifully together creating unforgettable bites!
For Hot Buttered Vanilla Extract Sauce:
-
1 cup brown sugar, which contributes both sweetness & depth when heated transforming into luscious syrup-like consistency.
-
1/2 cup light corn syrup, serving dual purpose: keeping mixture smooth & helping prevent crystallization!
-
3 tbsp unsalted butter, enriching sauce further giving luxurious mouthfeel.
-
1 ½ tsp kosher salt, balancing sweet notes perfectly without overwhelming them.
-
½ cup heavy cream, providing velvety richness elevating everything about this sauce!
Now let’s prepare ourselves with some essential equipment that’ll help bring this masterpiece to life!

Equipment You’ll Need:
Having the right tools makes all the difference when creating something beautiful in the kitchen! These aren’t just gadgets—they’re essential partners in crafting your delicious Hot Buttered Vanilla Extract (Alcohol-Free) Apple Pie.
-
Food processor – This handy device will save you time when mixing your dough for both crusts and crumbs alike! A food processor quickly combines ingredients while keeping them cool enough for optimum flakiness—a must-have if you’re serious about perfect pies!
-
Rolling pin – An indispensable tool for rolling out dough evenly; choose one made from hardwood or marble since they provide excellent weight distribution ensuring even thickness throughout your crust!
-
9-inch deep-dish pie pan – Using deep-dish ensures ample space for your filling without spilling over edges during baking—a wise investment if you plan on making pies frequently!
With these ingredients neatly lined up like old friends waiting to be reunited on their culinary adventure—and armed with trusty kitchen companions—we’re ready to dive into preparing this delightful Hot Buttered Vanilla Extract (Alcohol-Free) Apple Pie!
Step 1: Crafting Your Crust
Begin by combining two cups of all-purpose flour along with half a teaspoon of salt and two tablespoons of granulated sugar in your food processor; pulse until mixed thoroughly—this process ensures uniformity throughout your base layer! Next comes one of my favorite moments: cutting chilled unsalted butter into half-inch cubes before adding them into this mixture! You’ll want to pulse until everything resembles coarse crumbs resembling tiny peas—a visual cue indicating you’ve succeeded at achieving that perfect state where fat meets flour beautifully!
This step is crucial because evenly distributed cold fat creates pockets within dough leading directly toward flaky layers upon baking—a true hallmark distinction between good pies versus great ones! Now it’s time for some ice water magic—start by adding four tablespoons gradually while pulsing gently after each addition until everything starts clumping together nicely forming cohesive mass ready for shaping into disk form wrapping tightly in plastic wrap then refrigerating at least one hour until firm enough roll out easily later on…
Step 2: Rolling Out The Dough
Once chilled properly (trust me—it pays off), transfer unwrapped disk onto lightly floured surface preparing yourself mentally because rolling can sometimes feel daunting but remember—we’re going at this together buddy! Using even pressure from center outward aim toward creating circular shape approximately an eighth-inch thick wide enough fit snugly inside greased nine-inch deep-dish pan leaving extra hanging over edges allowing room crimping edges later so don’t stress just yet—the beauty lies ahead…
Be sure not rush through rolling either—it’s important take time ensuring uniform thickness across entire circle preventing uneven cooking resulting disappointment come bake time later when cutting slices reveals soggy undercooked sections instead golden perfection expected… Once rolled successfully place inside prepared pan crimp edges however suits preference whether fork pressed down decorative scallops formed fingers gently pinching away excess dough left behind…
Step 3: Preparing The Crumb Topping
Now let’s move onto crafting that marvelous crumb topping which will sit atop juicy apple goodness below tantalizing taste buds waiting eagerly dessert reveals itself soon enough… In same trusty food processor combine together one-third cup granulated sugar alongside three tablespoons packed dark-brown sugar half teaspoon cinnamon quarter teaspoon salt mixed well followed closely by one-third cup all-purpose flour straightaway feels comforting like wrapping soft blanket cozily around shoulders just thinking how amazing it’ll taste once baked…
Add cold unsalted butter cut small pieces next pulse ten-fifteen times until mixture appears crumbly resembling sandcastles kids build summertime beach… Don’t forget refrigerate after removing processor covered reserving until needed later because chilling keeps those little chunks intact preventing melting beforehand giving crunchiness desired outcome…
Step 4: Preparing The Filling
For filling excitement begins now placing two large sauté pans over medium-high heat evenly distributing one-third cup sugar between them allows caramelizing process commence—alluring dance begins turning crystal clear white amber color swirling gently tilting pans adjusting heat accordingly never stirring too soon trusting transformation unfold magnetically before own eyes… Approximately eight-ten minutes pass noting smell intoxicating fills kitchen bringing smiles faces surrounding us reminding why love doing this artfully crafted endeavors together celebrating life through food ultimately sharing joy amongst loved ones gathered close round table awaiting first slice served warm…
Oh dear friend—I could continue forever on this journey but alas let me pause here inviting you join me fully immersing yourself discovering next steps filled wonderment creativity baked right here inside delicious Hot Buttered Vanilla Extract (Alcohol-Free) Apple Pie awaits unveiling full potential promising unforgettable experiences await ahead…
Step 5: Roll Out the Dough to Perfection
Once your crust dough has chilled in the refrigerator for at least an hour, it’s time to bring it out and let it shine. The chilling process is absolutely crucial; it not only firms up the butter, making it easier to roll out, but it also helps prevent shrinkage during baking. As you transfer the unwrapped dough to a lightly floured surface, take a moment to appreciate its cool, smooth texture. Gently press down on the dough with your fingertips a few times to start warming it slightly before you begin rolling. This will allow it to become more malleable without losing its structure.
Using a rolling pin, roll the dough into a circle that is approximately 1/8-inch thick—this thickness is non-negotiable for achieving that beautifully flaky crust we all crave. Aim for a diameter large enough to cover the bottom and sides of your 9-inch deep-dish pie pan; I find that a bit of extra space around the edges can be helpful for crimping later on. As you roll, keep lifting and turning the dough occasionally, sprinkling more flour as needed to prevent sticking. If you notice any cracks forming at the edges, don’t fret! Just use your fingers to gently push them back together—this is part of the charm of homemade pie crusts. Once rolled out, carefully transfer the dough into your pie pan. Press it gently into place and trim any overhang with sharp kitchen scissors or a knife, leaving about an inch around for crimping.
Step 6: Crimping and Prepping Your Crust
Now comes one of my favorite steps: crimping! This isn’t just about aesthetics; crimping creates a seal that keeps all those delicious apple juices contained within your pie while also adding a delightful textural element to each slice served later on. You can crimp using your fingers or a fork—whichever method feels more comfortable for you! If you’re using your fingers, simply pinch small sections of dough between your thumb and forefinger and fold them over to create little peaks and valleys along the edge. This little touch adds character and charm to your pie.
Next up is pricking the bottom of your crust with a fork—don’t skip this step! The purpose here is two-fold: by creating small holes in the crust, we allow steam to escape during baking, preventing that dreaded soggy bottom that can ruin an otherwise perfect pie. Place your prepared crust in the fridge while you prepare the filling; this will keep it nice and firm until it’s ready for baking.
Step 7: Sautéing Your Apples
Now let’s dive into what makes this Hot Buttered vanilla extract (alcohol-free) Apple Pie truly exceptional—the filling! For this recipe, I recommend using a blend of Granny Smith and Honeycrisp apples; their unique flavors complement each other beautifully while providing varying textures. You’ll need about 6-8 large apples or roughly 3 ½ pounds in total. Start by peeling and slicing them into thin wedges; I love how therapeutic this process is—just me, my knife, and those beautiful apples.
Get ready for some kitchen magic as we transition from raw apples to caramelized bliss! Place two large sauté pans over medium-high heat; dividing your sugar between both pans ensures even cooking—a trick I learned through trial and error! Sprinkle 1/3 cup granulated sugar evenly across each pan. Avoid stirring at first; instead, let nature take its course as the sugar melts into liquid gold before our eyes. Watch closely as it transforms from white granules to an amber hue—that’s when you know it’s caramelizing beautifully! As soon as it reaches that color, toss in those sliced apples immediately.
Stirring frequently will ensure they cook evenly on both sides while absorbing all that luscious caramel flavor. You want these beauties sautéed until they’re half-cooked and most of their released juices have evaporated—about 8-10 minutes should do it. Trust me when I say that you’ll know they’re ready when they become tender yet still hold their shape beautifully—this balance is key for maintaining texture in our final pie!
Step 8: Combining Flavors for Filling Bliss
Once those fragrant apples have cooled down to room temperature after their sautéing adventure, it’s time for them to join forces with an ensemble of flavors in a large mixing bowl. First off, combine brown sugar (1/3 cup), cornstarch (1 tablespoon plus 1 teaspoon), dry pectin if you’re using it (which helps thicken our filling), ground cinnamon (1/2 teaspoon), freshly grated nutmeg (1/4 teaspoon), and kosher salt (1/4 teaspoon). This combination not only enhances sweetness but also adds depth through spices that evoke feelings of warmth and nostalgia—like curling up in front of a crackling fire on a cozy autumn evening.
After whisking these dry ingredients together until they are well-mixed, introduce vanilla extract (be sure it’s alcohol-free!) along with cold diced butter (4 tablespoons). Gently fold in those sautéed apples until every slice is thoroughly coated in this rich mixture—it’s like wrapping them in a warm embrace of flavor! Then transfer everything into your pastry-lined pie plate carefully so as not to disturb all that lovely filling you’ve created—the apple goodness should fill up nearly all available space without overflowing too much.
Before we move on to sprinkle that irresistible crumb topping over our masterpiece, let’s take a moment here: It’s essential not to rush through these steps because they build layers upon layers of flavor that make this pie truly extraordinary! The combination of sweet caramelized apples with warm spices creates an aroma that’s utterly intoxicating—and trust me when I say your kitchen will soon feel like home!
I hope you enjoy making this beloved family recipe as much as I do—it has been passed down through generations with love poured into every bite—and I promise it’ll do wonders bringing everyone closer together around shared meals full heartwarming moments too! Happy baking!
Storage and Enjoyment Tips for Your Hot Buttered vanilla extract (alcohol-free) Apple Pie
Now that you’ve crafted this beautiful, golden-brown Hot Buttered vanilla extract (alcohol-free) Apple Pie, it’s time to savor every slice! But what to do with those leftovers? I can promise you, this pie is just as delightful on day two or three—if it lasts that long! To keep the flavors fresh and inviting, storing it properly is key. Simply cover your pie with plastic wrap or transfer it to an airtight container and pop it in the fridge. It’ll stay delicious for up to four days, retaining that mouthwatering filling and crunchy topping. If you want to keep things ultra-fresh, consider placing a slice of bread in the container—this little trick keeps the crust from becoming too soggy while maintaining its wonderful texture.
Storing Leftover Hot Buttered vanilla extract (alcohol-free) Apple Pie
For those moments when you have some leftover Hot Buttered vanilla extract (alcohol-free) Apple Pie calling your name from the fridge, remember that quality matters! Store your pie in an airtight container or simply cover it tightly with plastic wrap to prevent any unwanted aromas from mingling. You can expect this delightful treat to last about four days in the refrigerator, but trust me, it won’t be around that long if you share it with loved ones! If you notice your pie crust getting a bit soft after a day or so, just place a slice of bread inside the container—it’s a fantastic way to absorb moisture and keep that delectable crunch intact. When you’re ready to enjoy another piece, simply reheat individual slices in the microwave for about 20 seconds or pop them in a preheated oven at 350°F for around 10 minutes. That gentle warming revives all those glorious flavors and textures.
Freezing Hot Buttered vanilla extract (alcohol-free) Apple Pie for Later
If you find yourself with more pie than you can handle—or if you’re simply planning ahead—freezing is an excellent option! To freeze your Hot Buttered vanilla extract (alcohol-free) Apple Pie, allow it to cool completely before wrapping it tightly in plastic wrap and then aluminum foil. This double-wrapping ensures no frostbite sneaks in and robs your pie of its fabulous taste and texture. You can freeze it for up to three months without sacrificing flavor—how fantastic is that? When you’re ready to indulge again, just place the frozen pie in the fridge overnight to thaw before reheating as previously mentioned. The convenience of having this comforting dessert on hand for unexpected guests or a cozy night in makes freezing a brilliant choice!
Dessert
Hot Buttered Vanilla Extract (Alcohol-Free) Apple Pie
Indulge in the delightful warmth of our Hot Buttered Vanilla Extract (Alcohol-Free) Apple Pie. This comforting dessert features a flaky, buttery crust filled with tender apples, harmoniously spiced with cinnamon and nutmeg. Topped with a crumbly, golden topping, this pie is perfect for gatherings or cozy evenings at home. With every bite, you’ll experience the nostalgia of homemade treats and the joy of sharing moments with loved ones. Easy to make and utterly delicious, this apple pie will quickly become a cherished favorite in your kitchen.
- Prep Time: 30 minutes
- Cook Time: 60 minutes
- Total Time: 1 hour 30 minutes
- Yield: Serves approximately 8 slices 1x
- Category: Dessert
- Method: Baking
- Cuisine: American
Ingredients
- 2 cups all-purpose flour
- 1/2 tsp salt
- 2 TBSP granulated sugar
- 2/3 cup chilled unsalted butter
- 4 to 5 TBSP ice water
- 6 to 8 large apples (3 ½ pounds)
- 1/3 cup granulated sugar for filling
- 1/4 cup packed brown sugar for filling
- 1/2 tsp ground cinnamon
- For crumb topping: 1/3 cup granulated sugar
- 3 TBSP packed dark-brown sugar
- 1/2 tsp cinnamon
- 1/4 tsp salt
- 1/3 cup all-purpose flour
- 1/2 cup chilled unsalted butter for topping
- 1 TBSP plus 1 tsp cornstarch
- 1 tsp dry pectin or extra cornstarch
- 2 tsp vanilla extract (alcohol-free)
- 1 TBSP spiced vanilla extract (alcohol-free)
- 1/2 tsp ground cinnamon
- 1/4 tsp freshly grated nutmeg
- 1/4 tsp kosher salt
Instructions
- Preheat your oven to 350°F.
- In a food processor, combine flour, salt, and granulated sugar for the crust. Add chilled butter and pulse until it resembles coarse crumbs.
- Gradually add ice water while pulsing until the dough forms a ball. Chill for at least one hour.
- Roll out the chilled dough and fit into a greased deep-dish pie pan.
- Prepare the filling by sautéing sliced apples with sugars until tender, then mix in spices and cornstarch.
- Pour the apple mixture into the crust and sprinkle crumb topping over it.
- Bake for about 60 minutes or until golden brown and bubbly.
Nutrition
- Serving Size: 1 slice (100g)
- Calories: 320
- Sugar: 30g
- Sodium: 180mg
- Fat: 14g
- Saturated Fat: 8g
- Unsaturated Fat: 4g
- Trans Fat: 0g
- Carbohydrates: 47g
- Fiber: 3g
- Protein: 2g
- Cholesterol: 30mg