Turkey Pesto Panini Recipe: Love at First Bite!
I first tasted a turkey pesto panini at a little café tucked away in a corner of my neighborhood, and let me tell you, it was love at first bite! The combination of tender turkey, aromatic fresh pesto, and gooey melted cheese practically had me swooning. I knew I had to recreate this masterpiece at home—not just because it was delicious, but also because I wanted to indulge in it whenever the craving struck without breaking the bank or waiting in line. Plus, I figured I could put my own spin on it and make it even better!
After a couple of (okay, maybe more than a couple) attempts in my kitchen that resulted in everything from soggy bread to overly dry turkey, I finally honed in on the perfect Turkey Pesto Panini Recipe. Each trial taught me something new—like the importance of sealing the sandwich properly to keep all that glorious filling inside—and let’s just say I’ve definitely had my fair share of “interesting” lunches during this process. Who knew getting that crispy exterior while keeping the inside perfectly melty would be so tricky?
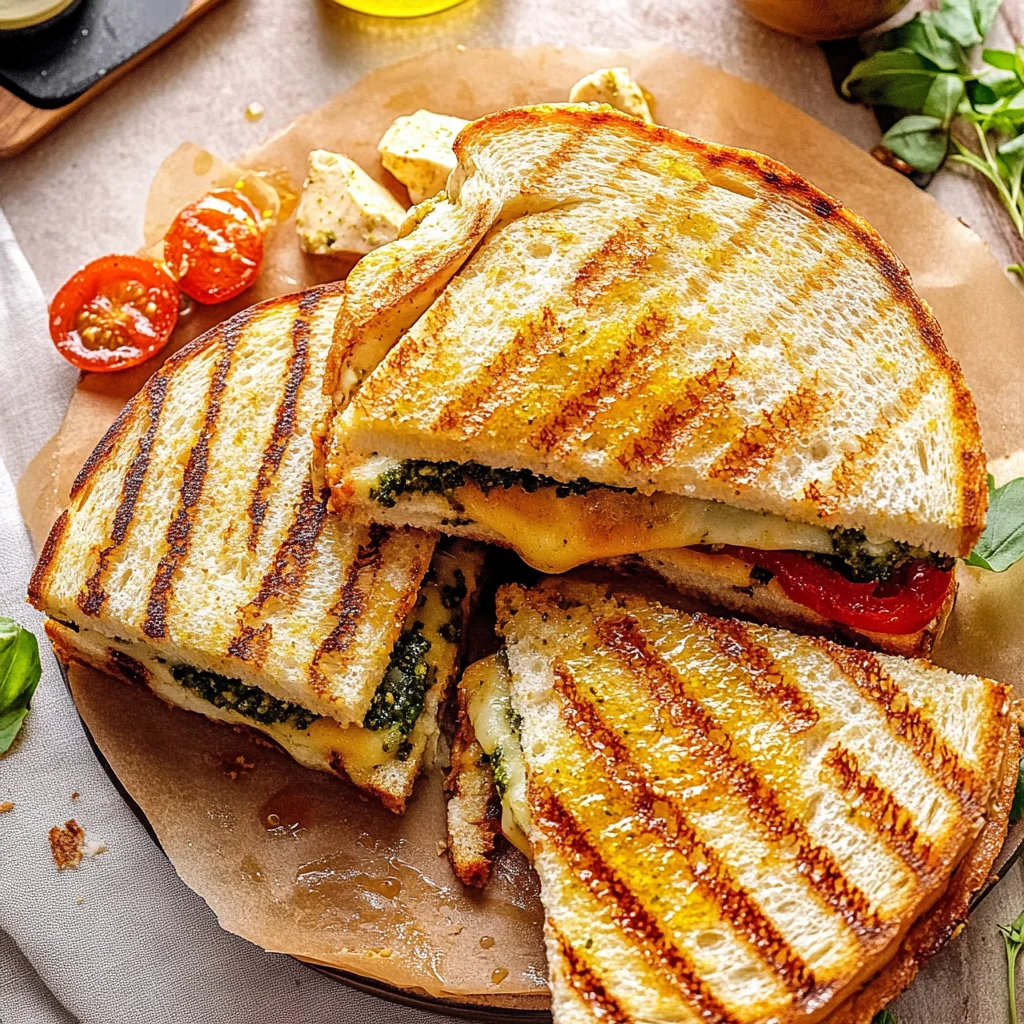
But all those culinary misadventures were absolutely worth it! The final result is a delicious and hearty panini filled with juicy turkey, vibrant pesto, and an irresistible layer of melted cheese that oozes out with every bite. It’s got that perfect crunch on the outside while being soft and comforting on the inside—a real showstopper for lunch or dinner. Trust me, you’ll want to keep this recipe close by; once you try it, you’ll be making it again and again! Let’s get cooking!
These Turkey Pesto Panini are…
…the ultimate gourmet sandwich that will elevate your lunch game!
1. They deliver an explosion of flavor with each bite, thanks to the vibrant pesto and sun-dried tomatoes. The fresh basil and garlic in the pesto perfectly complement the savory turkey, while the tangy sun-dried tomatoes add a delightful depth that makes this panini truly irresistible.
2. Irresistibly crispy crust – each panini is grilled to golden perfection, creating a satisfying crunch on the outside while keeping the inside soft and melty. The sourdough bread not only adds a lovely chewiness but also enhances the overall flavor profile with its distinct tang.
3. Elevated technique – brushing the outside of the bread with olive oil before grilling ensures a beautifully crisp finish. This simple step maximizes the crunchy texture while preventing the bread from becoming soggy, allowing you to enjoy every delicious layer of your Turkey Pesto Panini.
4. Budget-friendly indulgence – making this Turkey Pesto Panini at home is both cost-effective and quick compared to dining out. With just a few ingredients like cooked turkey and shredded mozzarella, you can whip up a gourmet meal in no time, saving both money and effort.
PS These paninis are perfect for two hearty servings, making them ideal for lunch or a light dinner!
Ingredients for the Turkey Pesto Panini
Each ingredient in this dish plays an essential role in flavor and texture. Here’s what you’ll need:
8 slices sourdough bread: Provides a hearty base with a delightful chew.
1 cup cooked turkey breast (sliced): Offers lean protein and a savory depth.
1/2 cup pesto sauce (store-bought or homemade): Infuses vibrant herb flavor and richness.
1 cup mozzarella cheese (shredded): Melts beautifully to create a creamy, gooey texture.
1/4 cup sun-dried tomatoes (chopped): Adds a sweet-tart burst of flavor and chewy texture.
1 tablespoon olive oil (for brushing): Enhances crispiness and adds a touch of richness.
You Must Brush the Outside with Olive Oil. No Skipping!
I know, I know—brushing olive oil on the outside of your panini might feel like an extra step you can skip to save time. Trust me; I’ve tried to cut corners here, thinking I’d get away with it. Spoiler alert: I was wrong. The difference between an oiled and unoiled crust is stark, and I’m not just saying that because I have a soft spot for crispy bread!
So, why is this step so crucial? Think of it as giving your sourdough bread a spa treatment before it hits the grill. That layer of olive oil helps achieve that golden-brown, crunchy exterior while locking in moisture for the turkey, cheese, and sun-dried tomatoes inside. It’s the magic ingredient that turns a good panini into a great one!
What does brushing with olive oil do?
- Flavor — The olive oil adds a rich, savory depth that enhances the overall taste of your panini.
- Texture — It creates a crispy outer layer that contrasts beautifully with the gooey mozzarella and tender turkey filling.
- Color — A well-oiled sandwich achieves that irresistible golden-brown color that’s visually appealing and appetizing.
- Moisture retention — By sealing in moisture, it prevents your turkey from drying out while cooking.
- Shelf life — An oiled crust stays fresher longer, preventing it from going stale too quickly after cooking.
Different olive oil brushing techniques
- No oil (poor) — The bread will end up pale and chewy, lacking any satisfying crunch or flavor.
- Light brush (fair) — A subtle improvement; you’ll get some texture but miss out on optimal crispness and flavor.
- Moderate brush (good) — A noticeable difference in both flavor and texture; still not the best version yet.
- Generous brush (great) — Perfectly golden-brown crust with excellent crunchiness and rich flavor; this is where you want to be!
Be warned: skipping or skimping on the olive oil is a recipe for disaster! Your panini will lack that delightful crunch and robust flavor you crave. Don’t let your hard work go to waste—make sure to brush on that olive oil generously!
How to make Turkey Pesto Panini

Are you ready to see how straightforward it is to make the Turkey Pesto Panini of your dreams??
1. PREPARE THE SANDWICHES
Let’s get those delicious layers ready for a perfect panini!
1. Preheat – Preheat the panini press according to the manufacturer’s instructions. This step is crucial for achieving that crispy, golden exterior and melting cheese that defines a great panini.
2. Spread – Spread a layer of pesto sauce on one side of each slice of sourdough bread. The pesto not only adds flavor but also helps create a barrier so the bread doesn’t get soggy from the fillings.
3. Layer – On four slices of bread, layer the sliced turkey, sun-dried tomatoes, and mozzarella cheese. Aim for even distribution so every bite has a delightful mix of flavors and textures!
4. Top – Top with the remaining slices of bread, pesto side down. This will keep the pesto contained within and maximize flavor with each bite!
5. Brush – Brush the outside of each sandwich with olive oil. This gives the panini a beautiful golden crust and prevents it from sticking to the press.
HANDY TIPS
- 💡 TIP: If you’re feeling adventurous, try adding extra sun-dried tomatoes for an even bolder flavor!
- 💡 TIP: Make sure your mozzarella cheese is shredded; this allows it to melt more evenly and quickly during cooking.
2. COOK THE PANINI
Now it’s time to grill these beauties to perfection!
6. Place – Place the sandwiches in the preheated panini press. Make sure they fit well without being squished too tightly; you want them to cook evenly!
7. Cook – Cook for about 5-7 minutes, or until the bread is golden brown and the cheese has melted. Keep an eye on them during cooking; you want that irresistible aroma wafting through your kitchen!
8. Cool – Remove the panini from the press and let them cool for a minute before slicing. This resting time helps everything set up nicely so your fillings don’t spill out when you cut into them.
HANDY TIPS
- ⚠️ Cooling — Don’t skip this step! If you slice them immediately, all that melty cheese might escape.
- 💡 TIP: If you like additional crunch, consider sprinkling some extra mozzarella on top before closing for an extra cheesy experience!
Congratulations on making a delicious Turkey Pesto Panini! You’ve combined fresh ingredients into a mouthwatering sandwich that’s perfect for lunch or dinner—easy as pie! I can’t wait for you to take that first bite—trust me, it’ll be worth it! – Nagi x
FAQ – Turkey Pesto Panini
🥪 How long will these paninis keep?
The Turkey Pesto Panini is best enjoyed fresh, but if you have leftovers, they can be stored in an airtight container in the refrigerator for up to 3 days. On day 1, they’re about 97% as good as when freshly made. By day 2, they drop to around 85% due to the bread potentially becoming soggy from the pesto. On day 3, I’d say you’re looking at a solid 75%, but definitely reheat them in a skillet or toaster to crisp them back up!
⏳ Do I need to let them rest before slicing?
Yes, absolutely! After cooking your panini for about 5-7 minutes, it’s crucial to let them rest for at least 1 minute before slicing. This resting period allows the cheese to firm up slightly, making it easier to cut without everything oozing out. Trust me on this one; I’ve made the mistake of diving in too soon and ended up with a gooey mess!
❄️ Can I freeze these paninis?
Yes, you can freeze Turkey Pesto Paninis! To do this, assemble your sandwiches but don’t cook them. Wrap each ungrilled sandwich tightly in plastic wrap and then place them in a freezer bag. They’ll keep well for about 2 months. When you’re ready to enjoy one, thaw it overnight in the fridge and then grill it in your panini press until golden brown and heated through.
🌾 Can I make this recipe gluten-free?
You definitely can! To make a gluten-free version of the Turkey Pesto Panini, substitute the sourdough bread with gluten-free bread of your choice. Just be aware that some gluten-free breads may not toast as well or have the same texture as traditional sourdough. Experiment with different brands to find one that holds up well when grilled!
🧀 What can I substitute for mozzarella cheese?
If you’re not a fan of mozzarella or simply want something different, you can replace it with provolone or gouda for a richer flavor. For a lower-fat option, use part-skim mozzarella; just remember that it may melt differently. I’ve also had success using vegan cheese alternatives if you’re looking for a dairy-free option—just check that they melt well!
🔥 Why is it important to preheat the panini press?
Preheating your panini press is essential because it ensures even cooking and helps achieve that perfect crispy crust while melting the cheese inside. If you skip this step, your bread might turn out soggy and unevenly cooked—definitely not what we’re going for! Trust me; I’ve tested both methods multiple times and preheating always wins.
🍅 Can I add other ingredients or variations to my panini?
Absolutely! The beauty of paninis is their versatility. You could add fresh spinach or arugula for extra greens or swap sun-dried tomatoes with roasted red peppers for a different flavor profile. Feel free to get creative! Just keep in mind that adding too many wet ingredients may lead to sogginess—balance is key here!
Troubleshooting
I will continue to add more to this Troubleshooting section as I start seeing questions coming through from people who have made the recipe.
Troubleshooting tips
“My panini turned out too flat! 😩”
- This often happens if you didn’t use enough filling. Make sure to layer a generous amount of turkey, mozzarella, and sun-dried tomatoes on each sandwich; otherwise, they can squish down too much when pressed.
- Another reason could be that you didn’t preheat the panini press long enough. A well-heated press is crucial for achieving that perfect crispy exterior and preventing the sandwiches from flattening too much.
I bet they were still YUM though!
“The cheese didn’t melt properly! 🧀”
- If your mozzarella is too cold when it goes into the press, it may not melt thoroughly during cooking. Try letting your cheese sit at room temperature for about 10-15 minutes before assembling your panini next time.
- Cooking for less than the recommended 5-7 minutes can also result in unmelted cheese. Make sure to keep an eye on them and adjust the time if necessary!
I bet they were still YUM though!
“Why is my bread so dark? 😱”
- This could be due to using a panini press that gets overly hot without proper heat control. Ensure you’re following the manufacturer’s instructions for preheating; sometimes, less time on the heat can prevent over-browning.
- If you brushed on too much olive oil, it could also cause the bread to brown faster. A light coating is usually best for achieving that golden finish!
I bet they were still YUM though!
“My pesto leaked out everywhere! 🌪️”
- This usually occurs if you overfilled your sandwiches with ingredients or didn’t spread the pesto evenly. Aim for a thin layer on each slice of bread; too much pesto can make them messy when pressed.
- Another common mistake is not sealing the edges of the panini properly. Make sure your bread layers are pressed together well before cooking.
I bet they were still YUM though!
Turkey Pesto Panini
Ingredients
Method
- Preheat the panini press according to the manufacturer's instructions.
- Spread a layer of pesto sauce on one side of each slice of sourdough bread.
- On four slices of bread, layer the sliced turkey, sun-dried tomatoes, and mozzarella cheese.
- Top with the remaining slices of bread, pesto side down.
- Brush the outside of each sandwich with olive oil.
- Place the sandwiches in the preheated panini press.
- Cook for about 5-7 minutes, or until the bread is golden brown and the cheese has melted.
- Remove the panini from the press and let them cool for a minute before slicing.