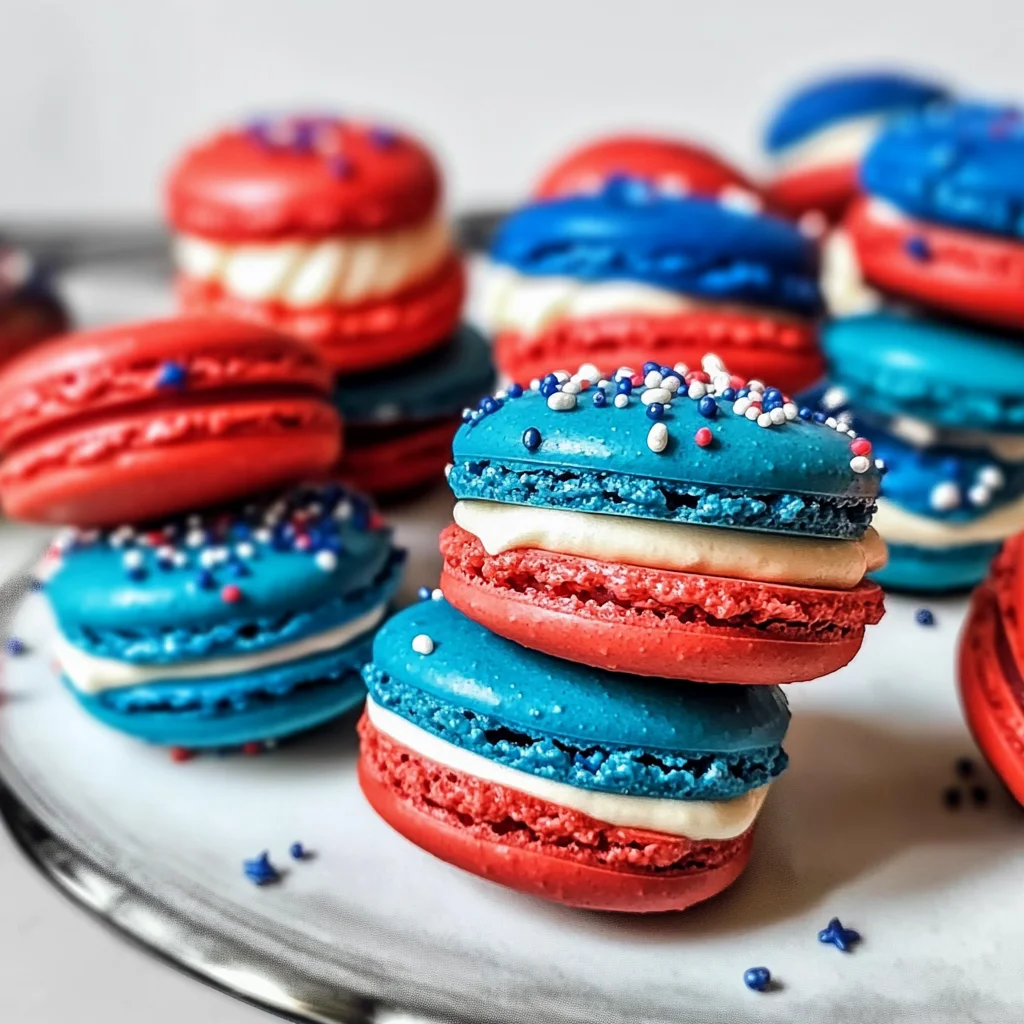
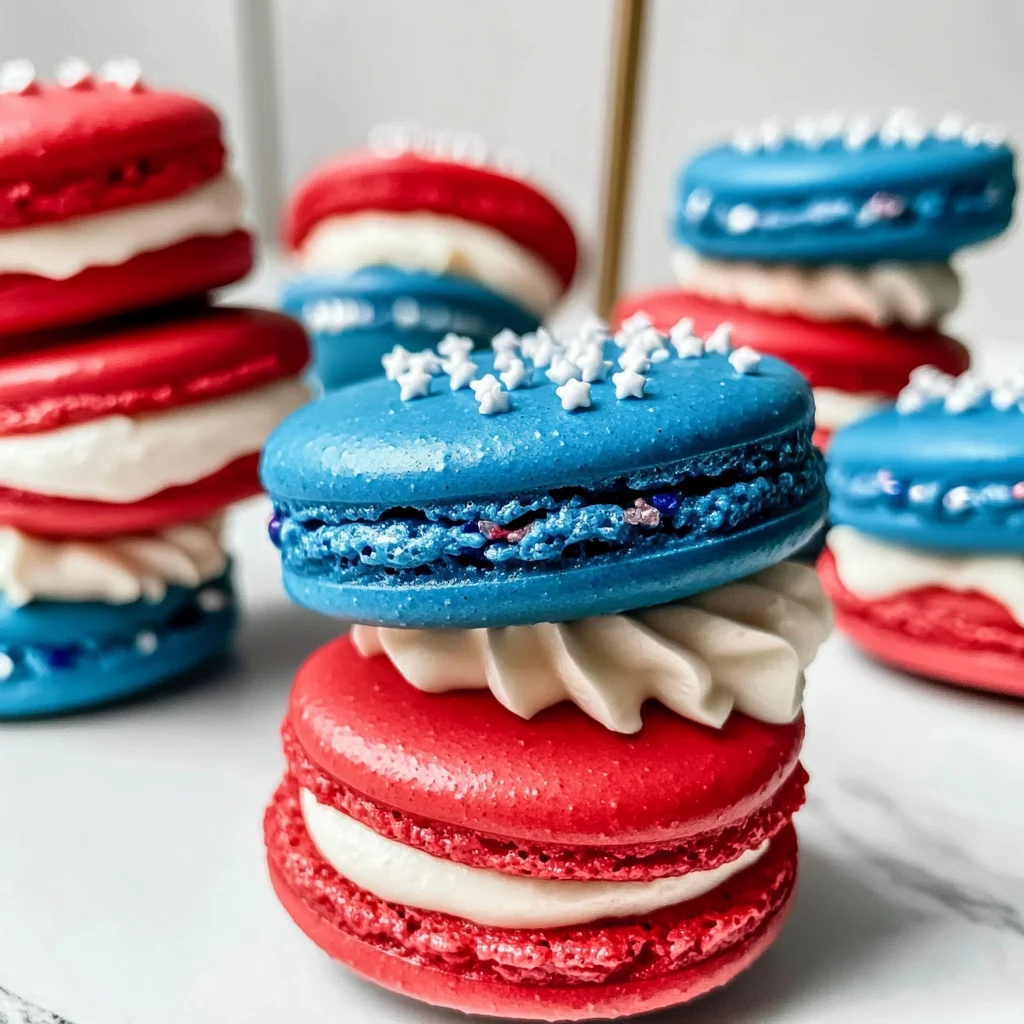
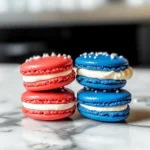
4th of July Macarons
There’s something truly magical about the 4th of July—a celebration filled with laughter, fireworks, and, of course, mouthwatering food. As we gather with loved ones to honor our nation’s independence, the joy of sharing delicious treats is an experience that transcends mere sustenance; it becomes a cherished memory, a bridge between generations. This is where my beloved 4th of July Macarons come into play—delicate, colorful bites that echo the vibrancy of our flag. With their chewy red and blue shells and creamy mascarpone frosting, they capture the essence of summer and festivity in every delightful nibble. Just imagine the way these macarons will glisten under the sun as you present them at your gathering—everyone will be reaching for just one more!
What makes these macarons even more special is their whimsical nature. They are not just cookies; they are little clouds of joy, offering a symphony of flavors that dance on your palate. The lightness of the almond flour combined with the airy egg whites creates a texture that’s nothing short of heavenly. And when you bite into these beauties, you’ll discover their secret: a luscious mascarpone filling that chills to an almost ice cream-like consistency in the fridge! Trust me when I say this transformation is absolutely paramount for those hot summer days when you’re seeking something refreshingly sweet yet indulgent. So let’s roll up our sleeves and embark on this culinary adventure together—I promise you’ll impress your friends and family in ways you never thought possible.
4th of July Macarons: A Festive Delight for Celebrating Freedom
These 4th of July Macarons are more than just a treat; they embody the spirit of summer celebrations and festive gatherings. With each bite, you’re not only enjoying a cookie but also partaking in a joyful experience that brings people together. The balance between chewy shell and creamy filling is simply delightful, making these macarons the perfect centerpiece for any Independence Day celebration.
Ingredients:
As we gather our ingredients for these festive macarons, think of each component as an essential note in our culinary symphony. Each ingredient plays a crucial role in achieving that perfect balance between taste and texture.
- 130 g powdered sugar – This ingredient forms the foundation of our macaron shells by adding sweetness without weighing them down. It dissolves easily during mixing, ensuring a silky smooth batter. When selecting powdered sugar, look for brands that contain cornstarch to prevent clumping—this will help maintain that light texture we’ve been aiming for.
- 120 g almond flour – Almond flour is key to creating that distinct nutty flavor and delicate crumb in our macarons. It’s essential to use finely ground almond flour rather than regular chopped almonds because it helps achieve that iconic smooth surface we’re all after. If you’re feeling adventurous or have nut allergies to consider, sunflower seed flour can serve as an excellent substitute; just be mindful it might react differently with food colorings.
- 105 g egg whites (about 3) – Egg whites are truly transformative in this recipe! When whipped into stiff peaks, they create the structure necessary for holding air—this is what gives macarons their signature lift and chewiness. For best results, room temperature eggs whip better than cold ones because they’re easier to incorporate air into; so plan ahead!
- 100 g granulated sugar – This sugar acts as a stabilizer when added to our egg whites during whipping. By gradually introducing granulated sugar while beating the egg whites, we create those glossy peaks that are crucial for successful macarons. Be sure not to rush this step; allowing enough time ensures your meringue reaches its full potential!
- 1 teaspoon vanilla bean paste – Ahh, vanilla bean paste—the essence of warmth and comfort! Its rich flavor profile adds depth to our frosting while providing beautiful specks throughout each macaron shell. If you can’t find vanilla bean paste locally (though I highly recommend it!), pure vanilla extract can work as an alternative; just remember it won’t have those lovely flecks.
- 10 drops red food gel – Food gel is magical because it allows us to achieve vibrant colors without altering the consistency of our batter too much! When crafting these patriotic shells, don’t be shy with color—add just enough until you’ve reached your desired hue!
- 10 drops blue food gel – Much like its red counterpart, blue food gel will bring life to our creations! Mixing the two colors will yield striking contrast against each other once baked. Make sure to mix them gently into separate batches so both colors remain distinct.
- White nonpareil sprinkles (optional) – Sprinkles add an extra touch of whimsy—like fireworks on top of your dessert! Though optional, they provide visual appeal and give each macaron a festive finish worthy of celebration.
- 113 g heavy cream (cold) – Heavy cream contributes richness to our frosting while providing stability when whipped—it’s what makes every bite feel luxurious! Make sure it’s cold before whipping; this ensures you achieve those fluffy peaks we’re after!
- 113 g mascarpone (cold) – Mascarpone cheese is like liquid gold in desserts; its creamy texture pairs beautifully with heavy cream to create an utterly intoxicating frosting that’s slightly tangy yet sweet. Using chilled mascarpone enhances its ability to hold shape when mixed with whipped cream—it’s non-negotiable!
- 50 g granulated sugar – This bit goes into our frosting as well—it balances out the richness from mascarpone while enhancing sweetness without overpowering everything else going on in there! Like before with egg whites, take your time incorporating it slowly for optimal results here too.
Equipment You’ll Need:
Before we dive into creating these stunning macarons together, let’s ensure we have all our tools ready at hand. Having the right equipment can make all the difference in your baking experience—think of them as supportive friends helping you along this journey!
- Kitchen scale – Precision is key when baking macarons since even slight variations can lead to drastically different results! A kitchen scale will help ensure accurate measurements for each ingredient—no guessing involved!
- Mixing bowls – You’ll want several bowls handy: one for dry ingredients like almond flour and powdered sugar; another large one for whipping egg whites; plus additional bowls if needed when preparing your frosting mix-ins.
- Whisk or hand mixer – A whisk can work wonders if you’re feeling ambitious—but I personally love using my trusty hand mixer because it saves time while giving me consistent results every time I whip up meringue or cream!
- Silicone spatula – This tool is essential for folding ingredients together without deflating air bubbles from whipped egg whites—which would compromise texture! Opting for silicone over rubber helps avoid sticking too much during mixing.
- Piping bags & round tip (size 10 or 12) – Piping bags allow us precise control over how we shape those beautiful macaron circles on parchment paper—no messy fingers required! A round tip ensures clean edges while maintaining uniformity across batches.
- Baking sheet lined with parchment paper or silicone mat – Baking sheets provide even heat distribution while parchment paper keeps everything from sticking during baking—a win-win scenario if I’ve ever seen one!
With all these tools gathered around you like supportive friends ready to help out on this adventure into macaron-making magic—we’re now set up perfectly for success!
Preparing the 4th of July Macarons
Now comes the part I absolutely adore: crafting these delightful little bites from scratch! We’ll take this journey step by step so you feel confident every inch along the way.
Step 1: Whipping Up That Perfect Meringue
Start by measuring out your egg whites carefully into a clean mixing bowl—make sure no yolk slips through since even tiny bits can hinder meringue formation! Begin whisking at low speed until frothy before gradually increasing speed until soft peaks begin forming (think clouds!). At this point—around minute three—you’ll want to start adding granulated sugar slowly; doing so allows even incorporation without shocking your mixture too much which could cause collapse later down line! Continue whisking until stiff peaks appear—you know you’ve hit gold once there’s no droop left whatsoever when turning bowl upside down!
Step 2: The Artful Folding Technique
Once you’ve achieved those glorious peaks within your meringue—we’ll want to introduce dry ingredients next including both almond flour and powdered sugar mixture previously prepared beforehand! Gently sprinkle this over meringue before taking spatula then folding carefully through motions resembling cutting rather than stirring—it’s important not deflate any air pockets created earlier since they provide structure needed during baking phase ahead!
Step 3: Coloring Your Shells
At this stage we’re ready add color gels into separate batches depending on whether crafting red or blue shells today—remember less is more here since too much gel could alter batter consistency negatively affecting rise later down line too! Use separate bowls again if necessary; mix thoroughly after adding drops until desired shades achieved before moving forward onto piping steps…
Step 4: Piping Those Beautiful Shells
Time has come where artistry meets science—you’ll pipe circles directly onto lined baking sheets using piping bags fitted with round tips previously mentioned above! Keeping consistent pressure throughout ensures even sizing among each circle which translates visually appealing end result after baked off nicely… Once piped let rest outside room temperature around twenty minutes before popping them inside preheated oven; allowing outer skins form creates classic crisp exterior signature characteristic found within perfect batches enjoyed worldwide today…
As we continue through preparation steps together—I promise you’ll master technique behind creating these scrumptious treats effortlessly while also gaining confidence throughout entire process… Remember patience pays off here so don’t rush things along—even little adjustments made may yield extraordinary outcomes worth savoring later on once plated beautifully amongst loved ones gathered round tables celebrating freedom ahead…
Step 5: The Art of Mixing – Creating the Perfect Meringue
Now that you’ve measured out your ingredients with precision and care, it’s time to focus on achieving that all-important meringue. Start by pouring your egg whites into a clean, dry mixing bowl. It’s crucial that there is no grease or residue in the bowl, as even the tiniest bit can prevent your meringue from achieving its full potential. Begin whisking the egg whites on medium speed until they become frothy and bubbly—this usually takes about 2-3 minutes. Once you see those lovely bubbles forming, gradually add in the granulated sugar, one tablespoon at a time. This slow addition is non-negotiable; it allows the sugar to dissolve fully into the egg whites, which is essential for creating a glossy and stable meringue.
Continue whisking on high speed until stiff peaks form—this means that when you lift the whisk out of the mixture, it should hold its shape and stand tall without collapsing. The transformation is nothing short of magical; what starts as simple egg whites evolves into a fluffy white cloud that can hold its own against gravity! At this point, add in your vanilla bean paste for that extra depth of flavor—trust me, it will make a world of difference in the final outcome. Once incorporated, you should have a beautiful, glossy meringue that signals you’re ready for the next step.
Step 6: Folding with Finesse – Incorporating Dry Ingredients
Now comes one of my favorite parts—the folding process! Gently sift together the powdered sugar and almond flour right over your meringue. This step is crucial because it helps prevent any lumps from sneaking into your macaron batter, which could disrupt their smooth texture. Using a rubber spatula, start folding the dry ingredients into your meringue using a method known as “macaronnage.” This technique involves gently cutting through the batter and bringing it back over itself while rotating the bowl with your other hand. Don’t rush this step; patience is key here!
As you fold, you’ll notice that the mixture begins to lose some of its volume—that’s exactly what we want! You’re aiming for a batter that flows like lava but isn’t too runny. A common rule of thumb is to stop folding when you can create a figure-eight shape with the batter without breaking it—this shows that you’ve reached just the right consistency. If you see any clumps of dry ingredients left behind after folding, don’t hesitate to give them a quick press with your spatula to incorporate them fully. Remember: achieving this perfect consistency sets you up for success in creating those iconic ‘feet’ on your macarons during baking!
Step 7: Coloring with Care – Adding Vibrant Hues
With your batter now beautifully mixed and silky smooth, it’s time to give these macarons their festive personality! Divide your batter evenly into two separate bowls; I recommend one for red and one for blue so we can capture that patriotic spirit perfectly! Using food gel coloring instead of liquid dye is absolutely paramount here; gel gives you intense color without adding excess moisture—which could throw off our precious macaron ratio. Start by adding 10 drops of red food gel to one bowl and 10 drops of blue to another; remember to use a clean spatula for each color to avoid cross-contamination.
Gently fold each color into their respective mixtures until fully combined—this should be an easy task since we’ve already achieved such great texture! What’s exciting here is watching how vibrant those colors become as they blend in; it feels like painting with edible art! Aim for an even distribution without over-folding again; our goal remains a thick yet flowing consistency. Once colored beautifully, transfer each colored batter into separate piping bags fitted with round tips—this will make our piping much more precise when we create those adorable little circles on our baking sheets.
Step 8: Piping Perfection – Shaping Your Macarons
Now we arrive at one of those moments where creativity meets technique—the piping stage! Line two baking sheets with parchment paper or silicone mats—they help ensure even baking while allowing easy release once cooled. With both piping bags at hand (one red and one blue), hold them vertically above your prepared sheets at about a 90-degree angle. Gently squeeze out circular shapes about an inch in diameter while keeping consistent pressure; this might take some practice if you’re new to piping but trust me when I say it becomes second nature!
A critical tip here: try not to lift up too quickly after releasing pressure at the end! Instead, give a slight twist before pulling away to avoid those unsightly peaks—we want flat tops! After piping all your circles onto the sheets (you should aim for about 52 total since each macaron needs a partner), let them rest uncovered at room temperature for about 30-60 minutes or until they form a skin on top—a process called “crusting.” You’ll know they’re ready when lightly touched; they should feel dry but not crack. This resting period allows air pockets to develop within—resulting in beautiful feet during baking—and it’s truly transformative!
Baking Your Perfect 4th of July Macarons
Once you’ve piped all those delightful circles and let them rest adequately, it’s time for the moment we’ve all been waiting for—baking these beauties! Preheat your oven to 300°F (150°C), which provides just enough heat to allow our macarons to rise beautifully without burning. When placing them in the oven, make sure you’re using separate racks if possible; this helps achieve more even airflow around each tray.
Bake each batch for approximately 12 minutes—resist opening the oven door during this time as it can cause your macarons to deflate! Instead, keep an eye on them through the window (I know how tempting it is) and watch closely as they begin developing their signature feet—a lovely frill around their base that indicates they’re rising properly. You’ll want them slightly firm yet still soft in texture when done so allow yourself some patience here! After they’ve baked perfectly golden (but not browned!), remove them from oven and let cool completely on trays before attempting removal; trust me on this—it makes all difference between perfection and crumbled disappointment.
Step 9: The Sweet Finale – Whipping Up Mascarpone Frosting
Finally, we arrive at perhaps my favorite part: creating our luxurious mascarpone frosting! In a chilled mixing bowl (I recommend chilling both bowl and beaters beforehand), combine your cold heavy cream with mascarpone cheese along with 50 grams of granulated sugar. Start mixing slowly until everything begins coming together before ramping up speed—you’ll want this fluffy texture akin to clouds upon hitting peaks!
The cold cream transforms into whipped heaven within minutes—I promise you will be entranced by its creamy richness combined with lightness from aeration through whipping technique employed earlier; it’s simply extraordinary! Once peaks form yet remain soft enough not overwhelming sweetness profile created by sugar balancing flavors beautifully—it’s truly something special every bite will convey warmth shared among loved ones gathered together celebrating Independence Day!
To finish off these delightful macarons, transfer your whipped frosting into another piping bag fitted with either star or round tip depending on desired aesthetic preference while filling macarons later down road ahead brings joy seeing creations come alive visually appealing way imaginable indeed!
Now you’re ready to assemble these glorious treats—sandwiching generous dollops between two matching macaron shells creates blissful bites bursting flavors embodying essence celebration shared among friends family alike—all while enjoying picturesque red white blue colors representing unity harmony throughout joyous occasion like no other!!
Conclusion:
As we wrap up this delightful journey through crafting your very own 4th of July macarons, I hope you’re as excited as I am about this enchanting recipe! From mixing the almond flour to swirling in those vibrant colors, it’s truly a labor of love that results in something spectacular. The combination of chewy shells paired with that light mascarpone frosting creates a symphony of flavors that is profoundly satisfying and utterly unforgettable. These aren’t just cookies; they’re memories waiting to happen at every bite!
You absolutely must try this recipe—it’s not only about taste but also about joy! Picture yourself pulling these eye-catching macarons from the oven; the aromas alone will transport you straight into summer bliss. They shine at any gathering—from Fourth of July picnics to birthday parties—and can even elevate your everyday coffee break into something extraordinary. Plus, making macarons can be such a rewarding experience; trust me when I say there’s nothing quite like sharing these homemade gems with friends and family!
Imagine savoring one with a crisp iced tea on a sunny afternoon or pairing it with rich dark chocolate for an indulgent dessert experience—oh, how heavenly! For even more decadence, consider serving them alongside fresh berries or whipped coconut cream; each pairing enhances their delicate nature while adding layers of flavor that dance on your palate beautifully.
Feeling adventurous? This recipe is wonderfully adaptable too! You could experiment with different fillings such as lemon curd or rich chocolate ganache—each variation brings its own unique twist while keeping that beloved macaron structure intact. Or why not add some zesty citrus zest into the shell mix for a refreshing kick? I encourage you to try this recipe out, make it uniquely yours, and don’t forget to share your experiences with me—I’d love nothing more than hearing how your kitchen adventures unfold!
4th of July Macarons
Celebrate Independence Day with vibrant 4th of July Macarons! Discover how easy it is to make these delicious treats and impress your guests today!
- Prep Time: 30 minutes
- Cook Time: 12 minutes
- Total Time: 42 minutes
- Yield: Approximately 24 macarons 1x
- Category: Dessert
- Method: Baking
- Cuisine: French
Ingredients
- 130 g powdered sugar
- 120 g almond flour
- 105 g egg whites (about 3)
- 100 g granulated sugar
- 1 teaspoon vanilla bean paste
- 10 drops red food gel
- 10 drops blue food gel
- 113 g heavy cream (cold)
- 113 g mascarpone cheese (cold)
- 50 g granulated sugar (for frosting)
Instructions
- Preheat your oven to 300°F (150°C). Line baking sheets with parchment paper.
- In a clean bowl, whisk egg whites until frothy. Gradually add granulated sugar while whisking until stiff peaks form.
- Gently fold together sifted almond flour and powdered sugar into the meringue using a spatula.
- Divide the batter into two bowls; add red food gel to one and blue to the other. Fold until thoroughly mixed.
- Pipe circles onto lined baking sheets, allowing them to rest for at least 30 minutes until dry to the touch.
- Bake for approximately 12 minutes, then cool completely on trays.
- For frosting, whip heavy cream, mascarpone, and granulated sugar until soft peaks form.
- Assemble by sandwiching whipped frosting between two macaron shells.
Nutrition
- Serving Size: 1 macaron
- Calories: 88
- Sugar: 6g
- Sodium: 0mg
- Fat: 5g
- Saturated Fat: 3g
- Unsaturated Fat: 2g
- Trans Fat: 0g
- Carbohydrates: 9g
- Fiber: <1g
- Protein: 2g
- Cholesterol: 16mg