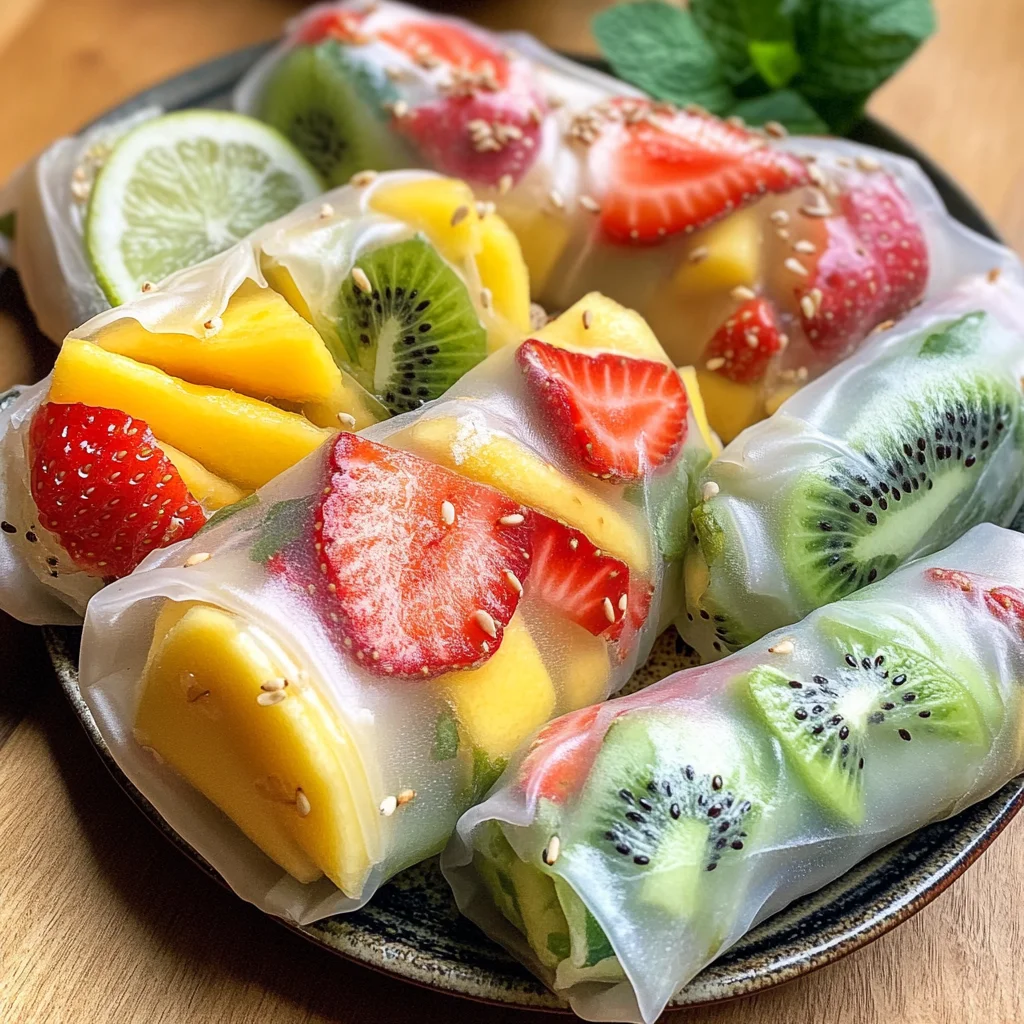
Fruit Spring Rolls
There’s something truly magical about delving into the world of fruit spring rolls, isn’t there? Each bite transports you to a sun-drenched afternoon, where the air is sweet with the scent of ripe summer fruits and laughter fills the space around you. This recipe for Fruit Spring Rolls isn’t just a delightful dessert; it’s a celebration of freshness and creativity that brings together flavors in a way that feels both comforting and exhilarating. Imagine the soft crunch of fresh strawberries, the tropical sweetness of mango, and the zesty kick of lime harmonizing together in a symphony of taste. It’s a revelation that combines tradition with innovation, inviting you to wrap up joy in rice paper and unveil it in each luscious bite.
What I love most about these Fruit Spring Rolls is their versatility. They can be enjoyed on a hot summer day as a refreshing treat or served at gatherings when you want to impress your friends with something beautiful yet simple. Each roll becomes a canvas for whatever fresh fruits you have on hand—so don’t hesitate to experiment! The beautiful contrast between creamy and fruity takes this otherwise straightforward recipe to extraordinary heights. I promise you, once you make these, they’ll become a staple at your table—everyone will be asking for more!
Fruit Spring Rolls: A Delightful Fusion of Freshness
I’m so excited to share this recipe with you! Fruit spring rolls are not only visually stunning but also incredibly satisfying to prepare and eat. There’s an undeniable joy in crafting them; each roll feels like wrapping up sunshine and happiness in one delicate package. Plus, they come paired with a creamy lime honey dip that elevates the experience to pure bliss—trust me, it’s utterly intoxicating! So grab your ingredients, roll up your sleeves, and let’s embark on this culinary journey together.
Ingredients:
As we gather our ingredients, think about how each one plays an essential role in creating those vibrant flavors that make fruit spring rolls so special. It’s not just about throwing things together; it’s about choosing high-quality items that will shine through in every bite!
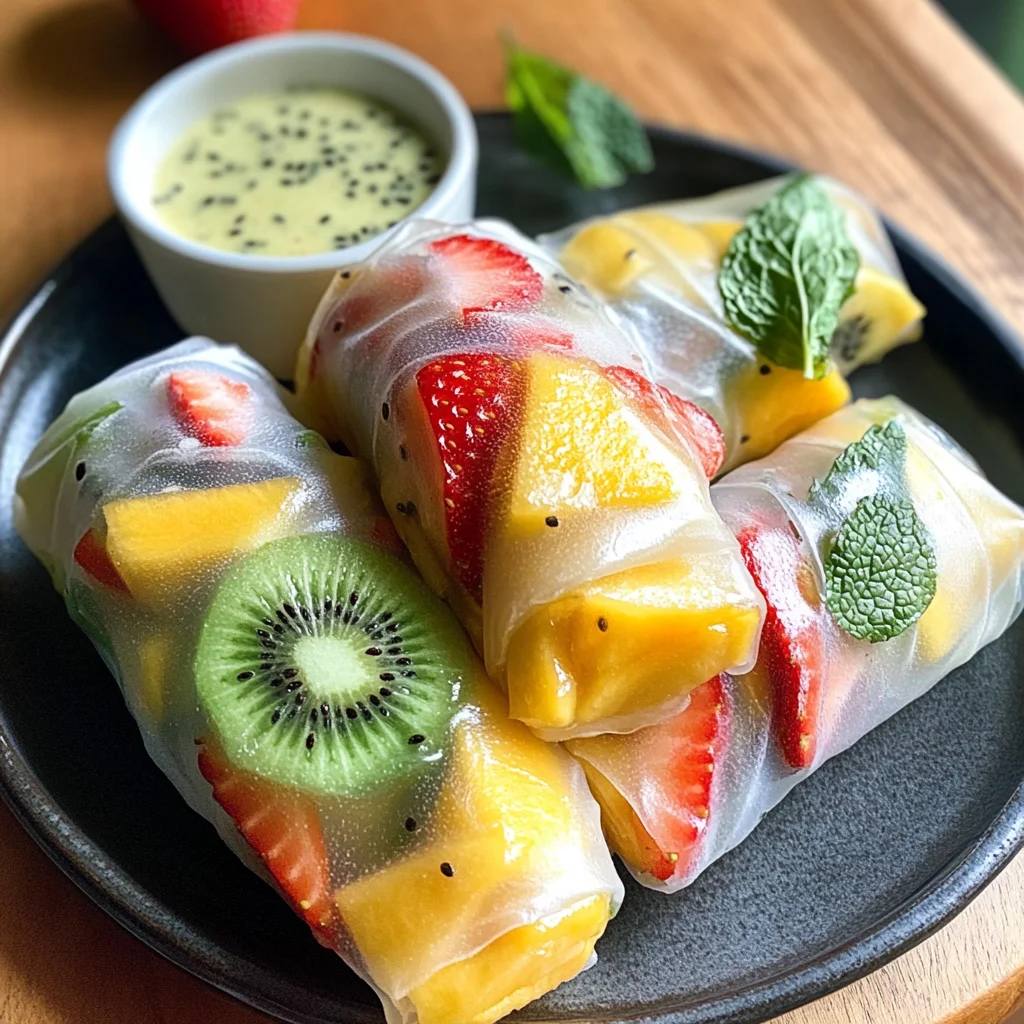
- 8 sheets of rice paper. These translucent sheets are non-negotiable for creating the wraps that hold everything together. Rice paper is unique because it becomes pliable when submerged in water; it allows us to create those lovely rolls without any frying or baking involved. When choosing rice paper, look for good quality brands that are free from additives—trust me; they’ll yield the best texture and flavor.
- Handful of mint leaves. Fresh mint adds an aromatic lift that elevates these fruit spring rolls from simply delicious to extraordinary. Its coolness complements the sweetness of fruits like strawberries and mango beautifully while providing a refreshing contrast that makes every bite feel balanced. Make sure your mint leaves are bright green and fragrant; this signifies freshness which is key!
- Handful of strawberries. Strawberries not only provide natural sweetness but also add vibrant color to our spring rolls. When selecting strawberries, look for ones that are firm yet slightly yielding when pressed—their aroma should be sweet and inviting too! The bright red hue brings joy to any dish, making your rolls visually appealing.
- 2 kiwis. These little gems bring both tanginess and color! Their unique green flesh speckled with tiny black seeds offers an exciting texture that pairs perfectly with other fruits. Choose kiwis that feel slightly soft when gently pressed; this means they’re ripe and bursting with flavor! You can peel them easily before slicing them into thin strips.
- 1 apple. Apples provide crunchiness alongside their sweet-tart flavor profile—a wonderful addition to enhance texture within our rolls! Opt for crisp varieties like Honeycrisp or Fuji for their juicy sweetness which contrasts nicely against softer fruits. Slice them thinly so they integrate seamlessly into our wraps.
- 1 mango. Ahh, the tropical allure of mangoes! Their luscious sweetness will have you dreaming of faraway beaches as soon as you take your first bite! Look for ripe mangoes that yield slightly when squeezed gently—this indicates they’re ready to be enjoyed! Their golden-yellow flesh adds both flavor depth and stunning visual appeal.
- 1/2 block cream cheese (about 4 oz). Cream cheese gives our dip its rich creaminess while balancing out the acidity from lime juice beautifully! Ensure it’s softened first; this helps achieve that smooth consistency we’re after when whipping it into our dip later on.
- 1 cup heavy cream (125g), softened. Heavy cream is key here—it whips up fluffy and light, providing volume while maintaining a luscious texture in our dip! Softening it beforehand means easier whipping; cold cream won’t give us those airy peaks we desire!
- 1/2 lime juiced. Lime juice adds brightness and acidity to our creamy dip, cutting through richness while enhancing all those fruity flavors beautifully! Always opt for fresh limes if possible—they have far more vibrant taste than bottled juice!
- 1-2 tbsp of honey. Honey serves as our natural sweetener here—it’s liquid gold drizzled over everything delicious! Choose raw honey whenever possible for its rich taste profile which compliments our creamy dip wonderfully; adjust the amount depending on how sweet you’d like it!
Equipment You’ll Need:
Before we dive into assembling these gorgeous treats, let’s talk about some essential tools you’ll want by your side as partners in this culinary creation process. Having the right equipment makes everything smoother—and trust me; no one enjoys feeling flustered in the kitchen!
- Cutting board & sharp knife: A sturdy cutting board paired with a sharp knife makes slicing your fruits precise and effortless—a crucial step since even cuts ensure uniformity in each roll! Take care to use separate boards if you’re handling different types of produce or allergens.
- Large shallow dish or plate: This is where you’ll soak your rice paper sheets until they become pliable enough to work with—all while keeping things tidy! A shallow dish allows easy access while ensuring every sheet gets properly moistened without getting overly soggy.
- Clean surface area (like countertop): You’ll need ample space where all ingredient assembly will happen—this prevents any mess while allowing room for creativity during rolling! Keeping things organized will help maintain focus on making those beautiful spring rolls without distractions.
Step 1: Preparing Your Fruits
Let’s start by channeling all that excitement into chopping our vibrant assortment of fruits into thin strips or slices! Begin by washing everything thoroughly under cool water—you want them fresh and clean since they’re going straight into those delightful rolls later on! Use your trusty cutting board as home base here: slice off any stems from strawberries before quartering them lengthwise so they fit neatly inside our wraps. For kiwis, cut off both ends before peeling away their fuzzy skin—then slice into rounds or half-moons depending on personal preference!
Next up is the apple: core it first before slicing it thinly so everyone can enjoy its crunch without overwhelming other flavors inside each roll—remember consistency matters here too! And finally comes my favorite part—the mango: peel away its skin carefully then slice lengthwise around its pit until you’ve got beautiful golden ribbons ready for rolling up tight later on!
Step 2: Soaking Rice Paper
Now onto one of my favorite parts—the rice paper soaking process! Grab your large shallow dish filled halfway with warm water—it should feel pleasantly warm but not hot enough to scald your fingers as we get started here (trust me!). Working one sheet at a time, gently dip it into the water just long enough (about 1 second per side) until it’s pliable but not overly soggy—that’s crucial because if left too long it’ll stick together frustratingly later on!
Once soaked correctly (you’ll know because it’ll feel soft yet still hold shape), carefully lay down this delicate sheet onto your clean surface area—it should resemble an inviting canvas waiting patiently for all those colorful fillings soon-to-arrive!
Step 3: Rolling Up Your Spring Rolls
Now comes where all our hard work pays off—it’s time for rolling up those tantalizing fruit-filled packages! Start by placing a small handful of chopped fruit along one edge (don’t overstuff!) followed by some fresh mint leaves nestled right beside them—remember balance is key here since we want flavors mingling without overwhelming anyone single component!
To fold successfully: bring both ends inward towards center then gently roll away from yourself until fully enclosed—think burrito style but lighter since we’re working with fragile rice papers instead… Take care during this step because rushing could lead to tears (literally!) which would cause leaks down below later on—we don’t want sad soggy spring rolls now do we?
Step 4: Whipping Up The Creamy Dip
While finishing up those lovely fruit spring rolls might keep us busy let’s not forget about making their perfect companion—the creamy lime honey dip that’s about ready waiting just around corner… In another mixing bowl equipped with electric mixer (or whisk if you’re feeling ambitious!), pour in heavy cream followed closely behind by softened cream cheese along with freshly squeezed lime juice along side drizzle honey goodness itself…
Start whipping slowly at first until combined then gradually increase speed until mixture transforms into fluffy clouds before reaching desired consistency—be patient here because overbeating risks turning everything grainy—and nobody wants an unhappy dip accompanying such joyful bites now do we? Adjust sweetness according preference by adding more honey as needed; after all who doesn’t love personalizing their own creations?
With everything prepared beautifully ahead I hope you’re feeling excited because serving these fabulous treats alongside whipped goodness promises nothing short than absolute bliss… Enjoy every moment spent savoring homemade fruit spring rolls guaranteed delight friends alike—I assure you they’ll be coming back asking again soon enough… Happy cooking everyone!
Discovering the Delight of Fruit Spring Rolls
Oh, my dear friend, now that we’ve prepared our vibrant ingredients and created a delightful filling, it’s time to dive into the art of rolling! This step is where the magic really happens; it’s almost meditative as you wrap up these colorful fruit treasures. You’ll want to make sure your workspace is clear and calm because trust me, rolling these fruit spring rolls is not just about the food—it’s an experience! The way each element comes together creates a beautiful harmony that is not only visually stunning but also profoundly satisfying for your taste buds.
Step 5: The Art of Rolling – Creating Your Edible Masterpieces
Now, let’s talk about how to transform those lovely bits of fruit and mint into elegant spring rolls. Begin by taking one sheet of rice paper and immersing it in a shallow dish filled with warm water. This process is crucial because warm water softens the rice paper, making it pliable and easier to work with. Let it soak for only about 5 to 10 seconds—just enough time for it to turn from a hard disc into a silky canvas without becoming overly soggy. You want that perfect texture that feels like fabric between your fingers but still holds its shape.
Once you’ve removed the paper from the water, place it flat on a clean surface like a cutting board. This is where your creativity shines! Lay down a few pieces of strawberries, kiwis, apple slices, mango chunks, and mint leaves in the center of the rice paper. Remember not to overcrowd; you want your fruit spring rolls to be easy to roll and burst with flavor without tearing apart. The art of rolling involves folding the sides over first—like tucking in little arms—before lifting the bottom edge and rolling it over your filling like you would wrap a gift. Trust me on this: take your time with each roll! It may feel awkward at first, but as you practice, you’ll find that rhythm that makes each roll look as good as they taste.
Step 6: Crafting Your Creamy Lime Honey Dip
As our fruit spring rolls come together beautifully, it’s time to prepare that dreamy dip that will elevate this dish to extraordinary heights! In a large mixing bowl, take one cup of heavy cream and begin whipping it until soft peaks form. This technique is known as whipping cream, which introduces air into the mixture—making it light and fluffy—and creating what some might call “liquid gold.” Keep an eye on your cream during this process; over-whipping can lead to unsightly butter clumps! You want that velvety texture that will beautifully complement the fresh fruits.
Once your cream is whipped to perfection, it’s time for the star players: softened cream cheese, freshly squeezed lime juice from half a lime (the zesty brightness is non-negotiable), and honey. Gently fold these ingredients into your whipped cream using a spatula or whisk—this approach preserves all those airy bubbles you just created while ensuring everything blends smoothly. As you mix, take moments to pause and taste; adjust the honey according to how sweet you desire your dip! The combination of creamy richness balanced with zesty lime will leave you utterly intoxicated—it’s truly extraordinary!
Step 7: Chill Out – Patience Makes Perfect
Now comes an essential step that many might overlook but I promise you matters greatly: chilling both your fruit spring rolls and dip before serving them. Cover them loosely with plastic wrap or place them in an airtight container if you’re making them ahead of time; this keeps them looking fresh while preventing them from drying out. Chill everything in the refrigerator for at least 30 minutes if you can muster the patience—the flavors meld together beautifully during this time while giving those rice papers just enough time to firm up slightly more.
Why chill? Well, aside from enhancing those vibrant flavors through melding, chilled spring rolls are refreshingly crisp when bitten into! Imagine biting through chewy rice paper only to unveil luscious fruits bursting with sweetness—all wrapped in a refreshing cool package paired with that decadent dip. Oh my goodness! Just thinking about it sends shivers down my spine! If you’re pressed for time or simply can’t wait (and who could blame you?), even 10-15 minutes can still bring great results—though longer is always better.
Step 8: Plating Your Creation – A Feast for All Senses
Finally, we’re at one of my favorite parts—the presentation! Once you’ve allowed everything to chill properly and you’ve gathered around friends or family (because let’s be real—you’ll want company for this!), it’s time to plate those gorgeous fruit spring rolls alongside their creamy companion. Use a large platter or individual plates for serving; arrange each roll with care so they’re showcasing their colorful fillings like little jewels ready to be admired.
Consider adding some extra mint sprigs or even edible flowers around your platter for visual appeal; after all, we eat first with our eyes! Don’t forget about that dip—place it in a small bowl right in the center or off to one side for easy access. Watching everyone dig in will fill your heart with joy as they indulge in your creation; trust me when I say nothing beats witnessing friends savoring something made straight from love.
Final Touches – Enjoy Every Bite!
And there you have it—your very own Fruit Spring Rolls served alongside a creamy lime honey dip, ready for devouring! Now take a deep breath before diving in; appreciate all those vibrant colors mingling on your plate and know just how much effort has gone into crafting these beauties. Each bite should transport you straight into summer bliss—sweetness dancing across your palate complemented by refreshing mint notes and that luxurious dip.
Remember always: cooking is about sharing love through food! So gather around those whom you cherish most and enjoy every single bite together because these moments are what life is truly about. Happy cooking—and even happier eating!
Storage and Enjoyment Tips for Your Fruit Spring Rolls
Now that you’ve crafted these delightful fruit spring rolls, it’s time to revel in the joy of sharing and savoring every bite! Whether you’re indulging right away or planning to save some for later, let me guide you through how to keep these treats fresh and delicious. Knowing how to store them properly ensures that the vibrant flavors and textures remain intact, so they’re just as exciting on day two—or even day three!
Storing Leftover Fruit Spring Rolls
To keep your leftover fruit spring rolls fresh and ready to enjoy, place them gently in an airtight container. Ideally, use a shallow dish where they can lay flat without being squished. You might want to add a slice of bread into the container; this little trick helps absorb moisture and keeps the rice paper from becoming too sticky or dry. When stored this way in the refrigerator, they’ll stay fresh for about 2-3 days. However, I must warn you—these rolls are so delicious that they hardly last long! After a day in the fridge, you’ll find that they still maintain their delightful crunch and juicy filling; just be sure to enjoy them cold or at room temperature for optimal flavor. If you’re considering reheating them, I recommend rolling them in a clean kitchen towel and giving them a quick steam over boiling water; this retains their texture beautifully.
Freezing Fruit Spring Rolls for Later
If you find yourself with an abundance of these fruity delights or simply want to prepare ahead for those busy days when sweet cravings strike, freezing is an excellent option! To freeze your fruit spring rolls properly, lay them out on a baking sheet lined with parchment paper so they aren’t touching each other—this ensures they won’t stick together. Once fully frozen, transfer them into a freezer-safe bag or container. They can last up to a month frozen without losing much quality! When you’re ready to enjoy them again, there’s no need to thaw—simply take them straight from the freezer and dip them into warm water for a few seconds until pliable. It’s such a convenient method that allows you to savor these refreshing bites whenever your heart desires. Trust me on this—having a stash of frozen fruit spring rolls is like having sunshine waiting for you at any moment!
Fruit Spring Rolls

Dive into these refreshing Fruit Spring Rolls made with fresh fruits and creamy dip—perfect for any occasion. Enjoy making them today!
- Prep Time: 30 minutes
- Cook Time: N/A
- Total Time: 0 hours
- Yield: Serves 4 (2 spring rolls per serving) 1x
- Category: Dessert
- Method: No-cook
- Cuisine: Asian
Ingredients
- 8 sheets of rice paper
- Handful of mint leaves
- Handful of strawberries
- 2 kiwis
- 1 apple
- 1 mango
- 1/2 block cream cheese (about 4 oz), softened
- 1 cup heavy cream (125g), softened
- 1/2 lime juiced
- 1–2 tbsp honey
Instructions
- Prepare your fruits by washing and slicing them into thin strips.
- Soak each rice paper sheet in warm water for about 5 seconds until pliable.
- Lay the soaked rice paper on a clean surface; place a small handful of fruit and mint leaves in the center.
- Fold the sides inward and roll tightly from the bottom to enclose the filling.
- For the dip, whip heavy cream until soft peaks form, then fold in softened cream cheese, lime juice, and honey until smooth.
- Chill both the spring rolls and dip for at least 30 minutes before serving.
Nutrition
- Serving Size: 2 spring rolls (approximately 100g)
- Calories: 180
- Sugar: 12g
- Sodium: 80mg
- Fat: 9g
- Saturated Fat: 5g
- Unsaturated Fat: 4g
- Trans Fat: 0g
- Carbohydrates: 23g
- Fiber: 2g
- Protein: 3g
- Cholesterol: 25mg