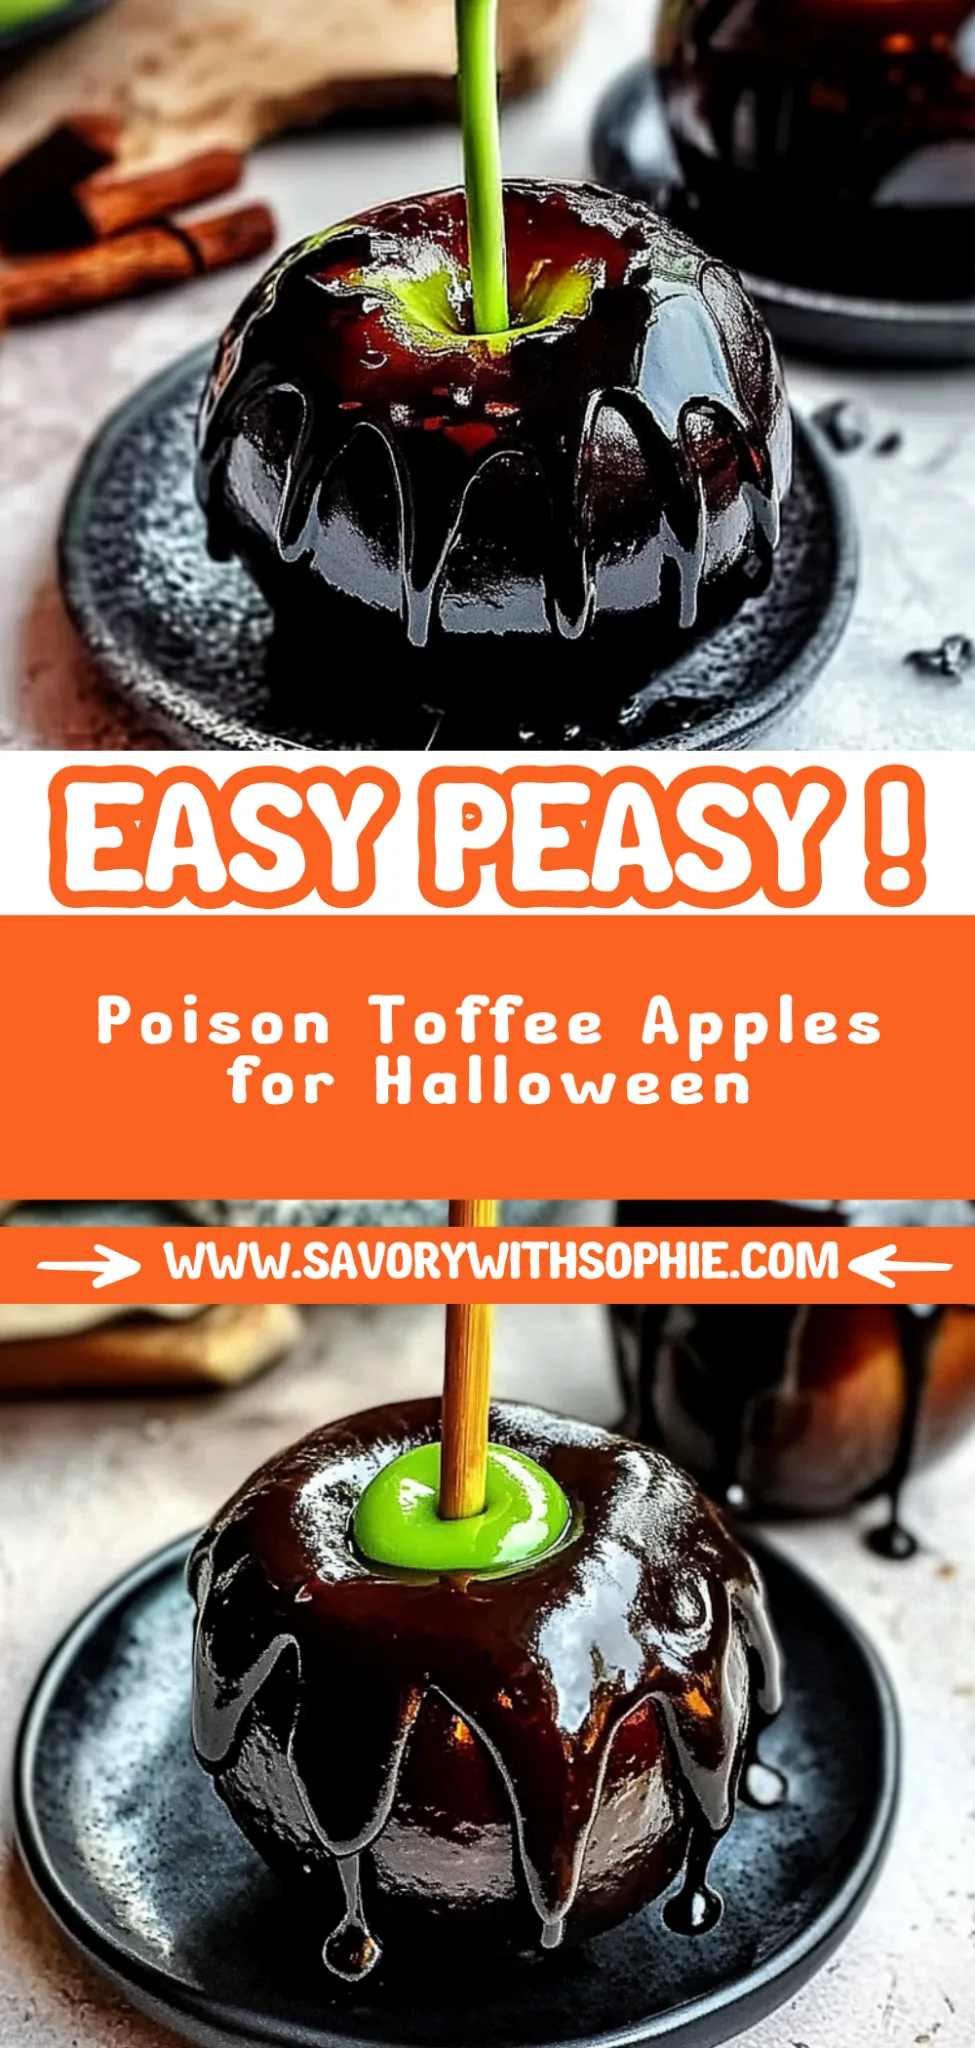
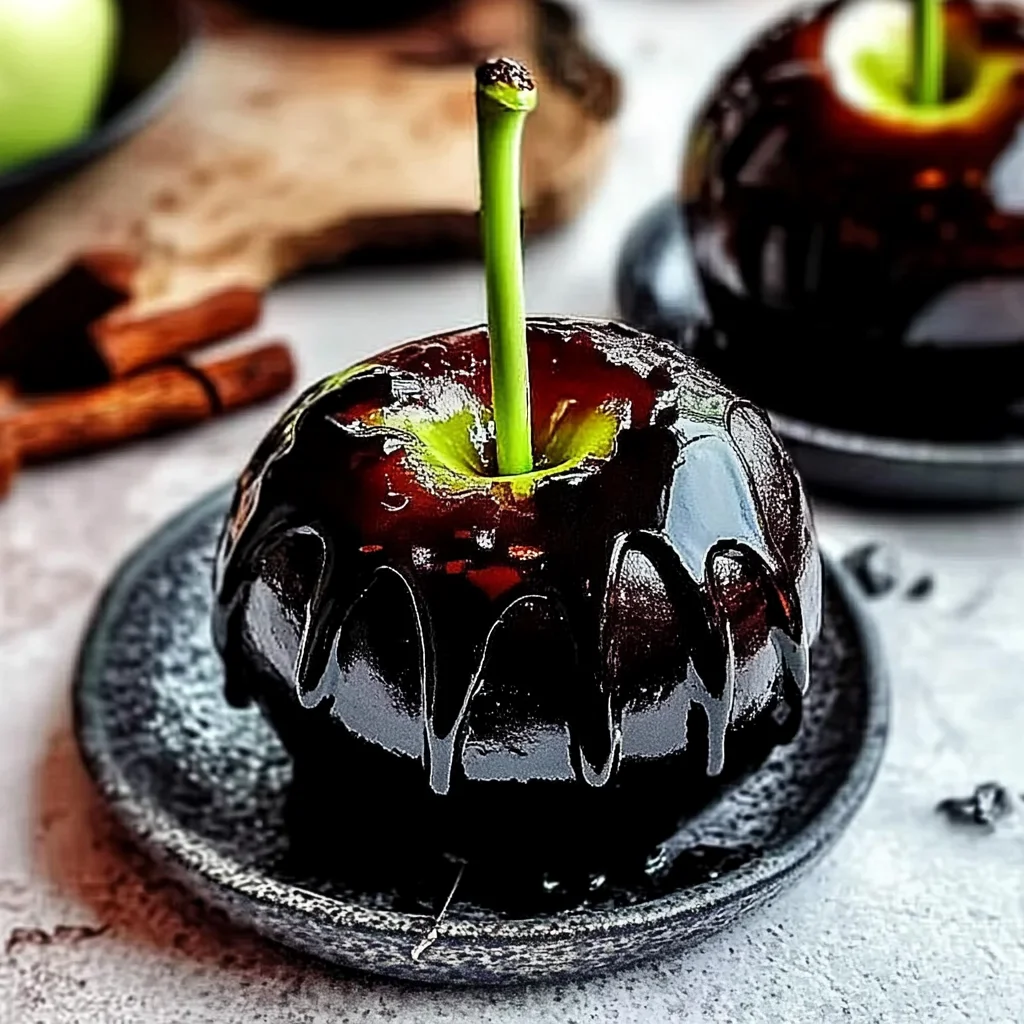
Poison Toffee Apples for Halloween: Spooky and Sweet Treats
I still remember the first time I laid eyes on a toffee apple at a charming little Halloween market. The glossy red coating glistened under the flickering lights, and I was instantly hooked. There’s something undeniably magical about a toffee apple, especially when it’s dressed up for Halloween. But let’s face it—I couldn’t justify splurging on what felt like an overpriced childhood memory. So, with a fierce determination (and an insatiable sweet tooth), I set out to create my own version of these Poison Toffee Apples for Halloween right in my kitchen.
Let me tell you, perfecting this recipe wasn’t a walk in the park. I think I went through about five different batches of toffee before I finally got it right—yes, five! My early attempts ranged from burnt caramel disasters that could’ve doubled as concrete to overly sticky concoctions that left my kitchen looking like a crime scene. With each iteration, I aimed for that ideal balance between crispness and chewiness, all while keeping the vibrant color that screams Halloween fun. Spoiler alert: my kitchen might still be recovering from the sticky aftermath!
But oh boy, was it worth every gooey mishap! These Poison Toffee Apples are not just any ordinary toffee apples; they boast a rich, crunchy shell that shatters beautifully with every bite, revealing the juicy tartness of the apple inside. They’re perfectly sweet with just a hint of something wickedly delightful—ideal for impressing guests at your spooky festivities. I can’t wait for you to dive into this recipe; trust me, you’ll want to share these eerie treats with everyone around!
These Poison Toffee Apples for Halloween are…
…a hauntingly delicious treat that will elevate your Halloween celebrations to a whole new level!
1. They deliver a sinister sweetness that’s irresistibly addictive, thanks to the perfect balance of granulated sugar and corn syrup. This combination creates a glossy, thick toffee coating that melts in your mouth, leaving behind a satisfying sweetness that lingers long after the last bite.
2. Expect a crunchy exterior with a delightful chewy texture inside. The careful cooking of the toffee mixture ensures it hardens just right, forming a crisp shell around the tartness of the apples, creating an exciting contrast that makes every bite a thrilling experience.
3. The art of toffee-making is key here — I’ve perfected the technique of cooking the sugar, corn syrup, and water to just the right temperature. This method allows for an even coating that sticks beautifully without being overly sticky, ensuring your Poison Toffee Apples for Halloween look as good as they taste.
4. They offer incredible cost-effectiveness, making them easy to whip up at home rather than splurging on store-bought versions. With just simple ingredients like sugar and apples, you can create a show-stopping treat that’s as fun to make as it is to eat!
PS These Poison Toffee Apples for Halloween are best served fresh but can be made ahead — just keep them stored in a cool, dry place to maintain that perfect crunch!
Ingredients for the Poison Toffee Apples for Halloween
Each ingredient in this dish plays an essential role in flavor and texture. Here’s what you’ll need:
- 2 cups granulated sugar: Provides the sweetness and caramelization for the toffee coating.
- 1 cup corn syrup: Ensures a smooth texture and prevents crystallization of the sugar.
- 1 cup water: Helps dissolve the sugar and create the right consistency for the toffee.
- 1 teaspoon red food coloring: Adds a spooky hue that enhances the Halloween theme.
- 1 teaspoon vanilla extract: Introduces a warm, aromatic note that complements the sweetness.
- 4 medium apples (preferably Granny Smith or similar): Offers a tart contrast to the sugary toffee coating.
- 4 pieces wooden skewers (for dipping): Provides a sturdy handle for dipping and enjoying the apples.
The Skewer Insertion Is Non-Negotiable. Trust Me!
I’ll admit, I tried to skip this step a couple of times, thinking it might not make a difference. Spoiler alert: I was wrong! Without securing the skewers properly, the apples can slip and slide right out of your toffee coating, leaving you with a sticky mess instead of a spooky treat. I learned the hard way (and yes, there were more than a few casualties in my kitchen!).
Inserting wooden skewers into the top of each apple is crucial for achieving that perfect dip. Think of it like having a sturdy handle on an ice cream cone; without it, your sweet treat is at risk of becoming an unmanageable disaster! A well-placed skewer ensures that each apple gets evenly coated in that dreamy, glossy toffee mixture, allowing you to swirl and dip with confidence.
What does skewer insertion do?
- Stability — Properly inserted skewers ensure your apples stay upright during dipping, preventing any unwanted slips.
- Even Coating — With a secure grip, you can easily swirl the apple in the hot toffee for an even layer, enhancing the overall look and taste.
- Control — A skewer gives you better control over how deep you dip each apple, ensuring they’re perfectly covered without risking burns from hot toffee.
- Presentation — Well-skewered apples look more professional and appealing when served, making them ideal for Halloween parties!
- Easier Handling — Once cooled, the skewer makes it much easier to hold and enjoy your spooky treat without getting your hands all sticky.
Different insertion techniques
- Straight down (good) — This basic method works but may not provide optimal stability or control during dipping.
- Angled insertion (better) — Inserting at a slight angle offers improved stability and allows for more confident swirling in the toffee.
- Twisting into place (best) — Twisting the skewer as you insert it creates friction against the apple’s surface, ensuring maximum grip and stability during dipping.
- Double skewering (⭐️ best) — For larger or heavier apples, using two skewers provides extra support and prevents any wobbling while coating.
Don’t be tempted to skip inserting those skewers! The most common mistake is rushing through this step or not securing them deep enough. If your apples aren’t anchored properly, they may fall apart in the hot toffee or become impossible to coat evenly—definitely not what we want for our Poison Toffee Apples!
How to make Poison Toffee Apples for Halloween
Are you ready to see how straightforward it is to make the Poison Toffee Apples for Halloween of your dreams??
1. PREPARE THE APPLES
First, let’s get the apples ready for their sweet transformation!
1. Wash and dry – Thoroughly wash and dry the apples to remove any wax or residue. This ensures the toffee adheres properly and gives you that perfect glossy finish.
2. Insert skewers – Insert a wooden skewer into the top of each apple, pushing it in about two-thirds of the way. This will serve as a handle for dipping and eating later.
3. Prepare cooling station – Place a baking sheet lined with parchment paper nearby; this is where your coated apples will cool and harden.
HANDY TIPS
- Choose firm apples like Granny Smith; they hold up well against the hot toffee.
- Make sure your apples are completely dry — any moisture can cause the toffee to seize.
2. MAKE THE TOFFEE
Now, let’s whip up that spooky red toffee!
1. Combine ingredients – In a saucepan, combine 2 cups of granulated sugar, 1 cup of corn syrup, and 1 cup of water over medium heat. Stir gently until the sugar dissolves completely; this helps prevent any graininess in your final mixture.
2. Boil without stirring – Increase the heat and bring the mixture to a boil without stirring; this allows it to reach its hard crack stage without crystallizing. Use a candy thermometer to keep an eye on the temperature, aiming for 300°F (hard crack stage).
3. Add color and flavor – Once the mixture reaches 300°F, remove it from heat immediately. Quickly stir in 1 teaspoon of red food coloring for that spooky effect and 1 teaspoon of vanilla extract for added flavor.
HANDY TIPS
- A candy thermometer is crucial here; it ensures you hit that sweet spot at 300°F for perfect hard candy.
- If you’re feeling adventurous, you can try adding a pinch of cinnamon or nutmeg along with the vanilla for an extra layer of flavor!
3. DIP THE APPLES
Time to dip those apples into your homemade toffee!
1. Dip quickly – Take each apple and quickly dip it into the hot toffee, swirling it around to coat evenly while allowing excess to drip off back into the saucepan. The goal is a smooth, even coat that glistens! ⚠️ Be careful — the toffee is extremely hot!
2. Cool on parchment – Place each coated apple onto your prepared baking sheet lined with parchment paper. This will catch any drips and prevent sticking as they cool.
HANDY TIPS
- Work quickly when dipping; once cooled, the toffee hardens rapidly!
- If you have leftover toffee, consider dipping other treats like pretzels or popcorn!
4. SERVE
Your Poison Toffee Apples are just about ready!
1. Cooling time – Allow the coated apples to sit until the toffee has hardened completely — this usually takes about 10-15 minutes at room temperature. Once set, they’re ready for serving!
Make these once, and I wager they will invade your dreams every night too! – Nagi x
FAQ – Poison Toffee Apples for Halloween
🍏 How long do these toffee apples last?
Poison Toffee Apples can be stored at room temperature for up to 3 days. After that, their quality diminishes significantly; I’d say they’re about 75% as good on day 4. The toffee can become slightly sticky and lose its delightful crunch if kept too long, so I recommend enjoying them fresh! If it’s particularly humid, they may not last as long due to moisture affecting the toffee coating.
❄️ Can I make these apples ahead of time?
Yes, you can make these toffee apples a day in advance! Just remember to keep them in a cool, dry place away from direct sunlight. If you need to store them longer, it’s best to wrap each apple in wax paper and then place them in an airtight container. They should still taste great the next day, but be mindful that the toffee might lose some of its crispiness.
🌾 Are these toffee apples gluten-free?
Absolutely! The ingredients used for Poison Toffee Apples — sugar, corn syrup, water, and apples — are naturally gluten-free. So you can enjoy these spooky treats without any worries. Just ensure that any additional toppings or variations you might consider also adhere to gluten-free guidelines!
🥄 Can I substitute the corn syrup with something else?
I’ve tried substituting corn syrup with honey and agave syrup in my testing — both work well but will yield a slightly different flavor profile. The texture may be affected too; the final product won’t have quite the same shiny finish as with corn syrup. If you’re looking for a healthier option, using brown rice syrup could also work, but expect a more complex taste! ⚠️ Just remember: No, you cannot reduce the sugar without compromising the entire recipe; I’ve tested this extensively!
🔥 Why do I need to use a candy thermometer?
Using a candy thermometer is crucial because it ensures that your toffee mixture reaches the correct temperature of 300°F (hard crack stage). At this temperature, the sugar caramelizes properly and forms that perfect hard coating around your apples. If you don’t use one, you risk ending up with either a sticky mess or burnt toffee (which is just sad!). Trust me — I’ve burned my fair share of batches figuring this out!
🎃 Can I add flavors or toppings to my Poison Toffee Apples?
Definitely! You can infuse your toffee with different flavors by adding extracts like almond or cinnamon right before dipping your apples. For toppings, crushed nuts, sprinkles, or even edible glitter can add an extra spooky flair! Just make sure any add-ons are added while the toffee is still hot so they stick properly. Go wild — Halloween is all about creativity!
Troubleshooting
I will continue to add more to this Troubleshooting section as I start seeing questions coming through from people who have made the recipe.
Troubleshooting tips
“My toffee apples turned out too thin! 😭”
- If your toffee is too thin, it might not have reached the hard crack stage of 300°F. This temperature is crucial for a good coating that hardens properly.
- Another reason could be that you didn’t allow enough excess to drip off after dipping; a quick swirl helps achieve that perfect coat.
I bet they were still YUM though!
“The toffee on my apples is cracking! 😱”
- Cracking can occur if the temperature of the toffee was too high when you dipped the apples. If it exceeds 300°F, it hardens too quickly and may crack as it cools.
- Additionally, if your baking sheet wasn’t lined with parchment paper, the apples may stick and cause uneven surfaces when trying to lift them off.
I bet they were still YUM though!
“My apples look wonky and uneven! 🤔”
- If your apples are misshapen, it might be due to not ensuring they’re thoroughly dried before dipping. Any moisture can cause the toffee to slide off unevenly.
- Also, if you didn’t dip them quickly enough in the hot toffee, they might not have gotten an even coating since the toffee can start cooling rapidly.
I bet they were still YUM though!
“The color of my toffee is too dark! 😬”
- If your toffee turned out too dark, this could happen if you cooked it for too long past the hard crack stage. Keep a close eye on your candy thermometer!
- Another factor could be using an excessive amount of red food coloring; a little goes a long way for that spooky effect!
I bet they were still YUM though!
Poison Toffee Apples for Halloween
Ingredients
Method
- Wash and dry the apples thoroughly. Insert a wooden skewer into the top of each apple.
- Place a baking sheet lined with parchment paper nearby for cooling the toffee apples.
- In a saucepan, combine sugar, corn syrup, and water. Stir over medium heat until the sugar dissolves.
- Increase the heat and bring the mixture to a boil. Do not stir. Use a candy thermometer to monitor the temperature.
- Once the mixture reaches 300°F (hard crack stage), remove from heat and quickly stir in red food coloring and vanilla extract.
- Quickly dip each apple into the hot toffee, swirling to coat evenly. Allow excess to drip off.
- Place the coated apples on the prepared baking sheet to cool and harden.
- Once the toffee has hardened, your Poison Toffee Apples are ready to serve! Enjoy your spooky treat.