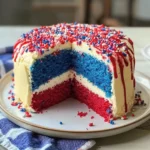
Firecracker Red, White and Blue Cake
There’s something utterly magical about baking a cake that celebrates not just the flavors, but the very essence of joy and togetherness. The Firecracker Red, White and Blue Cake is more than just a dessert; it’s an experience that encapsulates the warmth of summer gatherings, laughter echoing around a picnic table, and the excitement of fireworks lighting up the night sky. When you take your first bite of this luscious cake, you’ll find yourself enveloped in a symphony of flavors—sweet vanilla mingling with vibrant bursts of red and blue. Each slice is a slice of celebration, beckoning you to share it with friends and family as you create memories that last a lifetime.
Baking this cake is like opening a door to cherished traditions while inviting in fresh creativity. The bright colors are not merely for show; they symbolize unity and joy, making this cake perfect for summer holidays like the Fourth of July or any gathering where happiness is on the menu. I’ve always been captivated by how food can evoke such strong emotions and memories. This Firecracker Red, White and Blue Cake stands as a testament to that belief—each layer represents not just flavor but also the spirit of togetherness that we all crave. So let’s dive into this delightful recipe where every ingredient plays its part in creating something truly extraordinary.
Firecracker Red, White and Blue Cake: A Sweet Summer Celebration
Get ready to embark on a colorful culinary journey! This Firecracker Red, White and Blue Cake isn’t just visually stunning; it’s incredibly easy to make, especially with trusted ingredients that promise moistness and flavor. Whether you’re celebrating Independence Day or just wanting to bring some cheer into your kitchen, this cake will surely impress your guests—and yourself! Let’s gather our delightful ingredients together.
Ingredients:
As we begin our baking adventure, it’s essential to understand each ingredient’s role in crafting our vibrant masterpiece. Let’s take a closer look at what we’ll need!
- 1 box Betty Crocker™ Super Moist™ White Cake Mix: This convenient mix is your ticket to achieving a fluffy, tender cake without all the fuss of measuring flour and sugar! It offers consistent results every time, ensuring your Firecracker Red, White and Blue Cake turns out perfectly moist. The added bonus? You can focus on enhancing its flavor with your favorite extracts or zests if you wish! Just remember to follow the instructions on the box for water, vegetable oil, and whole eggs—these components are crucial for activating the leavening agents in the mix.
- Water (amount as called for on cake mix box): Water serves as the lifeblood of our cake batter; it hydrates dry ingredients and activates gluten in flour which helps form structure. Using room temperature water will yield better results compared to cold water since it allows for smoother mixing and better incorporation with other ingredients.
- Vegetable oil (amount as called for on cake mix box): Vegetable oil adds moisture without weighing down your cake. Unlike butter—which can contribute richness but may also create denser cakes if overmixed—oil keeps things light and fluffy while ensuring that every bite remains tender. Just be sure to measure accurately so we don’t oversaturate our delicate batter!
- Whole eggs (amount as called for on cake mix box): Eggs are essential in any baking endeavor; they provide structure through proteins while adding richness through their fats. Plus, they help bind all ingredients together harmoniously! For optimal results, always use large eggs at room temperature—they incorporate better into the batter compared to cold eggs straight from the fridge.
- 1 1/4 teaspoons red gel food color from 1 box Betty Crocker™ Classic Gel Food Color: This vibrant hue brings our Firecracker theme to life! Gel food coloring is concentrated, meaning it won’t alter the consistency of your batter significantly while still providing that eye-popping color we desire. It’s absolutely paramount that you blend it well so that every morsel captures that festive red without uneven spots.
- 1 1/4 teaspoons blue gel food color from 1 box Betty Crocker™ Classic Gel Food Color: Just like its red counterpart, blue gel food coloring is key to achieving those beautiful layers reminiscent of summer skies. Again, ensure thorough mixing—it’ll make all the difference when you cut into your gorgeous creation!
- 1/2 cup from 1 tub (16 oz) Betty Crocker™ Rich & Creamy Vanilla Frosting: This frosting is liquid gold when it comes to finishing touches! Its creamy texture pairs beautifully with our moist cake layers while offering a sweet contrast against our vibrant colors. If you want to customize it further—think lemon zest or vanilla bean paste—feel free! This frosting acts as both an adhesive for decoration and a delicious topping.
- 2 teaspoons Betty Crocker™ Red, White & Blue Sprinkles (if desired): These sprinkles are optional but oh-so-fun! They add a festive crunch that complements the softness of our cake beautifully. Not only do they bring whimsy to your dessert table but they also invite everyone to dig in with glee!
Equipment You’ll Need:
Now that we’ve gathered our ingredients let’s chat about some essential tools that will make baking this Firecracker Red, White and Blue Cake smooth sailing. Having these items at hand will ensure you can whip up this masterpiece without any hiccups!
- 12-cup fluted tube cake pan: This specific shape not only creates an eye-catching presentation but also guarantees even baking due to its unique design allowing heat circulation throughout each layer of batter. If you don’t have one on hand, consider using a standard bundt pan instead—just be sure to adjust cooking times slightly depending on depth!
- Electric mixer: A trusty electric mixer speeds up mixing significantly compared to whisking by hand; this is particularly important when you’re mixing baked goods where aeration plays such an important role in texture! Aim for medium speed during mixing unless otherwise specified so you don’t overwork your batter.
- Measuring cups and spoons: Accurate measurements are crucial in baking—especially when working with dry versus wet ingredients! Invest in quality measuring cups (both liquid and dry) plus measuring spoons so each component goes into your recipe precisely as intended.
- Spatula: A silicone spatula becomes invaluable when scraping down sides during mixing or transferring batter into pans. It ensures no precious mixture gets left behind—a non-negotiable step for achieving maximum height in your cake!
With our ingredients gathered and equipment prepped, we’re poised for success! Let’s move forward into creating this deliciously colorful Firecracker Red, White and Blue Cake—a true celebration on every plate!
Step 1: Preheat Your Oven
First things first—let’s get that oven preheating! Set it at 350°F (175°C). Preheating is crucial because it prepares your oven environment properly before introducing our lovely batter. Starting off with hot air allows cakes to rise beautifully right from the moment they hit those scorching walls—a technique known as “oven spring.” If you skip or rush this step by putting your cake batter into an unheated oven? Well, let’s just say it could lead to dense layers instead of light ones—the horror!
Step 2: Prepare Your Pan
Generously spray your fluted tube pan using baking spray with flour; this ensures effortless release once baked! While non-stick pans are fantastic nowadays—they still require proper greasing techniques since no one wants their hard work stuck inside any pan after all that love poured into each layer! With applications done correctly here—we’re setting ourselves up for victory come removal time.
Step 3: Mixing Your Batter
In a large mixing bowl—grab those electric mixers—and combine our Betty Crocker™ Super Moist™ White Cake Mix along with water, vegetable oil, whole eggs—all called out clearly on its instruction label too—for superb accuracy purposes here too! Beat everything together on medium speed until well blended (about two minutes), scraping down sides occasionally so nothing gets left behind…trust me when I say those little bits could affect textures later!
Step 4: Coloring Your Batter
Now comes one of my favorite parts—adding color! Divide one cup each into two small bowls; add red gel food color into one bowl while stirring until incorporated fully before doing likewise with blue gel food coloring next…don’t worry if they look intense now—they’ll tone down beautifully once baked—and remember—that layering technique we discussed earlier? That’s coming soon too!
Let’s keep moving toward crafting not only deliciousness but pure visual delight as well…stay tuned because there’s much more joy ahead in making this spectacular Firecracker Red, White and Blue Cake unfold right before our eyes!
Step 5: The Art of Baking – A Lesson in Patience
Now that your cake batter is beautifully layered with that mesmerizing red, white, and blue, it’s time for the magic to happen in the oven. Preheat your oven to 350°F (175°C) and make sure you’ve generously sprayed that 12-cup fluted tube cake pan with baking spray that contains flour—trust me, this step is absolutely paramount! It ensures the cake releases beautifully after baking, revealing those vibrant colors in all their glory. As you place the pan in the oven, set a timer for 39 to 44 minutes. But don’t just walk away—this is where the alchemy begins!
While your Firecracker Red, White and Blue Cake bakes, the aroma of vanilla and sweet batter will waft through your kitchen, making it feel like a warm hug on a summer day. You’ll want to keep an eye on it; when you insert a toothpick into the center and it comes out clean or with a few moist crumbs (but not wet batter), that’s your cue to pull it out! Remember, every oven behaves differently—some are hotter than others—so it’s always wise to check at the lower end of the time range. Once baked to perfection, let your cake rest for about ten minutes before removing it from the pan. This resting period allows the structure to settle just enough so that when you flip it onto a cooling rack, it comes out effortlessly.
Step 6: Cooling Down – The Essential Rest
As tempting as it may be to dive right into slicing your masterpiece, patience is key here. Allowing your Firecracker Red, White and Blue Cake to cool completely on a wire rack for about an hour is crucial for achieving that perfect texture. While cooling, the residual heat continues to bake the cake slightly while also allowing moisture to redistribute evenly throughout each layer. If you skip this crucial step and frost too soon, you risk having your frosting melt into a puddle rather than sitting pretty atop your gorgeous creation.
During this process, take a moment to reflect on how far you’ve come! That vibrant trio of colors is about to become something truly extraordinary once you sprinkle some love in frosting form. So breathe deeply and enjoy this waiting game—it’s part of what makes baking so special. You want every bite of this cake to be profoundly satisfying with layers that hold their shape and flavor beautifully.
Step 7: Drizzling Dreams – Preparing Your Frosting
Once your cake has cooled completely (and I mean completely—no warm spots!), it’s time for one of my favorite parts: decorating! Grab a small microwavable bowl and place 1/4 cup of frosting inside. Pop it into the microwave uncovered for just 10 to 15 seconds. This little trick transforms thick frosting into something that’s liquid gold—ideal for drizzling! Trust me; this technique not only enhances visual appeal but also adds a delightful texture contrast when biting into your cake.
As you drizzle the warmed frosting back and forth over the top of your cooled cake in a striping pattern, imagine how each line creates anticipation for those who will indulge in this treat later. It’s not just about aesthetics; by warming up the frosting slightly, you’re making sure every bite tastes rich and creamy without overwhelming sweetness. If at any point during your drizzling adventure you find that it’s too thick again (frosting can be unpredictable), just return it to the microwave for another few seconds until it’s beautifully pourable.
Step 8: Finishing Touches – The Grand Finale
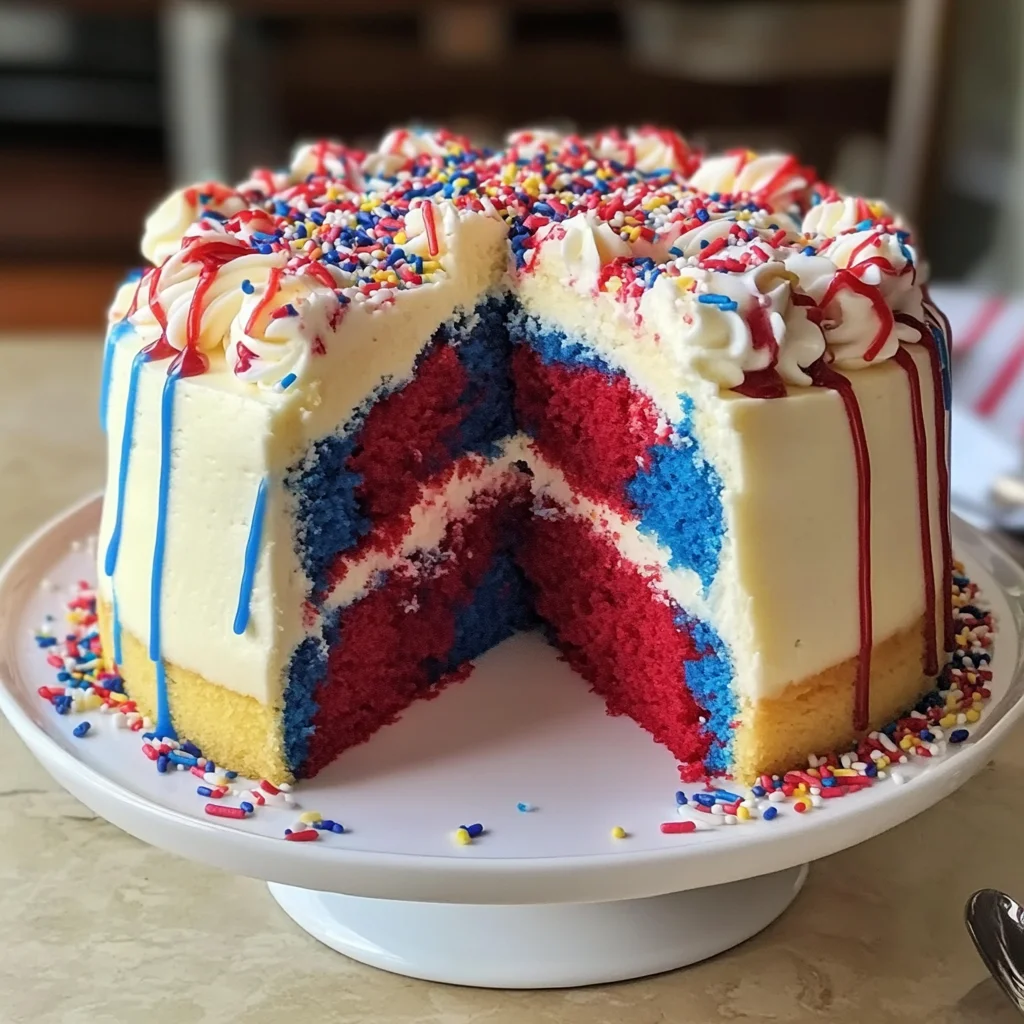
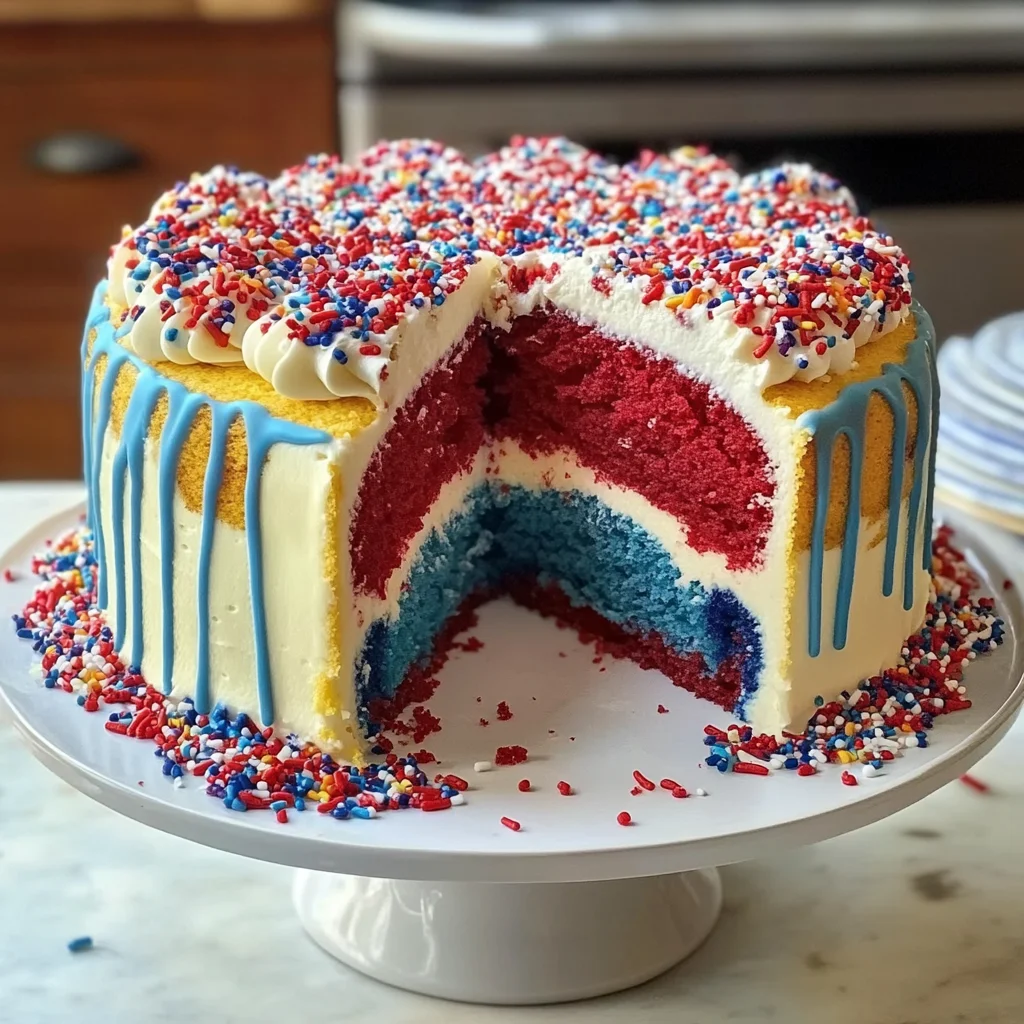
Now comes one of my favorite moments—the final touches that turn our Firecracker Red, White and Blue Cake from simply delightful into a showstopper! After drizzling the first layer of frosting over the top, divide what’s left between two small bowls for coloring purposes. In one bowl, stir in 1/4 teaspoon of red gel food color until it’s perfectly blended; do the same with blue food color in another bowl. This attention to detail really elevates your cake from homemade dessert to festive centerpiece!
Microwave each colored frosting separately until they reach that beautiful drizzle consistency we discussed earlier—just about 5-10 seconds should do it again. When you’re ready to decorate with these vibrant hues, allow yourself to have fun with this process! Drizzle each colored frosting over your original stripe pattern; watching those colors cascade down around each other is such an exhilarating experience! And finally, sprinkle on those cheerful red, white & blue sprinkles if desired—they add not only crunch but also an extra layer of festivity!
Imagine serving this stunning cake at your next gathering—the gasps of delight as friends and family see such an eye-catching creation will be worth every moment spent crafting it!
Final Thoughts on Your Firecracker Red, White and Blue Cake
As you let everything set for about half an hour at room temperature after decorating—giving time for flavors to meld together—you’ll find yourself eagerly anticipating tasting this beauty! Once ready to serve, slice into those colorful layers and watch as they reveal their vibrant personalities with each piece cut away; I promise you won’t regret taking that extra time spent layering flavors.
This Firecracker Red, White and Blue Cake isn’t just a dessert—it’s an embodiment of celebration wrapped up in deliciousness! Whether it’s a Fourth of July feast or simply enjoying summer’s warmth with loved ones around—a slice carries memories waiting to be made together! So grab those forks and dig in; happiness awaits in every crumb!
Storage and Enjoyment Tips for Your Firecracker Red, White and Blue Cake
Now that you’ve crafted this stunning Firecracker Red, White and Blue Cake, it’s time to revel in the vibrant celebration of flavors and colors on your plate. I can already imagine you slicing into that beautiful cake, the layers revealing their patriotic hues, and the sweet aroma wafting through your kitchen. As you gather around with loved ones to share this masterpiece, remember that any leftovers can be just as delightful when stored properly! Let’s dive into how to preserve this delicious creation so you can savor every last bite long after the candles have been blown out.
Storing Leftover Firecracker Red, White and Blue Cake
To keep your Firecracker Red, White and Blue Cake fresh and flavorful, it’s best to store it in an airtight container. This will protect it from drying out while also locking in its moistness. If you don’t have a dedicated cake keeper, a simple layer of plastic wrap will do wonders too—just make sure it’s sealed tightly around the edges. You can store it at room temperature for about 3-4 days without losing that delightful texture. If you want to maintain its quality even longer, consider placing a slice of bread alongside the cake in the container; this little trick helps absorb moisture in the air and keeps your cake pleasantly soft! When it comes to flavor after storage, you’ll find that the cake remains just as enchanting as when it was freshly baked—each bite still bursting with sweetness and that lovely vanilla essence. If you fancy a warm treat later on, gently reheating individual slices in the microwave for about 10 seconds brings back that fresh-baked warmth—a comforting embrace for your taste buds.
Freezing Firecracker Red, White and Blue Cake for Later
If you want to save some of this festive joy for a special occasion down the road (or simply because you can’t finish it all right away), freezing is an excellent option! Start by slicing your cake into individual portions; this way, you can thaw only what you need when cravings strike. Wrap each slice tightly in plastic wrap or foil to prevent freezer burn—trust me; this step is crucial for maintaining its delightful texture! Once wrapped securely, place the slices in a freezer-safe bag or container. Your cake will stay fresh in the freezer for up to three months, making it a convenient dessert option ready whenever you are. When you’re ready to enjoy again, simply transfer a slice to the refrigerator overnight or let it sit at room temperature for about an hour—this gentle thawing allows those vibrant flavors to shine once more. The convenience of having slices of this stunning cake on hand will surely bring smiles during impromptu gatherings or quiet moments at home.
What’s better than knowing that a piece of joyful celebration awaits you? With these tips, you’re set for sweet success!
Firecracker Red, White and Blue Cake
Firecracker Red, White and Blue Cake is a vibrant celebration of summer flavors and colors, perfect for any festive gathering. This delightful layered cake features a fluffy vanilla base enhanced by bright red and blue hues, creating a stunning visual that captures the spirit of joy and togetherness. Topped with creamy vanilla frosting and playful sprinkles, this cake not only tastes divine but also serves as an eye-catching centerpiece for your table. Whether it’s Independence Day or a casual summer get-together, each slice promises to evoke smiles and cherished memories. Join me in baking this colorful masterpiece that’s easy to make yet impressive enough to steal the show!
- Prep Time: 15 minutes
- Cook Time: 44 minutes
- Total Time: 59 minutes
- Yield: Serves approximately 12 slices 1x
- Category: Dessert
- Method: Baking
- Cuisine: American
Ingredients
- 1 box Betty Crocker™ Super Moist™ White Cake Mix
- Water (amount as called for on cake mix box)
- Vegetable oil (amount as called for on cake mix box)
- Whole eggs (amount as called for on cake mix box)
- 1 1/4 teaspoons red gel food color
- 1 1/4 teaspoons blue gel food color
- 1/2 cup Betty Crocker™ Rich & Creamy Vanilla Frosting
- Optional: 2 teaspoons Betty Crocker™ Red, White & Blue Sprinkles
Instructions
- Preheat your oven to 350°F (175°C). Generously spray a 12-cup fluted tube cake pan with baking spray.
- In a large mixing bowl, combine the cake mix, water, vegetable oil, and whole eggs according to package instructions. Mix on medium speed until well blended (about two minutes).
- Divide the batter into two bowls; add red gel food color to one bowl and blue gel food color to the other, stirring until fully incorporated.
- Pour alternating spoonfuls of red and blue batter into the prepared pan to create a marbled effect.
- Bake for 39 to 44 minutes or until a toothpick inserted in the center comes out clean. Allow cooling in the pan for ten minutes before transferring it to a wire rack to cool completely.
- Once cooled, drizzle warmed vanilla frosting over the top of the cake in a striping pattern and decorate with additional colored frosting and sprinkles if desired.
Nutrition
- Serving Size: 1 slice (85g)
- Calories: 290
- Sugar: 22g
- Sodium: 200mg
- Fat: 10g
- Saturated Fat: 1g
- Unsaturated Fat: 8g
- Trans Fat: 0g
- Carbohydrates: 47g
- Fiber: 0g
- Protein: 3g
- Cholesterol: 30mg