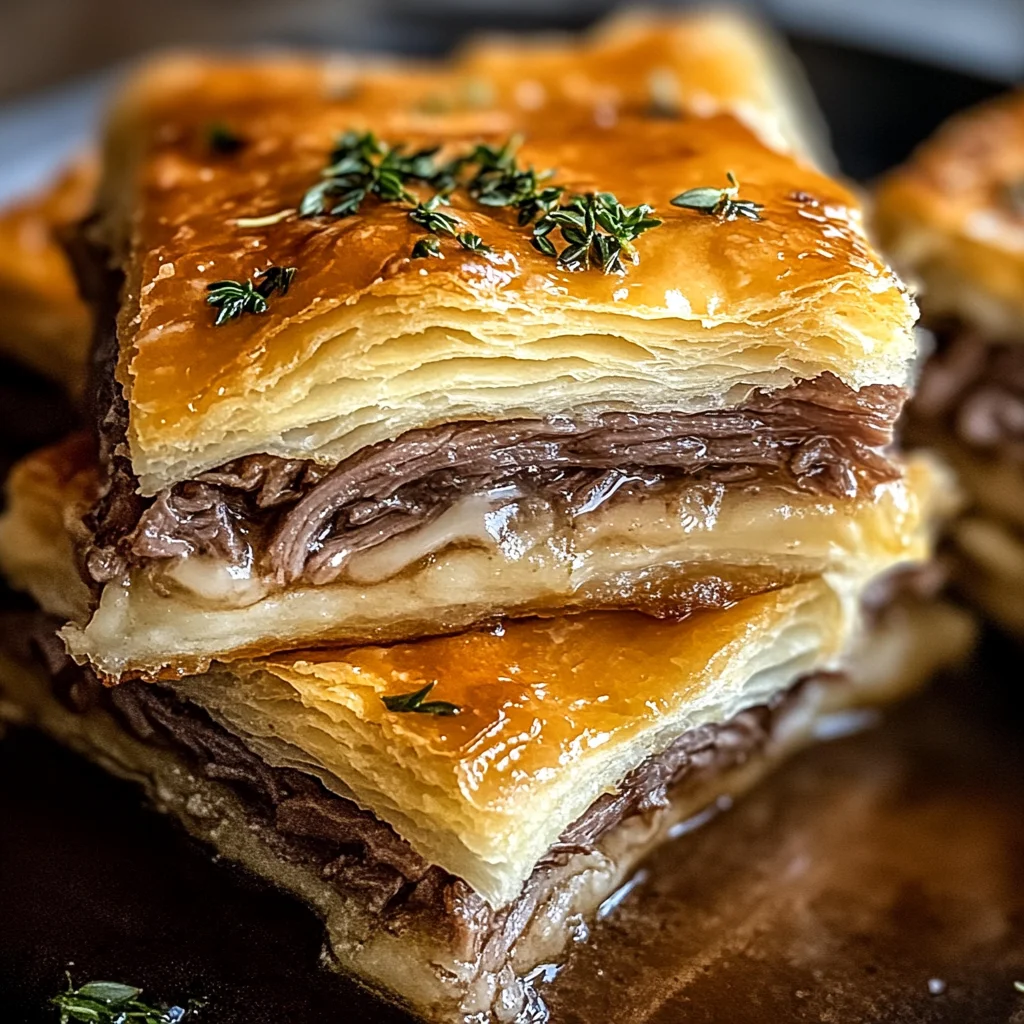
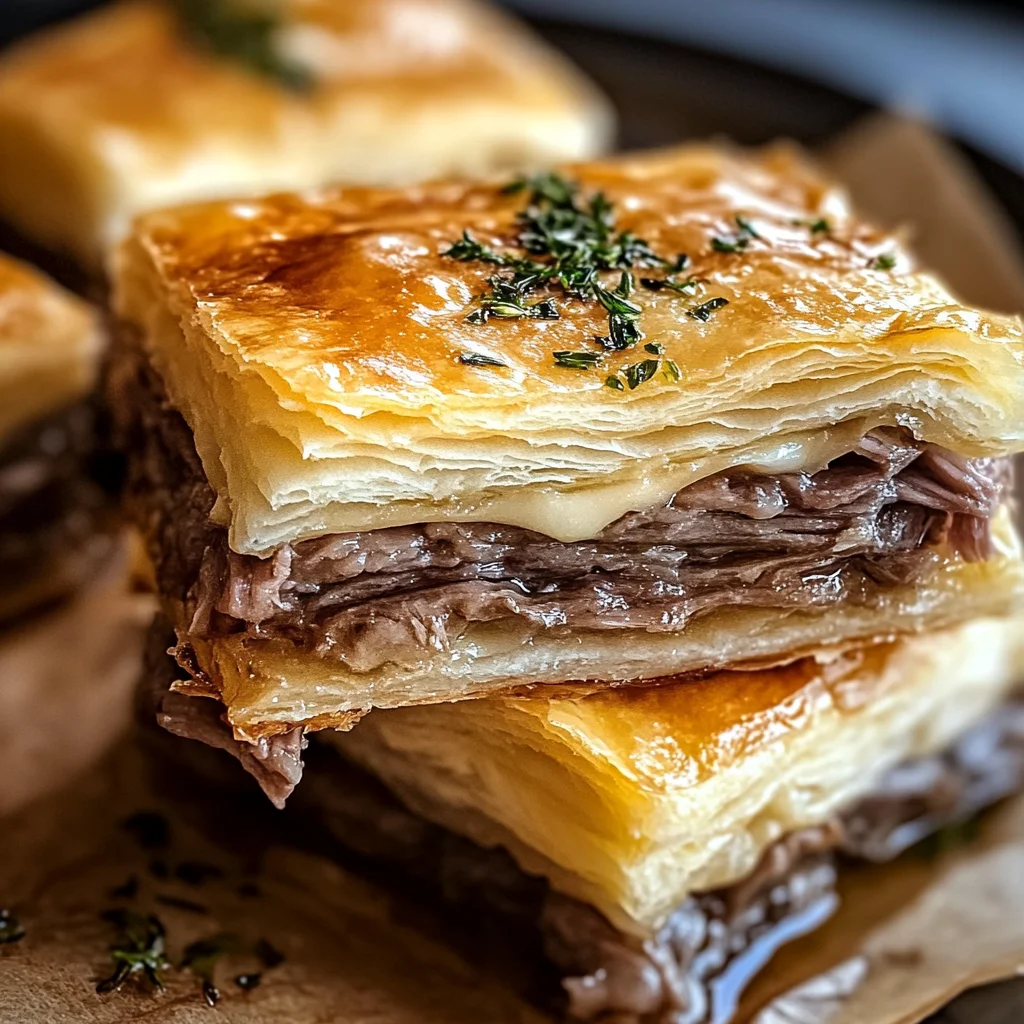
French Dip Squares
In the world of comforting foods, few dishes evoke quite as much warmth and nostalgia as a classic French Dip sandwich. There’s something utterly intoxicating about the combination of tender beef, melty cheese, and that rich, savory dipping broth. But what if I told you there’s a way to enjoy all of that deliciousness in a fun, shareable format? Enter the French Dip Squares—a delightful twist on the beloved classic that transforms the experience into something perfect for gatherings or cozy family dinners. Imagine biting into layers of buttery crescent rolls enveloping succulent roast beef and gooey Swiss cheese, all while being accompanied by a warm beef broth for dipping. It’s a revelation! Trust me when I say these French Dip Squares are not just food; they are an experience that will have your friends and family raving long after the last bite is gone.
But why do we love this recipe so much? It’s not just about convenience or simplicity; it’s about bringing people together. Picture this: You’re gathered with loved ones on a chilly evening, laughter fills the air, and you’re all sharing these golden squares right from the oven. The scent wafting through your home will draw everyone in, like moths to a flame. This dish has a unique ability to bridge tradition with innovation—taking something as classic as a French Dip sandwich and transforming it into an easy-to-serve appetizer or main dish. It perfectly balances savory notes with creamy textures, making it an unforgettable addition to any table. So let’s dive in and create something truly extraordinary together!
French Dip Squares: A Comforting Twist on Tradition
These French Dip Squares are not just another recipe; they are a heartfelt invitation to indulge in comfort food at its finest. Layered with love and oozing with flavor, this dish embodies everything we adore about cooking—creating joy through food that brings us closer together. Whether you’re hosting friends for game night or simply enjoying a quiet family dinner, these squares will surely become a staple in your kitchen repertoire.
Ingredients:
As we embark on this culinary journey together, let’s take a moment to appreciate each ingredient that plays a role in creating our delicious French Dip Squares. Every element contributes to the symphony of flavors that will dance across your palate!
- 2 cans of refrigerated crescent rolls. These delightful rolls serve as both the base and top layer of our French Dip Squares, creating that flaky texture we all crave. When selecting crescent rolls, opt for those made with high-quality ingredients—they make a noticeable difference in taste and texture. You can also substitute them with puff pastry if you’re feeling adventurous! Just remember that this flaky dough is essential for achieving that golden crust that holds all our savory goodness inside.
- 1/2 pound deli-sliced roast beef. The hero of our dish! This is where we get that rich flavor and tenderness integral to our squares. Look for high-quality roast beef from your deli counter; it should be juicy and well-seasoned. If you want to elevate this dish even more, consider using an oven-roasted version instead; it adds an extra layer of depth! The beauty here lies in how easily this ingredient combines with others—creating an utterly satisfying bite every single time.
- 1 cup grated Swiss cheese. Ah yes, the magic ingredient! Swiss cheese melts beautifully and offers just the right amount of creaminess without overpowering the other flavors. When grating your cheese, I always recommend opting for block cheese rather than pre-shredded versions because it melts better; those additives can alter the texture. This gooey layer gives us that nostalgic feel of indulging in a classic sandwich while tying together all those wonderful components.
- 1 packet dry onion soup mix. This little packet packs quite a punch! It’s crucial for infusing our squares with robust flavor without requiring hours spent slaving over sautéed onions. This mix combines various seasonings—from onion powder to herbs—that complement our other ingredients seamlessly while adding depth to every bite. If you’re feeling creative, you can even whip up your homemade version using dried onions and seasonings!
- 1/4 cup melted butter. Often referred to as liquid gold in baking circles! Butter brings richness and moisture into our squares while helping achieve that glorious golden color we adore so much at first glance. Make sure it’s melted but not too hot before using it; otherwise, it could cook the dough prematurely during assembly—definitely not what we want! Remember: quality matters here; using European-style butter can enhance flavor dramatically!
- 1 teaspoon Worcestershire sauce. This mighty little ingredient adds complexity with its unique blend of tangy and umami flavors—it elevates everything without being overpowering! A splash goes a long way in enhancing our already flavorful filling while providing an earthy undertone that marries beautifully with both beef and cheese.
- 1/2 teaspoon garlic powder. Garlic is the ultimate flavor enhancer! In this case, garlic powder makes things easy while still delivering that unmistakable aroma we associate with comfort food at its finest—you know what I mean? This subtle addition complements our meat perfectly without overwhelming it; trust me when I say don’t skip this step—it’s absolutely paramount!
- 1 cup beef broth (for dipping). Finally, we need something warm to dip these delightful squares into—a luscious beef broth served alongside enhances every bite significantly! Heating up homemade broth would be ideal if time allows since nothing beats fresh stock’s taste—but store-bought works wonders too! Just remember: warming it gently prevents any unwanted boiling which could reduce flavor intensity.
Equipment You’ll Need:
Before we start whipping up these scrumptious French Dip Squares, let’s ensure you have all the right tools at hand! Having quality equipment makes your cooking experience smoother and more enjoyable—like having trusted friends by your side throughout this culinary adventure.
- 9×13 inch baking dish – This size is perfect for holding all those delicious layers together while allowing for even baking across every square inch—literally! A glass or metal one works great; just be sure it’s non-stick or coated so nothing sticks when it’s time to serve those beautiful squares.
- Non-stick cooking spray – A must-have for greasing your baking dish before laying down those crescent rolls! It ensures easy removal post-baking without tearing apart any precious layers.
- Mixing bowls – Essential for blending different elements seamlessly before assembling everything into one harmonious masterpiece; they help keep things organized as we move through each step—and nobody wants chaos in their kitchen!
- Sharp knife or pizza cutter – For slicing up those finished squares effortlessly once they’ve cooled slightly after baking—having sharp tools guarantees clean cuts which means beautiful presentation when serving!
With everything gathered around us like loyal companions ready for action—we’re now prepared to create magic together!
Preparing the French Dip Squares
Step 1: Preheat Your Oven Like You Mean It
First things first: let’s get our oven preheating to 375°F (190°C). This step isn’t merely routine—it sets the stage for perfectly baked crescents later on! An adequately preheated oven ensures even cooking throughout every layer so those delightful crusts turn golden brown while maintaining tenderness inside—all aspects crucially important to achieving success with these French Dip Squares!
Step 2: Lay Down Your Foundation
Once preheated, grab your baking dish (don’t forget that non-stick spray!). Roll out one can of crescent rolls directly onto its bottom surface—pressing any seams firmly together until they form an even layer covering all corners evenly without gaps (this part is key). Think of this base as our sturdy foundation—the canvas upon which we’ll build layers upon layers of flavor-packed goodness!
Step 3: Build Up That Filling
Next comes layering up some serious flavor magic! Evenly distribute deli-sliced roast beef over our crescent roll base—a generous amount guarantees each square boasts mouthwatering filling upon every bite taken! Then sprinkle grated Swiss cheese liberally atop—we want enough gooey goodness so each square oozes delightfully when pulled apart later on (my mouth waters just thinking about it!). Each layer contributes unique flavors working harmoniously together—creating pure bliss within every morsel enjoyed.
Step 4: Whisk Up That Flavorful Sauce
Now let’s amp things up by combining some rich flavors into one cohesive drizzle over those beautiful layers below us! In a small bowl (or large if desired), whisk together dry onion soup mix along with melted butter along with Worcestershire sauce & garlic powder until thoroughly combined—this mixture acts like liquid gold adding depth & dimension unlike anything else imaginable (believe me!). Drizzle thoughtfully across cheese layer—it seeps through creating tantalizing bites full of savory excitement!
With each step thoughtfully executed thus far—the anticipation builds knowing soon enough we’ll indulge ourselves completely within these heavenly creations… Stay tuned as we continue crafting life-changing experiences through food together—the best is yet ahead!
Step 5: Topping It Off with Dough
Now it’s time to add that final layer of dough, which is truly crucial for sealing in all those glorious flavors. Roll out the second can of refrigerated crescent rolls, just as you did with the first. You want to gently unroll it and lay it over the beef and cheese filling, making sure to pinch together any seams or gaps. This step is not merely cosmetic; it’s essential for creating a cohesive dish where the filling stays nestled safely within its buttery embrace. Trust me on this—if there are holes or seams left unsealed, your filling might escape during baking, leading to a less-than-perfect presentation (and we all know how important that is!). As you press down on the dough, feel free to use your fingers to smooth out any rough spots; this will help create an even top crust that bakes beautifully golden brown.
Once you’ve got everything neatly tucked away under that top layer of dough, take a moment to brush a bit of melted butter over the surface. This is not just for flavor; it’s also about achieving that stunning color and texture. The butter will create a rich, golden crust as the squares bake, providing an inviting sheen that makes them look utterly irresistible when they come out of the oven. Don’t skimp on this step! A well-buttered top will make your French Dip Squares shine like jewels on your dining table.
Step 6: Baking – The Transformative Heat
With everything assembled, it’s time to slide your gorgeous creation into the preheated oven at 375°F (190°C). The magic of baking truly begins here! As those squares bake for approximately 15-20 minutes, the heat will work wonders—transforming raw dough into flaky layers while simultaneously melting that Swiss cheese into gooey perfection. Keep an eye on those glorious little squares as they bubble and puff up; you’re looking for that beautiful golden-brown hue across the top. This visual cue is essential because it indicates not only doneness but also that those flavors have melded beautifully during their time in the oven.
Baking isn’t just about cooking food; it’s about creating an experience. The aroma wafting through your kitchen will be nothing short of intoxicating—a blend of buttery goodness and savory roast beef that beckons everyone nearby. I promise you’ll find yourself peeking into the oven every few minutes, eagerly anticipating that moment when you can finally dig in. Just be careful not to open the oven door too often; maintaining consistent heat is paramount for achieving perfectly baked squares.
Step 7: Warming Up Your Dipping Sauce
While your French Dip Squares are blissfully baking away, let’s focus on preparing that warm beef broth for dipping—the pièce de résistance! In a small pot over medium heat, pour in your cup of beef broth and bring it to a gentle simmer. This step may seem simple, but warming the broth is absolutely essential; serving these squares with hot broth creates a luxurious experience where each bite can be dipped into liquid gold. The warmth enhances all those mouthwatering flavors and elevates the entire dish to something truly extraordinary.
As the broth heats up, take a moment to savor this process—enjoying how everything unfolds together harmoniously in your kitchen. Make sure to stir occasionally so nothing clings stubbornly to the bottom of your pot. You’re looking for just enough heat to warm through without boiling; after all, we want our broth smooth and velvety when it meets those luscious squares! Once it reaches a gentle simmer, remove it from heat and cover it with a lid to keep it warm until you’re ready to serve.
Step 8: Cooling and Cutting with Care
After pulling those golden-brown French Dip Squares from the oven—oh my goodness!—you’ll want to allow them to cool slightly before cutting them into squares. I cannot emphasize enough how tempting it may be to dive right in at this point (believe me, I’ve been there), but patience is key here! Letting them cool for about 5-10 minutes allows the layers to set and makes cutting much easier without losing any filling. If you try cutting too soon, all those delicious juices might ooze out instead of staying nestled within their flaky layers.
When you’re ready to cut them, grab a sharp knife or pizza cutter and slice through with confidence—aiming for about two-inch squares gives you perfect bite-sized portions ideal for dipping. As each square separates easily from its neighbors yet still holds together beautifully thanks to that careful assembly earlier on, you’ll feel a rush of satisfaction knowing you’ve created something special! The anticipation builds as you present these delightful morsels alongside your warm beef broth—it’s truly magical how something so simple can become such an impressive dish.
Conclusion:
As we wrap up this delightful journey through making French Dip Squares, I hope you feel as excited about bringing this dish into your kitchen as I do every time I prepare it! It’s more than just a recipe; it’s about creating memories around the table with friends and family while indulging in layers of buttery goodness and savory flavors that come together so beautifully. The combination of flaky crescent rolls with tender roast beef and gooey Swiss cheese creates an experience that’s nothing short of extraordinary—not just a meal but an event that everyone will remember.
This recipe is an absolute must-try not only because it’s bursting with flavor but also due to its versatility! Whether you’re hosting a casual gathering or looking for something comforting on a cozy weeknight, these French Dip Squares never disappoint. Imagine pulling them from the oven, golden brown and inviting; each square begs to be dipped into warm beef broth that elevates every single bite into something truly special. It’s comfort food made easy—perfectly shareable yet satisfying enough for solo indulgence.
When it comes to serving suggestions, think beyond just enjoying them on their own! Imagine savoring one with a crisp garden salad dressed lightly with lemon vinaigrette—it would balance out all those rich flavors perfectly! Or perhaps pair it with some roasted vegetables tossed in olive oil and herbs for an extra touch of freshness on your plate. For those lazy afternoons when you’re craving something simple yet delectable while binge-watching your favorite show, these squares paired with homemade potato wedges could be just what you need.
Feeling adventurous? This recipe is wonderfully adaptable; why not switch out Swiss cheese for provolone or even sharp cheddar? You could add sautéed mushrooms or caramelized onions for added depth or swap out roast beef for turkey breast if you’re looking for something lighter! Every variation adds its own flair while keeping true to the comforting essence of this dish. So roll up your sleeves, dive into this culinary adventure, try different twists on this classic recipe, and don’t forget to share your experiences—I can’t wait to hear how each of you makes this special recipe your own!
French Dip Squares

Discover irresistible French Dip Squares filled with roast beef and melted cheese. Perfect for sharing—try this delightful recipe today!
- Prep Time: 20 minutes
- Cook Time: 20 minutes
- Total Time: 40 minutes
- Yield: Approximately 12 servings 1x
- Category: Appetizer/Main
- Method: Baking
- Cuisine: American
Ingredients
- 2 cans refrigerated crescent rolls
- 1/2 pound deli-sliced roast beef
- 1 cup grated Swiss cheese
- 1 packet dry onion soup mix
- 1/4 cup melted butter
- 1 teaspoon Worcestershire sauce
- 1/2 teaspoon garlic powder
- 1 cup beef broth (for dipping)
Instructions
- Preheat your oven to 375°F (190°C).
- Spray a 9×13 inch baking dish with non-stick cooking spray.
- Roll out one can of crescent rolls into the bottom of the dish, sealing any seams.
- Layer the roast beef evenly over the dough, then sprinkle with Swiss cheese.
- In a bowl, whisk together onion soup mix, melted butter, Worcestershire sauce, and garlic powder; drizzle over the cheese layer.
- Roll out the second can of crescent rolls and place over the filling, sealing seams carefully.
- Brush melted butter over the top layer.
- Bake for 15-20 minutes until golden brown.
- While baking, warm beef broth in a small pot over medium heat for dipping.
- Allow to cool slightly before cutting into squares.
Nutrition
- Serving Size: 1 serving
- Calories: 250
- Sugar: 2g
- Sodium: 720mg
- Fat: 16g
- Saturated Fat: 7g
- Unsaturated Fat: 8g
- Trans Fat: 0g
- Carbohydrates: 18g
- Fiber: 1g
- Protein: 10g
- Cholesterol: 30mg