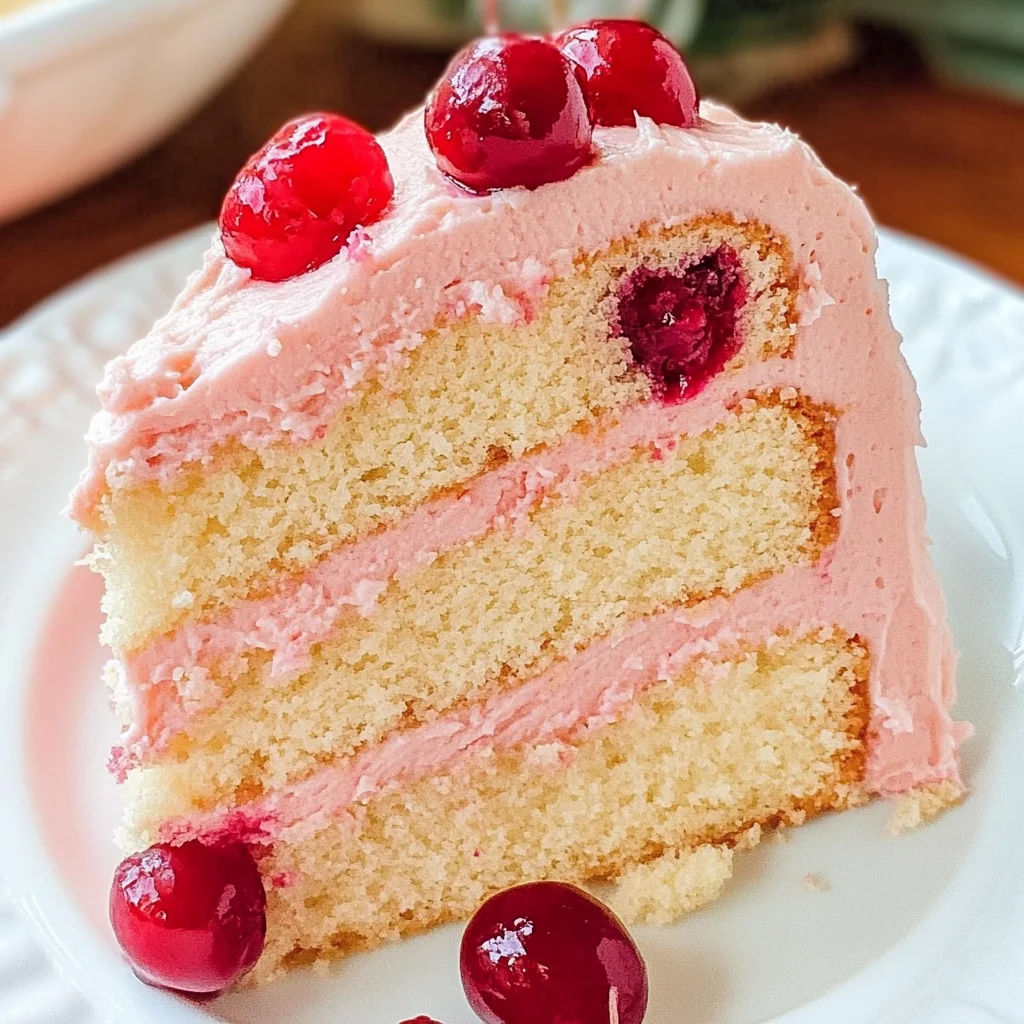
Cherry Almond Cake
From the moment you step into your kitchen, the air tinged with the sweet aroma of baking, there’s a palpable sense of magic that unfolds. The Cherry Almond Cake is more than just another dessert; it’s a radiant expression of joy, nostalgia, and celebration. Imagine the gentle caress of almond fragrance wafting through your home, mingling with the lush sweetness of maraschino cherries. This cake is not merely a treat; it’s an experience that evokes fond memories and creates new ones with every slice shared among loved ones. The combination of fluffy almond cake and rich cherry buttercream frosting is nothing short of a symphony of flavors, inviting you to take a bite and be transported to a place where happiness flourishes.
As I reflect on this beloved recipe, I’m reminded of family gatherings where laughter filled the air, and desserts were always the highlight. The Cherry Almond Cake stands out not just for its irresistible taste but for the stories it tells—stories woven together by generations who have cherished this delightful creation. Whether it’s a birthday party or simply an afternoon tea with friends, this cake has become synonymous with celebration in my life. And trust me when I say that once you serve it at your next gathering, people will be asking for seconds—and even thirds!
Cherry Almond Cake: A Sweet Symphony of Flavor
This divine Cherry Almond Cake is perfect for any occasion—whether you’re celebrating a special milestone or just indulging in some well-deserved self-care. The lightness of the almond cake pairs beautifully with the luscious maraschino cherry buttercream frosting, creating a delightful contrast that dances on your palate. Each bite is like a warm hug from an old friend—a comforting reminder that simple ingredients can come together to create something truly extraordinary.
Ingredients:
Before we embark on this culinary journey together, let’s gather our essential ingredients. Each one plays its unique role in crafting the Cherry Almond Cake, and understanding their importance will elevate your baking experience.
- 2 1/2 cups all-purpose flour. This foundational ingredient provides structure to our cake while ensuring it remains tender and light. When selecting flour, look for high-quality brands that offer finely milled grains; this ensures an even texture throughout your cake. Remember to measure accurately; too much flour can lead to a dense result instead of the airy delight we’re aiming for!
- 1 teaspoon baking soda. This powerful leavening agent reacts with acidic components in our batter (like sour cream) to create bubbles that lift our cake as it bakes. It’s essential for achieving that wonderfully fluffy texture we crave in our Cherry Almond Cake. Be sure to check the expiration date on your baking soda—an expired product won’t provide the lift necessary for success!
- 1/2 teaspoon baking powder. Similar to baking soda, this ingredient contributes to leavening but does so by producing carbon dioxide gas when mixed with moisture and heat. It works synergistically with baking soda to ensure our cake rises perfectly without becoming overly dense or crumbly.
- ½ teaspoon salt. While it may seem minimal, salt enhances flavor and balances sweetness in baked goods. It also strengthens gluten structure—providing better texture—so don’t skip this crucial addition!
- 4 large eggs. Eggs serve multiple purposes in our Cherry Almond Cake: they add moisture, richness, and act as a binding agent that holds everything together beautifully. Make sure your eggs are at room temperature before using them; this ensures they incorporate smoothly into your batter rather than creating cold clumps.
- 2 cups granulated sugar. Sugar isn’t just a sweetener—it’s fundamental in achieving that light texture we desire by helping aerate the batter during mixing (this process is known as creaming). Opt for fine granulated sugar as it dissolves more easily into your batter and yields better results.
- 1 cup unsalted butter, softened to room temperature (2 sticks). Softened butter is crucial for creaming properly and creating that lightness we’re striving for in our Cherry Almond Cake. If your butter is too cold, it won’t incorporate effectively; if melted, you risk creating a dense texture instead of fluffy layers.
- 4 teaspoons almond extract. This fragrant essence brings forth an intoxicating aroma reminiscent of marzipan while enriching our cake with nutty notes that perfectly complement both the cherries and sweetness within the frosting.
- 1 cup sour cream. Sour cream adds moisture while contributing acidity—a key component that activates both baking soda and powder for optimal rise! Its creamy texture lends a rich mouthfeel while keeping our cake tender.
- 1 1/4 cups butter, softened (2 1/2 sticks), for frosting. Just like before, using softened butter here allows us to achieve an airy consistency when creamed with powdered sugar later on; cold butter will lead to clumps within your frosting!
- 5 cups powdered sugar. Powdered sugar sweetens our cherry buttercream while also providing structure—a thicker consistency perfect for spreading onto our cooled cakes lovingly! Be sure to sift it first if clumps are present; nobody likes gritty frosting!
- 1/3 cup heavy whipping cream. This liquid gold transforms our frosting into something utterly luxurious! It makes each bite feel decadent yet light as air—essential when pairing against such rich flavors.
- 1/4 cup maraschino cherry juice. Not only does this juice infuse beautiful color into our frosting, but it also adds subtle tartness counteracting sweetness while enhancing overall flavor profile complexity!
- 3 teaspoons vanilla extract. A classic flavor enhancer adding warmth alongside almond extract—this duo creates harmony between flavors without overpowering any single note within either component!
- 8–10 maraschino cherries, slightly chopped, add fun visual appeal as well as bursts of fruity goodness sprinkled atop each slice! Feel free to adjust based on personal preference; more cherries equal bolder flavor!
Equipment You’ll Need:
Having the right tools makes all the difference when preparing such a delightful dessert! While these items aren’t ingredients, they are essential partners in crafting something wonderful together—and trust me; you’ll love having them by your side.
- Mixing Bowls – A good set of mixing bowls in various sizes will facilitate easy transitions between steps—allowing you space to combine dry ingredients separately from wet ones without frustration! Look for glass or stainless steel options; both are durable and easy to clean post-baking chaos!
- Electric Mixer or Stand Mixer – These devices save time and effort while ensuring proper creaming techniques are followed! If using an electric mixer (hand-held), make sure it has multiple speed settings allowing complete control over mixing processes during critical stages like incorporating eggs or beating butter/sugar mixtures thoroughly until light & fluffy!
- Measuring Cups & Spoons – Accurate measurements are paramount when baking! Invest in quality measuring cups (both dry & liquid) ensuring consistency each time you tackle this scrumptious recipe confidently—and you’ll thank yourself later when each layer rises perfectly!
Preparing the Cherry Almond Cake / Making the Batter
Step 1: Preheating & Preparing Your Pans
Before diving into mixing ingredients together enthusiastically—it’s vital first step involves preheating your oven to 350°F (175°C). Allowing sufficient time ensures even heat distribution throughout during bake-time later on yielding optimal results thereafter! While waiting patiently… grab two 9-inch round cake pans coated lightly with non-stick cooking spray—a non-negotiable step ensuring effortless release once cooled down post-baking session concludes successfully!
Step 2: Mixing Dry Ingredients
In a medium-sized bowl—gather those dry ingredients: all-purpose flour, baking powder, baking soda & salt blending harmoniously together until evenly combined! Whisk gently ensuring no lumps remain visible within mixture—that would create uneven textures throughout final product causing disappointment upon tasting later down road… Letting them rest aside whilst shifting focus toward wet components now beckons us forward eagerly…
Step 3: Creaming Eggs & Sugar
In another large bowl basking under bright kitchen lights—crack open four large eggs tossing them alongside two cups granulated sugar inside using electric mixer set onto medium speed! Beat diligently for approximately two minutes until mixture transforms into LIGHT & CREAMY consistency resembling pale sunshine glistening softly beneath warm glow surrounding us—it’s truly magical watching transformation occur right before eyes… This process known as creaming allows air incorporation leading toward lighter cakes ultimately resulting stunning texture achieved inside finished masterpiece awaiting us ahead!
Step 4: Incorporating Butter & Extracts
Now ready ourselves by adding softened unsalted butter along four teaspoons aromatic almond extract directly into egg-sugar blend previously prepared! Gently lower speed initially while combining these elements before gradually increasing intensity allowing thorough integration taking place seamlessly throughout batter without fear clumping occurring—which would be disastrous outcome after all hard work invested thus far… Continue beating until everything melds beautifully together forming smooth velvety mixture ready awaiting further additions soon arriving shortly thereafter just around corner…
With each step we take towards creating this delightful Cherry Almond Cake—a world filled with sweetness unfolds before us inviting everyone around kitchen table during celebrations yet still reminding us how important sharing moments become through food crafted lovingly by hands dedicated towards bringing joy forth continuously… Stay tuned as we dive deeper into subsequent steps guiding us closer toward finishing touches required before devouring slices indulgently enjoyed amongst friends family alike gathered close…
Baking Your Perfect Cherry Almond Cake
Step 5: Mixing the Batter with Care
Now that we have our dry ingredients set aside, it’s time to combine them with our previously beaten egg and sugar mixture. This step is where we introduce the flour blend to our creamy concoction, and trust me, this is crucial! Begin by carefully adding the dry mixture into your large bowl. I recommend doing this in three batches; it makes incorporating everything so much easier and ensures a tender crumb in your cake. Turn your mixer to low speed—this is absolutely paramount to avoid over-mixing. Over-mixing can lead to a dense cake rather than the light and fluffy texture we’re after. As you mix, watch for those beautiful swirls of flour disappearing into the batter until just blended; it should still look slightly lumpy and thick, like clouds forming in a blue sky.
Once your dry ingredients are incorporated, we’re going to fold in the sour cream next. This might sound unusual if you’ve never baked with sour cream before, but I promise you, it adds moisture and richness that’s simply extraordinary! Using the same low speed, beat in the sour cream until everything is smooth and well combined. Don’t be alarmed by how thick the batter feels—it’s precisely how we want it! A thicker batter gives us that dreamy, airy cake texture once baked. And here’s a little tip: if you find yourself wondering if it looks too thick, remember that it will spread beautifully as it bakes.
Step 6: Filling Your Cake Pans
With our cake batter ready to go, let’s get those pans filled! Grab your prepared 9-inch cake pans that have been lightly sprayed with non-stick cooking spray. The goal here is to fill each pan halfway with that luscious cherry almond batter. Why halfway? Well, think of it this way: as the cake rises in the oven, we want to allow enough space for it to expand without spilling over—no one wants a messy oven clean-up! Use an ice cream scoop or a measuring cup for consistency; evenness is key for a beautiful layer when stacked later on. Once filled, gently jiggle each pan back and forth on your countertop; this will help pop any air bubbles that might have formed during mixing, which is vital for ensuring an even rise.
Now comes the magical part—baking! Slide those pans into your preheated oven at 350°F and set your timer for 23-25 minutes. But don’t just walk away; this is a moment of anticipation! As they bake, take a moment to appreciate the intoxicating aroma of almond wafting through your kitchen. It’s truly one of life’s small pleasures! You’ll know they’re done when they spring back lightly when touched or when a toothpick inserted into the center comes out clean—this is your golden ticket that all that patience has paid off!
Step 7: Cooling Down Before Frosting
Once those cakes are out of the oven and smelling heavenly, it’s time for another important step: cooling them down properly before frosting. Resist the urge to frost right away (I know it’s tempting!), as warm cakes can cause frosting to melt into a gooey mess instead of creating those picturesque layers we all dream about. Place each cake pan on a wire rack; this allows air circulation around them so they can cool evenly without getting soggy on the bottom—a common baking faux pas!
Let them cool in their pans for about 10-15 minutes before gently running a knife around the edges to loosen them up. Then flip them onto the wire rack; you’ll hear that satisfying plop as they release from their molds! Allow them to cool completely before you even think about frosting—trust me on this one—it usually takes about 30 minutes or so depending on your kitchen’s temperature. You’ll know they are ready when they feel room temperature to the touch.
Step 8: Creating That Irresistible Cherry Buttercream Frosting
Ahh, now we reach one of my favorite moments—the frosting! This maraschino cherry buttercream frosting is not only deliciously sweet but also brings an utterly charming pop of color and flavor that complements our cherry almond cake beautifully. Start by creaming together softened butter (that lovely liquid gold) with powdered sugar using an electric mixer on medium speed until light and fluffy—this typically takes about 2-3 minutes. It should look creamy like clouds on a perfect summer day; if it seems too stiff, add just a splash of heavy whipping cream until you achieve that luscious consistency.
Next up is where magic happens—add in your maraschino cherry juice along with vanilla extract for depth of flavor. It’s essential because this little addition ties everything together beautifully and enhances both taste and color. Beat again until fully combined—you’ll notice how vibrant pink hue starts developing as you whisk everything together—it’s like catching glimpses of sunset within your bowl! If you want an extra cherry punch (and let’s be honest who wouldn’t?), fold in those chopped maraschino cherries at this stage. They will provide delightful bursts of flavor throughout every bite!
Final Touches
Step 9: Frosting Your Masterpiece
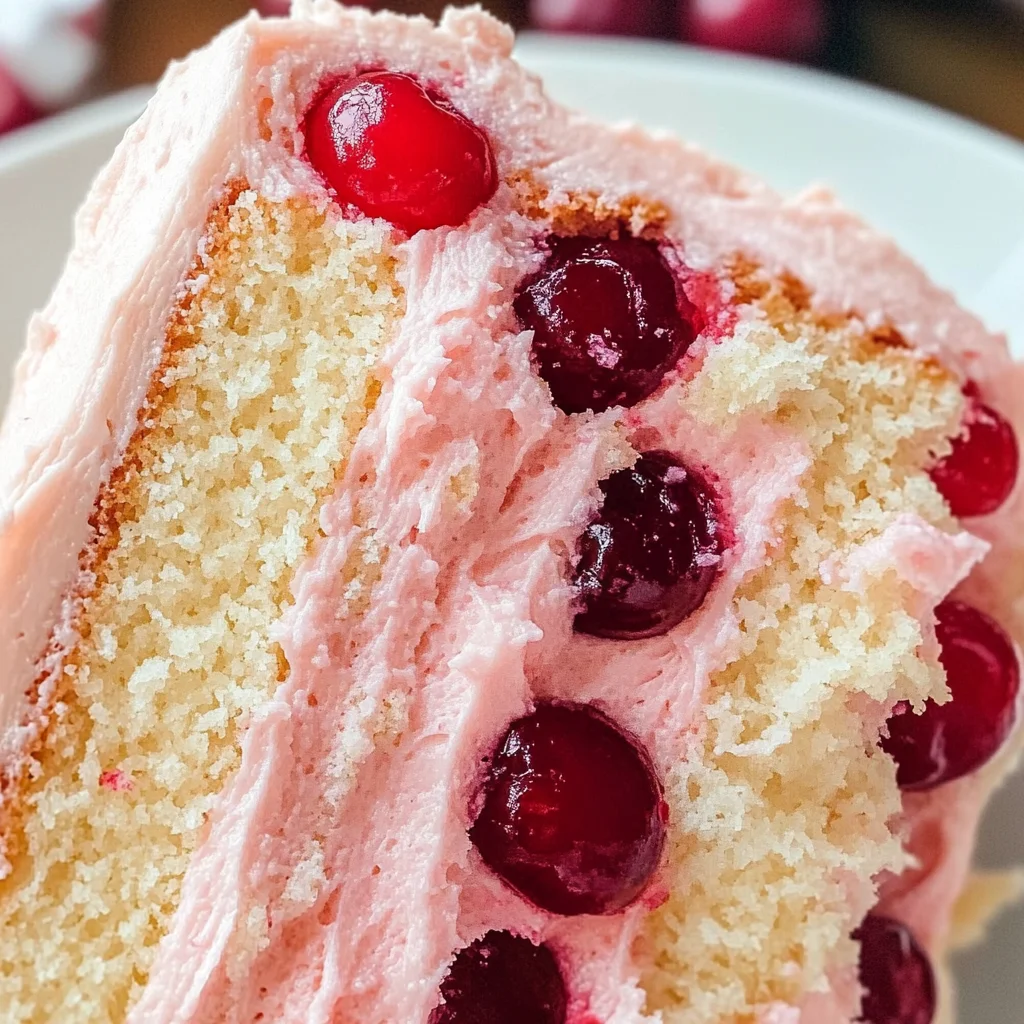
Now comes perhaps my favorite part—frosting our cooled cakes! Grab one layer and place it on a serving plate or stand (this makes presentation so much easier). Use an offset spatula or knife to spread an even layer of frosting across its top; aim for about half an inch thickness—that sweet spot between indulgent and manageable! Gently place your second layer on top of that frosted base, making sure it’s centered perfectly because nobody likes lopsided cakes at celebrations!
Once stacked securely, apply a thin crumb coat first—it’s just a light layer meant to catch any crumbs so they don’t interfere with our final coat (trust me; no one wants bits of crumbs ruining their gorgeous finish). After chilling briefly (about 10-15 minutes), go ahead and slather on another generous layer of that luscious buttercream all around the sides too—the more frosting love we give here means happier mouths later on!
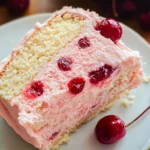
Finally—and I can hardly contain my excitement now—you might consider decorating with some spare chopped cherries or even slivers of toasted almonds sprinkled on top for visual flair (and extra crunch)! It adds dimension while keeping true to those cherry-almond vibes we love so dearly.
And there you have it—a stunning Cherry Almond Cake ready for any celebration or just because life deserves sweetness sometimes! Slice into those layers filled with joy; each bite will transport you straight to cloud nine—a symphony of flavors dancing delightfully across your palate while leaving behind memories worth savoring long after dessert disappears from sight! Enjoy every moment spent sharing this labor-of-love creation with friends or family—I promise you won’t regret it!
Storage and Enjoyment Tips for Your Cherry Almond Cake
Now that you have crafted this absolutely divine Cherry Almond Cake, it’s time to savor every last crumb! Whether you’re celebrating a special occasion or simply treating yourself to a delightful slice, this cake is bound to bring joy to your day. But what happens when you have leftovers? Fear not, because I have some fantastic tips to ensure that your cake remains as scrumptious as the moment it came out of the oven.
Storing Leftover Cherry Almond Cake
To keep your Cherry Almond Cake fresh and delicious for as long as possible, store it in an airtight container at room temperature. If you’re planning to enjoy it over several days, wrapping individual slices in plastic wrap before placing them in the container can help maintain their moisture. This cake will stay delightful for up to four days at room temperature, but trust me—it’s hard to resist devouring it sooner! If you ever find yourself with leftover slices (which is a rare occurrence!), remember that a tip I swear by is placing a slice of bread in the container with the cake; this keeps everything beautifully moist! Even after storage, the flavors meld together beautifully, enhancing that intoxicating almond essence while the cherries continue to shine. When you’re ready for a slice again, simply serve it at room temperature or warm it slightly in the microwave for about 10 seconds—just enough to awaken those delicious flavors once more!
Freezing Cherry Almond Cake for Later
If you’re anything like me, you’ll want to savor this delight even longer than just a few days! Freezing your Cherry Almond Cake is an excellent option if you want to relish its flavors at a later date. To freeze, wrap individual slices or the whole cake tightly in plastic wrap and then place it into a freezer-safe bag or container. This double layer of protection ensures that no freezer burn will dampen its charm. You can keep it frozen for up to three months—how convenient is that? When you’re ready to enjoy a slice from frozen, simply transfer it to the fridge overnight or let it thaw at room temperature for about an hour before indulging. Freezing allows you to have this marvel on hand for spontaneous celebrations or cozy evenings at home! I promise you; every bite will still taste like freshly baked bliss.
Cherry Almond Cake
Experience the joy of baking with this delightful Cherry Almond Cake, a perfect dessert for any occasion. This light and fluffy cake is infused with the warm essence of almond and crowned with a rich maraschino cherry buttercream frosting. Each slice not only brings a burst of flavor but also evokes cherished memories shared among family and friends. Whether it’s for a birthday celebration or an afternoon treat, this cake promises to create moments worth savoring. The combination of tender almond sponge and luscious cherry frosting makes it irresistible—once served, your guests will be reaching for seconds!
- Prep Time: 30 minutes
- Cook Time: 25 minutes
- Total Time: 55 minutes
- Yield: Approximately 12 servings 1x
- Category: Dessert
- Method: Baking
- Cuisine: American
Ingredients
- 2 ½ cups all-purpose flour
- 1 teaspoon baking soda
- ½ teaspoon baking powder
- ½ teaspoon salt
- 4 large eggs
- 2 cups granulated sugar
- 1 cup unsalted butter, softened
- 4 teaspoons almond extract
- 1 cup sour cream
- 1 ¼ cups butter, softened, for frosting
- 5 cups powdered sugar
- 1/3 cup heavy whipping cream
- ¼ cup maraschino cherry juice
- 3 teaspoons vanilla extract
- 8–10 maraschino cherries, chopped
Instructions
- Preheat oven to 350°F (175°C). Prepare two 9-inch round cake pans by lightly greasing them.
- In one bowl, mix flour, baking soda, baking powder, and salt. In another bowl, cream together sugar and softened butter until light and fluffy. Add eggs one at a time, followed by almond extract and sour cream.
- Gradually add the dry mixture to the wet ingredients in three parts, mixing on low speed until just combined.
- Divide the batter evenly between the prepared pans.
- Bake for 23-25 minutes or until a toothpick comes out clean. Allow cakes to cool before frosting.
- For the frosting, beat together softened butter and powdered sugar until fluffy. Add cherry juice, heavy cream, and vanilla extract; mix until smooth. Fold in chopped cherries.
- Frost the cooled cake layers generously, stacking them as desired.
Nutrition
- Serving Size: 1 serving
- Calories: 370
- Sugar: 40g
- Sodium: 210mg
- Fat: 18g
- Saturated Fat: 10g
- Unsaturated Fat: 6g
- Trans Fat: 0g
- Carbohydrates: 52g
- Fiber: 1g
- Protein: 4g
- Cholesterol: 70mg