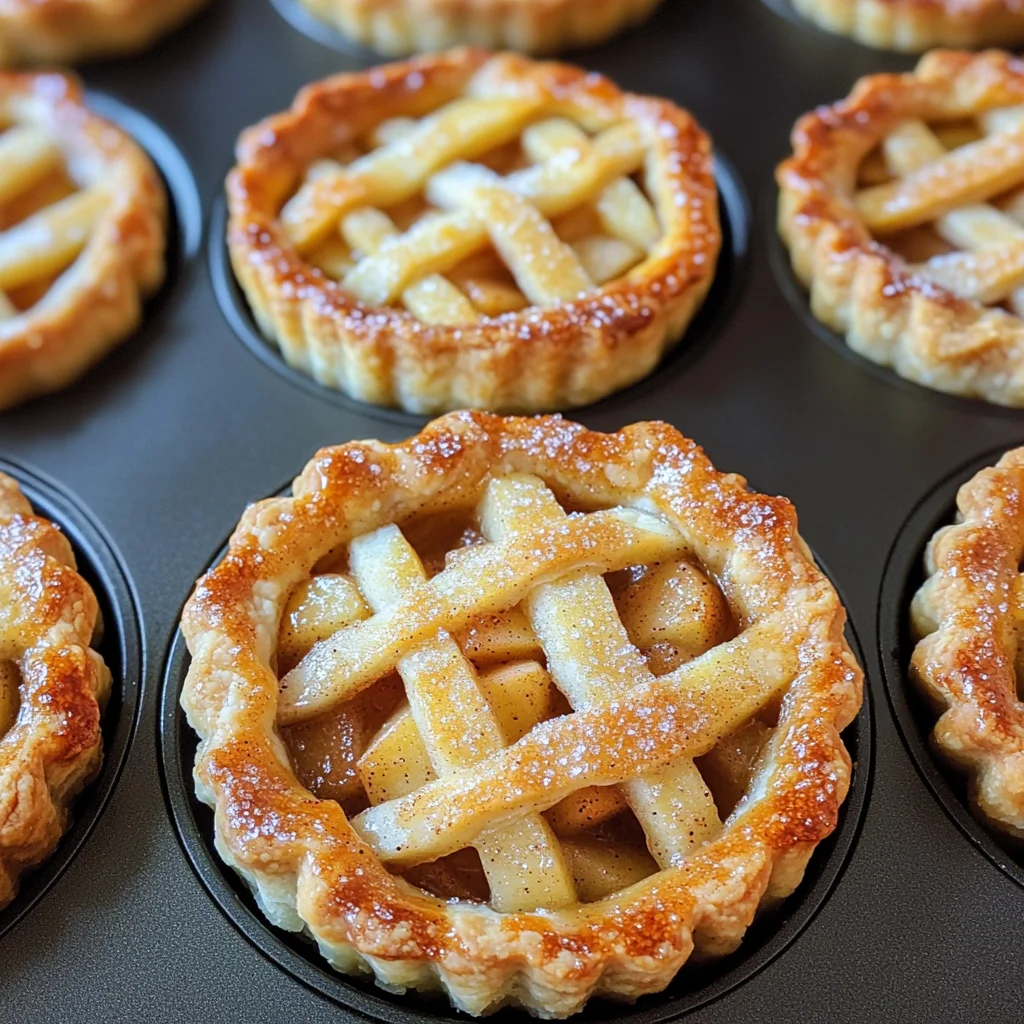
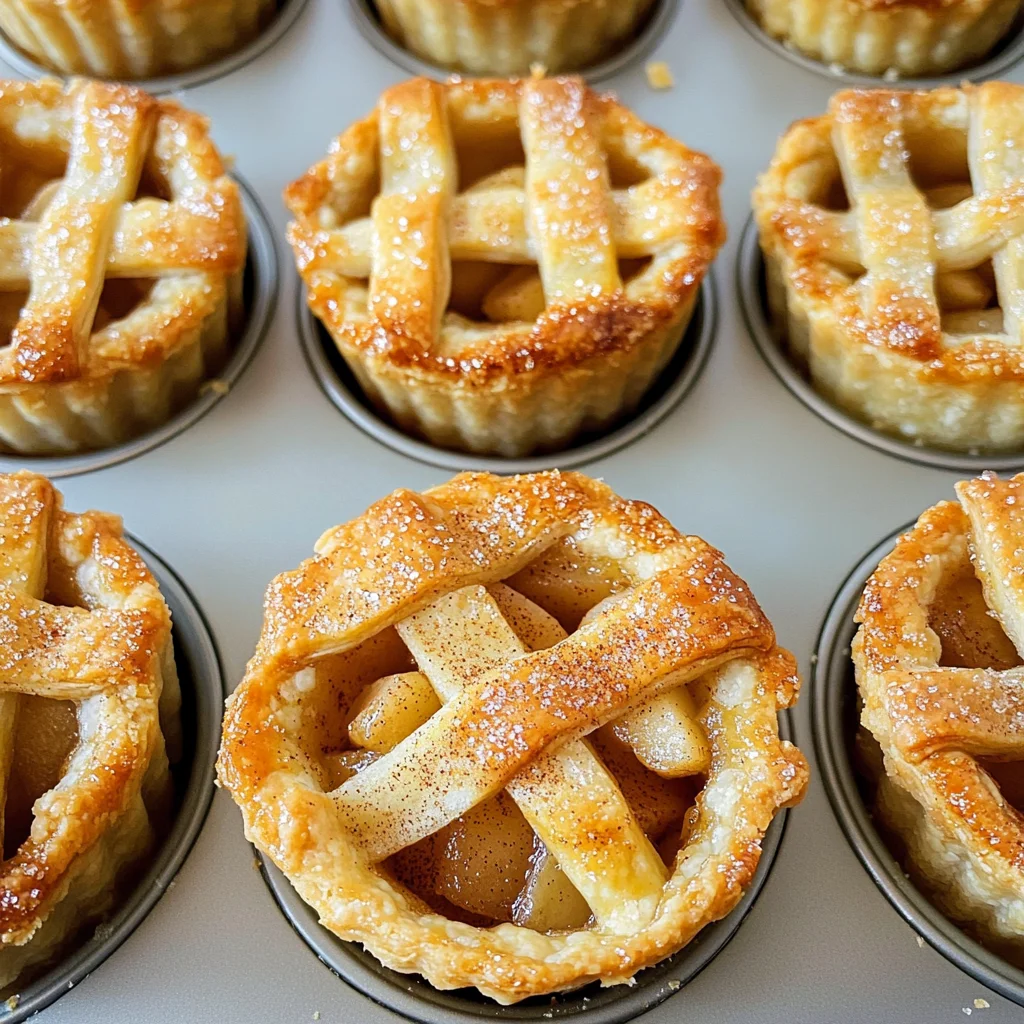
Muffin Tin Mini Apple Pies
There’s something so magical about the scent of baked apples wafting through the kitchen, isn’t there? It’s a comforting aroma that transports us back to cozy autumn days, wrapped in our favorite sweater, sipping on warm cider while leaves swirl around us. Muffin Tin Mini Apple Pies are more than just dessert; they embody a celebration of simplicity and warmth, with each bite bursting with sweet appley goodness and a hint of cinnamon. When I make these delightful little treats, I feel like I’m creating a bridge between generations—bringing my family traditions into the present while adding my own personal twist. Trust me when I say that these mini pies are utterly intoxicating and will quickly become a cherished recipe in your home.
What makes these Muffin Tin Mini Apple Pies so special? It’s not just the flaky crust or the tender apple filling; it’s the experience of crafting them together with loved ones, sharing stories as you dice apples and roll out dough. This recipe is perfect for gatherings, holiday celebrations, or even as a cozy afternoon treat while you binge-watch your favorite series. It’s versatile, too—perfect for picnics in warmer months or served warm with a scoop of dairy-free ice cream in winter. So let’s roll up our sleeves and embark on this delicious journey together!
Ingredients:
As we dive into making these Muffin Tin Mini Apple Pies, let’s talk about the ingredients that will come together to create this delightful dessert. Each component plays a vital role in achieving that perfect balance of flavor and texture.
- 2 1/2 cups all-purpose flour, plus more for rolling out dough. Flour is the backbone of any pie crust; it gives structure and stability while providing that perfect crumbly texture we all adore. The all-purpose variety is versatile enough to yield great results without being too heavy. When measuring flour, be sure to spoon it into your measuring cup and level it off with a knife—this prevents packing too much flour into your cup, which can lead to a tough crust. If you’re feeling adventurous or want to experiment, you could substitute part of this flour with whole wheat for added nutrition and flavor.
- 1 1/2 Tablespoons minced fresh rosemary (optional). Now let’s talk about rosemary! While traditionally not found in sweet pies, adding fresh rosemary introduces an aromatic twist that beautifully complements the sweetness of apples. It may sound unusual at first glance but trust me on this—it’s absolutely delightful! Make sure to finely mince the rosemary to evenly distribute its flavor throughout the filling; otherwise, you might bite into an overpowering piece if it’s in larger chunks.
- 1 1/2 Tablespoons white sugar. Sugar is not just a sweetener; it elevates flavors and helps create that golden-brown crust we all love. This sugar will primarily enhance your crust’s flavor but also help balance out the tartness of the apples once they’re baked. You can easily adjust this quantity if you prefer your desserts less sweet; after all, cooking should reflect your taste!
- 3/4 teaspoon salt. Salt is often an unsung hero in baking—it enhances flavors significantly and balances sweetness perfectly. In pie crusts specifically, salt can also help strengthen gluten formation without making it tough. Just remember: too much can lead to an unpleasantly salty taste, so stick to the right amount!
- 1 cup (2 sticks) unsalted butter, cold and cubed. Butter is where the magic happens! Cold butter creates layers within your pie crust that result in flakiness—this is crucial for achieving that tender yet crisp texture everyone craves when they bite into a pie. Make sure your butter is indeed cold (think straight from the fridge) when you cut it into cubes; this ensures maximum flakiness as opposed to melting into the dough during mixing.
- 5 to 6 Tablespoons ice water. Ice water is crucial for bringing our dough together without compromising its integrity by melting our lovely butter prematurely! Adding just enough ice water hydrates the flour without overworking it—too much handling leads to dense pastry rather than light and flaky goodness. Start with five tablespoons and add more if necessary until you achieve a cohesive dough.
- 4 medium apples, peeled and diced small (about 3 cups). For this recipe, I recommend using a mix of tart apples like Granny Smith along with sweeter varieties such as Fuji or Honeycrisp for depth of flavor! Apples are high in moisture content which will break down beautifully during baking; dicing them small ensures they cook evenly within those delightful little crusts.
- 1/4 cup white sugar & 1/4 cup packed light brown sugar. This combination gives complexity to our filling—the white sugar provides straightforward sweetness while brown sugar contributes richness due to its molasses content. Together they create an utterly harmonious apple filling that’s both comforting and indulgent.
- 1 teaspoon ground cinnamon. Cinnamon—ahh! It brings such warmth and familiarity! This spice elevates our apple filling from good to extraordinary by complementing their natural sweetness while imparting its own fragrant notes. Feel free to experiment with spices like nutmeg or allspice if you’re feeling adventurous!
- 2 Tablespoons all-purpose flour. A touch of flour here acts as a thickening agent for our fruit filling by absorbing excess moisture released from those juicy apples during baking—this prevents us from ending up with soggy bottoms!
- 1 large egg whisked with 1 Tablespoon water (egg wash). An egg wash creates that beautiful golden sheen on top of our mini pies while also helping seal edges together beautifully—a non-negotiable step if you’re aiming for perfection here! If you’re looking for alternative options due to dietary preferences, brush coconut milk or almond milk over instead.
- Sanding sugar (optional). Oh boy! Sanding sugar adds sparkle! While purely decorative, sprinkling some over your pie tops before baking gives them an eye-catching finish that’s bound to impress anyone who gets their hands on one.
Equipment You’ll Need:
Before we get started on creating these lovely little pies, let’s gather up our essential tools! Having the right equipment makes the process smoother and allows creativity to flow freely as we embark on this culinary adventure together.
- Muffin tin: This is where our mini pies will take shape! A standard muffin tin holds twelve wells—ideal for creating individual servings that are easy to grab and enjoy without fussing over plates or forks! Opt for non-stick pans if possible; they help ensure easy removal after baking without leaving behind crumbs or sadness.
- Rolling pin: A trusty rolling pin will help flatten out our dough perfectly thin yet still sturdy enough to hold all those delicious fillings inside! If you find yourself without one handy, don’t fret—a wine bottle works just as well!
- Mixing bowls: You’ll need at least two bowls: one for mixing your dry ingredients (flour + sugars + salt) separately from your wet (butter + ice water) before combining them into that glorious pie crust we’re after!
- Pastry cutter or fork: This tool comes in handy when cutting cold butter into flour—you want those cubes broken down until they’re pea-sized pieces throughout your mixture which will lead us toward flaky perfection later on!
- Measuring cups/spoons: Accurate measurements are key here; invest in some good-quality measuring cups/spoons so every ingredient shines as intended within each mouthful.
Now that we’ve gathered everything needed for these Muffin Tin Mini Apple Pies let’s move onto preparing them—the best part awaits as we bring everything together into something truly extraordinary!
Preparing the Muffin Tin Mini Apple Pies
Step 1: Making the Pie Crust
Begin by combining two-and-a-half cups of all-purpose flour with one-and-a-half tablespoons of minced fresh rosemary (if using), one-and-a-half tablespoons of white sugar, and three-fourths teaspoon salt in a large mixing bowl—you’ll want these dry ingredients thoroughly mixed since they form the foundation of our beloved pie crust! Next comes my favorite part: incorporating one cup (two sticks) of cold cubed unsalted butter into this mixture using either a pastry cutter or fork until it resembles coarse crumbs with bits no larger than pea-sized remaining visible throughout—that’s where flakiness comes from! The importance cannot be overstated here; ensuring your butter remains chilled helps keep pockets intact during baking which results in crunchy layers rather than dense doughy bites later on down the line—so resist any temptation toward warming things up prematurely!
Once you’ve achieved this crumb-like consistency within your bowl—be patient—it’s time for hydration! Gradually drizzle five tablespoons of ice-cold water across your mixture while gently stirring until everything starts coming together nicely; use just enough liquid until it forms into cohesive dough without becoming sticky—the goal is smooth yet firm consistency throughout so do not rush through here either—trust me when I say patience pays off immensely at this stage!
Step 2: Chilling Your Dough
After forming your dough ball gently knead it briefly between palms before wrapping tightly in plastic wrap then placing it inside refrigerator allowing time (at least half-hour) resting period where flavors meld beautifully whilst also firming up nicely—a crucial moment indeed! Chilling helps develop gluten strands allowing elasticity later on when rolling out plus prevents shrinking post-bake since warmer temperatures tend toward expansion leading potential disaster during cooking process—it seems counterintuitive initially but trust me on its significance here!
While waiting patiently for thirty minutes (I know it’s hard!), why not prep those gorgeous apples? Take four medium varieties peeled then diced small—you’ll want approximately three cups total once completed—which will provide delightful textures mingling harmoniously alongside spices infusing each bite thereafter leading straight toward heavenly satisfaction awaitingly beckoning us forth after chilling period concludes shortly…
Step 3: Preparing Your Filling
Once time has elapsed pull out freshly chilled dough then return back onto lightly floured surface ready now roll out carefully until reaching thickness roughly about one-eighth inch thick (or slightly thinner)—aiming towards round discs large enough fit snugly within muffin tin’s wells leaving additional room around edges enabling folding upon themselves later once filled generously inside awaiting delectability ensuing forth thereafter post-baking bliss guaranteed awaitingly beckoning us onward towards true greatness unravelling ahead eagerly anticipated moments soon arise following successful assembly efforts initiated beforehand…
Assembling these mini pies involves layering diced apple mixture atop prepared bottom shell thoughtfully crafted earlier alongside sprinkle two tablespoons all-purpose flour combined previously mentioned quarter-cup white plus brown sugars yielding wondrous filling thereafter graced generously ground cinnamon sprinkled lightly across entirety resulting spectacular symphony flavors harmonizing magnificently once welcomed warmly oven-bound shortly thereafter—it simply cannot be overstated how transformative each ingredient becomes collectively culminating divine experience unfolding beautifully within every morsel enjoyed wholeheartedly shared amongst friends family alike!
Step 4: Assembling Your Mini Pies
Now comes perhaps most exciting part assembling pie slices themselves filling those delicate shells entirely generously heaping fruit combinations throughout ensuring balanced distribution occurs evenly across each mold similarly brushing edges lightly beaten egg washed mixture providing golden sheen ultimately desired leading forth spectacular presentation guaranteed awe-inspired reactions abound following unveiling final product emerges victorious triumphantly basked glow warmth radiating inviting smiles simultaneously felt hearts alike enveloped cozy scents permeating through entire space surrounding us joyfully reminding why culinary adventures matter deeply fostering connections shared nurturing bonds formed through food crafted lovingly hand-in-hand reaching unforgettable experiences created lasting memories cherished fondly recounting tales told repeatedly gathered around tables reminiscing long after last crumb devoured completely satisfied bellies fulfilled echoed laughter lingers lingering sentiments reminding importance simple pleasures life shared lovingly captured moments treasured eternally…
And there you have it—the beginning steps towards creating delightful Muffin Tin Mini Apple Pies awaits you filled excitement anticipation delightfully promising indulgence ahead leading forth unforgettable experiences surely never forgotten journey embarked upon together weaving stories deliciously intertwined forevermore treasured fondly always remembered cherished dearly…
Step 5: Perfecting the Pie Crust
Now that you have your ingredients ready and your workspace prepped, it’s time to bring that pie crust to life! In a large mixing bowl, combine the flour, minced fresh rosemary (if using), white sugar, and salt. The rosemary adds an unexpected and delightful depth of flavor that complements the sweetness of the apples beautifully. I’ve always been captivated by how just a hint of herb can elevate a classic dessert into something truly extraordinary. Next, add the cold, cubed unsalted butter to the dry mixture. Using a pastry cutter or your fingers—my preferred method for its tactile connection—work the butter into the flour until it resembles coarse crumbs. You want those little pieces of butter to remain visible; they are crucial for creating a flaky texture during baking.
Once you achieve that crumbly consistency, gradually add in ice water, one tablespoon at a time. Mix gently with a fork until the dough comes together but is not sticky. Trust me on this: don’t rush this step! The cold water helps keep the dough firm while ensuring that the butter stays solid as well—this is paramount for achieving that perfect flaky crust we all crave. Once your dough forms, divide it into two discs, wrap them in plastic wrap, and refrigerate for at least 30 minutes. This chilling process allows the gluten to relax and ensures your crust won’t shrink while baking; it’s like giving your dough a well-deserved spa day!
Step 6: Crafting the Apple Filling
While your dough chills and develops its flavors, let’s turn our attention to what will make these Muffin Tin Mini Apple Pies sing—the apple filling! Start by peeling and dicing your apples into small cubes; aim for about half an inch in size. You want them small enough to fit comfortably within those muffin cups but still substantial enough to provide texture when you bite into your mini pies. As you chop, you might notice the sweet aroma wafting through your kitchen—oh, it’s utterly intoxicating! Once diced, place those apples in a large bowl and sprinkle them with white sugar, brown sugar, ground cinnamon, and flour. The sugars will draw out some moisture from the apples while the flour will help thicken any juices released during baking.
Mix everything together gently but thoroughly; you’re looking for each piece of apple to be coated evenly with that sugary-spiced goodness. This part is essential because it ensures every bite has that harmonious blend of flavors we desire in an apple pie. Let this mixture sit for about 10-15 minutes—yes, patience is key here! Allowing it to rest helps meld those flavors together even more beautifully while also allowing excess moisture to escape from the apples; this way, you won’t end up with soggy pies later on.
Step 7: Rolling Out That Dough
With your delicious apple filling prepared and resting nicely in its sugary embrace, it’s time to roll out your chilled pie crusts! Dust your work surface generously with flour (it’s like creating a cozy blanket for your dough). Take one disc of dough from the refrigerator and place it on the floured surface. Using a rolling pin, roll out the dough evenly to about 1/8 inch thick—this thickness is key because too thin will lead to tears during assembly while too thick may result in an overly bready base instead of that delicate crust we adore.
As you’re rolling out that beautiful dough, lift it occasionally and sprinkle more flour underneath if it begins to stick; nobody wants their hard work glued down! Once rolled out uniformly, use a round cutter or an inverted glass (about 4 inches in diameter) to cut circles from your dough. Gather any scraps together gently—you can re-roll them later—but remember not to overwork the dough as this could create toughness rather than flakiness. You should have about 12 circles; carefully place each circle into greased muffin tin cups allowing some overhang since we’ll be folding them over later.
Step 8: Bringing It All Together
Now comes one of my favorite parts: assembling those Muffin Tin Mini Apple Pies! Preheat your oven to 375°F (190°C) so it’s nice and hot when we’re ready to bake these beauties. At this point, take those delightful little rounds you’ve just cut and gently press them into each muffin cup; don’t worry if they seem imperfect—they’re going to taste incredible regardless! Spoon about two tablespoons of that luscious apple filling into each crust-lined cup, making sure not to overfill them; we want just enough room for those apples to bubble away without spilling over everywhere.
Once filled with those aromatic apple pieces coated in cinnamon-sugar magic, fold any excess crust hanging over the edges towards the center—it doesn’t have to be perfect! A rustic look adds charm and character which makes these mini pies even more inviting. Now take that whisked egg mixed with water and brush it generously over each folded edge; not only does this create a beautiful golden-brown finish as they bake but adds another layer of flavor—a touch of richness if you will. If desired, sprinkle some sanding sugar on top for extra sparkle!
Conclusion:
As we wrap up this delightful journey through creating Muffin Tin Mini Apple Pies together, I hope you’re feeling as excited as I am about this recipe! It’s more than just dessert; it’s about creating memories in the kitchen while filling your home with warmth and sweetness. The combination of tender apples mingling with aromatic cinnamon nestled in a flaky crust creates a symphony of flavors that is truly extraordinary. Each bite is profoundly satisfying—trust me when I say that everyone will be reaching for seconds!
Why should you make these little wonders? Well, beyond their remarkable taste lies the joy of crafting something special from scratch. Whether it’s a cozy family gathering or an impromptu get-together with friends, these mini pies shine like stars at any occasion. Imagine pulling them out of your oven while you’re met with gasps of delight and eager hands reaching for these golden beauties—it’s an experience worth every moment spent in preparation.
Now let’s talk about serving suggestions because there are endless ways to enjoy these treats! Imagine savoring one with a dollop of freshly whipped cream slowly melting atop its warm surface or perhaps alongside a scoop of creamy vanilla ice cream—oh my goodness! For an afternoon pick-me-up with coffee or tea, they’re simply divine; just think of how comforting that combo feels on a chilly day. And if you’re feeling indulgent (who could blame you?), drizzle some caramel sauce over the top for an added touch of decadence—now we’re talking next-level deliciousness!
Feeling adventurous? This recipe is wonderfully adaptable! Swap out some apples for pears or add berries into the mix; experimenting will yield delightful surprises every time. Or perhaps sprinkle in some nutmeg along with your cinnamon for an unexpected twist? You could even try incorporating nuts for added crunch or changing up herbs like using thyme instead of rosemary—I promise each variation will bring its own charm! So gather your ingredients and get ready to create magic in your kitchen. Share your experiences with me—I would love hearing how these Muffin Tin Mini Apple Pies turn out for you!
Muffin Tin Mini Apple Pies

Delight in homemade Muffin Tin Mini Apple Pies filled with spiced apples! Follow our easy recipe and share these sweet treats today.
- Prep Time: 30 minutes
- Cook Time: 20 minutes
- Total Time: 50 minutes
- Yield: Makes approximately 12 servings 1x
- Category: Dessert
- Method: Baking
- Cuisine: American
Ingredients
- 2 1/2 cups all-purpose flour
- 1 cup cold unsalted butter, cubed
- 4 medium apples, peeled and diced
- 1/4 cup white sugar
- 1/4 cup packed light brown sugar
- 1 teaspoon ground cinnamon
- 5 to 6 tablespoons ice water
Instructions
- In a large mixing bowl, combine flour, sugar, and salt. Cut in cold butter until it resembles coarse crumbs.
- Gradually add ice water until dough comes together. Wrap in plastic and refrigerate for at least 30 minutes.
- Preheat oven to 375°F (190°C).
- Roll out chilled dough and cut into circles to fit muffin tin cups. Press into each well.
- In another bowl, mix diced apples with sugars, cinnamon, and flour.
- Fill each crust with apple mixture and fold over any excess dough.
- Brush tops with egg wash or non-dairy milk and sprinkle with sanding sugar if desired.
- Bake for 18-20 minutes until golden brown.
Nutrition
- Serving Size: 1 mini pie (60g)
- Calories: 210
- Sugar: 12g
- Sodium: 150mg
- Fat: 10g
- Saturated Fat: 6g
- Unsaturated Fat: 3g
- Trans Fat: 0g
- Carbohydrates: 29g
- Fiber: 2g
- Protein: 2g
- Cholesterol: 25mg