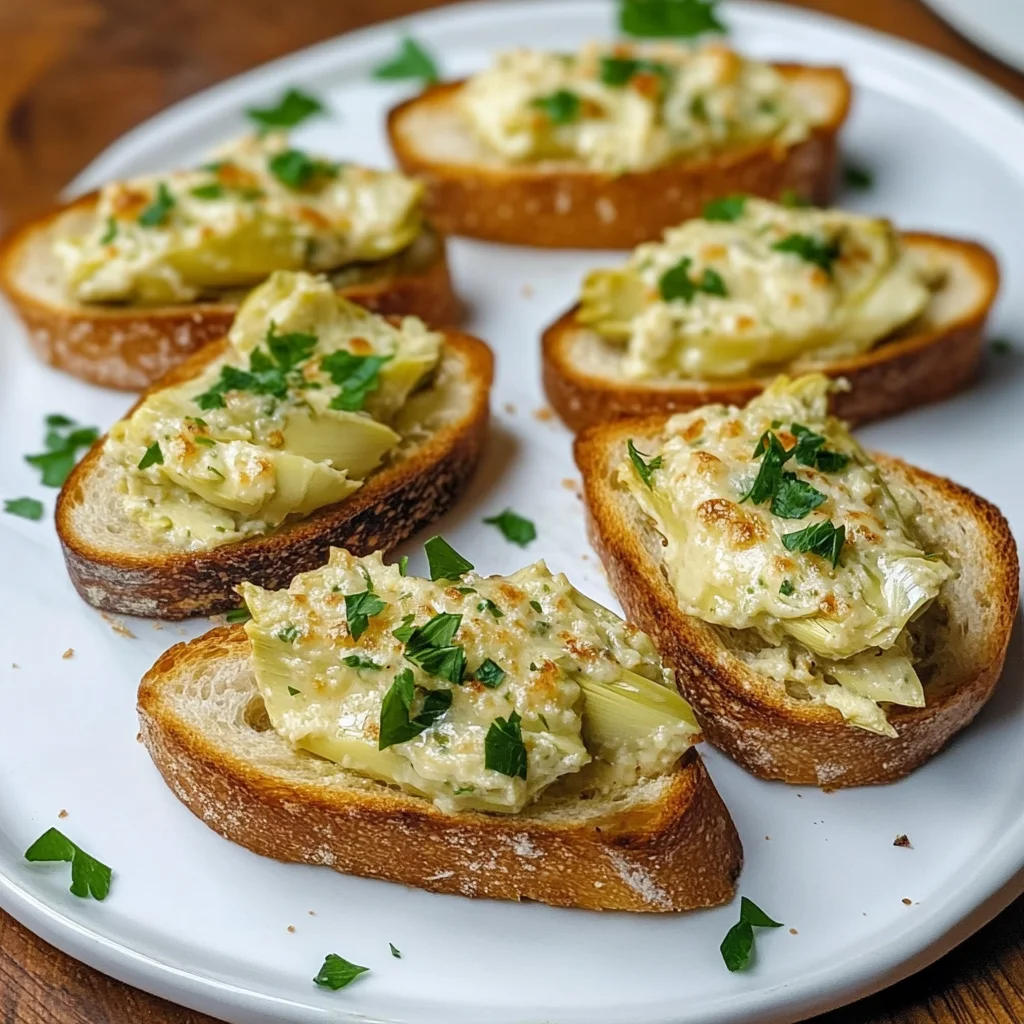
Artichoke Bruschetta
There’s something utterly enchanting about the aroma of freshly baked bread mingling with the creamy, savory notes of a delectable spread. As I whip up this Artichoke Bruschetta, memories flood back of gatherings with friends and family, where laughter echoed around the kitchen and every bite ignited delight. This recipe is more than just a simple appetizer; it’s an experience that bridges tradition with innovation, offering a symphony of flavors that dances on your palate and leaves you craving more. The way each toasted baguette slice cradles that luscious artichoke mixture is nothing short of magical. Trust me when I say this Artichoke Bruschetta will elevate any gathering, making it not just a meal, but a cherished memory.
Imagine those warm evenings when the sun dips low in the sky, casting golden hues across your table. Picture the twinkling lights overhead, laughter bubbling like champagne as you serve these crispy yet creamy delights to your guests. This isn’t just food; it’s a celebration of togetherness, a bridge that connects us all through shared flavors and experiences. What makes these little bites so special? It’s the balance of textures—the crunch of the baguette contrasted with the smoothness of the artichoke spread—that captivates everyone who takes a bite. Each mouthful offers something new; it’s comforting yet sophisticated, familiar yet fresh. Whether you’re hosting a dinner party or simply enjoying a casual evening at home, I promise you this Artichoke Bruschetta will become an instant favorite.
Ingredients:
As we embark on this culinary journey together to create our Artichoke Bruschetta, let’s take a moment to appreciate each ingredient that contributes to this delightful appetizer. Each component plays its part in crafting a dish that is both comforting and elegant.
- 1 (8-ounce) package of cream cheese (softened). Cream cheese forms the rich, creamy base for our artichoke spread. It’s essential to ensure it’s softened because this allows for easy blending with other ingredients—if it’s too cold, you’ll struggle to achieve that smooth consistency we’re aiming for! Look for full-fat cream cheese for optimal flavor; it will lend a luscious texture that enhances every bite of bruschetta.
- 1 cup mayonnaise. Mayonnaise is not just an ordinary condiment here; it brings an extraordinary creaminess and depth to our spread. The oil in mayonnaise works harmoniously with the artichokes and cheeses to create a velvety texture that clings beautifully to each baguette slice. If you’re looking for alternatives, consider using Greek yogurt for a lighter option without sacrificing creaminess.
- 1 can (14-ounce) can of artichoke hearts (whole, halved, or quartered) (drained & chopped). Ah, artichokes—the stars of our show! Their unique flavor profile adds a delightful earthiness that balances out the richness of cream cheese and mayonnaise perfectly. When choosing canned artichokes, look for ones packed in water rather than oil or vinegar; this ensures they retain their delicate flavor without overwhelming our dip’s balance.
- 1 cup grated Parmesan cheese. This ingredient adds not just flavor but also umami depth—it’s that secret ingredient that keeps everyone coming back for more! Grating your own Parmesan from a block will provide superior flavor compared to pre-grated varieties since they often contain anti-caking agents that can dull their taste.
- 1 cup shredded mozzarella cheese. Mozzarella lends its stretchy quality to our topping—when broiled, it melts into gooey perfection that’s utterly irresistible! Using fresh mozzarella can elevate your bruschetta even further but be sure to drain any excess moisture so it doesn’t make our spread soggy.
- 1 teaspoon garlic salt. Garlic salt is essential in bringing out all the flavors in our bruschetta filling while adding aromatic warmth without overpowering any single ingredient—it’s like adding seasoning magic! If you prefer fresh garlic or garlic powder instead, feel free; just remember to adjust quantities according to taste.
- French baguette loaf of bread (cut at an angle into 1/3-inch slices). The choice of bread is crucial—it should be crusty enough to hold up against our creamy topping without getting soggy too quickly! Cutting at an angle not only makes beautiful presentation slices but also increases surface area for even toastiness when broiled.
- Fresh minced parsley OR paprika (for garnish, optional). While garnishes might seem trivial, they play an important role in brightening up your dish both visually and flavor-wise! Fresh parsley adds vibrant color and freshness while paprika contributes its smoky notes—a sprinkle elevates the entire experience!

Equipment You’ll Need:
Now that we’ve gathered all our ingredients let’s talk about some essential tools you’ll need on this culinary adventure! Having the right equipment not only simplifies the process but also enhances your overall cooking experience by making everything smoother and more enjoyable.
- Electric mixer – This handy tool is non-negotiable when it comes to achieving that silky-smooth consistency for your artichoke mixture! A good electric mixer saves time and effort compared to mixing by hand—plus, it ensures everything combines evenly without lumps.
- Baking sheet – A sturdy baking sheet provides ample space for arranging your bruschetta slices while allowing them to broil evenly under high heat without overcrowding them—a key factor in achieving that perfect bubbly top!
- Spatula – A flexible spatula helps you dollop and spread your creamy artichoke mixture onto each slice effortlessly. Look for one with a wide blade so you can get generous amounts onto each piece without tearing them apart!
- Broiler-safe dish or pan – If you happen to have a broiler-safe dish instead of using parchment paper on your baking sheet, go ahead—this can help catch any drips while ensuring even heating across your bruschetta as they bubble away under high heat!
With these ingredients and tools at hand, you’re fully equipped to create an unforgettable appetizer that’ll impress anyone lucky enough to share in its deliciousness!
Preparing the Artichoke Bruschetta
Step 1: Creating Your Creamy Base
To kick off this wonderful adventure in flavors, let’s start by creating our creamy base! In a large bowl—preferably one that’s deep enough so things don’t get too messy—take your softened cream cheese and plug in your electric mixer. This process known as creaming is crucial because it breaks down any lumps in the cream cheese while incorporating air into our mixture—this lightens everything up beautifully! Beat until smooth; you want it completely free from lumps before moving forward because no one wants chunky bits ruining their delightful spread later on!
Once you’ve achieved that velvety texture with your cream cheese—this should take about 2 minutes at medium speed—it’s time to blend in your mayonnaise followed by those chopped artichoke hearts. This combination creates such an intoxicatingly rich base filled with layers upon layers of flavor; trust me when I say it’s going to be hard not sneaking tastes along the way! After you’ve mixed those ingredients together well until combined smoothly again (about another minute), incorporate both grated Parmesan cheese and shredded mozzarella into this luscious filling before giving everything one last beat at high speed until fully incorporated—the result should be creamy perfection ready for slathering onto those baguette slices!
Step 2: Prepping Your Baguette Slices
While we wait for our artichoke mixture’s flavors meld together beautifully inside their bowl—and yes they will marry wonderfully—we can shift gears towards prepping our French baguette loaf now! Start by cutting it diagonally into 1/3-inch slices; this technique isn’t just aesthetically pleasing—it allows each piece more surface area which translates directly into greater crispiness once we pop them under broiler heat later on! Lay these slices out flat on either side of two baking sheets—you may need two depending on how many pieces fit comfortably without overlapping too much since we want even browning across all pieces during broiling later on.
Now here’s where things get exciting: lightly brush each slice with olive oil before heading off into broiler territory—that golden liquid gold enhances both color AND flavor as they toast away so don’t skip out on this vital step! Once coated well enough on both sides (about 1 tablespoon total should suffice), arrange them neatly along side-by-side rows readying themselves patiently until it’s time for their big moment under high heat!
Step 3: Broiling Until Bubbly
Alright friends—we’re reaching peak anticipation now as we get ready for what promises absolute heavenly results from those carefully crafted baguette pieces topped generously with our dreamy artichoke mixture! Preheat your broiler setting high until hot enough ideally around 500°F (or whatever max temp yours reaches)—this ensures they achieve bubbly perfection quickly without risking drying out completely due prolonged exposure times once added atop those toast points!
Once preheated properly place one baking sheet loaded up with dolloped portions atop each baguette slice straight onto rack closest near heating element inside oven—it’ll only need around 2–3 minutes total cooking time max depending various factors including thickness/bread type etc., so here’s where vigilance pays off big time friends: keep watch throughout entire duration until gorgeous golden brown bubbles appear bursting forth from surfaces above—they’re calling out saying “eat me” louder than ever before!
Step 4: Garnishing & Serving Hot!
As soon as those beauties emerge bubbling away from their fiery sauna environment within oven…don’t hesitate friend—immediately transfer onto serving platter adorned prettily alongside sprinkle garnishes if desired sprinkle finely minced parsley atop warm tops OR light dust paprika depending personal taste preferences preferred range options available here today which adds vibrant colors enhancing visual appeal immensely alongside enticing aromas wafting through air inviting everyone over closer together gathering ’round table ensuring good times shared amongst loved ones nearby whilst indulging thoroughly within blissful moments enjoyed savoring every last morsel devoured wholeheartedly till gone entirely leaving nothing behind except fond memories made around delightful appetizers shared among company gathered close sharing laughter stories unfolding joyfully forever etched hearts souls alike forevermore celebrating life love friendships forged alongside delicious food made together proudly today!
And there you have it—a truly extraordinary Artichoke Bruschetta recipe that’s bound to become a staple at any gathering! Enjoy every moment spent creating and eating these delightful bites—they’re sure not only satisfy appetites but also bring people together around tables laden full warmth joy smiles galore lasting long after plates cleared away too happily reminiscing about flavorful experiences shared forevermore through food crafted lovingly from heart soul combined joyously today always remembered fondly afterward next time around!
Perfecting Your Artichoke Bruschetta
Step 5: The Creamy Artichoke Mixture – A Symphony of Flavors
Once you’ve achieved that delightful, fluffy consistency with the cream cheese, it’s time to introduce the next stars of our show: the mayonnaise and chopped artichoke hearts. These ingredients are not just fillers; they bring an incredible depth of flavor and a luscious creaminess that makes each bite utterly intoxicating. Gently fold in the mayonnaise first—this is crucial as it adds moisture and a velvety texture to our spread, transforming what could be a dry topping into something profoundly satisfying. Then, add your artichoke hearts, which should be nicely drained and chopped to ensure they integrate beautifully into the mixture. As you blend these together at high speed, watch how the colors meld into a creamy beige—this visual cue tells you that you’re on the right track! I promise you, this mixture is where magic happens. The tang from the mayo and the earthiness of the artichokes balance each other perfectly, setting up an unforgettable flavor profile that will have your guests asking for more.
Step 6: Adding the Cheesy Goodness – A Flavor Explosion
Now comes one of my favorite parts: introducing the cheeses! Grated Parmesan and shredded mozzarella are not just there for flavor; they play vital roles in texture and richness. Parmesan adds a nutty sharpness while mozzarella brings that gooey stretch we all love. As you mix these cheeses into your creamy concoction, don’t rush this step; take your time to ensure they’re evenly distributed. You’ll know it’s ready when everything is smoothly combined and you can see little flecks of cheese throughout—a visual celebration in itself! Remember, this is what makes your bruschetta stand out from any regular spread; it’s about creating layers of flavor that dance on your palate. Trust me on this: these two cheeses will elevate your Artichoke Bruschetta from ordinary to extraordinary.
Step 7: Prepping Your Baguette – The Foundation of Flavor
While we’re whipping up our creamy topping, let’s talk about the baguette—your vessel for this magnificent spread! Cut your French baguette at an angle into 1/3-inch slices. This technique not only gives each piece more surface area to soak up those delicious flavors but also ensures every bite has that perfect crunch. Arrange them on a baking sheet, but leave some space between each slice; trust me, this matters because it allows hot air to circulate around them during broiling, giving you that golden-brown exterior we all crave without steaming them into sogginess. At this point, feel free to brush them lightly with olive oil if you want an extra touch of richness—although it’s not necessary since we’ll be layering on plenty of creamy goodness soon enough! Watching those edges turn golden as they toast will make your heart flutter with anticipation for what’s to come.
Step 8: Broiling to Perfection – The Transformative Effect
Now comes the grand finale—the broiling! Preheat your broiler to high because we want intense heat that creates a beautiful caramelization on top of our artichoke spread. This step is absolutely paramount; without broiling, you’d miss out on that heavenly bubbly texture and golden crust that makes bruschetta so irresistible. Spoon a generous dollop of your artichoke mixture onto each baguette slice—don’t skimp here! Spreading it all the way to the edges helps prevent burning while ensuring every inch is covered in creamy goodness. Place those beauties under the broiler for about 2-3 minutes, but keep a close eye on them; ovens can vary dramatically when it comes to broiling times! You’ll know they’re done when the topping starts bubbling away like a pot of liquid gold and turns beautifully golden brown around the edges. This transformation—from simple ingredients to something sublime—is what cooking is all about!
The Final Touches – Elevating Your Creation
Step 9: Garnishing with Love – A Beautiful Presentation
As soon as those Artichoke Bruschetta slices emerge from their brief stint under the broiler, you’ll want to let them cool for just a moment before garnishing them with fresh minced parsley or perhaps a light sprinkle of paprika if you’re feeling adventurous! This final touch isn’t just for aesthetics (though it does make everything look oh-so-appetizing); it also adds brightness and freshness that cuts through the richness of our creamy topping. Imagine taking that first bite—the warmth from the baguette combined with creamy artichokes and then suddenly meeting that fresh pop from parsley—it’s an explosion of flavors in your mouth! I always say presentation is half the battle in cooking; after all, we eat first with our eyes. So go ahead and plate these beauties with pride!
And there you have it—the ultimate Artichoke Bruschetta! Whether you’re serving these at a gathering or simply indulging yourself on a cozy night in (I won’t tell!), every bite promises comfort and joy wrapped in crispy bread and creamy goodness. Enjoy every moment as you savor this delightful dish—you deserve it!
Storage and Enjoyment Tips for Your Artichoke Bruschetta
Now that your Artichoke Bruschetta is all golden and bubbling with anticipation, it’s time to dig in! But let’s be real—sometimes we don’t finish every last morsel in one sitting, and that’s perfectly okay! This delightful appetizer can be saved for later enjoyment, allowing you to savor those creamy, cheesy flavors even when the party winds down. If you find yourself with leftovers (which I promise you will want to save), let’s talk about how to store them properly so they remain just as delicious for your next snack attack.
Storing Leftover Artichoke Bruschetta
To keep your leftover Artichoke Bruschetta fresh, it’s best to place it in an airtight container. The key here is to ensure it’s sealed tightly; this will prevent any unwelcome air from sneaking in and ruining that rich creaminess we adore. Ideally, consume your bruschetta within three days of cooking it, as that’s when the flavors are still at their peak. Trust me on this: while the artichoke spread maintains its luscious texture, the bread does tend to lose its crispness over time. A little pro tip? If you’re saving some slices of bread separate from the spread, you can toast them fresh when you’re ready to enjoy leftovers—this keeps everything crunchy and delightful! Just remember, while the toppings might soften a bit after storage, they’re still utterly scrumptious—perfectly comforting in their creamy goodness.
Freezing Artichoke Bruschetta for Later
If you’re looking to prepare ahead of time or simply want to store some away for a future get-together, consider freezing the artichoke mixture itself. You can portion out the creamy spread into freezer-safe containers or zip-top bags—just make sure to remove as much air as possible before sealing. This way, you can freeze it for up to three months without losing any of that divine flavor! When you’re ready for a treat, defrost the mixture overnight in the refrigerator and then spread it on freshly toasted baguette slices before popping them under the broiler for that bubbly finish. The convenience factor here is absolutely paramount! Imagine having a gourmet appetizer ready at a moment’s notice; it just makes life easier and more delicious.
Artichoke Bruschetta

Indulge in creamy Artichoke Bruschetta topped on crispy baguette slices—an easy yet elegant appetizer perfect for any occasion. Try it today!
- Prep Time: 15 minutes
- Cook Time: 3 minutes
- Total Time: 18 minutes
- Yield: Serves approximately 12 slices 1x
- Category: Appetizer
- Method: Broiling
- Cuisine: Mediterranean
Ingredients
- 1 (8-ounce) package of softened cream cheese
- 1 cup mayonnaise (or Greek yogurt for a lighter option)
- 1 can (14-ounce) artichoke hearts, drained and chopped
- 1 cup grated Parmesan cheese
- 1 cup shredded mozzarella cheese
- 1 teaspoon garlic salt
- French baguette loaf, cut into 1/3-inch slices
- Fresh minced parsley or paprika for garnish (optional)
Instructions
- In a large mixing bowl, combine the softened cream cheese and mayonnaise. Mix until smooth.
- Fold in the chopped artichoke hearts, grated Parmesan, shredded mozzarella, and garlic salt until fully incorporated.
- Preheat your broiler to high. Arrange baguette slices on a baking sheet and lightly brush with olive oil if desired.
- Top each baguette slice generously with the artichoke mixture.
- Broil for 2-3 minutes until bubbly and golden brown.
- Garnish with fresh parsley or paprika before serving warm.
Nutrition
- Serving Size: 1 serving
- Calories: 150
- Sugar: 1g
- Sodium: 320mg
- Fat: 10g
- Saturated Fat: 4g
- Unsaturated Fat: 5g
- Trans Fat: 0g
- Carbohydrates: 11g
- Fiber: 0g
- Protein: 5g
- Cholesterol: 20mg