7 Layer Salad
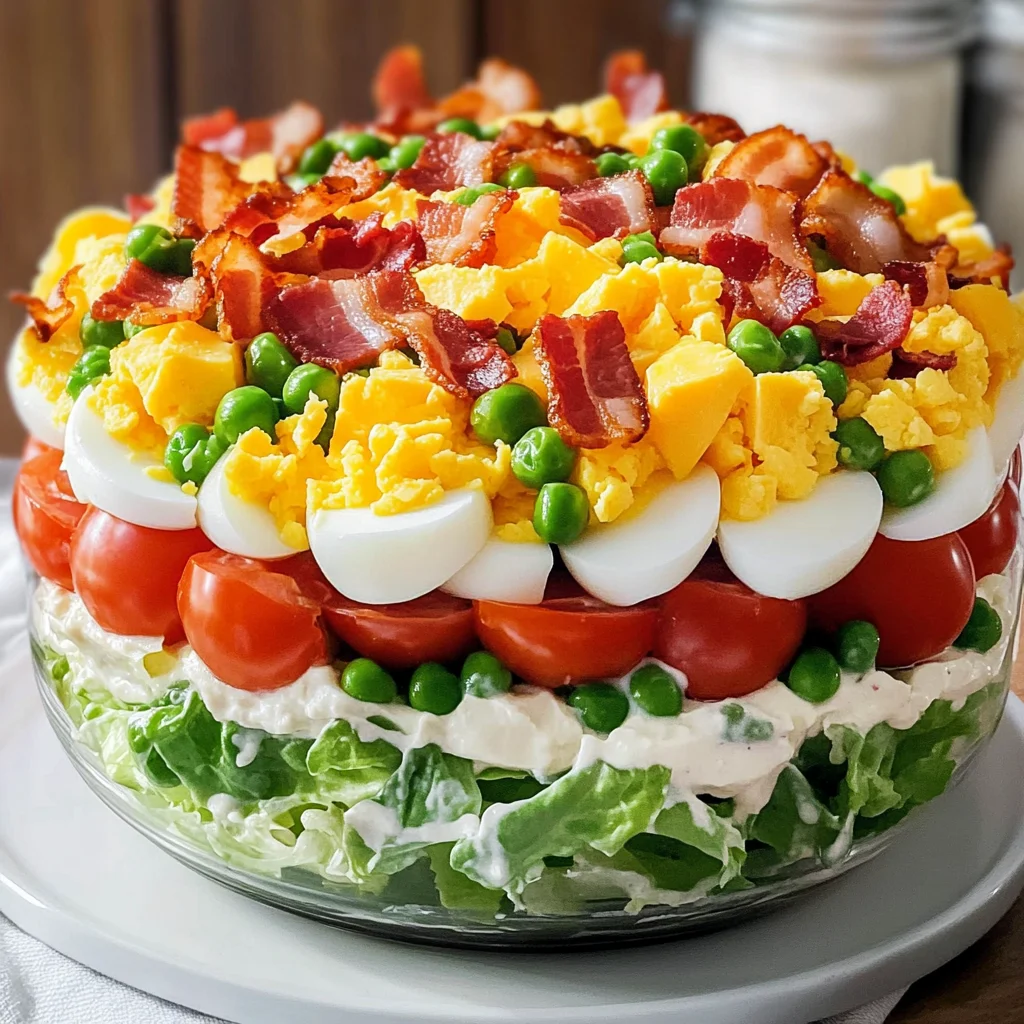
What if I told you that a simple salad could evoke memories of family gatherings, laughter over shared meals, and the joy of creating something beautiful that also tastes absolutely divine? The 7 Layer Salad is not just a recipe; it’s a vibrant tapestry of flavors and textures, a delightful journey where each layer tells its own story. Imagine the crunch of fresh Iceberg lettuce mingling with the sweetness of thawed peas, the creaminess of silky mayonnaise dressing draped over sun-ripened tomatoes, and the rich flavors of grated cheeses harmonizing with perfectly boiled eggs. This salad is a celebration of everything we love about food – it’s colorful, it’s satisfying, and it brings people together around the table in the most delightful way. Trust me when I say that this 7 Layer Salad will not only be a feast for your eyes but also an unforgettable experience for your taste buds.
As we dive into this culinary adventure, it’s important to know that every ingredient plays a crucial role in building this masterpiece. Each layer is carefully crafted to bring out the best in one another, creating a symphony of flavors that’s both refreshing and deeply satisfying. This dish is perfect for potlucks, holiday feasts, or even just a cozy dinner at home—any occasion where you want to impress without spending hours in the kitchen. So grab your favorite mixing bowl and let’s get started on this delightful journey together!
7 Layer Salad: A Wholesome Delight for Every Occasion
This beloved 7 Layer Salad is not just another side dish; it’s an experience meant to be savored. With its beautifully arranged layers and creamy dressing, each bite offers a new combination of flavor that dances on your palate. It’s like unwrapping a present with every forkful—a surprise waiting to delight you! Plus, what I adore most about this salad is its versatility; you can easily customize it based on what you have at home or your personal preferences. Whether served at a summer barbecue or alongside hearty winter comfort foods, this salad never fails to make an impression.
With my step-by-step guide, you’ll learn how to create this layered wonder seamlessly. I promise you; once you start layering those beautiful ingredients into your dish, you’ll feel like an artist painting a canvas—each ingredient representing vibrant colors and unique textures that come together in harmony. So let’s embark on this culinary adventure and explore each component that makes our 7 Layer Salad truly extraordinary!
Ingredients:
Embarking on making the 7 Layer Salad is like stepping into a world filled with fresh ingredients waiting to come together in perfect harmony. Each component has been chosen not just for its taste but also for the joy it brings to the final dish.
- 1 1/3 cup mayonnaise. This ingredient serves as the foundation of our dressing—creamy and rich, it binds all layers together while adding depth and flavor to each bite. When selecting mayonnaise, look for high-quality brands made with wholesome ingredients; consider trying homemade mayo for an even fresher taste! If you’re looking for healthier alternatives, an avocado-based mayonnaise can provide similar creaminess while adding healthy fats.
- 1/4 cup sour cream. Adding sour cream introduces a tangy brightness that elevates our dressing from ordinary to extraordinary! It helps balance the richness of the mayonnaise while contributing a luscious texture that coats every layer beautifully. If you’re feeling adventurous or need dairy-free options, consider using coconut yogurt or cashew cream instead—they’ll give you that creamy consistency without compromising flavor.
- 2 teaspoons white vinegar (or substitutes like white grape juice, apple cider vinegar, or rice vinegar). Vinegar isn’t just there for acidity; it acts as a secret weapon in brightening up flavors across all layers! The sharpness cuts through richness while enhancing other ingredients’ natural sweetness. Don’t skip this step—trust me when I say that this little addition makes all the difference.
- 1/2 teaspoon Kosher salt. Salt acts as flavor enhancer—it brings out the essence in our vegetables and unifies them with other elements in our salad. Opting for Kosher salt allows for better control over seasoning since its larger grains are easier to sprinkle evenly throughout your dish. Remember: taste as you go!
- 1/3 cup grated Parmesan cheese. This aged cheese adds depth with its nutty notes while delivering umami goodness we all crave! Its texture complements our layers perfectly—just make sure to choose freshly grated cheese rather than pre-packaged versions; you’ll appreciate how much more pronounced its flavor will be.
- 12 slices thick-cut bacon, diced (you can substitute crispy baked chickpeas or smoked tofu here). The crispy bacon adds crunchy texture along with savory smokiness—the kind of flavor that creates cravings! For those avoiding bacon altogether (like using chickpeas), roasting them until golden will give you an equally satisfying crunch!
- 4 cups (about 1 head) Iceberg lettuce, chopped (ensure it’s dry). Iceberg lettuce provides crispness; it holds everything together without wilting under other heavier ingredients’ weight! Look for heads that feel firm yet feel light when lifted—they should have bright green leaves without browning edges.
- 2 cups grape tomatoes, halved lengthwise and seeded. Their juicy sweetness makes them perfect companions within our layered affair! Be sure they’re ripe; those deep red jewels bursting with flavor will elevate everything else surrounding them!
- 6 large hard-boiled eggs, roughly chopped—this creamy protein source adds heartiness while also providing visual contrast among vibrant colors within our salad’s layers! To achieve perfectly boiled eggs without green yolks (which happen due to overcooking), simmer them gently instead boiling rapidly.
- 1 (16-ounce) bag frozen peas, thawed in colander. These sweet little gems add pops of color along with their delightful sweetness—the perfect complement against savory bacon! Thawing them ahead ensures they blend nicely rather than cooling down other warm ingredients unnecessarily.
- 1 1/2 cup freshly grated Cheddar cheese—richly flavored cheddar complements every layer beautifully while providing additional creaminess when mixed into dressings!
Now that we’ve gathered all these wonderful ingredients let’s move on to some essential tools you’ll need before diving into preparation!

Equipment You’ll Need:
Having the right tools by your side can transform cooking from mere preparation into joyful creation! These essential partners help ensure success at every stage—making your culinary experience smoother and more enjoyable.
- Mixing bowls – A good set of mixing bowls is invaluable; they allow you to combine dressing ingredients effortlessly while having space left over when gathering chopped veggies or layering components later on! Look for nesting sets so they take up minimal storage space too.
- Whisk – This tool helps emulsify mayo components quickly into creamy perfection—tackling clumps efficiently until smooth without leaving behind any lumps whatsoever! A sturdy whisk makes all difference when achieving desired consistency!
- Large sauté pan – Ideal for cooking bacon perfectly crispy without burning—it can also double as storage during prep stages whenever needed since there’s plenty room available inside!
- Cutting board & sharp knife – You’ll want both handy so chopping veggies becomes safe & efficient rather than tedious work—plus using quality knives saves effort along way!
- Trifle dish or casserole dish – Depending on which presentation style appeals most—layering salads beautifully showcases colors visually enticing guests before digging into deliciousness awaiting below surface level!
Now let’s dive into preparing our spectacular 7 Layer Salad so we can bring all these elements together beautifully…
Step 1: Crafting Your Dressing
In a medium-sized mixing bowl, add all of your dressing ingredients: mayonnaise, sour cream, white vinegar (or whichever substitute you’ve chosen), Kosher salt, and Parmesan cheese. Using your whisk (my favorite tool!), blend these components until they merge seamlessly into one creamy concoction that glistens invitingly under light—a true labor of love indeed! This step is pivotal because proper emulsification ensures even distribution across layers later on; trust me—you don’t want any dry bites when serving guests who expect indulgence here!
Step 2: Crispy Bacon Magic
Next up is rendering our diced bacon heavenly crispy—a process requiring patience but yielding delicious results! Grab that large sauté pan mentioned earlier and heat it over medium-high heat; once hot enough (you’ll notice shimmering oil forming), toss in diced bacon pieces evenly spread out across surface area within pan itself—be cautious not overcrowd otherwise frying process stalls completely risking soggy morsels instead! Stir occasionally until golden brown (around 10–12 minutes usually suffices). Once finished cooking perfectly crispy bits emerge from pan ready rest upon paper towel-lined plate draining excess grease off before cooling completely down before layering atop incredible creation awaiting assembly next steps ahead…
Step 3: Building Layers
Now comes my favorite part: assembling this beautiful masterpiece! Have ready either trifle dish/bowl/casserole dish previously prepped—you want something transparent allowing guests witness beauty happening inside too… Start off layer one by placing chopped Iceberg lettuce directly at bottom followed closely by halved grape tomatoes ensuring even coverage throughout entire circumference above greens below… Follow up next through sprinkling roughly chopped hard-boiled eggs evenly distributed across surface until fully covered beneath luscious green backdrop created above… Lastly sprinkle thawed peas generously scattering about giving touch vibrant pop color before temporarily setting aside awaiting creamy dressing arrival shortly following suit thereafter…
Step 4: Dressing Up
Pour prepared dressing lovingly over peas while taking care spread smoothly across surface utilizing spatula if handy desired—it should glide effortlessly coating entire top layer beneath providing rich moisture needed throughout entire salad experience enjoyed later… Next comes exciting moment where fresh grated cheddar cheese joins party sprinkling freely atop creamy goodness already established thus far completing overall look stunningly presented beforehand awaiting crispy bacon’s grand entrance momentarily arriving soon after completion assembly directions followed closely nearby…
Now let’s pause here as we allow time chill resting covered plastic wrap within refrigerator ensuring flavors meld beautifully overnight resulting explosion savory satisfaction guaranteed each bite taken thereafter indulged upon happiness shared amongst friends/family alike gathered around table eagerly anticipating first taste revealed finally unveiled…
In conclusion? Get ready indulge yourself completely amidst joys found inside deliciousness crafted lovingly just waiting patiently beneath surface revealing pure magic nestled delicately among assorted layers intermingled thoughtfully crafted together midst heartfelt laughter shared enjoying company surrounding us… Are you excited yet? Because I certainly am—and can’t wait see smiles brought forth from everyone diving headfirst savoring bites formed throughout unforgettable moments created gathering round table celebrating life itself through glorious food shared simply made right home kitchens everywhere today…
Crafting Your 7 Layer Salad: Building Layers of Joy
Step 5: The Artful Assembly
Now that your dressing is ready and your bacon has cooled, it’s time to construct this magnificent masterpiece. Grab your trifle dish or casserole dish—whichever you’ve chosen should be wide enough to showcase the beautiful layers you will create. Begin with the Iceberg lettuce, which forms the base of our salad. I always make sure to chop my lettuce into bite-sized pieces; this not only makes for easier serving but also allows each layer to marry together beautifully. Spread about 4 cups of this crisp, refreshing lettuce evenly across the bottom. This first layer is crucial because it acts as a crunchy foundation that helps to absorb some of the moisture from the layers above, ensuring everything stays intact and delicious.
Next up are the grape tomatoes! Halve them lengthwise and seed them if you prefer a less watery layer—this will prevent your salad from becoming soggy as it sits in the fridge. As you layer these vibrant red beauties on top of the lettuce, think about how their juicy sweetness will contrast with the creamy dressing and savory bacon. This combination not only adds a pop of color but also a delightful freshness that balances out all those rich flavors we’re working with. Don’t rush this step; take your time arranging them neatly because presentation matters! A well-layered salad is like a work of art that beckons everyone to dig in.
Step 6: The Heart of the Salad
After you’ve laid down your tomatoes, it’s time for the stars of our show—the hard-boiled eggs! Roughly chop six large eggs and sprinkle them generously over the tomatoes, taking care to distribute them evenly. The eggs provide not just protein but an absolutely luscious creaminess that enriches every bite you take. They meld beautifully with both the dressing and cheese above, creating a silky mouthfeel that is utterly intoxicating. You’ll find that this layer also plays an essential role in texture; it adds a soft component amidst all those crunchy veggies.
Remember, when making hard-boiled eggs, timing is everything! If they’re undercooked, you’ll end up with a gooey center; if overcooked, they might develop that unsightly greenish ring around the yolk—a sign they’ve been sitting too long in boiling water. Aim for about nine minutes in boiling water for perfectly cooked eggs; then cool them quickly in ice water to stop cooking further. Trust me on this simple yet transformative technique—it makes a world of difference!
Step 7: Peas Please!
Once you’ve arranged your eggs with love and care, we can move on to one of my favorite components—the peas! This may sound simple, but trust me when I say these little green gems pack a flavor punch and bring such vibrancy to our dish. Use one full bag (16 ounces) of thawed frozen peas, drained well in a colander prior to layering so we avoid any excess moisture seeping into our salad—it’s an important detail many overlook!
Spread these peas generously over the chopped eggs; their subtle sweetness and bright color are not just visually striking but also provide an exciting burst of flavor when you dig into your salad later on. Do remember that thawing them before use helps maintain their lovely texture—nobody wants mushy peas ruining our masterpiece! Plus, it’s always rewarding to know these little guys are rich in vitamins and nutrients while keeping our salad light yet satisfying.
Step 8: Dressing It Up
Now comes one of my favorite parts—the dressing! Pour your lovingly whisked mayonnaise mixture evenly over the peas; don’t forget that this is where all those flavors will coalesce into something truly extraordinary. Using a spatula or back of a spoon, spread it gently across the top layer—the goal here is even coverage so every single bite has that creamy goodness without overwhelming any particular flavor.
This step is absolutely paramount because it binds all those fresh ingredients together while adding richness without being overly heavy. Remember, patience is key here; letting it sit for at least two hours—or even better overnight—allows flavors to deepen and meld together beautifully as they chill in harmony. You’ll find that once chilled, each layer becomes more vibrant while enhancing its taste dramatically—don’t rush this step! The waiting game pays off big time.
Final Touches for Your Perfect 7 Layer Salad
Step 9: The Grand Finale
To crown your creation, sprinkle freshly grated Cheddar cheese liberally over the dressing followed by that crispy bacon we set aside earlier—hello irresistible crunch! Picture how those golden cheese shreds melt into every crevice while contrasting perfectly against the crispness of bacon bits—a symphony of textures if there ever was one! This final touch adds not just flavor but visual appeal as well; who could resist digging into something so colorful?
Cover your layered beauty with plastic wrap and place it gently into the refrigerator for chilling—this phase truly lets all those ingredients flirt with each other before they hit your plate! Ideally, you want it resting there for at least two hours or even overnight if you’re planning ahead for a gathering or special occasion; I promise you won’t regret giving it that extra time. When you’re ready to serve, simply unveil this layered wonder at your next meal or potluck gathering—you’ll be met with gasps followed by smiles as everyone digs in!
And there you have it—the ultimate 7 Layer Salad that’s sure to become a cherished recipe in your home just like it has been in mine! Enjoy every bite knowing you’ve crafted something deliciously beautiful from scratch!
Storage and Enjoyment Tips for Your 7 Layer Salad
Now that you’ve lovingly layered your 7 Layer Salad, the real joy is just beginning! This dish is a celebration of textures and flavors, and it’s ready to grace your table with its stunning presentation. But let’s talk about what to do with any leftovers—if there are any! Trust me when I say this salad is as delightful the next day as it is fresh out of the fridge. The layers meld together beautifully, creating a symphony of taste that will have you going back for seconds (or thirds!).
Storing Leftover 7 Layer Salad
To ensure your 7 Layer Salad stays as vibrant and delicious as the moment you prepared it, it’s best to store any leftovers in an airtight container. A glass or plastic container with a tight-fitting lid will work wonders to keep those layers intact and fresh. If you happen to have any leftover salad, it can typically be kept in the refrigerator for about three days without losing its charm. However, I strongly recommend keeping the dressing separate if you’re storing it for more than a day; this helps maintain that crispness of the lettuce and avoids sogginess. After all, no one wants a limp salad! And don’t forget—if you want to avoid moisture from affecting your salad’s texture, adding a slice of bread on top can help absorb excess humidity. When you take it out after a day or two, expect those flavors to deepen; it’s like letting a fine wine breathe! Just give it a gentle toss before serving again for an equally satisfying experience.
Freezing Components for Later
If you find yourself with extra ingredients or simply want to prepare ahead of time, freezing is an excellent option! While the fully assembled salad isn’t exactly freezer-friendly due to the delicate nature of its components, many of its elements can be frozen individually. For instance, you can freeze portions of cooked bacon or even grated cheese—both will hold up beautifully in the freezer for about three months. To freeze properly, ensure these items are in airtight bags or containers so there’s no freezer burn ruining their flavors. When you’re ready to enjoy again, simply thaw them in the refrigerator overnight and layer them back into your salad masterpiece. How convenient is that? It allows you to whip up this delightful dish at a moment’s notice without sacrificing quality!
7 Layer Salad

Discover the vibrant and delicious 7 Layer Salad, a delightful combination of fresh ingredients and creamy dressing that will brighten up any meal. This colorful dish brings together layers of crisp Iceberg lettuce, juicy grape tomatoes, hearty hard-boiled eggs, sweet peas, and rich cheeses—all harmoniously topped with a luscious mayonnaise dressing. Perfect for potlucks, summer barbecues, or cozy dinners at home, this salad is not only visually stunning but also a treat for your taste buds. With its easy assembly and endless customization options, the 7 Layer Salad is sure to impress family and friends alike.
- Prep Time: 20 minutes
- Cook Time: None
- Total Time: 0 hours
- Yield: Serves approximately 8
- Category: Salad
- Method: Layering
- Cuisine: American
Ingredients
- 1 1/3 cup mayonnaise
- 1/4 cup sour cream
- 2 teaspoons white vinegar (or substitute)
- 1/2 teaspoon Kosher salt
- 1/3 cup grated Parmesan cheese
- 4 cups chopped Iceberg lettuce
- 2 cups halved grape tomatoes
- 6 large hard-boiled eggs, roughly chopped
- 1 (16-ounce) bag thawed frozen peas
- 1 1/2 cup freshly grated Cheddar cheese
Instructions
- In a medium mixing bowl, combine mayonnaise, sour cream, vinegar, salt, and Parmesan cheese. Whisk until smooth.
- In a trifle or casserole dish, layer the chopped Iceberg lettuce evenly at the bottom.
- Add the halved grape tomatoes on top of the lettuce layer.
- Sprinkle the chopped hard-boiled eggs over the tomatoes.
- Spread thawed peas evenly across the eggs.
- Pour the prepared dressing over the peas and spread it evenly.
- Top with freshly grated Cheddar cheese.
- Cover with plastic wrap and refrigerate for at least two hours or overnight before serving.
Nutrition
- Serving Size: 1 cup (240g)
- Calories: 320
- Sugar: 4g
- Sodium: 600mg
- Fat: 24g
- Saturated Fat: 7g
- Unsaturated Fat: 14g
- Trans Fat: 0g
- Carbohydrates: 20g
- Fiber: 3g
- Protein: 9g
- Cholesterol: 200mg