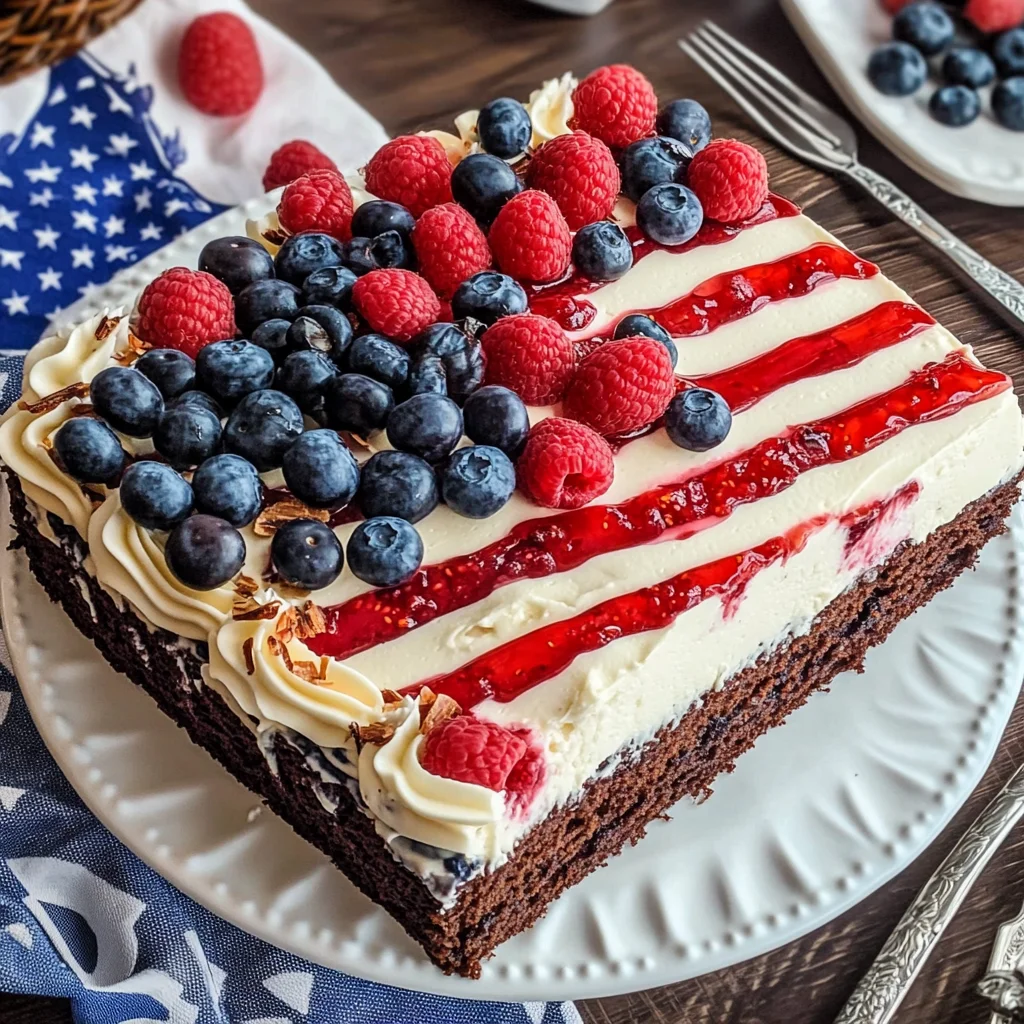
American Flag Cake
There’s something profoundly magical about a cake that captures the essence of celebration and togetherness, isn’t there? The American Flag Cake is not just a dessert; it’s a joyous symbol of summer gatherings and festive cheer. As the warm sun casts its golden rays and laughter fills the air, this cake stands proudly at the center of it all—its layers whispering stories of tradition while inviting us to innovate. Picture this: a moist, rich chocolate cake, draped in velvety cream cheese frosting, adorned with vibrant raspberries and blueberries. Each slice is like a canvas painted with red, white, and blue—sweet berries bursting with flavor against the backdrop of creamy bliss. Trust me when I say, this isn’t just any cake; it’s an experience waiting to unfold.
As we dive into this recipe for our American Flag Cake, let’s take a moment to reflect on why it resonates so deeply during our Independence Day celebrations. It’s more than just a feast for the eyes or a delightful treat for the palate; it’s a heartfelt tribute to our shared history, reminding us of the joy that comes from uniting friends and family around the table. This cake is perfect for those sunny afternoons spent grilling burgers or enjoying fireworks as dusk falls. And while it looks impressive with its patriotic flair, don’t shy away from making it! With just a bit of guidance and heart, you’ll create something truly extraordinary that will have everyone asking for seconds.
American Flag Cake: A Delicious Celebration of Summer
This American Flag Cake is an invitation to bring friends and family together in celebration. With its rich chocolate base and tangy cream cheese frosting—a combination that dances on your taste buds—it promises to be the showstopper at any gathering. And don’t worry if you’re feeling hesitant about decorating; I’ve got your back! We’ll walk through each step together, ensuring that your cake not only tastes divine but also looks as stunning as a summer sunset.
Ingredients:
Let’s embark on this culinary journey! Each ingredient plays an essential role in crafting our deliciously memorable American Flag Cake, so let’s explore what makes them special.
- 1 cup boiling water. This seemingly simple ingredient is crucial! By using boiling water in the batter along with cocoa powder, we unlock the full potential of chocolate’s flavor. It helps dissolve the cocoa completely, creating a smoother batter that enhances moisture and richness in our cake. Don’t skip this step; it’s where our chocolate truly comes alive!
- 3/4 cup natural unsweetened cocoa powder. Opting for natural cocoa powder gives us that deep, robust chocolate flavor without any added sweetness from Dutch-processed cocoa. When shopping, look for high-quality brands; they can make all the difference in taste. Its intense profile pairs perfectly with our sweet frosting later on.
- 1 tablespoon instant coffee granules. Here’s a secret: adding coffee elevates chocolate flavors to new heights! It deepens the taste without making the cake taste like coffee itself. Just make sure to use instant granules—regular brewed coffee would alter the liquid balance in our batter.
- 1/2 cup whole milk. This ingredient adds moisture and richness to our cake while contributing to its tender crumb structure. Whole milk ensures we get that beautiful balance between fat and liquids needed for baking success. If you prefer alternatives due to dietary needs, almond or oat milk can work well here too!
- 1 1/2 teaspoons pure vanilla extract. Vanilla has this wonderful way of enhancing other flavors subtly yet significantly; think of it as magic liquid gold! Always choose pure extract over imitation for a more profound flavor profile that brightens every bite.
- 2 cups all-purpose flour, plus additional flour for dusting pan. Flour is what gives structure to our cake—it holds everything together beautifully! Make sure it’s measured correctly by scooping it lightly into your measuring cup rather than packing it down tightly; too much flour can lead to dryness.
- 1 1/4 teaspoons baking soda. This leavening agent is non-negotiable! It reacts with acidic ingredients (like cocoa) to help our cake rise beautifully while giving it that light texture we crave. Check expiration dates regularly—old baking soda won’t give us those fluffy results we desire.
- 1/2 teaspoon salt. Salt is often overlooked but is absolutely paramount when baking—it enhances sweetness and balances flavors perfectly throughout every slice of cake.
- 2 sticks (1/2 pound) unsalted butter, softened plus additional butter for greasing pan. Softened butter creates tiny air pockets when creamed with sugar—this process is known as “creaming”—which leads us toward that light texture in baked goods we all adore! Ensure your butter is truly softened (not melted!) before starting; otherwise, you’ll miss out on achieving that airy base.
- 1 cup packed light brown sugar. Brown sugar brings moisture along with its rich caramel notes into this decadent creation—making every bite feel indulgent! The key here is to pack it firmly when measuring so you’re getting all its sweetness right.
- 1 cup sugar. While brown sugar contributes depth, granulated sugar helps create stability within our batter while also promoting browning during baking time—it’s like teamwork at its finest!
- 4 large eggs. Eggs bind everything together while also providing structure through their proteins as they cook—don’t underestimate their importance! Use room temperature eggs if possible; they incorporate more evenly into batters than cold ones straight from the fridge!
- 2 (8-ounce) packages cream cheese, at room temperature. This creamy delight forms the base of our luscious frosting—its tanginess beautifully balances out sweetness while ensuring an ultra-smooth texture when whipped up with butter later on!
- 2 sticks (1/2 pound) unsalted butter, at room temperature again! A repeat here because we need both butter types—the one for creaming into our batter earlier and this one set aside specifically for frosting purposes later down the line!
- 1 1/2 teaspoons pure vanilla extract (again!). We’re layering flavors here because who doesn’t love vanilla?!
- 1 1/2 cups confectioners’ sugar, sifted so no lumps find their way into frosting heaven! Sifting ensures smoothness which ultimately translates into perfect consistency whether piping or spreading onto cakes alike!
- 1 1/2 pints raspberries (about 3 cups total). These gorgeous little gems add freshness alongside bursts of tartness against rich sweetness—they’re truly essential components when bringing life onto our flag design!
- 1/2 pint blueberries (about 1 cup total). Blueberries are another delicious star player here—they offer subtle sweetness paired beautifully next door with those zesty raspberries creating harmony across each slice served up!
Equipment You’ll Need:
Ahh, now let’s talk about tools—the unsung heroes behind every successful bake! Having the right equipment not only streamlines your process but also makes creating something marvelous feel effortless.
- 13-by-9-inch metal baking pan – This size is perfect for our flag cake since it allows ample room to achieve an even bake across its surface area while providing enough depth for thick layers without spilling over edges during rising times.
- Stand mixer fitted with paddle attachment – Using a stand mixer saves time and energy during mixing phases because it does all heavy lifting—for example creaming butter versus manual whisking would take ages unless you’re looking for an arm workout instead!
- Pastry bag – This handy tool allows precision decorating capabilities when piping icing designs such as stars that mimic those seen upon flags themselves—it grants control over how much pressure applied leads toward desired shapes being formed effortlessly too once you’ve got practice under belt!
- Star-shaped pastry tip (such as Wilton #2110) – A must-have accessory paired alongside pastry bags if aiming towards achieving charming decorative effects—a star tip creates beautiful designs reminiscent of twinkling stars shining bright upon nighttime skies!
Now that we’ve gathered all necessary components let’s dive deeper into how these come together beautifully through preparation steps ahead…
Step 1: Prepping Your Oven & Pan
First things first—we need to set ourselves up for success by preheating our oven to 350°F (175°C). Positioning your oven rack in the middle ensures even heat distribution throughout baking process which translates directly into uniform results without burnt edges or gooey centers—a baker’s dream come true! Next up? Time to grease that trusty metal baking pan thoroughly using additional butter before lining bottom part either with wax paper or parchment paper (both work wonderfully). Remember: greasing helps prevent sticking issues later on when trying remove baked goods once cooled off entirely—a crucial step worth taking care not skipping out!
Step 2: Dissolving Cocoa Magic
In a medium-sized bowl set aside specifically meant just now whisk together boiling water alongside natural unsweetened cocoa powder plus instant coffee granules until smooth consistency achieved—that’s right folks we’re bringing forth some serious flavor intensity here thanks largely due these two ingredients working harmoniously hand-in-hand bringing forth richness unparalleled by anything else out there today trust me there aren’t many shortcuts available within world culinary delights beyond careful attention given during moments like these—this process creates foundation upon which all future steps build seamlessly atop resulting deliciousness promised ahead!
Step 3: Combining Dry Ingredients
In another medium bowl sift together flour along with baking soda plus salt until perfectly mixed together evenly distributed throughout mixture thereafter ready awaiting addition forthcoming wet counterparts—it may seem tedious however know full well doing so allows air circulation thus yielding lighter textures overall once baked meaning fluffy cakes await eager tasters ahead soon enough post assembly phase completed afterwards too—all part big picture plan unfolding nicely indeed please don’t rush through this vital segment please stay focused trusting intuition guiding actions taken here moving forward onward smoothly past small roadblocks encountered en route toward greatness achieved eventually down line waiting patiently until served finally family friends alike gathered round sharing joyful moments shared recalling memories forged through food created lovingly crafted hands involved wholeheartedly combined efforts surely result tangible rewards harvest reaped afterward enjoyed blissfully thereafter…
Step 4: Mixing Batter Bliss
Now shift gears back towards stand mixer fitted paddle attachment previously mentioned earlier combining softened stick(s) unsalted butter beforehand alongside packed light brown sugar then regular granulated type beating mixture medium speed until fluffy lightened color appears visibly noticeable approximately three minutes elapsed time passing quickly indeed next? One-by-one introduce large eggs allowing full incorporation occur between additions ensuring nothing clumpy remains behind lingering inside mixing bowl before reducing speed low adding previously prepared dry flour+cocoa mixtures alternating batches begin/end flour mixture culminating final product arriving close proximity desired end goal realization finally dawning upon waiting hearts eager anticipation growing evermore stronger soon enough no doubt whatsoever involved therein…
And there you have it—the first few steps laid out lovingly just like one would do when sharing secrets passed along generations past reaching present day today reminding us why cooking matters deeply connects people bridging gaps found between cultures backgrounds alike fostering relationships built around food enjoyed together celebrating life itself fully embraced wholeheartedly always beyond mere sustenance alone… Stay tuned—we’ll continue exploring more steps bringing forth glorious creations produced within kitchen realms shortly thereafter next article installment forthcoming eagerly anticipated promise delivered soon enough!
Step 5: Whisking Up a Chocolate Symphony
Now that we have our ingredients prepped, let’s dive into the heart of our cake—the chocolate batter! In a medium bowl, take the boiling water and whisk together the natural unsweetened cocoa powder and instant coffee granules until they meld together smoothly. This step is truly magical, as the boiling water helps to bloom the cocoa, unlocking its rich flavor and creating an intense chocolate experience that will elevate your cake beyond the ordinary. The addition of instant coffee isn’t just a nod to caffeine lovers; it enhances the chocolate’s depth, giving it that extra oomph that will leave your guests guessing about your secret ingredient!
Next, you’ll want to whisk in the whole milk and pure vanilla extract. This combination not only adds moisture but also contributes to a beautifully balanced sweetness. It’s crucial to mix well here—taking your time ensures that everything is evenly incorporated. You should end up with a silky-smooth mixture, reminiscent of liquid gold glistening in the bowl. Set this delightful concoction aside for now; we’ll come back to it shortly.
Step 6: The Perfect Dry Mix
While our chocolate mixture cools slightly, let’s tackle the dry ingredients—a vital foundation for any great cake! In another medium bowl, sift together two cups of all-purpose flour, baking soda, and salt. Sifting is an essential technique here; it aerates the flour and removes any lumps that might disrupt our batter’s smooth texture. Think of this process as creating a featherlight blanket for our cake—ensuring each slice is tender and fluffy.
It’s important to use fresh baking soda; old or expired leavening agents can produce lackluster results—no one wants a dense cake on such a festive occasion! Once sifted, set this bowl aside because we’re about to bring all these elements together in glorious harmony.
Step 7: Creaming for Fluffiness
Now comes one of my favorite parts: creaming the butter and sugars! In the bowl of your stand mixer fitted with the paddle attachment, combine two sticks of softened unsalted butter with one cup of packed light brown sugar and one cup of granulated sugar. Beat them together on medium speed for about three minutes until you achieve a light and fluffy consistency. This step is absolutely paramount because creaming incorporates air into the butter. That air will expand during baking, creating those lovely little pockets in your cake that make each bite so profoundly satisfying.
As you beat this mixture, you’ll notice it transforms from a dense paste into something airy and almost cloud-like—a sign that you are on track! Now add each egg one at a time, mixing well between additions. The eggs not only provide moisture but also bind everything together beautifully. After all four eggs are added, reduce your mixer speed to low and gradually incorporate both the flour mixture and chocolate mixture in alternating batches—beginning and ending with the flour mix. Don’t rush this step; taking your time ensures everything blends seamlessly without overmixing, which could lead to a tougher cake.
Step 8: Baking Your Masterpiece
Once your batter is ready—and trust me when I say it will look like pure decadence—it’s time to transfer it into our prepared baking pan. Pour it into your greased 13- by 9-inch metal pan and gently smooth out the top with a spatula to create an even layer. This ensures uniform baking—a key factor for achieving that perfect rise throughout.
Place your pan in the preheated oven set at 350°F (175°C). Now comes the waiting game—bake for 35 to 40 minutes or until you insert a wooden toothpick into the center, and it comes out clean (or with just a few moist crumbs). It’s important to keep an eye on it after about 30 minutes; every oven can vary slightly in temperature, so watch for signs like edges pulling away from the pan or a slight spring-back when lightly pressed in the center—these cues tell you it’s ready! Once baked to perfection, allow your masterpiece to cool in its pan on a rack for about ten minutes before carefully inverting it onto another rack to cool completely.
Final Touches
Step 9: Creating Our Creamy Canvas
With our cake now cooled completely (and oh-so-ready for frosting), let’s whip up that creamy dream topping—the cream cheese frosting! In your stand mixer with the paddle attachment again, combine two packages of room-temperature cream cheese with two sticks of softened unsalted butter. Beat them on medium speed until you achieve an irresistibly creamy texture—this should take about three to five minutes. You want it smooth yet substantial enough to hold its shape when piped onto our flag design.
Next up is vanilla extract—that fragrant burst of flavor! Mix it in well before gradually adding one-and-a-half cups of sifted confectioners’ sugar in three batches while keeping your mixer on low speed initially. Trust me; adding sugar too quickly can result in an avalanche of sweet dust that will coat your kitchen counter instead of staying where you want it—in that lovely bowl! Once fully incorporated, increase speed to medium-high again until everything is perfectly blended into what I can only describe as frosting heaven! To enhance its spreadability while giving us some time management benefits later on, chill this creamy treat in the refrigerator for about thirty minutes before we assemble our flag cake.
Step 10: Decorating With Patriotism
Now comes perhaps my favorite moment—the decoration! Using about two-and-a-half cups of your chilled frosting, generously frost both the top and sides of your cooled cake using an offset spatula or knife—aiming for an even layer without leaving bare patches behind (you want every guest who sees this creation to be wowed!).
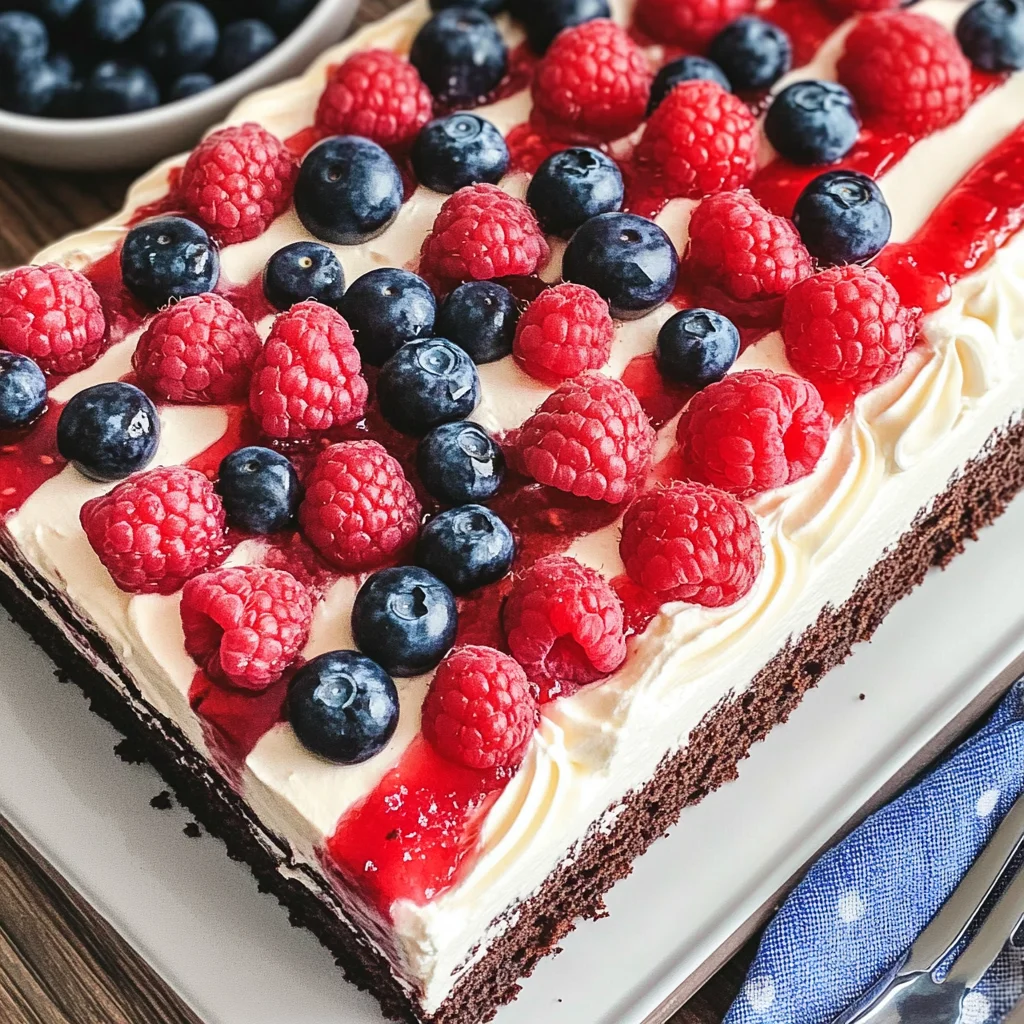
To represent our stars and stripes proudly, outline a rectangle measuring approximately four-and-a-half inches long by three-and-a-half inches wide at the top left corner of this frosted canvas using either a toothpick or small knife—this reserved section will showcase those beautiful blueberries later on.
Starting from the longer side closest to you, pipe along that top edge with more frosting before arranging two horizontal rows of luscious raspberries directly above—it adds such vibrancy! Continue piping lines above each row as you repeat this process until all rows are complete except for our reserved blueberry section. Finally, fill that area lovingly with rows upon rows of plump blueberries arranged neatly—it’s these thoughtful details that truly make our American Flag Cake so special!
So there you have it—a stunning American Flag Cake that’s not only visually striking but also bursting with flavor thanks to its delightful blend of chocolate richness complemented by tangy cream cheese frosting and fresh summer berries. Slice into this beauty and watch as everyone gathers around—it’s bound to become an annual favorite at every celebration! Enjoy each delicious bite while soaking up those joyful moments surrounded by loved ones; after all, that’s what cooking—and life—is really all about!
Storage and Enjoyment Tips for Your American Flag Cake
Now that you’ve lovingly crafted your American Flag Cake, it’s time to bask in the glory of your creation! This cake is not just a feast for the eyes but also a delight for the palate. But what happens if you have some left over? Fear not! Here are some tips to ensure your cake stays as fresh and delicious as the day you made it.
Storing Leftover American Flag Cake
To keep your American Flag Cake in tip-top shape, you’ll want to store it in an airtight container to lock in that moist, chocolatey goodness. If you don’t have one handy, wrapping it tightly in plastic wrap will work wonders too. Make sure to keep it at room temperature if you’re planning to enjoy it within a couple of days; however, if you’re looking at a longer storage period, popping it into the refrigerator is best. This patriotic masterpiece can stay fresh for about 3-4 days when stored properly. Pro tip: Adding a slice of bread inside the container can help maintain moisture and prevent the cake from drying out—it’s like giving your cake a cozy little blanket! After a day or two, you might notice the flavors becoming even more harmonious as they meld together beautifully. When you’re ready to serve, simply slice away and enjoy it chilled or let it come to room temperature for that perfectly tender bite.
Freezing Components for Later
If you find yourself with extra cake—or perhaps you want to prepare ahead for a future celebration—freezing is an excellent option! To freeze your American Flag Cake effectively, first ensure it’s completely cooled before wrapping it tightly in plastic wrap and then aluminum foil to prevent freezer burn; this dual-layer protection is absolutely key. The cake will keep frozen for up to 2-3 months while still tasting divine when thawed! When you’re ready to indulge again, simply transfer it from the freezer to the fridge overnight, allowing it to thaw slowly while preserving its texture and flavor. This prep-ahead trick is fantastic because it allows you the convenience of having an eye-catching dessert ready whenever you want—just imagine pulling out this stunning cake on short notice!
With these storage tips in hand, I hope you’re excited about savoring every last crumb of this American Flag Cake!
American Flag Cake
American Flag Cake is a stunning centerpiece for any summer gathering, combining rich chocolate layers with creamy frosting and vibrant berries. This festive dessert captures the spirit of celebration and togetherness, making it perfect for picnics, barbecues, or Independence Day festivities. Each slice reveals a moist chocolate cake topped with luscious cream cheese frosting and fresh raspberries and blueberries, creating a delightful burst of flavors that will have everyone coming back for more. It’s not just a cake; it’s an experience that brings friends and family together to create lasting memories.
- Prep Time: 30 minutes
- Cook Time: 40 minutes
- Total Time: 1 hour 10 minutes
- Yield: Approximately 12 servings 1x
- Category: Dessert
- Method: Baking
- Cuisine: American
Ingredients
- 1 cup boiling water
- 3/4 cup natural unsweetened cocoa powder
- 1 tablespoon instant coffee granules
- 1/2 cup whole milk or almond/oat milk
- 1 1/2 teaspoons pure vanilla extract
- 2 cups all-purpose flour
- 1 1/4 teaspoons baking soda
- 1/2 teaspoon salt
- 2 sticks unsalted butter, softened
- 1 cup packed light brown sugar
- 1 cup granulated sugar
- 4 large eggs
- 2 (8-ounce) packages cream cheese, at room temperature
- 1 1/2 cups confectioners' sugar
- 1 1/2 pints raspberries (about 3 cups)
- 1/2 pint blueberries (about 1 cup)
Instructions
- Preheat oven to 350°F (175°C). Grease a 13-by-9-inch metal baking pan.
- In a medium bowl, whisk boiling water with cocoa powder and coffee until smooth. Set aside.
- In another bowl, sift together flour, baking soda, and salt.
- In a stand mixer, cream softened butter with light brown and granulated sugars until fluffy. Add eggs one at a time, mixing well after each addition.
- Alternate adding the dry ingredients and cocoa mixture into the creamed butter until well blended.
- Pour batter into the prepared pan and bake for 35–40 minutes or until a toothpick comes out clean.
- Let cool before frosting with cream cheese frosting made from whipped cream cheese, butter, vanilla extract, and confectioners' sugar.
- Decorate with raspberries and blueberries to create your American flag design.
Nutrition
- Serving Size: One slice (approximately 120g)
- Calories: 380
- Sugar: 42g
- Sodium: 310mg
- Fat: 16g
- Saturated Fat: 10g
- Unsaturated Fat: 5g
- Trans Fat: 0g
- Carbohydrates: 54g
- Fiber: 2g
- Protein: 5g
- Cholesterol: 85mg