Apple Samoas
There’s something so enchanting about the combination of flavors and textures that unfold when you bite into a beautifully crafted dessert. It’s like taking a stroll through an orchard, where the crispness of the air dances with the sweetness of ripe apples, enveloped in a luscious blanket of rich almond butter and coconut that evokes memories of cozy fall afternoons. That’s exactly what my Apple Samoas bring to the table—a delightful experience that transcends mere nourishment and transforms it into something deeply comforting and joyous. With just five simple ingredients, this recipe is not merely about food; it’s about crafting moments of happiness that you can share with friends and family, or even just indulge in by yourself as a little treat at the end of a long day.
I’ve always been captivated by the idea of reinventing traditional snacks into healthier versions without sacrificing flavor. The Apple Samoas are a perfect illustration of this—crunchy apple slices topped with a creamy, dreamy coconut almond butter mixture, all drizzled in a velvety layer of chocolate. It’s an utterly intoxicating symphony of flavors that will leave your taste buds singing! Whether you’re hosting friends for a casual gathering or simply seeking to satisfy your own sweet tooth during movie night, these apple samoas are versatile enough to fit any occasion. They’re not just a snack; they’re an invitation to celebrate the season, embracing everything that makes fall special—warmth, togetherness, and the irresistible allure of fresh produce.
Apple Samoas: A Delightfully Healthy Treat
Let me take you on this culinary adventure where we transform humble apples into something truly extraordinary! These Apple Samoas are not just quick to whip up but also incredibly satisfying—perfect for those who crave something sweet yet wholesome. So grab your favorite apple variety and let’s get started on crafting this deliciously healthy treat!
Ingredients:
As we embark on this delightful journey, let’s take a moment to appreciate each ingredient we’ll be working with today. Each element plays its role in creating those mouthwatering Apple Samoas that I know you’ll love.
- 1 apple (Honeycrisp are my fave, but I also like Pink Lady). Choosing the right apple is absolutely paramount in this recipe! Honeycrisp apples offer an exceptional balance of sweetness and tartness with a crisp texture that’s simply divine. Pink Lady apples also bring their unique flavor profile to the mix—a beautiful marriage between juicy sweetness and refreshing tartness. When selecting your apples, look for ones that are firm to the touch with vibrant skin; avoid any soft spots or bruises because those won’t hold up as well when sliced.
- ⅓ cup unsweetened shredded coconut. This ingredient is crucial for adding that tropical flair while providing healthy fats and fiber. When you use unsweetened shredded coconut, you’re ensuring that no added sugars interfere with the natural sweetness from our apple slices. This adds both flavor and texture—each bite brings that delightful chewiness which complements the crunchiness of the apple perfectly! If you’re feeling adventurous or looking for alternatives, you could consider using flaked coconut or even finely chopped nuts for a different twist.
- 3 Tablespoons almond butter or cashew butter (or seed butter of choice). Nut butters are like liquid gold in this recipe! They offer creaminess along with protein and healthy fats that help keep you satisfied longer. Almond butter has a subtly sweet flavor that pairs wonderfully with coconut and apple, while cashew butter is rich and buttery smooth—absolutely indulgent! If you’re opting for seed butter due to allergies, sunflower seed or pumpkin seed butter works marvelously too; they provide similar creaminess while adding their own unique nutty notes.
- ½ Tablespoon maple syrup. This golden elixir adds just enough sweetness to enhance our mixture without overpowering it—it’s truly magical! I love using pure maple syrup because it carries such depth; its warm notes remind me of cozy mornings spent sipping hot beverages while watching the leaves change outside my window. Just remember: a little goes a long way here; trust me on this one—it’s non-negotiable!
- 2 Tablespoons chocolate chips. Ahh yes—the pièce de résistance! Chocolate brings everything together with its rich flavor profile that’s simply irresistible against the backdrop of our fruity base and nutty topping. I recommend using dark chocolate chips since they strike a beautiful balance between sweet and bitter flavors, making them perfect for drizzling over our creations. You can also opt for dairy-free chips if you’re looking for vegan options—or even carob chips if you want an alternative twist!
- ½ teaspoon coconut oil. This ingredient serves as our secret weapon when it comes to melting those chocolate chips smoothly—it helps achieve that glossy sheen we all adore when drizzling over our treats! Coconut oil solidifies at cooler temperatures but melts beautifully when heated; it’s important for creating that luscious drizzle we want on our Apple Samoas.
Equipment You’ll Need:
Having the right tools makes your cooking experience so much smoother—and trust me, it can make all the difference in achieving success in your kitchen adventures! While these tools aren’t ingredients themselves, they act as essential partners in crafting something truly wonderful.
- Cutting board – A sturdy cutting board is essential when slicing your apples; it provides stability so you can cut safely without fear of slipping or wobbling around.
- Sharp knife – Using a sharp knife not only ensures clean cuts through your apple but also makes slicing easier and more enjoyable; dull knives can lead to accidents more easily!
- Mixing bowl – A medium-sized mixing bowl is perfect for combining your coconut mixture without making too much mess; choose one that’s easy to handle as you’ll be mixing until fully combined.
- Parchment paper – Lining your baking sheet with parchment paper creates an easy cleanup situation while preventing sticking during freezing time—trust me; you’ll thank yourself later!
- Microwave-safe bowl – This will come in handy for melting your chocolate chips alongside coconut oil; ensure it’s big enough so there’s room for stirring without splattering!
Preparing the Apple Samoas
Step 1: Slice Your Apples
First things first—we need to prepare those beautiful apples! Start by placing one apple on your cutting board; using your sharp knife, carefully slice it into ¼-inch thick rounds. Make sure you core them before slicing because no one wants biting into seeds while enjoying their delicious treat! I usually end up getting about three to four slices per apple depending on its size—just enough to create ample servings for sharing or savoring solo later on.
Step 2: Create Your Coconut Mixture
While those lovely slices await their turn in the limelight, let’s whip up our sumptuous topping! In your mixing bowl, combine ⅓ cup of unsweetened shredded coconut with 3 tablespoons of almond (or cashew) butter along with half a tablespoon of maple syrup—what happens next is pure magic! Using either a spatula or spoon (whichever feels comfortable), mix everything together until fully combined—the texture should be thick yet spreadable like frosting. Don’t rush through this step—take time here because achieving consistency allows us to pile on generous amounts atop each apple slice!
Step 3: Top Those Slices!
Now comes one of my favorite parts—the assembly! Place each sliced apple onto parchment paper laid out neatly on your counter or workspace (this keeps things tidy). Using either an offset spatula or spoon again (feel free to get creative!), generously scoop out portions from our glorious coconut mixture onto each slice—don’t skimp here! Aim for an even distribution across all slices because every bite deserves equal love and attention!
Step 4: Melt Your Chocolate
Alright friends, we’re nearing completion! Now grab yourself that microwave-safe bowl along with those chocolate chips alongside half a teaspoon of coconut oil—we’re ready to create our decadent drizzle! Pop them into the microwave heating them up in increments of about 15 seconds at first so we avoid burning anything (it happens faster than you’d think!). Stir after each interval until completely melted—that glossy sheen we’ve been dreaming about will soon appear before us!
With these steps laid out clearly before us—as well as plenty more excitement awaiting ahead—I hope you’re feeling inspired and eager to dive into making these Apple Samoas yourself soon! Trust me when I say once you’ve tasted them firsthand there’ll be no turning back…
Creating Your Delicious Apple Samoas
Step 5: The Art of Topping with Coconut Bliss
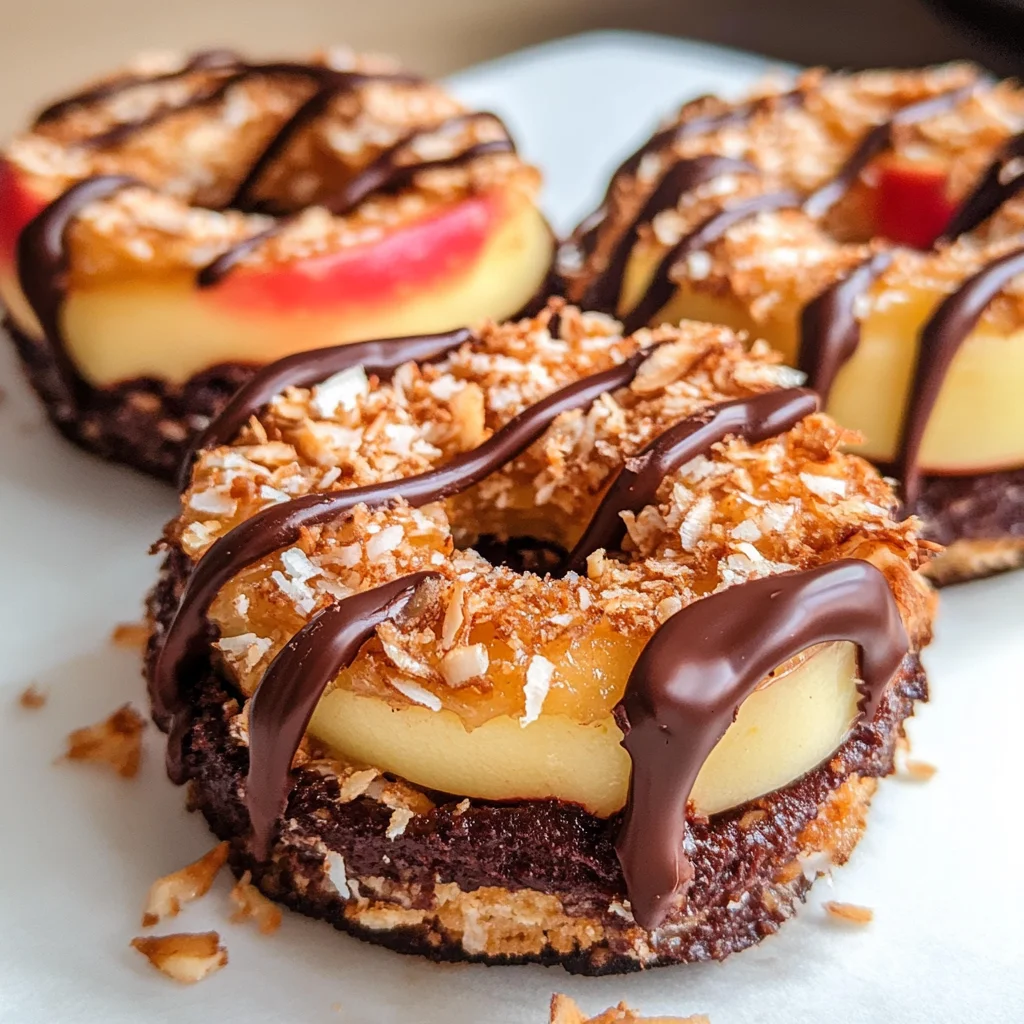
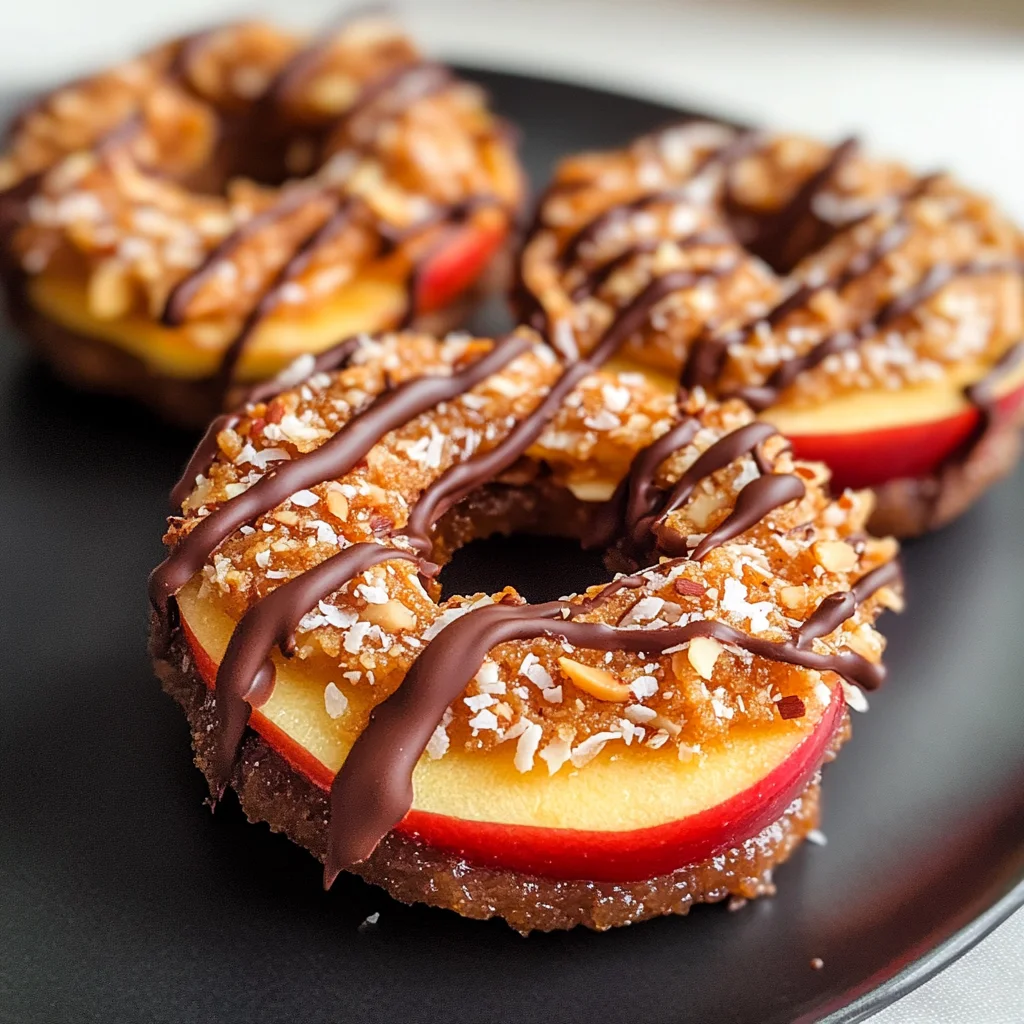
Now that your apple slices are neatly lined up on that parchment paper—looking like little canvases just waiting for a masterpiece—you’ll want to create the coconut almond butter topping that truly makes these Apple Samoas sing. In a medium bowl, combine ⅓ cup of unsweetened shredded coconut, 3 tablespoons of almond butter (or your chosen nut or seed butter) and ½ tablespoon of maple syrup. The almond butter serves as a creamy, rich base that not only adds flavor but creates a luscious texture that binds everything together. As you mix, you’ll notice how the syrup brings a hint of sweetness reminiscent of autumn afternoons, while the coconut adds both chewiness and that delightful tropical flair.
When combining these ingredients, take your time to ensure they’re fully integrated; you want every scoop to have that perfect balance of flavors. Trust me on this! If the mixture is too crumbly, consider adding just a splash more maple syrup until it holds together beautifully. This step is crucial because it ensures each bite is bursting with deliciousness rather than being dry and lackluster. Once mixed, use a spoon or even your fingers—who doesn’t love getting hands-on in the kitchen?—to generously dollop this heavenly coconut concoction onto each apple slice. Aim for about one heaping tablespoon per slice, allowing it to cascade down the sides like a cozy blanket.
Step 6: Melting Chocolate for the Perfect Drizzle
Now, let’s move on to one of the most exciting parts before we get to enjoy our culinary creation—the chocolate drizzle! For this, you’ll need to melt 2 tablespoons of chocolate chips mixed with ½ teaspoon of coconut oil in a microwave-safe bowl. Why coconut oil? Well, it serves as a magical elixir here—not only does it help the chocolate melt smoothly, but it also adds a subtle hint of coconut flavor that beautifully complements our topping. Start by microwaving your chocolate chips and coconut oil in short bursts—about 30 seconds at a time—stirring in between until smooth and glossy.
This melting process is where patience really pays off; don’t rush this step! If overheated, chocolate can seize up in an unfortunate turn of events, transforming your velvety treat into a gritty mess instead. So stir gently and watch as those chips gradually morph into liquid gold! Once melted and silky smooth, use a spoon or a piping bag to drizzle this decadent chocolate over each topped apple slice. Picture those luscious ribbons cascading down; it’s an art form in itself! After all those beautiful layers come together, pop these beauties into the freezer for about 5-10 minutes until the chocolate firms up nicely.
Step 7: The Freezing Finale
While we wait for our Apple Samoas to chill out in the freezer—a transformative step indeed—it’s essential to understand why this brief respite is necessary. Chilling not only allows the chocolate coating to solidify into that dreamy texture we all adore but also helps meld all those incredible flavors together. Think about it: when you bite into one of these treats after they’ve had some time in the cold embrace of your freezer, you’ll experience an explosion of contrasting textures—the crispness of fresh apple meets the chewy coconut-almond topping and finishes with that smooth chocolate drizzle.
Let’s talk timing; I recommend checking them at around the five-minute mark. You want them firm but not overly frozen; just enough so that when you take a bite, they hold their structure beautifully without losing any freshness from the apple underneath. As you remove them from the freezer, allow yourself a moment to admire their beauty—those glistening drizzles are nothing short of artistry!
Step 8: Plating Your Masterpiece with Love
Now comes my favorite part—the grand reveal! Carefully lift each apple samoas from the parchment paper; I promise you they’ll slide off effortlessly if you’ve lined your tray correctly. Arrange them on a beautiful platter or even individual plates for an extra special touch when serving guests or family members who may just be lucky enough to join you in this delicious adventure!
As you plate these treats, consider garnishing with additional shredded coconut or perhaps even crushed nuts for an added visual appeal and texture contrast if you desire. Trust me when I say presentation makes all the difference—it’s like putting on that final accessory before heading out! And don’t forget to take a moment for yourself here; inhale those heavenly aromas wafting up from your creations because you’ve earned this joy after all your hard work.
Final Touches: Enjoying Your Apple Samoas!
Once plated and ready to serve, gather everyone around; I guarantee they won’t be able to resist diving in! These Apple Samoas are not just snacks; they’re conversation starters filled with warmth and nostalgia—not unlike memories made during family gatherings over shared treats baked from love. Each bite offers something profoundly satisfying—a sweet reminder of fall’s arrival wrapped up in vibrant flavors.
So go ahead and enjoy your labor of love! Savor every morsel as it dances on your tastebuds—this is what cooking is all about: connection through food. And remember, whether it’s during chilly evenings or festive occasions, these Apple Samoas will always be there to warm hearts and satisfy cravings alike!
Storage and Enjoyment Tips for Your Apple Samoas
Now that you’ve created these delightful Apple Samoas, I can hardly contain my excitement as I think about the joy they bring! Trust me when I say that these treats are not just a fleeting moment of happiness; they can be savored over time if stored properly. Whether you’re diving into them right away or saving some for later, knowing how to keep them fresh will ensure each bite is just as delicious as the first. With just a few simple tips, you can enjoy the sweet, nutty flavors of your Apple Samoas whenever your heart desires!
Storing Leftover Apple Samoas
When it comes to storing leftover Apple Samoas, the right container is key! I recommend using an airtight container to keep those delectable flavors locked in. As for storage, placing them in the refrigerator is ideal; this helps maintain their freshness while also prolonging their shelf life. You can typically expect your Apple Samoas to stay good for about 2-3 days—though I assure you they might not last that long because they’re so scrumptious! To maintain their quality, consider placing a slice of bread inside the container; this little trick helps absorb excess moisture and keeps the apple slices crisp. After a day or two in the fridge, you’ll find that while the texture may soften slightly, each bite will still be profoundly satisfying with that glorious blend of coconut and almond butter. When you’re ready to indulge again, simply pull them out and enjoy as is, or even pop them in the microwave for a few seconds if you prefer them warm—just don’t rush this step; allow those flavors to meld back together!
Freezing Components for Later
If you want to stock up on your Apple Samoas in advance—what a fantastic idea! Freezing them is not only easy but super convenient too. To freeze properly, I suggest laying the assembled apple slices on a baking sheet lined with parchment paper first. This way, they won’t stick together as they freeze; once solid, transfer them into a freezer-safe bag or container. These frozen delights can be kept for about 1-2 months without losing their charm. When you’re ready to enjoy one from frozen, there’s no need to thaw; just drizzle on some melted chocolate before serving! This makes for an incredibly quick treat when unexpected guests arrive or when your sweet tooth calls at an ungodly hour! The convenience factor here is absolutely paramount—you’ll always have a healthy indulgence right at your fingertips.
Apple Samoas

Apple Samoas are a delightful, healthy treat that combines the natural sweetness of apples with the rich creaminess of almond butter and the tropical flair of coconut. These easy-to-make snacks require just five simple ingredients and are perfect for sharing at gatherings or enjoying solo as a comforting dessert. Each bite delivers a satisfying blend of textures, from the crisp apple to the chewy coconut and silky chocolate drizzle. Ideal for fall, these treats embody warmth and joy, making them an irresistible addition to your snack repertoire.
- Prep Time: 15 minutes
- Cook Time: 5 minutes
- Total Time: 20 minutes
- Yield: Approximately 4 servings (8 slices) 1x
- Category: Dessert
- Method: No-bake
- Cuisine: American
Ingredients
- 1 apple (such as Honeycrisp or Pink Lady)
- ⅓ cup unsweetened shredded coconut
- 3 tablespoons almond butter (or seed butter of choice)
- ½ tablespoon maple syrup
- 2 tablespoons chocolate chips
- ½ teaspoon coconut oil
Instructions
- Slice the apple into ¼-inch thick rounds, ensuring you core them first.
- In a mixing bowl, combine unsweetened shredded coconut, almond butter, and maple syrup. Mix until fully combined.
- Place apple slices on parchment paper and generously top each slice with the coconut mixture.
- Melt chocolate chips with coconut oil in a microwave-safe bowl in short increments until smooth.
- Drizzle melted chocolate over topped apple slices and freeze for 5-10 minutes until set.
Nutrition
- Serving Size: 2 apple slices (75g)
- Calories: 140
- Sugar: 10g
- Sodium: 5mg
- Fat: 7g
- Saturated Fat: 3g
- Unsaturated Fat: 4g
- Trans Fat: 0g
- Carbohydrates: 18g
- Fiber: 3g
- Protein: 3g
- Cholesterol: 0mg