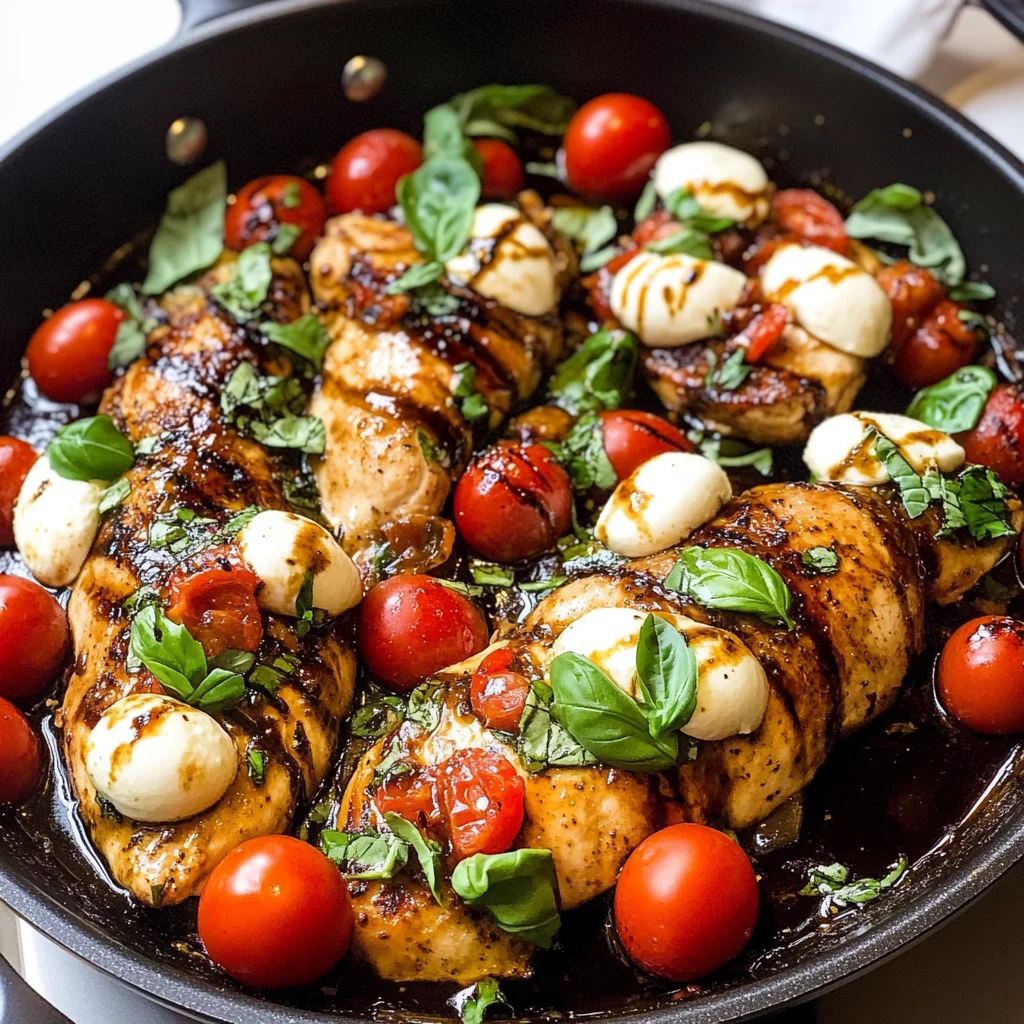
Balsamic Glazed One Pan Chicken
One of the most profound joys in life, for me, has always been gathering around the dinner table with loved ones, sharing stories and laughter over a plate of something delicious. Food isn’t just sustenance; it’s a language that speaks to our hearts and memories. The aroma of my Balsamic Glazed One Pan Chicken wafting through the house feels like a warm embrace, wrapping around us as we settle into our evening rituals. It’s a dish that transcends the everyday hustle, offering up a symphony of flavors and textures that beckon you to slow down and savor each bite. Imagine tender chicken bathed in a tangy balsamic glaze, mingling beautifully with juicy grape tomatoes and creamy mozzarella—each mouthful is an experience, not just a meal.
What I adore about this recipe is its simplicity paired with elegance—an effortless one-pan wonder that allows you to focus on what truly matters: connecting with those you love. As the chicken cooks in the oven, releasing its savory juices and mingling with the bright acidity of balsamic vinegar and sweetness of honey, I promise you’ll find yourself enchanted. The vibrant colors of the fresh ingredients are not only visually appealing but also provide a medley of nutrients that nourish both body and soul. It’s perfect for any night of the week when you crave something quick yet extraordinary—a simple weeknight dinner that feels celebratory rather than routine.
Balsamic Glazed One Pan Chicken: A Flavorful Escape
Let’s dive into creating this wonderful dish together! Cooking should always feel like an adventure, and I can’t wait for you to embark on this one-pan journey with me. The beauty of this Balsamic Glazed One Pan Chicken lies in its ease; it’s as if we’re inviting all those delightful flavors to dance together without fuss—just pure culinary joy.
Ingredients:
As we prepare for this culinary adventure, let’s talk about the star players in our kitchen today—the ingredients. Each one contributes uniquely to the flavor profile and overall experience of our dish, so let’s treat them with the respect they deserve.
- 1/3 cup balsamic vinegar. This liquid gold is the heart of our glaze—it adds depth and complexity that elevates our chicken from ordinary to extraordinary. When selecting balsamic vinegar, look for high-quality options that are thick and syrupy rather than overly acidic; they will offer a sweeter balance against the savory notes in our dish. Balsamic vinegar’s rich flavor is enhanced by cooking it down slightly, which brings out its natural sweetness while balancing the acidity perfectly.
- 2 Tbsp. honey. Ah, honey—nature’s sweetest nectar! Its role here is twofold: it acts as a sweetener to complement the tanginess of balsamic vinegar while also helping create that beautiful glaze we’re looking for. Honey not only enhances flavor but also helps achieve that gorgeous caramelization when cooking—a crucial factor in achieving depth in any dish. Always opt for raw or pure honey if possible; it has more nuanced flavors compared to processed versions.
- 2 Tbsp. oil (such as avocado or olive oil). Oil isn’t merely a backdrop here; it plays an essential role in sautéing our chicken to perfection while allowing it to develop that lovely golden-brown crust we all crave. Avocado oil is fantastic due to its high smoke point and neutral flavor, making it ideal for high-heat cooking without compromising taste or health benefits. Olive oil can also be used for its rich flavor profile; just ensure it’s suitable for sautéing at medium-high heat.
- 2 garlic cloves, minced. Garlic is like magic dust in cooking—it infuses everything with an aromatic warmth that’s utterly intoxicating! Fresh garlic provides bold flavor notes that enhance our glaze beautifully; it’s essential not to skip this step! Ensure your garlic is minced finely so it distributes evenly throughout the sauce, releasing its pungent goodness that pairs so well with balsamic vinegar.
- 1 tsp. Italian seasoning. This blend encapsulates all those classic herbaceous flavors—think oregano, basil, thyme—which transport you straight to Italy with every bite! Italian seasoning adds layers of taste without having to measure out individual herbs—how convenient is that? Feel free to adjust based on your preference; fresh herbs can be swapped in if you’re feeling adventurous!
- 1 Tbsp. Dijon mustard. A dollop of Dijon mustard brings creamy richness and a hint of sharpness that’s absolutely paramount in balancing out sweetness from both honey and balsamic vinegar. It ties everything together beautifully while adding depth without overpowering other flavors—a true team player!
- 8 oz. grape tomatoes, halved. These little bursts of sunshine add color and freshness while their natural sugars caramelize during roasting, amplifying their sweetness within our dish! When selecting tomatoes, choose firm ones without blemishes for optimal juiciness—they will create a stunning contrast against our savory elements.
- 8 oz. fresh mozzarella balls (ciliegine or pearls). Oh cheese lovers rejoice! Fresh mozzarella adds creaminess and richness that’s utterly satisfying alongside tangy tomatoes and succulent chicken. Opt for high-quality mozzarella packed in water; it will melt beautifully without becoming rubbery during baking.
- 2 Tbsp. finely chopped fresh basil. Fresh basil offers an aromatic garnish that uplifts every bite—you’ll want this fragrant herb sprinkled generously throughout your dish! Look for vibrant green leaves without browning or wilting; their aroma should be refreshing and sweet—perfectly complementing our other ingredients!
- 2 lb. boneless skinless chicken breasts (pounded to even thickness). Chicken breasts are versatile canvases waiting to soak up all those luscious flavors we’re layering on top! Pounding them ensures even cooking throughout—no dry edges here! Always opt for high-quality poultry when possible; organic or free-range options tend to have richer flavor profiles.
- 2 Tbsp avocado oil (or other high-heat oil) (for searing). This final drizzle ensures your chicken sizzles beautifully when hitting the pan—it creates a lovely crust while locking moisture inside! Remember to use oils suited for high heat so we don’t compromise on flavor!
- Kosher salt and fresh black pepper (to taste). These two staples might seem basic but are absolutely essential—they enhance every ingredient’s inherent flavors while bringing balance throughout our dish!
Equipment You’ll Need:
Before diving into cooking blissfully away in our kitchen sanctuary, let’s gather some trusty tools—the unsung heroes behind every successful meal! Having the right equipment can make all the difference between smooth sailing through preparation versus feeling overwhelmed by chaos.
- Large oven-safe skillet – This versatile piece is your best friend here since you’ll start on stovetop before transitioning seamlessly into oven baking! Make sure it’s sturdy enough to handle high heat without warping—you want even browning on your chicken!
- Whisk – A simple tool yet incredibly powerful; whisking helps incorporate ingredients smoothly into sauces ensuring no lumps remain behind! It allows air into mixtures making them lighter—a must-have when creating glazes!
- Wooden spoon – Perfectly designed for scraping up those golden brown bits from pan after searing chicken—these remnants carry immense flavor that’ll enrich your sauce beyond measure!
- Meat thermometer – Trust me on this one: investing in an instant-read thermometer will ensure perfectly cooked chicken every time! You want internal temperature reaching 165°F—that’s non-negotiable if you aim for juicy results!
Now that we’ve gathered all necessary ingredients along with vital equipment let’s roll up our sleeves together—I can’t wait until we create this masterpiece side by side!
Preparing the Balsamic Glazed One Pan Chicken
Step 1: Create Your Flavor-Packed Sauce
Start by whisking together your sauce ingredients—the balsamic vinegar, honey, olive oil (or avocado), minced garlic, Italian seasoning & Dijon mustard—in a bowl until well combined into an enticing elixir bursting with potential! This process allows each component’s flavors meld beautifully before they get cozy with our chicken later on—trust me when I say letting these sit briefly allows their personalities shine brighter once cooked together later down line!
Step 2: Toss Together Tomatoes and Cheese
In another bowl (yes it’s okay—we’re multitasking!), toss halved grape tomatoes along with fresh mozzarella balls & finely chopped basil together until evenly coated; season lightly yet generously with salt & pepper at this stage too! Not only does this help draw moisture out from tomatoes pre-bake but brings forth those vibrant colors too—a visual feast awaits us!
Step 3: Preheat Your Oven
While prepping everything else takes place warming up your oven now at 400°F sets us up nicely because we’ll transition from stovetop magic straight into baking bliss soon enough ensuring things move along swiftly once ready later on!
Step 4: Sear That Chicken!
Grab your trusty large oven-safe skillet & heat up some avocado oil over medium-high heat until shimmering—we want nice sear happening here folks!! Season chicken breasts liberally using kosher salt & freshly cracked black pepper followed by placing them carefully inside pan ensuring there’s space between each piece allowing proper browning throughout rather than steaming instead…that would defeat purpose altogether wouldn’t it?! Let ’em cook undisturbed around 1–2 minutes each side until golden brown forms then pour prepared balsamic sauce mixture right over top immediately afterwards allowing sizzling sounds fill kitchen air—a beautiful moment indeed!
With these steps laid out before us let’s keep riding this flavorful wave towards creating something truly special together as we continue through additional steps shortly after…
Step 5: Layering the Flavors with Balsamic Bliss
Now comes the moment when we infuse our chicken with that utterly intoxicating blend of flavors. Once your chicken is beautifully golden brown, it’s time to add the balsamic sauce mixture you’ve prepared. This step is absolutely paramount, as the combination of balsamic vinegar, honey, garlic, and Dijon mustard creates a rich glaze that will envelop every bite of chicken in a sweet and tangy embrace. Gently pour the sauce over the sizzling chicken in the skillet; you’ll hear that delightful sizzle as it hits the hot surface. Remember to use a wooden spoon to scrape up any brown bits from the bottom of the pan—these are flavor gold! Those caramelized bits are what truly elevate this dish, providing depth and complexity to your glaze.
As you watch the sauce come to a gentle simmer, take a moment to appreciate how everything is coming together. The heat activates those robust flavors, transforming them into something truly extraordinary. Trust me on this: allow it to simmer for just a minute or two so it thickens ever so slightly; this will create a luscious coating that clings beautifully to the chicken. Just imagine cutting into that juicy meat and seeing all those glistening, flavorful droplets! It’s like a celebration on your plate—a symphony of flavors waiting to be enjoyed.
Step 6: The Colorful Contrast
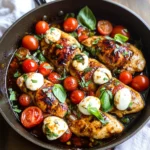
Once your chicken is coated in that deep, glossy balsamic glaze, it’s time to add another layer of color and freshness—enter our fresh tomato and mozzarella mixture! In a separate bowl, you’ve already tossed together those vibrant grape tomatoes, creamy mozzarella balls, and freshly chopped basil. This medley not only adds visual appeal but also brings contrasting textures and flavors that are essential for balance in any dish. The sweet juiciness of the tomatoes offsets the richness of the glaze while the mozzarella adds that delightful creaminess that melts in your mouth.
Carefully sprinkle this mixture over your glazed chicken in the skillet. The tomatoes will burst open during baking, releasing their juices and mingling with the balsamic sauce to create an even more complex flavor profile. This step is crucial because it enriches every bite with freshness while ensuring each piece of chicken remains moist and tender throughout cooking. Take a moment here to savor how delightful your kitchen smells—it’s like an Italian bistro has popped up right in your home!
Step 7: Baking Your Perfect Dish
Now that everything is layered beautifully in your skillet, it’s time for the magic to happen in the oven! Preheat your oven to 400 degrees Fahrenheit; this temperature is essential for achieving perfectly cooked chicken without drying it out. The high heat allows for an even cook while simultaneously caramelizing those lovely tomatoes, giving you both flavor and texture that’s simply irresistible.
Place your skillet carefully into the preheated oven. I recommend setting a timer for 18 minutes but keep an eye on it as ovens can sometimes be temperamental—what’s normal may vary based on individual appliances or even altitude! After about 18-23 minutes (depending on how thick your chicken breasts are), check for doneness by inserting an instant-read thermometer into the thickest part of one breast; you’re looking for an internal temperature of 165 degrees Fahrenheit. This ensures not only safety but also guarantees that your chicken will be juicy and tender rather than dry or rubbery.
Step 8: Patience Pays Off—The Resting Period
Once you’ve confirmed that beautiful temperature reading, it’s hard not to dig right in, but I urge you—patience is key! Remove your skillet from the oven and let it rest for at least five minutes before serving. Resting allows those savory juices within each piece of chicken to redistribute throughout its fibers rather than spilling out onto your cutting board when sliced. This step transforms what could be a dry bite into something extraordinarily succulent.
During this brief interlude—as tantalizing aromas waft through your kitchen—take a moment to appreciate all that hard work you’ve put into creating this incredible dish. You deserve it! Plus, while you wait, consider preparing some crusty bread or fluffy rice on which to serve this gorgeous creation. Both options are perfect for soaking up all those delectable juices pooling around each piece of chicken.
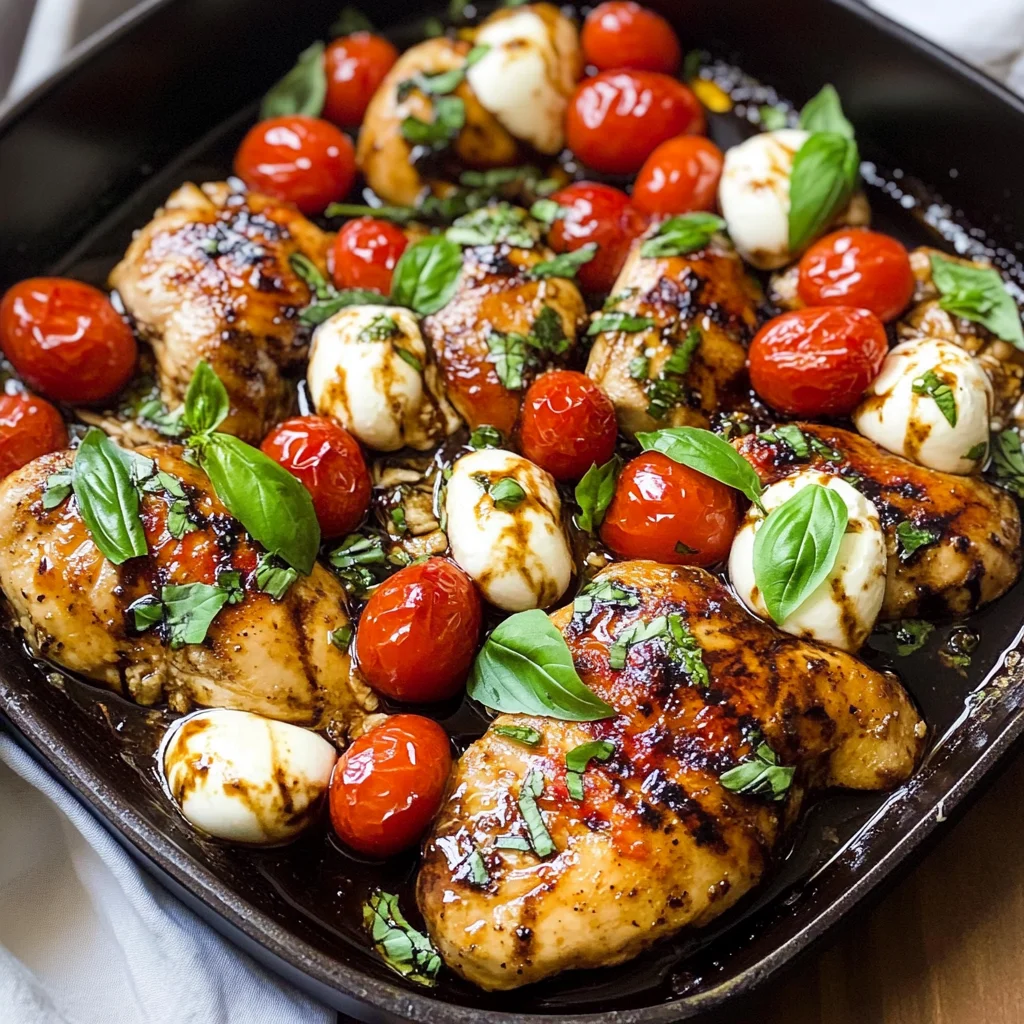
Final Touches: Serving Up Your Masterpiece
Step 9: Plating Perfection
After allowing your Balsamic Glazed One Pan Chicken to rest lovingly for five blessed minutes (I promise you it’s worth it!), it’s finally time for plating! Carefully transfer each piece onto serving plates along with those bursting tomatoes and creamy mozzarella—you want everyone at your table to see how mesmerizing this dish truly is! Drizzled with any remaining balsamic glaze from the pan adds just a touch more sophistication; think of it as liquid gold gracing each plate!
Garnish generously with additional fresh basil if desired; this not only enhances visual appeal but also introduces another layer of freshness right before enjoying every mouthful. As you gather around with loved ones—whether it’s family dinner or gathering friends—you’ll find conversations flowing effortlessly over plates filled with joy and laughter.
I can’t stress enough how proud you’ll feel sharing this recipe—it’s simple yet undeniably impressive! So whether you’re making this for yourself after a long day or hosting friends over wine-infused chatter (without actual wine!), I assure you: every bite will bring smiles all around. Enjoy every moment spent relishing this beautiful meal; you’ve earned it!
Storage and Enjoyment Tips for Your Balsamic Glazed One Pan Chicken
Now that your kitchen is filled with the mouthwatering aroma of Balsamic Glazed One Pan Chicken, it’s time to savor every bite! But what about those delightful leftovers? This dish is not just a one-time wonder; it can be enjoyed in multiple ways throughout the week. Storing your leftovers properly ensures that you can relive that symphony of flavors even days after cooking. So let’s dive into how to keep this delicious meal fresh and vibrant for as long as possible!
Storing Leftover Balsamic Glazed One Pan Chicken
To preserve your Balsamic Glazed One Pan Chicken, I recommend using an airtight container, which will help lock in moisture and flavor while keeping unwanted air at bay. If you have a glass container, that’s even better! It’s like offering your chicken a cozy little home. You can store it in the refrigerator for up to 3-4 days. If you want to maintain its quality, consider placing a slice of bread inside the container; this clever trick absorbs excess moisture, keeping your chicken tender and juicy! When you get around to enjoying those leftovers, you might find that the flavors have deepened and melded together beautifully—a truly extraordinary experience! For reheating, I suggest popping it back in the oven at a low temperature to retain that delicious glaze or using a microwave if you’re in a hurry. Trust me; it’s worth taking the time to reheat gently.
Freezing Balsamic Glazed One Pan Chicken for Later
If you’re looking to prepare ahead or simply want to stock up on meals for future busy days, freezing your Balsamic Glazed One Pan Chicken is a fantastic option! To do this properly, allow the chicken to cool completely after cooking, then transfer it to freezer-safe bags or containers. Make sure to remove as much air as possible before sealing—a simple but crucial step that helps prevent freezer burn. You can enjoy this dish from frozen for up to three months! The beauty of freezing is that when you’re ready for another taste sensation, all you need to do is thaw it overnight in the fridge and reheat as described earlier. Imagine having such an incredible meal effortlessly at hand—now that’s convenience at its finest!
With these storage tips tucked away in your culinary toolkit, you’ll be able to enjoy your Balsamic Glazed One Pan Chicken over several delightful meals without missing out on its delectable charm.
Balsamic Glazed One Pan Chicken
Balsamic Glazed One Pan Chicken is a delightful dish that transforms a simple weeknight dinner into a culinary experience. This easy-to-make recipe features tender chicken breasts coated in a rich balsamic glaze, complemented by sweet grape tomatoes and creamy mozzarella. Every bite bursts with flavor, making it perfect for busy evenings or gathering with loved ones. Not only does it come together in one pan, but it also offers vibrant colors and nutrients that nourish both body and soul. With minimal cleanup and maximum taste, this dish invites you to slow down and savor each delicious mouthful.
- Prep Time: 15 minutes
- Cook Time: 25 minutes
- Total Time: 40 minutes
- Yield: Serves 6
- Category: Main
- Method: Baking
- Cuisine: Italian
Ingredients
- 1/3 cup balsamic vinegar
- 2 tablespoons honey
- 2 tablespoons avocado oil
- 2 garlic cloves, minced
- 1 teaspoon Italian seasoning
- 1 tablespoon Dijon mustard
- 8 oz. grape tomatoes, halved
- 8 oz. fresh mozzarella balls
- 2 tablespoons fresh basil, chopped
- 2 lb. boneless skinless chicken breasts
Instructions
- Preheat oven to 400°F.
- In a bowl, whisk together balsamic vinegar, honey, avocado oil, minced garlic, Italian seasoning, and Dijon mustard.
- In another bowl, combine halved tomatoes, mozzarella balls, and basil; season with salt and pepper.
- Heat avocado oil in a large oven-safe skillet over medium-high heat. Season chicken with salt and pepper; sear for 1-2 minutes per side until golden brown.
- Pour balsamic sauce over the chicken and add the tomato mixture on top.
- Transfer the skillet to the preheated oven and bake for 18-23 minutes until chicken reaches an internal temperature of 165°F.
- Let rest for five minutes before serving.
Nutrition
- Serving Size: 1 chicken breast (160g)
- Calories: 290
- Sugar: 10g
- Sodium: 480mg
- Fat: 12g
- Saturated Fat: 3g
- Unsaturated Fat: 8g
- Trans Fat: 0g
- Carbohydrates: 14g
- Fiber: 2g
- Protein: 30g
- Cholesterol: 90mg