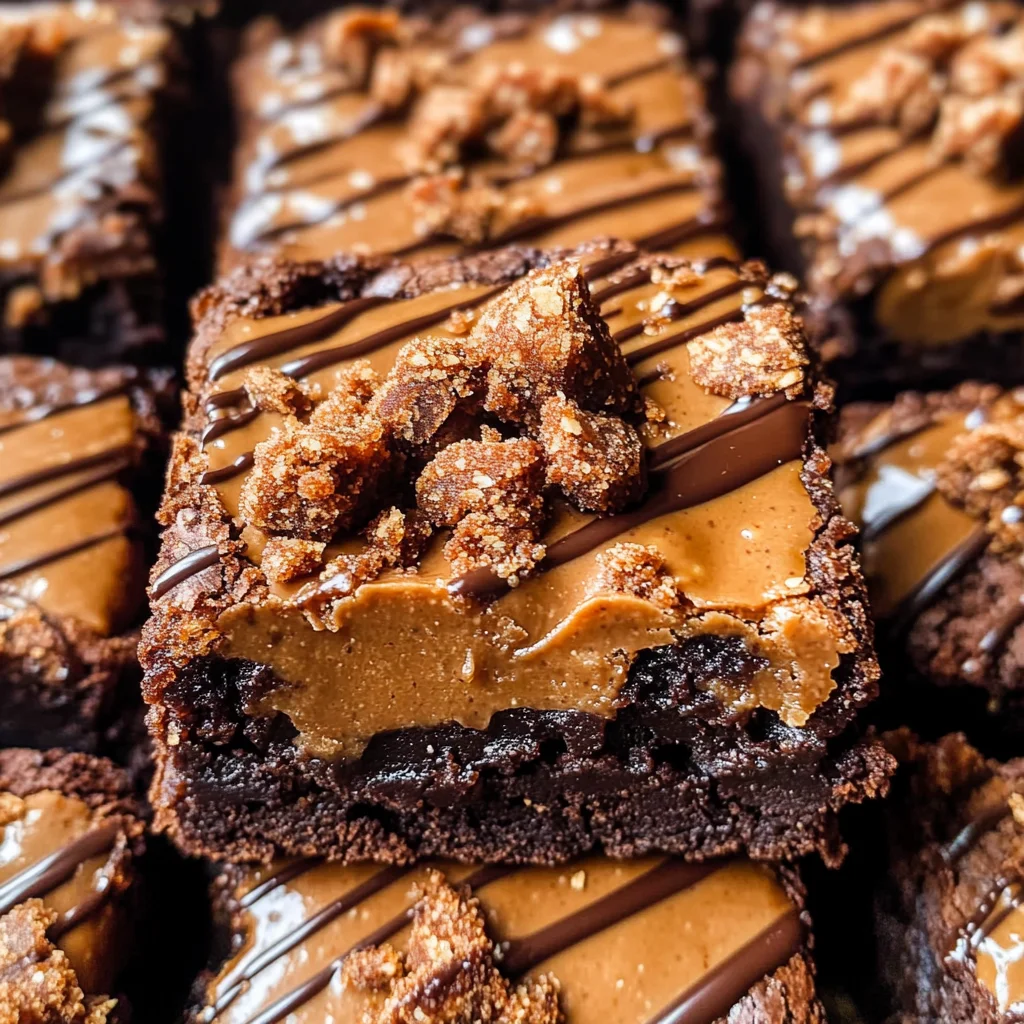
Biscoff Brownies
What a delightful treat we have in store today! These Biscoff brownies are not just another dessert; they’re a celebration of rich flavors, a hug in every bite, and an experience that draws you in with their intoxicating aroma. Imagine the moment when you pull these fudgy squares from the oven, the scent curling around you like warm caramel on a chilly day. The deep chocolate brownie base, studded with luscious Biscoff cookie butter, is truly something special. As you cut into them, the gooey cookie butter oozes out, creating a beautiful contrast between the rich brownie and the sweet, spiced notes of the Biscoff flavor that brings back memories of cozy afternoons spent indulging in your favorite treats. Trust me when I say that these Biscoff brownies will elevate any gathering or simply make your afternoon tea feel like a grand affair.
The magic of these brownies lies not only in their incredible taste but also in their ability to bring people together—friends and family alike will gather around with eager forks ready for a bite. This recipe beautifully marries tradition with modern indulgence, offering a twist on classic brownies by incorporating everyone’s favorite cookie butter. Each bite is a revelation: it’s soft yet chewy, deeply chocolatey yet delicately spiced. So whether you’re celebrating a special occasion or just treating yourself after a long day, these brownies promise to deliver joy and satisfaction that transcends mere dessert.
Biscoff Brownies: A Gooey Delight
Welcome to this exciting baking adventure! I can’t wait to share this recipe with you because these Biscoff brownies are truly something extraordinary. They’re easy enough for beginners yet impressive enough to wow seasoned bakers—perfect for sharing with loved ones or enjoying all by yourself (no judgment here!). Let’s dive into this culinary journey together!

Ingredients:
As we embark on crafting these luscious Biscoff brownies, let’s take a moment to appreciate each ingredient that makes them so irresistibly delicious. Each component plays a vital role in creating that perfect balance of flavors and textures that will leave everyone asking for seconds (or thirds!).
- 3/4 cup Biscoff cookie butter – This is the star of our show! Biscoff cookie butter isn’t just any spread; it’s liquid gold made from crushed Biscoff cookies blended until creamy. It adds an unparalleled depth of flavor and an indulgent creaminess that infuses every bite of our brownies. If you find yourself wanting to experiment, try using almond or sunflower seed spread as alternatives; just keep in mind they will change the flavor profile slightly.
- 1/2 cup light or dark brown sugar (packed) – Brown sugar is essential here because it contributes moisture and richness due to its molasses content. Light brown sugar lends a sweeter taste while dark brown sugar adds more caramel notes—both work beautifully in these brownies. Make sure to pack it firmly into your measuring cup so you get all that lovely sweetness!
- 1/2 cup granulated sugar – This adds sweetness and helps create those deliciously chewy edges we love so much. While brown sugar brings moisture, granulated sugar aids in creating structure—perfect for achieving that ideal brownie texture where it’s fudgy but holds together beautifully.
- 2 large eggs – Eggs are our binders here; they contribute to the rich texture while helping our brownies rise just enough without becoming cake-like. Using room temperature eggs ensures even mixing and better incorporation into the batter—so don’t skip this step!
- 1 large egg yolk – Adding an extra yolk provides additional fat which enhances richness and moisture—the secret weapon for achieving that fudgy consistency we crave in our brownies! It’s like giving them an extra layer of indulgence.
- 1 tablespoon vanilla extract – Vanilla extract is what takes our brownies from good to great! It adds warmth and complexity to the overall flavor profile, enhancing both the chocolate and cookie butter layers beautifully.
- 10 tablespoons unsalted butter – Butter is crucial for creating those melt-in-your-mouth qualities! Opting for unsalted butter allows us full control over the saltiness of our recipe. Melt it gently so it blends smoothly without being too hot when added to other ingredients—it should be warm but not boiling hot!
- 2/3 cup + 1/4 cup semi-sweet chocolate chips – Semi-sweet chocolate chips lend richness and enhance that chocolatey goodness we adore in brownies. Choose high-quality brands for optimal flavor; after all, they play such an important role! The extra quarter cup adds little pockets of melted chocolate throughout each square—pure bliss!
- 1/4 cup unsweetened Dutch cocoa powder – Cocoa powder deepens chocolate flavor while contributing color and richness without adding any sweetness—it’s absolutely essential! Dutch cocoa has been treated to neutralize its acidity which gives our brownies a smoother taste profile.
- 2/3 cup + 1 tablespoon all-purpose flour – Flour provides structure to our brownies but be careful—too much can lead to dryness! I recommend spooning it lightly into your measuring cup rather than scooping directly from the bag; this helps avoid packing too much flour into your measure.
- 1 teaspoon espresso powder – Espresso powder intensifies chocolate flavors without adding any coffee taste itself. It’s amazing how just a bit can elevate the overall experience; trust me on this one—don’t skip it!
- 1/2 teaspoon fine sea salt – Salt enhances sweetness and balances flavors beautifully—it’s non-negotiable in dessert recipes! Using fine sea salt ensures even distribution throughout our batter.
- 4-5 Biscoff cookies (for the top) – These iconic cookies add crunch as well as visual appeal—they’re like little treasures waiting beneath your fork! Break them up before pressing them down onto your brownie batter.
- Extra cookie butter (for the top) – Drizzling more cookie butter on top creates an eye-catching finish while delivering even more flavor! Just warm it slightly so it flows easily over your baked beauties.
Equipment You’ll Need:
Before we dive into making these heavenly Biscoff brownies, let’s talk about some essential tools that will make your baking experience smooth sailing! Having the right equipment can be as crucial as having quality ingredients—you want everything working together harmoniously.
- 8×8 inch square metal baking pan – A sturdy metal pan ensures even heat distribution which helps achieve those perfectly baked edges while keeping the center nice and gooey. If you don’t have one handy, glass pans will work too but may require slight adjustment in baking time since they retain heat differently.
- Parchment paper – Lining your pan with parchment paper aids tremendously during removal post-baking; no one wants crumbled brownies stuck at the bottom! Plus, it helps prevent sticking while allowing for easy clean-up afterward—trust me when I say this step is absolutely paramount!
- Mixing bowls – A set of mixing bowls is indispensable for whisking together dry ingredients separately before combining with wet ones—it keeps things organized while ensuring proper mixing techniques!
- Whisk – A sturdy whisk allows you to blend ingredients smoothly without clumps forming; be sure it’s comfortable to hold since you’ll be using it quite often throughout this process!
Now that we’ve gathered all our ingredients and tools together let’s get started on preparing these decadent Biscoff brownies!
Step 1: Preparing Your Pans Like A Pro
First things first—we need to ensure our baking pan is prepped correctly so removing those delicious squares later feels effortless! Take a large piece of parchment paper and press it firmly into an 8×8 inch square metal baking pan, creasing the edges carefully along each side so you can see where they meet once filled with batter. This little trick makes lifting out your finished creation easier than ever before—thank me later! After lining, spread about 3/4 cup of cookie butter evenly inside those creased edges then pop it into your freezer until firm (about 15 minutes). Why chill? Well, this sets up nicely allowing us easy access later when layering over brownie batter without worrying about melting!
Step 2: Prepping For Perfection
Once your cookie butter layer has chilled completely (don’t rush this step!), go ahead and line your baking pan again with fresh parchment paper hanging off all four sides—this creates handles making removal super simple once baked. Now preheat your oven to 350°F (180°C). This temperature is crucial because it’s hot enough for browning yet gentle enough not to scorch delicate sugars—we want those fudgy centers intact while still achieving lovely edges!
Step 3: Mixing Up Sweet Magic
In one medium bowl, combine both sugars along with eggs & vanilla extract using either a whisk or electric mixer until fully blended—it should look thick & creamy at first glance showcasing air bubbles forming within mixture indicating successful incorporation of ingredients together! The reason we do this? The combination allows sugars ample time absorbing moisture from eggs creating luscious texture throughout final product plus adding depth via vanilla enhancing overall flavor immensely!
Step 4: Melting Away Chocolatey Dreams
Next up comes my favorite part: melting together unsalted butter alongside semi-sweet chocolate chips until smooth—you can do this either on stovetop using double boiler method or microwave if preferred (just remember short bursts stirring frequently). Once melted & shiny remove from heat then whisk cocoa powder right into mixture until fully combined resulting gorgeous rich paste bursting aromatic notes—a true symphony unfolding before us here folks!
Let’s pause here as we savor what we’ve accomplished thus far before diving deeper into building out these scrumptious delights next time together—I promise it’ll be worth every moment spent waiting patiently towards tasting perfection soon enough!
Step 5: Folding in the Goodness
Now that we have our rich chocolate mixture ready and waiting, it’s time to bring in the dry ingredients—a step that demands your full attention because it’s where the magic begins! Gently fold in the all-purpose flour, espresso powder, and fine sea salt until just combined. This is a critical moment, my friend; over-mixing at this stage can develop gluten in the flour, leading to brownies that are more cake-like instead of decadently fudgy. We want them to be gooey and rich, melting in your mouth like a sweet hug on a chilly day. Take your spatula and use a gentle folding motion—think of folding in layers rather than stirring. You want the ingredients to mingle lovingly without losing their individual charm.
As you incorporate these elements, keep an eye out for the specks of flour disappearing into the luscious chocolate batter; it should take on a glossy sheen that promises an utterly intoxicating outcome. The espresso powder is not just a booster for flavor; it amplifies the chocolate notes beautifully, giving your brownies depth that will have everyone asking for seconds—and maybe thirds! Trust me on this; even if you’re not a coffee lover, you won’t taste coffee specifically; instead, you’ll experience an enhanced chocolate explosion.
Step 6: Layering with Love
Once your brownie batter is perfectly combined—smooth and inviting—it’s time to start layering! Pour half of the brownie batter into your prepared baking pan, using about 340 grams (this ensures an even distribution). With a gentle hand, spread it evenly to the edges of the pan. This creates a solid foundation for our gooey cookie butter center. I cannot stress enough how important it is to spread this layer evenly; it’s your base, after all! If it’s too thick in some places and thin in others, you’ll end up with uneven baking later on.
Now comes the fun part—taking that frozen cookie butter square from the freezer! Carefully peel off the parchment paper from one side and place it directly on top of your brownie layer. The contrast between that warm chocolate batter and cool cookie butter is simply divine. It’s like creating a hidden treasure inside—a little surprise waiting to be discovered with every bite! Then pour the remaining brownie batter over this layer, spreading it gently but thoroughly so that every corner is filled with creamy goodness. This dual-layer technique adds complexity to our Biscoff Brownies; you’ll get that wonderful contrast between fudgy brownie and velvety cookie butter.
Step 7: The Finishing Touches
Let’s make these brownies truly special with some delightful Biscoff cookie pieces! Break up 4-5 Biscoff cookies into smaller chunks—don’t worry about making them uniform; rustic is charming here! Sprinkle them generously atop your second layer of brownie batter, pressing them slightly into the surface so they meld beautifully during baking. Each bite will offer that nostalgic crunch which complements the soft fudge perfectly—it’s like having a party of textures!
And what would this masterpiece be without an extra drizzle? Warm two tablespoons of cookie butter in the microwave for about 15-20 seconds until it becomes wonderfully runny—not too long though; we don’t want it bubbling over! Drizzle this liquid gold over your Biscoff cookies right before popping them into the oven. This step isn’t just for aesthetics—it forms a luscious topping that caramelizes slightly as they bake, creating an utterly enticing aroma wafting through your kitchen. I promise you; this final touch transforms these brownies from delicious to extraordinary!
Step 8: Baking Your Perfect Biscoff Brownies
Now it’s time for these beauties to meet their destiny—the oven! Preheat to 350°F (180°C) if you haven’t already done so, ensuring it’s nice and hot when you introduce those brownies. Bake them for about 30-40 minutes; however, keep an eye on those glorious treats as they approach the end of their baking time. At around 30 minutes, start checking for doneness by inserting a toothpick into the center. What you’re looking for are moist crumbs clinging to it—not wet batter—that’s how you know you’ve reached perfect fudginess!
Remember that oven temperatures can vary quite a bit—yours may run hotter or cooler than another’s—but don’t fret! A range gives us flexibility while ensuring delicious results. If your toothpick comes out clean or with dry crumbs, you’ve likely overbaked them—which we want to avoid at all costs since we crave that indulgent texture! Once they are done baking, remove them from the oven and let them cool completely on a wire rack before attempting to cut into them—the cooling process allows flavors to settle beautifully while also firming up that gooey center just right.
Conclusion:
As we come full circle on this delightful journey of crafting Biscoff brownies together, I can’t help but feel a rush of excitement! The luscious combination of chocolate and cookie butter is not merely delicious; it evokes those warm feelings you only get from sharing something special with loved ones. The way the gooey brownie melts in your mouth alongside that hint of spiced sweetness from the Biscoff creates this utterly intoxicating experience that truly elevates dessert time beyond mere sustenance into something profoundly satisfying. Each bite sings with layers of flavor and texture—from that crackly top adorned with cookie pieces down into its dense fudginess that leaves you yearning for more.
This recipe is an absolute must-try not just because of its delectable taste but also because of the sheer joy it brings during its creation. Picture yourself filling your kitchen with aromatic chocolate notes while whisking together those simple ingredients—it’s an experience worth reveling in! Whether you’re baking for a gathering or treating yourself after a long week, these brownies are incredibly versatile and inviting. Imagine pulling them from the oven while their rich scent envelops you; it’s nothing short of magical!
When it comes time to serve these beauties, imagine savoring one with a steaming cup of coffee or perhaps pairing it with freshly whipped coconut cream that contrasts perfectly with their richness. For an afternoon pick-me-up, how about enjoying one alongside a scoop of creamy vanilla ice cream? And if you’re feeling adventurous, drizzle on some extra cookie butter before serving—it will elevate every bite into sheer bliss!
Feeling adventurous? This recipe is wonderfully adaptable! You could toss in some chopped nuts for added crunch or even swirl in peanut butter before baking for an entirely different flavor profile that dances on your palate. Or how about adding some sea salt on top right after baking? It creates this beautiful interplay between sweet and salty that’s absolutely divine! I encourage you to play around with these variations—each twist offers its unique charm that makes this recipe even more special. I can’t wait for you all to try these amazing Biscoff brownies and share your experiences; let’s connect over our love for baking and indulging together!
Biscoff Brownies
Indulge in the ultimate dessert experience with these rich and fudgy Biscoff brownies, perfectly layered with gooey cookie butter. Each bite offers a delightful contrast of deep chocolate flavors and the warm, spiced sweetness of Biscoff, creating a heavenly treat that’s sure to impress. Easy enough for beginners yet sophisticated enough for seasoned bakers, these brownies will elevate any gathering or make your afternoon tea feel special. Imagine pulling them from the oven, their intoxicating aroma wrapping around you like a warm embrace. These brownies are not just a dessert; they’re an invitation to share joy and create lasting memories with friends and family.
- Prep Time: 20 minutes
- Cook Time: 35 minutes
- Total Time: 55 minutes
- Yield: Approximately 16 servings 1x
- Category: Dessert
- Method: Baking
- Cuisine: American
Ingredients
- 3/4 cup Biscoff cookie butter
- 1/2 cup light or dark brown sugar (packed)
- 1/2 cup granulated sugar
- 2 large eggs
- 1 large egg yolk
- 1 tablespoon vanilla extract
- 10 tablespoons unsalted butter
- 2/3 cup semi-sweet chocolate chips
- 1/4 cup semi-sweet chocolate chips (extra)
- 1/4 cup unsweetened Dutch cocoa powder
- 2/3 cup all-purpose flour
- 1 tablespoon all-purpose flour (extra)
- 1 teaspoon espresso powder
- 1/2 teaspoon fine sea salt
- 4–5 Biscoff cookies (for the top)
- Extra cookie butter (for the top)
Instructions
- Preheat oven to 350°F (180°C) and line an 8×8 inch metal baking pan with parchment paper.
- In a medium bowl, mix together the brown sugar, granulated sugar, eggs, and vanilla until creamy.
- Melt the butter and semi-sweet chocolate chips together until smooth. Whisk in cocoa powder.
- Fold the chocolate mixture into the sugar mixture until combined.
- Gently fold in flour, espresso powder, and salt until just mixed.
- Pour half the batter into the prepared pan, then layer with chilled cookie butter followed by remaining brownie batter.
- Top with crushed Biscoff cookies and drizzle extra cookie butter over the top.
- Bake for 30-40 minutes or until a toothpick comes out with moist crumbs. Allow to cool before cutting.
Nutrition
- Serving Size: 1 brownie
- Calories: 200
- Sugar: 15g
- Sodium: 100mg
- Fat: 12g
- Saturated Fat: 7g
- Unsaturated Fat: 5g
- Trans Fat: 0g
- Carbohydrates: 22g
- Fiber: 1g
- Protein: 3g
- Cholesterol: 40mg