Easy Tres Leches Cake
The art of baking can often feel like a magical dance, where every ingredient plays its part in creating something truly extraordinary. This Easy Tres Leches Cake is not just another dessert; it’s an experience steeped in tradition and love. Imagine the moment when you slice through the light, airy layers of cake, releasing the sweet aroma of vanilla and cinnamon into the air. As you take your first bite, the creamy milks meld together with the fluffy cake to create an utterly intoxicating sensation—each forkful a blissful reminder of childhood celebrations, family gatherings, and joyous moments shared with loved ones. With every layer soaking up that delicious milk mixture, you’re not just indulging in a dessert; you’re diving headfirst into a soft cloud of nostalgia and warmth. Trust me when I say that this Easy Tres Leches Cake will become your new go-to recipe for any occasion!
The beauty of this cake lies not only in its delectable flavor but also in its simplicity. Using a boxed cake mix is a wonderful way to take some pressure off while still delivering an impressive dessert that will have everyone asking for seconds. This recipe is flexible enough for beginners but satisfying enough for seasoned bakers looking to impress. Whether it’s a birthday celebration or a quiet evening at home with family, this cake embodies the spirit of sharing and togetherness. So roll up your sleeves and let’s embark on this delightful culinary journey together!
Ingredients:
As we gather our ingredients for this easy yet decadent Tres Leches Cake, let’s take a moment to appreciate each component’s role in crafting this masterpiece. Every ingredient brings its own flavor and texture, working harmoniously to create that luscious experience we crave.
- 1 (14.25 oz) box yellow cake mix: This foundation sets the stage for our cake! A yellow cake mix provides that perfect balance of moistness and fluffiness, creating a delightful base that soaks up all those milks beautifully. When choosing your brand, look for one without artificial flavors or preservatives if possible; it really does make a difference in both taste and quality.
- 1 (3.4 oz) package instant vanilla pudding mix: Adding pudding mix elevates our cake’s texture to cloud-like softness while enriching the flavor profile with creamy vanilla notes. It acts as a secret weapon here—helping retain moisture once we add our milks later on—so don’t skip this step!
- 1 teaspoon cinnamon: Ah, cinnamon—the warm hug of spices! This aromatic addition infuses our cake with cozy notes that complement the sweetness beautifully. You may choose freshly ground cinnamon for an even more vibrant flavor; trust me when I say it transforms everything!
- 3 large eggs: Eggs are essential players in our easy Tres Leches Cake; they provide structure while adding richness and moisture. Make sure your eggs are at room temperature to ensure proper emulsification during mixing, which leads to better texture overall.
- 1/2 cup whole milk: Whole milk adds creaminess without being overly rich—it strikes just the right balance! Opting for whole milk instead of skim or low-fat ensures that your cake remains moist throughout the soaking process.
- 1/2 cup vegetable oil: Oil contributes to that tender crumb we’re aiming for by keeping things moist without weighing them down like butter might in certain recipes. Plus, vegetable oil has a neutral flavor allowing all those other delicious ingredients to shine through.
- 1/3 cup water: While it may seem simple, water helps activate all dry elements in our batter while ensuring smooth consistency as we blend everything together.
- 1/4 cup sour cream: Sour cream is like magic—it adds depth and tanginess while keeping moisture locked inside! Plus, it creates an incredibly rich mouthfeel that’s simply irresistible.
- 1 teaspoon vanilla extract: Vanilla is non-negotiable here! It enhances every other flavor present while providing that comforting essence we’re all familiar with from baked goods past.
- 1 (14 oz) can sweetened condensed milk: This liquid gold is what gives Tres Leches Cake its name! Sweetened condensed milk adds an undeniable richness as it soaks into the cake layers—think of it as sugary syrup that brings everything together harmoniously.
- 1 (12 oz) can evaporated milk: Similar yet distinct from sweetened condensed milk, evaporated milk has less sugar and more creaminess—making it ideal for adding depth without overwhelming sweetness.
- 1 cup heavy cream: For topping our cake with fluffy clouds of whipped cream goodness! Heavy cream whips up beautifully with stability—ensuring our topping holds up well over time while enhancing indulgence levels.
- 16 oz tub cool whip (or homemade whipped cream): If you’re short on time or looking for convenience, Cool Whip works perfectly here—but if you want to elevate things further, homemade whipped cream made from heavy cream offers unparalleled freshness and flavor.
- Cinnamon (for dusting): A light sprinkle of cinnamon on top before serving adds visual appeal while echoing those delightful flavors within—it’s the final touch that ties everything together!
Now that we’ve gathered these beautiful ingredients brimming with potential, let’s move on to how we transform them into something unforgettable.
Equipment You’ll Need:
Before we dive into making this enchanting Tres Leches Cake, let’s ensure you have all the right tools at hand because having the right equipment makes your baking journey smoother and far more enjoyable! Trust me; these essential partners will help you craft something truly special without added stress.
- 9×13 inch baking pan: A sturdy 9×13 inch baking pan is essential for accommodating all that dreamy batter you’ll create. Its size allows ample space for even baking; plus, you’ll be able to soak every inch of cake later on without worrying about overflow!
- Mixing bowls (various sizes): Having different-sized mixing bowls on hand allows you flexibility during prep—from combining dry ingredients to whipping up creams or batters seamlessly—all contributing towards achieving perfect results!
- Whisk: A reliable whisk is vital when ensuring all components are well combined—whether it’s dry ingredients or whipping up heavy cream later on. The right whisk makes blending effortless while incorporating air into your mixtures beautifully!
- Rubber spatula: This handy tool is perfect for scraping down sides in mixing bowls while gently folding ingredients together without deflating any air you’ve incorporated along the way—a crucial part of achieving lightness in cakes!
- Cooling rack: Allowing your cake proper cooling time after baking prevents sogginess by letting steam escape freely; plus, it’s easier to work with once cooled if you plan on handling layers later on!
- Skewers or toothpicks: These little helpers are instrumental when creating holes in your baked cake—that step where we’ll soak it thoroughly with milks!
With these tools at your disposal paired alongside those fantastic ingredients we’ve gathered earlier—it’s time we unleash our creativity onto this kitchen canvas! Let’s start preparing our Easy Tres Leches Cake!
Step 1: Prepping Your Oven & Baking Pan
First things first—we need to preheat our oven to 350°F (175°C), allowing it plenty of time to reach temperature before we place anything inside. A well-preheated oven ensures even baking which is absolutely paramount for achieving perfectly risen cakes every single time! As your oven warms up, grab your trusty 9×13 inch baking pan and give it a good spray with non-stick baking spray; this will prevent any sticky situations later on when it’s time to release our glorious creation from its confines after baking!
Step 2: Mixing Dry Ingredients
Now that we’ve got everything set up nicely let’s focus on combining those dry ingredients before adding any wet ones! In a large mixing bowl, combine your box of yellow cake mix along with the instant vanilla pudding mix and one teaspoon of cinnamon using a whisk until they’re blended smoothly together. You want these ingredients thoroughly mixed because each element plays its part—this combination sets us up for success by ensuring an even distribution throughout which contributes directly towards texture and taste once baked!
Step 3: Incorporating Wet Ingredients
Once you’ve successfully combined those dry elements, it’s time we introduce moisture into this party! Add three large eggs followed by half a cup each of whole milk and vegetable oil along with one-third cup water plus one-fourth cup sour cream along with one teaspoon vanilla extract directly into your bowl filled with dry goodness. Now whisk gently until just combined—be careful not to overmix as doing so could lead us astray from achieving optimal fluffiness within our final product! Some lumps may remain but that’s perfectly fine—the end goal here is simply blending until no dry flour remains visible.
Step 4: Pouring & Baking
With everything nicely mixed now—a beautiful batter should emerge ready for its next phase! Pour this luscious mixture into your prepared 9×13 inch pan while smoothing out any rough spots across the surface using a rubber spatula—to achieve an even bake across all corners is crucial here since uneven surfaces can lead toward uneven cooking too! Place this beauty into your preheated oven where it’ll bake luxuriously for about 25 minutes—or until golden brown edges form around its perimeter plus testing doneness using either toothpick or skewer inserted centrally coming out clean or showing few moist crumbs attached gives assurance you’ve got perfection ready ahead!
Stay tuned because we’re just getting started—and soon we’ll transform this lovely baked creation into something truly divine that’ll leave everyone craving more!
Step 5: Letting the Cake Breathe and Soak Up the Love
Once your cake has baked to a beautiful golden hue and is giving off that intoxicating aroma of vanilla and cinnamon, it’s time to let it cool for just a moment. Transfer it to a cooling rack—this step is vital because letting the cake breathe prevents any unwanted moisture from gathering at the bottom, which could make it soggy. After about 10 minutes, it’s time to poke holes into this fluffy wonder. Using a skewer, toothpick, or even a large fork, gently poke holes all over the top of the cake. Aim for even spacing; I like to think of this as creating little pathways for the milks to seep in. Trust me on this one—the more holes you create, the better your cake will absorb that heavenly tres leches mixture.
Why is this step so crucial? When you pour in those luscious milks later on, they need a way in! Those little holes act like tiny sponges, allowing every drop of sweetened condensed milk, evaporated milk, and heavy cream to penetrate deep into the cake. Picture it soaking up that liquid gold until it’s absolutely saturated with flavor—this is what makes an easy Tres Leches Cake truly extraordinary! Don’t rush through this part; take your time and enjoy the anticipation of what’s to come.
Step 6: The Milky Bath – Infusing Flavor
Now comes the fun part: pouring those delightful milks over your masterpiece! In a bowl or measuring cup, layer together your sweetened condensed milk, evaporated milk, and heavy cream. I like to take my time here because each layer contributes its own unique flavor profile—a sweet richness from the condensed milk, a creamy texture from the evaporated milk, and that silky finish from the heavy cream. Starting with the sweetened condensed milk, pour slowly over the cake’s surface. You’ll want to be generous but also strategic; ensure every nook and cranny gets some love while avoiding any overflow that could lead to a mess (and no one likes cleaning!).
After drenching it with condensed milk, allow it some moments to soak in before you repeat with evaporated milk and then heavy cream. This layering is non-negotiable; each type of milk plays a pivotal role in achieving that classic tres leches texture—think moist but not overly soggy! The magic happens as they seep into those holes you’ve created earlier. You might notice some surface bubbling—that’s perfectly normal! It means all that creamy goodness is working its way into every delicious bite.
Step 7: The Patience Game – Chill Out Time
With your cake thoroughly soaked in its milky bath, it’s now time for some well-deserved chilling! Cover your pan tightly with plastic wrap or aluminum foil—this keeps everything fresh while allowing the flavors to meld beautifully together. Pop it in the refrigerator for at least 4 hours (or even better, overnight if you can resist!). Now, I know patience isn’t always easy when something so scrumptious is sitting right there calling your name; however, I promise you that this step transforms your cake from merely good to absolutely unforgettable.
During these hours in the fridge, magic unfolds—the flavors deepen as they mingle together. The chill also helps solidify that lovely texture we’re aiming for; you want each slice to hold its shape yet melt effortlessly in your mouth when served. Try not to rush; I’ve found that letting it sit overnight results in an utterly intoxicating dessert experience when you finally serve it up!
Step 8: The Grand Finale – Topping It Off
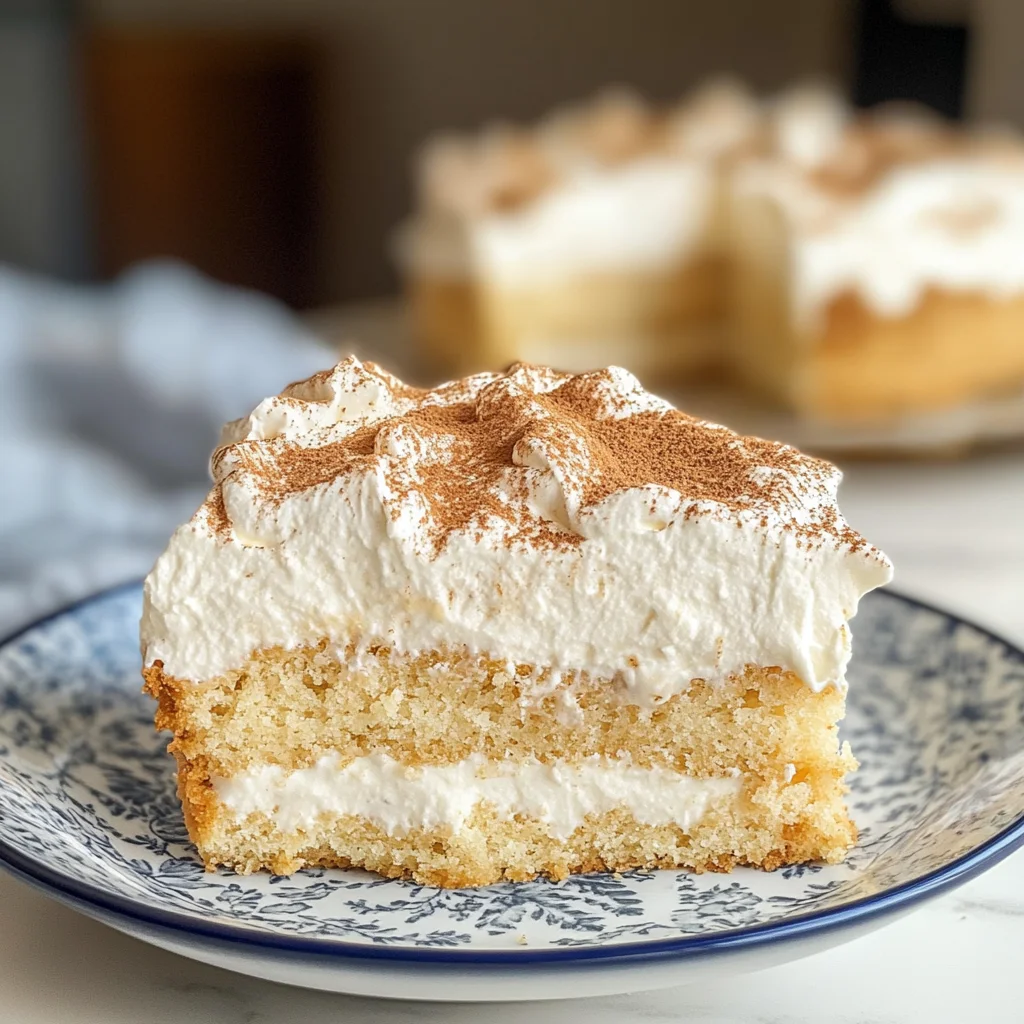
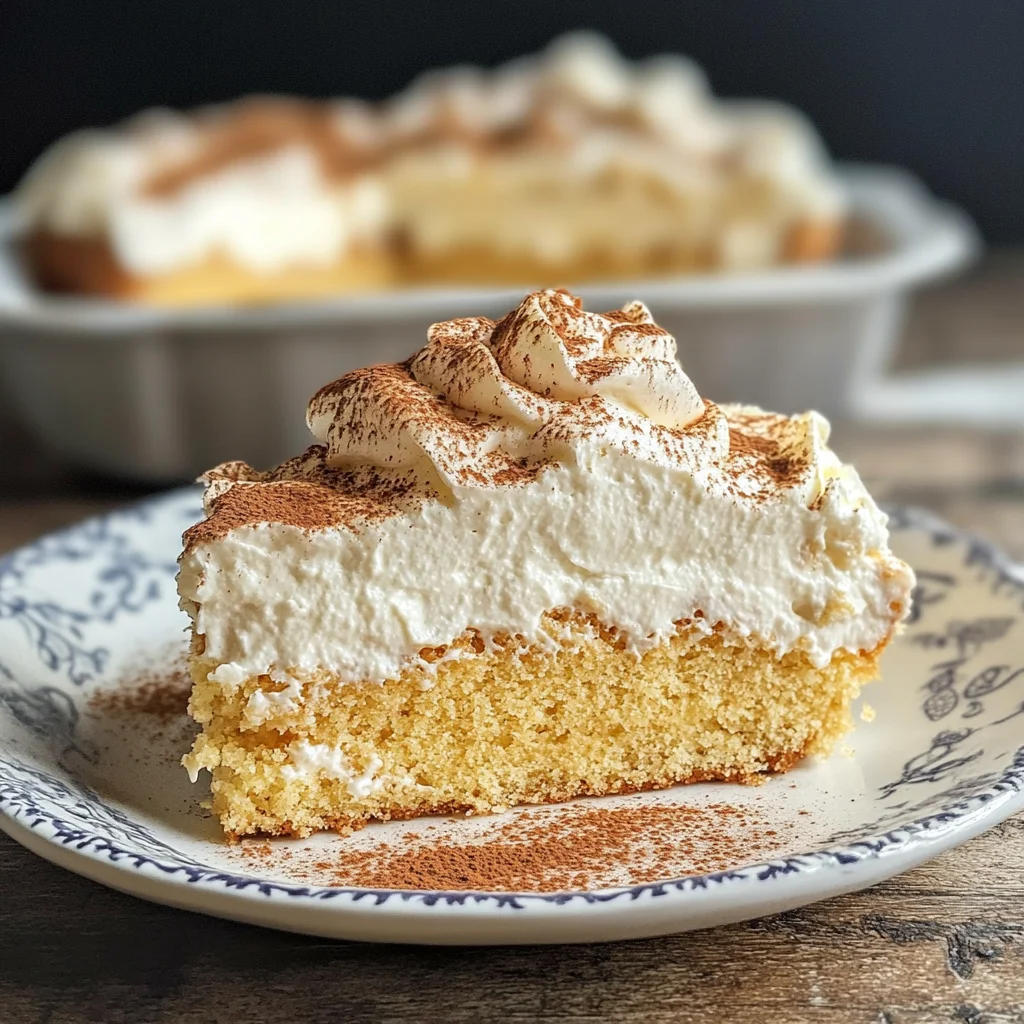
When you’re ready to unveil your masterpiece after all that waiting (and trust me—it’ll be worth every second), it’s time for one last flourish! Grab your tub of Cool Whip or whip up some homemade whipped cream if you’re feeling adventurous (it’s easier than you think!). Spread this fluffy cloud generously over the top of your chilled cake; aim for an even layer that covers all those beautiful soaked edges without hiding them away entirely. This step adds not only another layer of creamy goodness but also creates an inviting appearance that’s sure to impress anyone at your table.
As you finish off with a delicate dusting of cinnamon on top—just like a sprinkle of fairy dust—you’re not just adding flavor but also visual appeal! That warm spice against the bright white cream creates an inviting contrast that’s simply irresistible. Now slice into this beauty and watch as each piece reveals its rich layers within; what you’re serving up is not merely dessert but rather a heartfelt creation meant to be shared and enjoyed among loved ones.
A Sweet Conclusion: Enjoying Your Easy Tres Leches Cake
And there you have it—the journey through crafting an easy Tres Leches Cake! As you take that first delectable bite, let yourself savor every layer of flavor and texture you’ve worked so diligently on. This cake embodies warmth and comfort; it’s perfect for celebrations or simply as a treat at home when you need a little pick-me-up. As my friends often say after enjoying this dessert: It feels like a hug! So gather around with those you cherish most, share stories over slices of this incredible treat, and bask in the joy that only good food can bring. Happy baking!
Storage and Enjoyment Tips for Your Easy Tres Leches Cake
Now that your Easy Tres Leches Cake is beautifully assembled, it’s time to revel in the joy of enjoying this delightful treat. The anticipation builds as you slice into the cake, revealing its moist layers soaked in creamy goodness. But what happens if you have some leftovers? Fear not! This cake is actually known for getting even better after a day or two in the fridge, allowing those flavors to meld into a truly extraordinary dessert experience.
Storing Leftover Easy Tres Leches Cake
To keep your Easy Tres Leches Cake fresh and delicious, I recommend transferring any leftovers to an airtight container. If you don’t have one handy, covering the cake with plastic wrap or aluminum foil works wonders too! Store it in the refrigerator, where it will stay delightful for about 4 to 5 days. Here’s a pro tip: place a slice of bread in the container with the cake to help maintain its moisture—this little trick works like magic! After storage, you’ll find that the flavors deepen and become even more intoxicating. When serving, there’s no need to reheat; just slice it cold and enjoy that silky texture right away!
Freezing Easy Tres Leches Cake for Later
If you’re looking to extend your cake’s life even longer, freezing is an excellent option! To freeze your Easy Tres Leches Cake properly, ensure it’s completely cooled before wrapping it tightly in plastic wrap followed by aluminum foil. This double-layered protection helps avoid freezer burn and keeps your dessert pristine. It can be frozen for up to three months—ideal for spontaneous celebrations or sweet cravings that sneak up on you! When you’re ready to indulge again, simply move it from the freezer to the fridge a few hours before serving so it can thaw slowly and evenly. Trust me on this; having a slice of this decadent cake waiting in your freezer is such a comforting thought!
In conclusion, whether you’re enjoying a fresh slice right after making it or savoring the last piece pulled from the freezer months later, every bite of this Easy Tres Leches Cake is filled with warmth and sweetness.
Easy Tres Leches Cake

Experience a delightful slice of nostalgia with our Easy Tres Leches Cake—a creamy, dreamy dessert that encapsulates the spirit of celebration in every bite. This cake features light, fluffy layers soaked in a rich combination of sweetened condensed milk, evaporated milk, and heavy cream. Each forkful transports you back to joyful gatherings filled with laughter and love. The addition of vanilla and cinnamon elevates its flavor profile, making it perfect for birthdays, holidays, or simply as a treat to share with family and friends. Plus, it’s incredibly easy to make using a boxed cake mix! Dive into this culinary adventure and bring a smile to everyone’s face with this beloved classic.
- Prep Time: 20 minutes
- Cook Time: 25 minutes
- Total Time: 45 minutes
- Yield: Approximately 12 servings 1x
- Category: Dessert
- Method: Baking
- Cuisine: Mexican
Ingredients
- 1 box yellow cake mix
- 1 package instant vanilla pudding mix
- 3 large eggs
- 1/2 cup whole milk
- 1/2 cup vegetable oil
- 1/4 cup sour cream
- 1 can sweetened condensed milk
- 1 can evaporated milk
- 1 cup heavy cream
Instructions
- Preheat your oven to 350°F (175°C) and spray a 9×13 inch baking pan with non-stick spray.
- In a large bowl, combine the yellow cake mix, instant vanilla pudding mix, and cinnamon. Mix well.
- Add the eggs, whole milk, vegetable oil, sour cream, and vanilla extract; whisk until just combined.
- Pour the batter into the prepared baking pan and bake for about 25 minutes or until golden brown.
- Allow the cake to cool for about 10 minutes before poking holes all over the top.
- In a separate bowl, mix together the sweetened condensed milk, evaporated milk, and heavy cream; pour this mixture over the cooled cake.
- Cover with plastic wrap and chill in the refrigerator for at least 4 hours or overnight.
- Top with whipped cream before serving and dust with cinnamon.
Nutrition
- Serving Size: 1 slice (approximately 100g)
- Calories: 280
- Sugar: 24g
- Sodium: 170mg
- Fat: 14g
- Saturated Fat: 8g
- Unsaturated Fat: 5g
- Trans Fat: 0g
- Carbohydrates: 36g
- Fiber: <1g
- Protein: 4g
- Cholesterol: 60mg