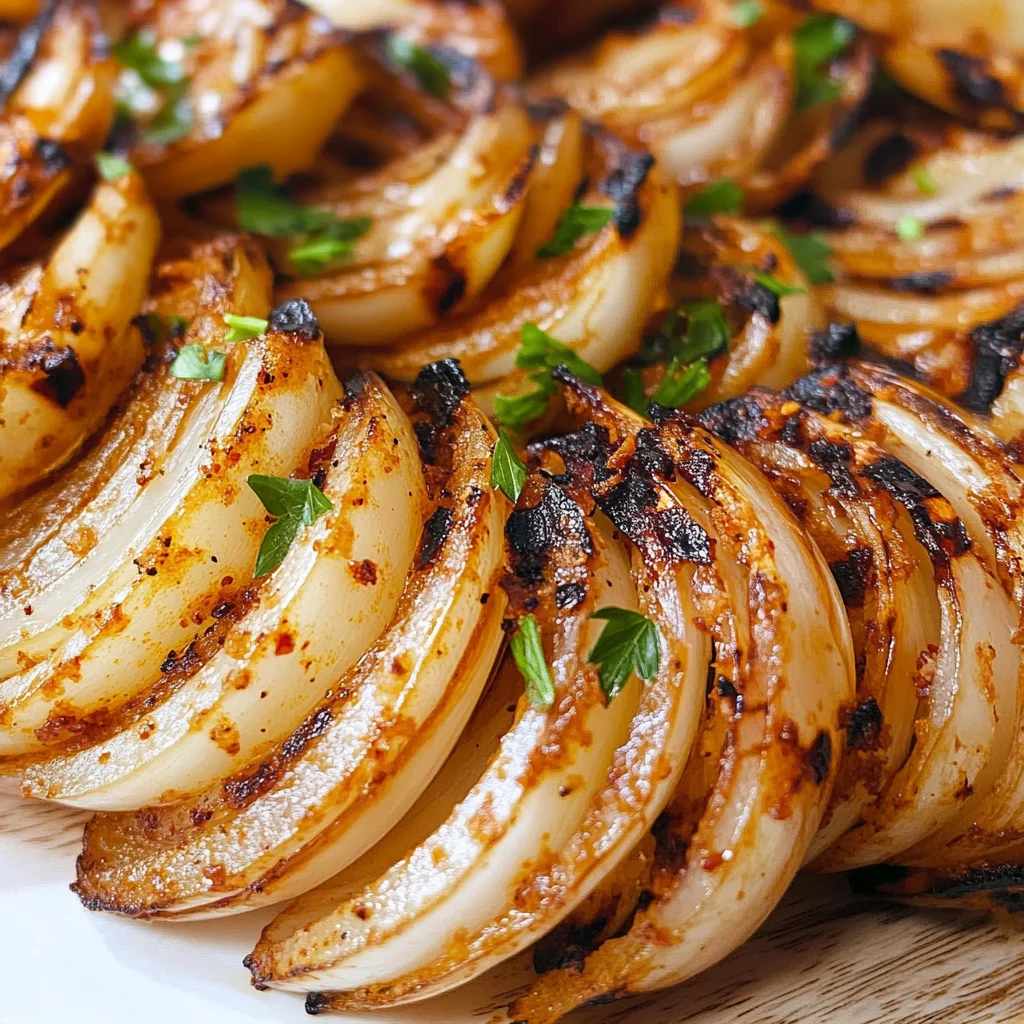
Grilled Onion Blossoms
There’s something utterly magical about food that brings people together, isn’t there? It transcends mere sustenance; it becomes an experience, a cherished memory waiting to be created. I’m particularly enamored by the way flavors can mingle and dance on our palates, especially when grilling brings out that smoky essence we all adore. Today, I want to share with you a recipe that embodies this sense of community and flavor: Grilled Onion Blossoms. These beauties aren’t just appetizers; they are a celebration of sweetness and savory goodness, showcasing the humble onion in such an elegant way that your friends and family will be clamoring for more. Each petal grilled to tender perfection, revealing layers of flavor, is not only visually stunning but also profoundly satisfying to eat.
Imagine gathering around the grill with your favorite people, laughter filling the air as you unveil these stunning onion blossoms. The anticipation builds as the aroma wafts through the yard—a sweet scent mingled with a hint of char—inviting everyone to come closer. As you break apart the petals and dip them into a creamy sauce that complements their natural sweetness perfectly, you’ll discover why this dish has earned a special place at my table. It’s truly extraordinary how something so simple can create such joy and connection among loved ones.
Equipment You’ll Need:
Having the right tools makes all the difference in creating these gorgeous Grilled Onion Blossoms—and trust me, there’s nothing worse than fumbling through half-baked steps because you lack essential equipment! Let me guide you through what you’ll need to make this process smooth sailing.
- Grill – Whether you’re using charcoal or gas doesn’t matter as much as ensuring it’s preheated properly! A good grill provides even heat distribution which is crucial here; you want those onions cooked thoroughly while achieving lovely char marks.
- Cutting board – This trusty companion will help ensure safety while chopping away at those beautiful Vidalia onions! A sturdy cutting board gives stability during preparation—a must-have in any kitchen setup.
- Sharp chef’s knife – Investing in a good quality knife makes slicing through those onions effortless—and trust me, having sharp tools is key to safety too!
- Small mixing bowls – You’ll need these for combining our sauces and seasoning mixtures efficiently without mess! Having separate bowls helps maintain organization throughout cooking.
With everything gathered together—the ingredients laid out like pieces on your culinary chessboard—and tools at your fingertips ready to spring into action…let’s begin crafting these stunning Grilled Onion Blossoms!
I hope you’re getting excited about making these Grilled Onion Blossoms as much as I am sharing them with you! There’s something truly special about gathering around food prepared from scratch together—it ignites warmth within every home shared amongst friends & family alike…So let’s keep going strong towards completing our culinary masterpiece next time—you won’t want miss what comes after grilling magic happens next step onward…Stay tuned my dear friend because magic awaits us ahead as we savor every moment made deliciously memorable together soon enough!
Step 1: Preparing the Onions
Begin by selecting large sweet onions, such as Vidalia onions, because their natural sweetness becomes even more pronounced when grilled. Place each onion on a cutting board and carefully slice off about ½ inch from the top. Be sure to keep the root end intact—this is important because it holds the onion together while it cooks.
Next, peel away the outer skin so the smooth layers underneath are exposed. Turn the onion cut-side down so it sits flat on the cutting board. This stable base will make the next step much easier and safer.
Step 2: Creating the Blossom Shape
Using a sharp chef’s knife, begin making vertical cuts from the top of the onion down toward the root. Make sure you stop about ½ inch from the bottom so the onion remains connected.
Start by cutting the onion into four equal sections, then continue slicing each section again until you have about 12–16 petal-like segments. As the onion begins to open slightly, you’ll notice it naturally forming the beautiful “blossom” shape that gives this recipe its name.
Gently separate the layers with your fingers to help the petals fan outward. This allows the heat and seasonings to reach every layer during grilling.
Step 3: Preparing the Seasoning Blend
Now it’s time to create the flavorful seasoning that will elevate these blossoms. In a small mixing bowl, combine grated Parmesan cheese, paprika, cayenne pepper, Italian seasoning, salt, and black pepper.
Stir everything together until the spices are evenly distributed throughout the cheese. This mixture will add a savory, slightly smoky flavor that pairs perfectly with the natural sweetness of the grilled onions.
Set the seasoning blend aside—you’ll use it shortly once the onions begin to cook.
Step 4: Opening and Seasoning the Blossoms
Place the prepared onion blossoms onto a plate or tray. Using your fingers, gently pull apart the onion layers to create more space between the petals. This step is important because it allows the oil and seasoning to reach deeper into the onion.
Once the petals are slightly opened, lightly sprinkle salt and pepper over the blossoms to start building flavor. At this stage, the onions are ready for the olive oil drizzle and grilling process that will transform them into tender, golden blossoms.
Step 5: Drizzling with Liquid Gold
Once your onions have been artfully cut into those delightful petal-like shapes, it’s time to give them a luxurious drizzle of oil. This step is absolutely paramount because the oil not only adds richness but also helps in achieving that beautiful char and caramelization on the grill. When you drizzle about two tablespoons of olive oil over the blossoms, you’re essentially coating them in liquid gold, allowing each petal to absorb those flavors while preventing dryness. Don’t rush this step; take your time to ensure each section gets a good amount of oil. You want to see it glistening but not swimming in it—too much oil can lead to flare-ups on the grill, which is something we definitely want to avoid.
Now, as you prepare to place these marvelous creations on the grill, make sure your grill is preheated over medium-high heat. The right temperature is crucial here; too low and they’ll just steam without developing that gorgeous golden crust, while too high could burn them before they get tender. I promise you, patience pays off in grilled onion blossoms! Once those onions hit the grill, listen for that sizzle—it’s music to your ears and a sign that those sugars are starting to caramelize beautifully.
Step 6: The Grilling Dance
With your onions oiled and ready for their moment in the spotlight, carefully place them cut-side up on the preheated grill. It’s important to make sure they’re spaced out just enough so that each blossom has room to breathe and develop its flavor. Close the lid gently and let them work their magic for about 15 minutes. This is where the transformation happens—the high heat draws out moisture from the onions while also encouraging those natural sugars to caramelize. Keep an eye on them; you’ll want to check occasionally but resist the temptation to lift the lid too often! Each time you do, you’re allowing precious heat—and flavor—to escape.
As they cook, you’ll notice that wonderful aroma wafting through the air, enticing everyone nearby. Those hints of sweetness combined with a hint of smokiness create an utterly intoxicating scent that’s difficult to resist! The goal here is for them to become tender and lightly charred—those char marks aren’t just pretty; they add layers of flavor. So how do you know when they’re done? Gently tug at a petal; if it pulls away easily and feels soft yet firm, then you’ve hit that sweet spot!
Step 7: The Cheese-Spice Finale
Now comes one of my favorite parts—the sprinkling of our cheese-spice mixture! After you’ve grilled the onions for about 15 minutes until they look invitingly golden brown with subtle char marks appearing, it’s time for this delicious finishing touch. This isn’t just any sprinkle; it’s where flavor truly elevates! In a small bowl, you’ve already prepared a blend of finely grated Parmesan cheese, paprika, cayenne pepper, and Italian seasoning—all stars in their own right but together create a symphony of flavors that harmonizes beautifully with the sweetness of those grilled onions.
When you’re ready to apply this mixture, don’t rush it—take your time to ensure every petal gets its fair share of this cheesy goodness. Use a spoon or even your fingers (clean hands are essential here) and gently press it into every nook and cranny of those onion petals. Why is this important? Well, not only does it add rich umami flavors from the cheese but also creates a delightful crunch as it crisps up during grilling. Trust me on this part—you want those bits clinging lovingly onto each blossom for maximum flavor impact!
Step 8: Garnishing with Freshness
Once you’ve adorned your grilled onion blossoms with that cheesy spice mixture and let them grill for another 3-5 minutes until everything melds beautifully together (and yes—keep listening for that delightful sizzle), it’s time for one last flourish before serving: fresh parsley! This final touch isn’t just for looks; it brightens up everything by adding a pop of color and freshness that perfectly balances out all those rich flavors we’ve built up during cooking.
After pulling these beauties off the grill—be careful as they’ll be hot!—allow them just a minute or two to rest before serving. This brief pause allows all those incredible juices inside to redistribute evenly throughout the blooms rather than spilling out immediately when sliced or pulled apart. And believe me when I say this makes all the difference! Your patience will be rewarded with an explosion of flavors in every bite.
To serve these Grilled Onion Blossoms properly, arrange them artistically on your favorite platter or serving dish drizzled with some extra olive oil if desired—just think presentation matters! Pair them alongside our zesty dipping sauce made earlier using mayonnaise, sour cream, ketchup, Worcestershire sauce (the non-alcoholic kind), paprika, and cayenne pepper—a dip that’s creamy yet packs just enough punch without overshadowing our star ingredient.
Conclusion:
As we wrap up this culinary journey together through the delightful world of Grilled Onion Blossoms, I hope you’re feeling as inspired as I am! This recipe is not just about cooking; it’s about creating something truly extraordinary right in your own kitchen. The sweet Vidalia onions transform into golden-brown blossoms filled with cheesy goodness and vibrant spices that dance on your palate. Each ingredient plays its part perfectly—the creamy dipping sauce providing that luscious contrast that elevates every bite into something profoundly satisfying.
I cannot emphasize enough why these Grilled Onion Blossoms are a must-try. The process is simple yet rewarding, allowing anyone—whether you’re an experienced chef or just starting out—to feel like a culinary artist. They shine brightly at barbecues, family gatherings, or even as a cozy snack while binge-watching your favorite show. The moment you pull these beauties off the grill and let their intoxicating aroma waft through the air is nothing short of magical.
Imagine savoring one with a side of fresh guacamole or perhaps pairing it with crispy grilled vegetables for an afternoon pick-me-up! For those special gatherings, serve them alongside homemade hummus or tangy tzatziki for a truly decadent experience that will have your guests raving about your culinary prowess long after the last bite has been taken.
Feeling adventurous? This recipe is wonderfully adaptable! Experiment with different cheeses like feta or gouda to create new dimensions of flavor or toss in some chopped herbs like chives or dill for an unexpected twist that could make these blossoms even more spectacular! Don’t hesitate to share your own variations with friends and family—I can’t wait to hear how you put your unique spin on this classic dish. So grab those onions and get grilling; I promise you won’t regret taking this delicious leap!
Grilled Onion Blossoms
Delight your taste buds with these Grilled Onion Blossoms—sweet, cheesy perfection grilled to golden bliss! Try them today!
- Prep Time: 20 minutes
- Cook Time: 20 minutes
- Total Time: 40 minutes
- Yield: Serves approximately 4 people 1x
- Category: Appetizers
- Method: Grilling
- Cuisine: Contemporary
Ingredients
- 4 sweet Vidalia onions
- 1/4 cup mayonnaise
- 1/4 cup sour cream
- 1 tablespoon ketchup
- 1 teaspoon vegetarian Worcestershire sauce
- 1/2 cup finely grated Parmesan cheese
- 1 tablespoon paprika (divided)
- Pinch of cayenne pepper (divided)
- 1/2 teaspoon Italian seasoning
- Olive oil for drizzling
- Fresh parsley for garnish
Instructions
- Preheat your grill to medium-high heat.
- Prepare the dipping sauce by mixing mayonnaise, sour cream, ketchup, Worcestershire sauce, 1/2 tablespoon paprika, and cayenne pepper in a bowl until smooth.
- Cut the tops off the Vidalia onions without cutting through the root; carefully slice downwards to create petal-like sections.
- Drizzle olive oil over each onion blossom and sprinkle with the cheese-spice mixture (Parmesan, remaining paprika, cayenne pepper, and Italian seasoning), pressing gently to adhere.
- Grill cut-side up for about 15 minutes until tender and lightly charred.
- Serve warm with the dipping sauce and garnish with fresh parsley.
Nutrition
- Serving Size: 1 onion blossom (90g)
- Calories: 136
- Sugar: 2g
- Sodium: 280mg
- Fat: 9g
- Saturated Fat: 3g
- Unsaturated Fat: 5g
- Trans Fat: 0g
- Carbohydrates: 9g
- Fiber: 1g
- Protein: 5g
- Cholesterol: 12mg