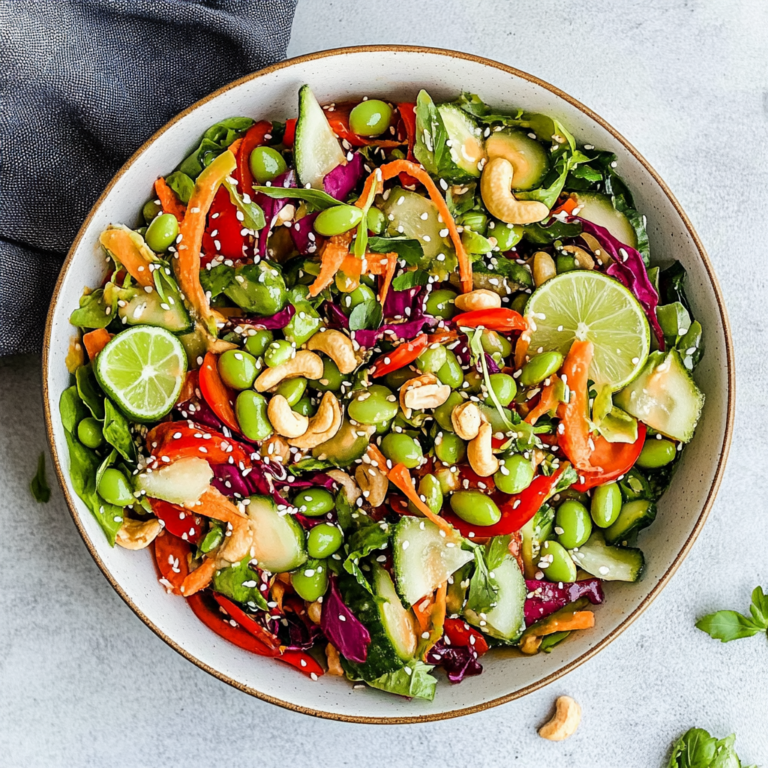
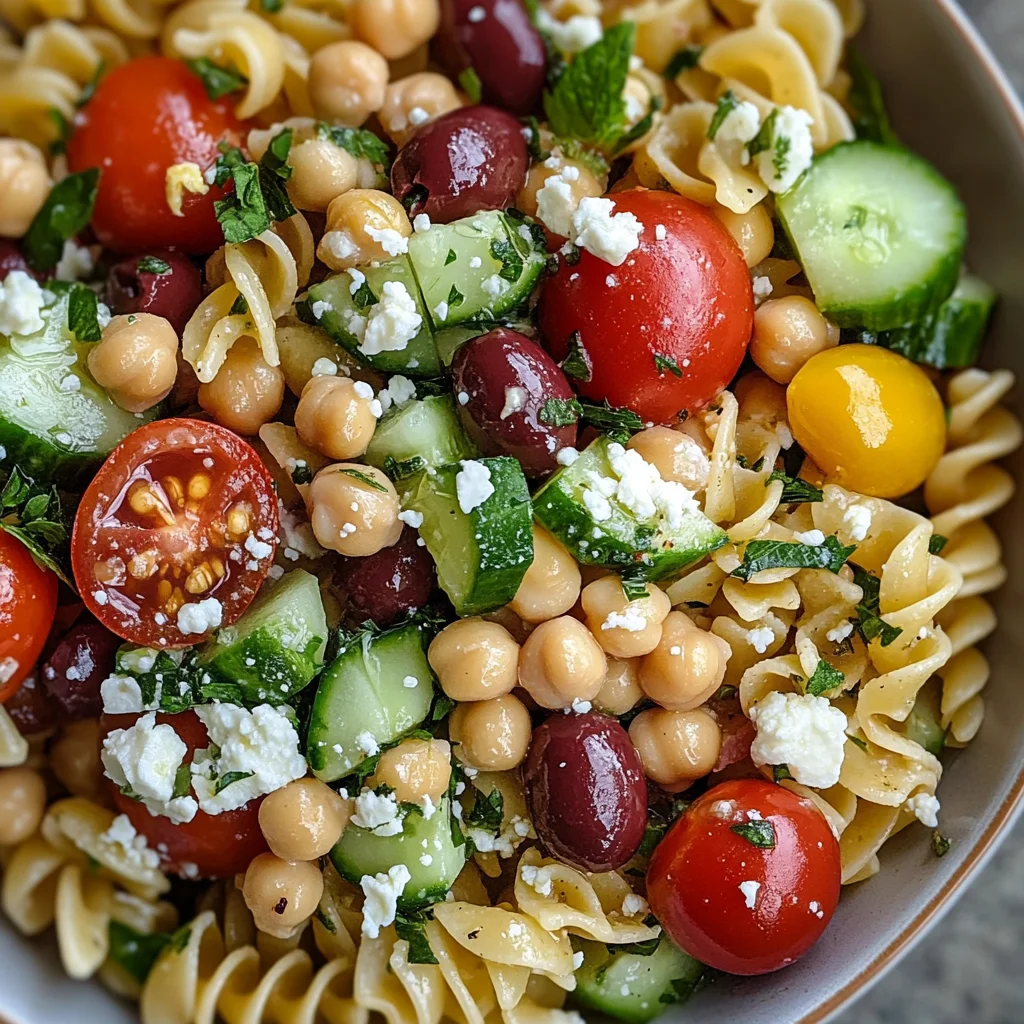
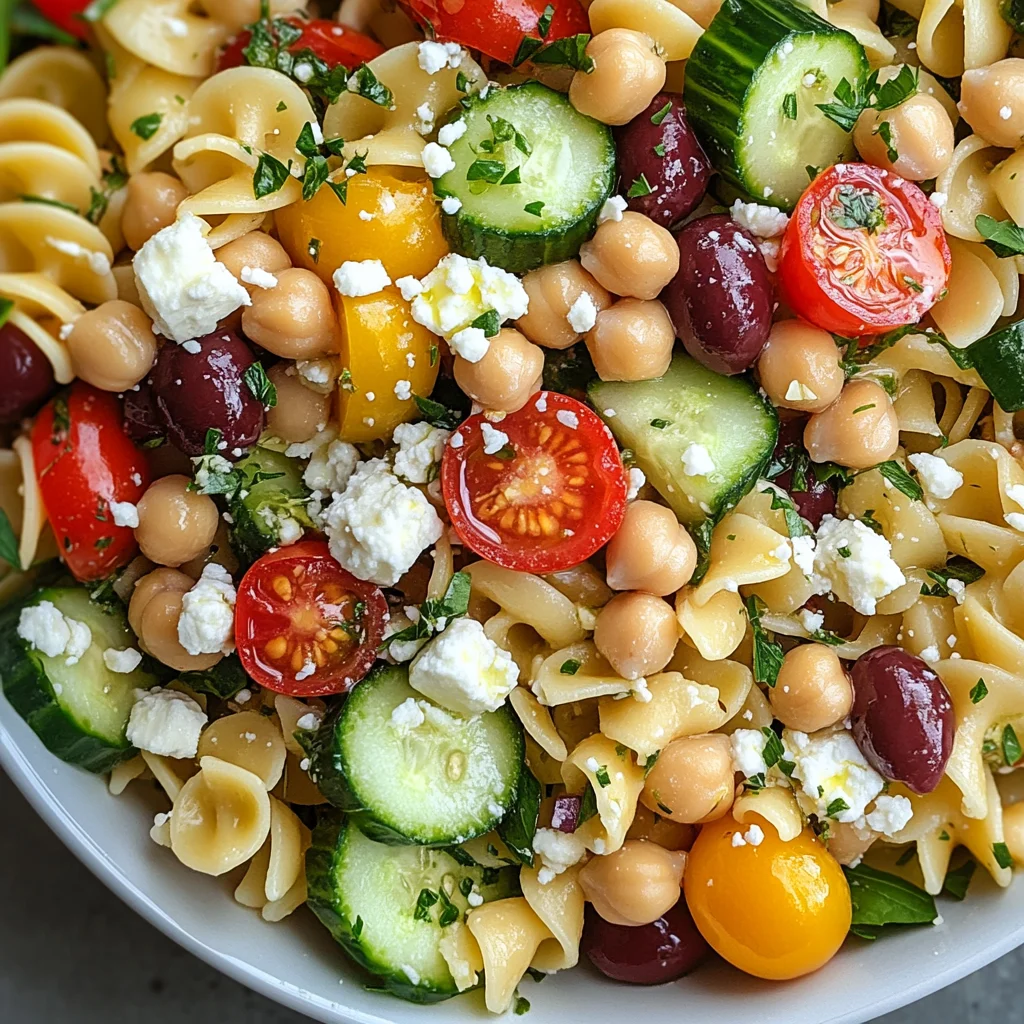
mediterranean chickpea pasta salad
There’s something truly magical about a dish that brings together vibrant colors, hearty textures, and a symphony of flavors—like our Mediterranean chickpea pasta salad. This is more than just a meal; it’s an experience that dances on your palate and fills your heart with warmth. Picture this: tender pasta mingling with nutty chickpeas, crisp cucumbers, juicy cherry tomatoes, and briny olives, all dressed in a zesty lemon vinaigrette that sings of sunny Mediterranean afternoons. As you take a bite, the freshness bursts forth like a gentle breeze, making each mouthful not only satisfying but also uplifting. I promise you, this dish has the power to transport you to sun-drenched terraces overlooking azure seas, where laughter and good food come together in joyous harmony.
Every time I prepare this Mediterranean chickpea pasta salad, it feels like a celebration of life itself—a tribute to the seasons and the abundance they bring. It’s perfect for picnics under the sky or as a side at family gatherings where stories are shared over plates filled with love. The beauty of this salad lies not just in its simplicity but also in its versatility; it can be served as a hearty main course or as a delightful accompaniment to grilled vegetables or fresh fish. Each ingredient plays a vital role, creating layers of flavor that keep you coming back for more. Trust me when I say this salad is not just food; it’s a bridge connecting us with tradition while embracing modern wellness. Let’s dive into making this culinary masterpiece together!
mediterranean chickpea pasta salad: A Sunshine-Filled Delight
Welcome to the world of fresh flavors and wholesome ingredients! With just a handful of pantry staples and fresh produce, we’ll create an unforgettable Mediterranean chickpea pasta salad that’s both nourishing and delicious.
Ingredients:
As we embark on this culinary journey together, let’s explore each ingredient in our Mediterranean chickpea pasta salad. These components not only harmonize beautifully but also add their unique touch to make every bite profoundly satisfying.
- 2 cups cooked pasta – Choosing the right pasta is absolutely paramount here! Opt for whole-grain or gluten-free varieties if that’s your preference; they not only provide more fiber but also have nutty undertones that complement the other ingredients beautifully. When cooking your pasta, remember to salt your water generously—it should taste like the sea! This seasoning is crucial for enhancing flavor right from the start. Once cooked al dente (that perfect tender yet firm texture), give it a quick rinse under cold water to stop the cooking process and cool it down for our salad.
- 1 cup canned chickpeas (rinsed) – Chickpeas are little powerhouses packed with protein and fiber, making them an excellent addition to our Mediterranean chickpea pasta salad. Rinse them well under cold water before adding them to your dish—this step helps remove excess sodium from the canning process while giving them that clean taste we crave. Their creamy texture balances perfectly against the crunch of fresh veggies, creating that delightful contrast we all love.
- 1/2 cup cucumber – Cucumbers add an invigorating crunch and refreshing quality that brightens up our salad immensely. Choose English cucumbers if available; their thinner skin means less bitterness and fewer seeds—perfect for salads! When chopping them into bite-sized pieces, think about how they will pair with each forkful of pasta—this attention to detail makes all the difference in texture and enjoyment.
- 1/2 cup cherry tomatoes – Those vibrant little gems are bursting with sweetness! They’re like nature’s candy—juicy and addictive! Slice them in half so they can soak up all those lovely flavors from our dressing while creating little pockets of flavor in every bite. The contrast between their sweetness and brininess from olives creates an utterly intoxicating experience.
- 1/4 cup olives (sliced) – Olives are essential in achieving that authentic Mediterranean flair! Whether you prefer Kalamata or green olives (or both!), their tangy bite adds depth that elevates our salad. Make sure to slice them thinly for even distribution throughout the dish; this way, everyone gets to enjoy their bold flavor without overwhelming any single bite.
- 1/4 cup feta cheese – Feta cheese brings creaminess and a delightful salty punch that ties everything together beautifully. You can use regular or dairy-free feta alternatives if you’re looking to avoid dairy altogether; both options will add richness but do consider crumbling it over top at serving time for aesthetics as well as taste!
- 2 tbsp olive oil – Liquid gold! Extra virgin olive oil is non-negotiable here—not only does it enrich flavors with its fruity notes, but it also acts as a base for our dressing while providing healthy fats that help absorb all those fat-soluble vitamins from our veggies.
- 1 tbsp lemon juice – Freshly squeezed lemon juice introduces brightness and acidity which cuts through richness beautifully—the perfect foil for creamy feta! Always use fresh lemons rather than bottled juice if possible; there’s no comparison when it comes to flavor!
- 1 tsp dried oregano – This herb is fragrant magic—its earthy aroma evokes sun-kissed gardens and ancient recipes passed down through generations. Dried oregano infuses our dressing with depth while harmonizing perfectly with the other ingredients; don’t skimp on this step!
- Salt and pepper – Finally, we’ll finish things off with salt and pepper to taste—these simple staples enhance every other flavor present in our Mediterranean chickpea pasta salad without overpowering them. Remember: seasoning should be done thoughtfully so each ingredient shines through!
Equipment You’ll Need:
Having the right tools at your disposal makes all the difference when preparing any meal—and this Mediterranean chickpea pasta salad is no exception! These essential partners will help ensure your cooking experience is smooth and enjoyable.
- Large pot – A sturdy pot is crucial for boiling your pasta evenly without overcrowding it; larger pots allow water temperature to stay consistent while cooking effectively so every piece turns out perfectly al dente.
- Colander – After boiling your precious pasta (and rinsing those lovely chickpeas), you’ll need a colander to drain excess water efficiently—this step helps prevent sogginess later on!
- Large mixing bowl – We want ample space when combining ingredients so they mix thoroughly without flying everywhere! A large bowl allows you room to toss ingredients gracefully without worrying about spills.
- Whisk – This handy tool makes whisking up our dressing effortless—you’ll get that lovely emulsification quickly while ensuring every drop captures all those beautiful flavors working together!
Step 1: Cooking Your Pasta Perfectly
First things first: let’s cook our pasta until it’s just right! Bring a generous pot of salted water to boil—this step not only cooks your noodles but also enhances their flavor significantly by infusing them with saltiness right from the start. Once boiling vigorously, add your chosen type of pasta (I often favor penne or fusilli) and stir occasionally to prevent sticking. Set your timer according to package instructions but check for doneness one minute earlier than suggested because we want al dente—that firm texture adds body during tossing later on! When done, drain it immediately using your trusty colander then run cold water over it until cooled completely; this halts further cooking preventing mushy results—a crucial step indeed!
Step 2: Chopping Your Veggies
While waiting on our beautiful pasta concoction, it’s time to chop up those gorgeous veggies! Grab yourself a cutting board along with some sharp knives—it makes cutting easier plus keeps fingers safe throughout prep work too! Begin by slicing cucumbers into quarter-inch pieces ensuring uniformity across bites which guarantees an even distribution when tossed later on—after all presentation matters just as much as taste does! Next up are cherry tomatoes—slice them in half carefully so juices ooze out slightly capturing flavors during mixing—we want these bursts captured perfectly amidst creamy feta crumbles too… yum!
Step 3: Preparing Our Dressing
Now onto one of my favorite parts: making that zesty dressing which pulls everything together beautifully! In another bowl (a medium-sized mixing one works best here), combine extra virgin olive oil along with freshly squeezed lemon juice before sprinkling dried oregano generously over top—this aromatic herb transforms ordinary dressings into extraordinary creations effortlessly! Using your whisk again gives you control over emulsification resulting in silky smoothness throughout instead of separation—the goal here is full incorporation allowing all flavors meld harmoniously upon reaching final assembly stage later on… trust me when I say this part counts immensely!
Step 4: Combining Everything Together
With everything prepped beautifully now comes my favorite moment—the grand assembly where magic happens before our eyes! In that large mixing bowl you set aside earlier (the same one we’ll end up tossing everything together into), add cooled cooked pasta along with rinsed chickpeas then sprinkle chopped cucumbers followed closely by halved cherry tomatoes plus sliced olives ensuring even distribution throughout each layer carefully placed inside awaiting final touches…
Stay tuned as we continue blending these vibrant components into one harmonious dish bursting forth alive with flavor—all ready for chilling away until serving time arrives soon enough!
Let me know if you’d like me to continue further into this joyous journey towards crafting an unforgettable meal together—I’m so excited about sharing each delightful step alongside you!
Step 5: Combine Your Ingredients with Love
Now that your pasta has cooled, it’s time to bring everything together in a beautiful, harmonious medley. Grab a large mixing bowl—this is where the magic happens! Start by adding in those vibrant two cups of cooked pasta. I can already envision the colorful swirls of noodles as they mingle with the other ingredients, creating a feast for both the eyes and the palate. Next, gently fold in one cup of rinsed chickpeas; these little gems pack a protein punch that will leave you feeling satisfied and energized. The chickpeas not only add nutrition but also an enjoyable creaminess that contrasts beautifully with the crunchy vegetables we’re about to introduce.
Now for the fresh veggies! Dice up half a cup of crisp cucumber and slice a generous half-cup of cherry tomatoes in half. The cucumber brings such a refreshing crunch, while the cherry tomatoes burst with juicy sweetness when you take that first bite. Don’t forget to add in one-fourth cup of sliced olives; their briny depth adds an extraordinary dimension to our salad, transporting us straight to sun-drenched Mediterranean shores. Finally, sprinkle in one-fourth cup of crumbled feta cheese, which adds a creamy tanginess that’s absolutely paramount for achieving that quintessential Mediterranean flavor profile. As you combine these ingredients, don’t rush this step—take your time to ensure each component is evenly distributed throughout the salad. This meticulous attention will pay off when you take that first taste!
Step 6: Whisking Up Liquid Gold
Now that your beautiful mosaic of ingredients is assembled, let’s move on to creating the dressing—the liquid gold that ties everything together so wonderfully! In a separate small bowl, measure out two tablespoons of high-quality olive oil. Trust me when I say this: investing in good olive oil makes all the difference! Its rich flavor will elevate every single bite. Add one tablespoon of freshly squeezed lemon juice; this bright acidity cuts through the richness of the feta and chickpeas, creating a balance that’s utterly intoxicating.
Next comes one teaspoon of dried oregano—a spice that encapsulates the essence of Mediterranean cuisine. Oregano is not just an herb; it’s an aromatic hug for our salad! Season generously with salt and pepper according to your taste preferences; I usually suggest starting with about a quarter teaspoon of each and adjusting from there. Now grab a whisk (or even just a fork) and mix everything together until it’s well combined—a lovely emulsion should form where the oil glistens and coats all those flavors beautifully. This step is crucial because it ensures each bite will be bursting with flavor rather than having some parts taste bland or overwhelmed by oiliness.
Step 7: Dress It Up!
With your dressing ready, it’s time for my favorite part—dressing our salad! Drizzle your homemade vinaigrette over the colorful mixture you’ve created in your large bowl. Then comes the fun part: using two large spoons or spatulas, gently toss everything together until every piece is coated in that zesty dressing. This isn’t just about making sure every ingredient gets some dressing; it’s about creating a symphony of flavors where each element complements one another perfectly. As you toss, watch how those colors blend and how each ingredient starts to glisten—that’s when you know you’re on the right track!
But why do we toss instead of stirring? Great question! Tossing is more gentle on delicate ingredients like tomatoes and feta cheese, ensuring they don’t break apart too much—nobody wants mushy tomatoes ruining their gorgeous salad! It’s important to be gentle here; trust me on this! Once everything looks beautifully intertwined and coated with that vibrant dressing, take a moment to admire your handiwork—you’ve already created something truly extraordinary.
Step 8: Chill Out for Maximum Flavor
I cannot stress enough how vital this next step is—chilling your Mediterranean chickpea pasta salad takes it from delicious to downright transcendent! After tossing all those fresh ingredients together, cover your bowl with plastic wrap or transfer everything into an airtight container and pop it into the refrigerator for at least 30 minutes but ideally between 1-2 hours if you have time to spare. Why chill? Well, first off, allowing those flavors to meld creates an intricate tapestry where each ingredient sings together in harmony rather than shouting over one another.
During this chilling period, not only do we enhance flavors but we also allow textures to come into play as well—think about how refreshing it’ll be when served cold on a hot summer day! The coolness will make every bite feel like an embrace from Mother Nature herself as you savor her finest offerings during warmer months. So don’t rush this step; patience truly pays off here as it allows you to serve up what could very well become your new go-to dish for gatherings or even just lazy afternoons at home.
Final Touches
Step 9: Serve With Joy
When you’re ready to serve up this delightful Mediterranean chickpea pasta salad, take it out from its cool resting place in the fridge and give it another gentle toss—this will reintroduce any settled dressing while keeping those lovely textures intact. Consider garnishing with extra crumbles of feta or perhaps even some fresh herbs like parsley or basil for an added burst of freshness right before serving. Trust me when I say this final touch elevates presentation levels significantly!
Now gather around your table—it’s time for everyone to experience what you’ve so lovingly crafted! As you scoop generous portions onto plates or into bowls, take note of those smiles erupting around you as they dig in—they’re savoring not just food but heartwarming memories being made around shared experiences at mealtime. This Mediterranean chickpea pasta salad isn’t just nourishment; it’s connection served on a plate—a reminder that food brings us closer together no matter where we are in life.
So there you have it—a recipe that’s not only easy but deeply satisfying too! Perfect for potlucks or simply enjoying on your own throughout the week as meal prep delights await you! I can’t wait for you all to try this deliciousness out—I promise it’ll be worth every second spent making it! Happy cooking!
Storage and Enjoyment Tips for Your mediterranean chickpea pasta salad
Now that your mediterranean chickpea pasta salad is all dressed up and ready to dazzle, it’s time to talk about how to savor every last delightful morsel! Whether you’re enjoying this dish straight away or saving some for later, I promise you’ll find joy in every bite. This vibrant salad isn’t just good for a single meal; it’s perfect for thoughtful meal prep, picnics, or even potlucks where you want to impress your friends and family. So let’s dive into the best ways to store this beauty while preserving its incredible flavors.
Storing Leftover mediterranean chickpea pasta salad
When it comes to storing your leftover mediterranean chickpea pasta salad, the best approach is to use an airtight container. This is crucial because it keeps the flavors fresh and prevents any unwanted odors from infiltrating your delicious creation. If you’re using glass containers, that’s fantastic—but if plastic is what you have on hand, just make sure it’s well-sealed! You can keep the salad in the refrigerator for up to four days without losing the integrity of those beautiful flavors. Trust me, it actually tastes even better the next day as the ingredients meld together in a beautiful symphony of tastes. If you’re worried about the pasta drying out, a little drizzle of olive oil before sealing can help maintain that delightful texture. When it’s time to serve again, simply toss it gently and perhaps add a touch more lemon juice or olive oil if you desire that bright zing!
Freezing Chickpeas for Later
If you’ve made a generous batch of this stunning mediterranean chickpea pasta salad or want to prepare some ahead of time, consider freezing individual portions of just the chickpeas! To do this properly, rinse and drain them well before laying them flat on a baking sheet lined with parchment paper. Freeze them until solid and then transfer them into freezer-safe bags or containers—this way, they won’t clump together! When it’s time for your next craving, simply pull out what you need; they can be tossed directly into salads while still frozen or thawed overnight in the fridge for use in other dishes. This method not only saves time but also ensures you always have a convenient protein-packed option on hand whenever you’re inspired to whip up something delicious!
Mediterranean Chickpea Pasta Salad
Indulge in a vibrant and refreshing Mediterranean Chickpea Pasta Salad that captures the essence of sunny days and wholesome ingredients. This delightful dish combines tender pasta with protein-packed chickpeas, crisp cucumbers, juicy cherry tomatoes, and briny olives, all tossed in a zesty lemon vinaigrette. Perfect for picnics, family gatherings, or as a satisfying meal prep option, this salad is as versatile as it is delicious. Each bite delivers a burst of flavor, making it not just a meal but an experience that brings everyone together. Prepare to be transported to sunlit terraces with every forkful!
- Prep Time: 15 minutes
- Cook Time: 10 minutes
- Total Time: 25 minutes
- Yield: Serves 6
- Category: Salad
- Method: Mixing
- Cuisine: Mediterranean
Ingredients
- 2 cups cooked pasta (whole-grain or gluten-free)
- 1 cup canned chickpeas (rinsed)
- 1/2 cup cucumber (diced)
- 1/2 cup cherry tomatoes (halved)
- 1/4 cup olives (sliced)
- 1/4 cup feta cheese (or dairy-free alternative)
- 2 tbsp olive oil
- 1 tbsp lemon juice
- 1 tsp dried oregano
- Salt and pepper to taste
Instructions
- Cook the pasta according to package instructions in salted boiling water until al dente. Drain and cool under cold water.
- In a large mixing bowl, combine the cooled pasta, rinsed chickpeas, diced cucumber, halved cherry tomatoes, sliced olives, and crumbled feta cheese.
- In a separate bowl, whisk together olive oil, lemon juice, dried oregano, salt, and pepper until well combined.
- Drizzle the dressing over the salad and gently toss until everything is evenly coated.
- Cover and refrigerate for at least 30 minutes to allow flavors to meld before serving.
Nutrition
- Serving Size: 1 bowl (about 250g)
- Calories: 290
- Sugar: 3g
- Sodium: 320mg
- Fat: 12g
- Saturated Fat: 3g
- Unsaturated Fat: 9g
- Trans Fat: 0g
- Carbohydrates: 38g
- Fiber: 8g
- Protein: 10g
- Cholesterol: 15mg