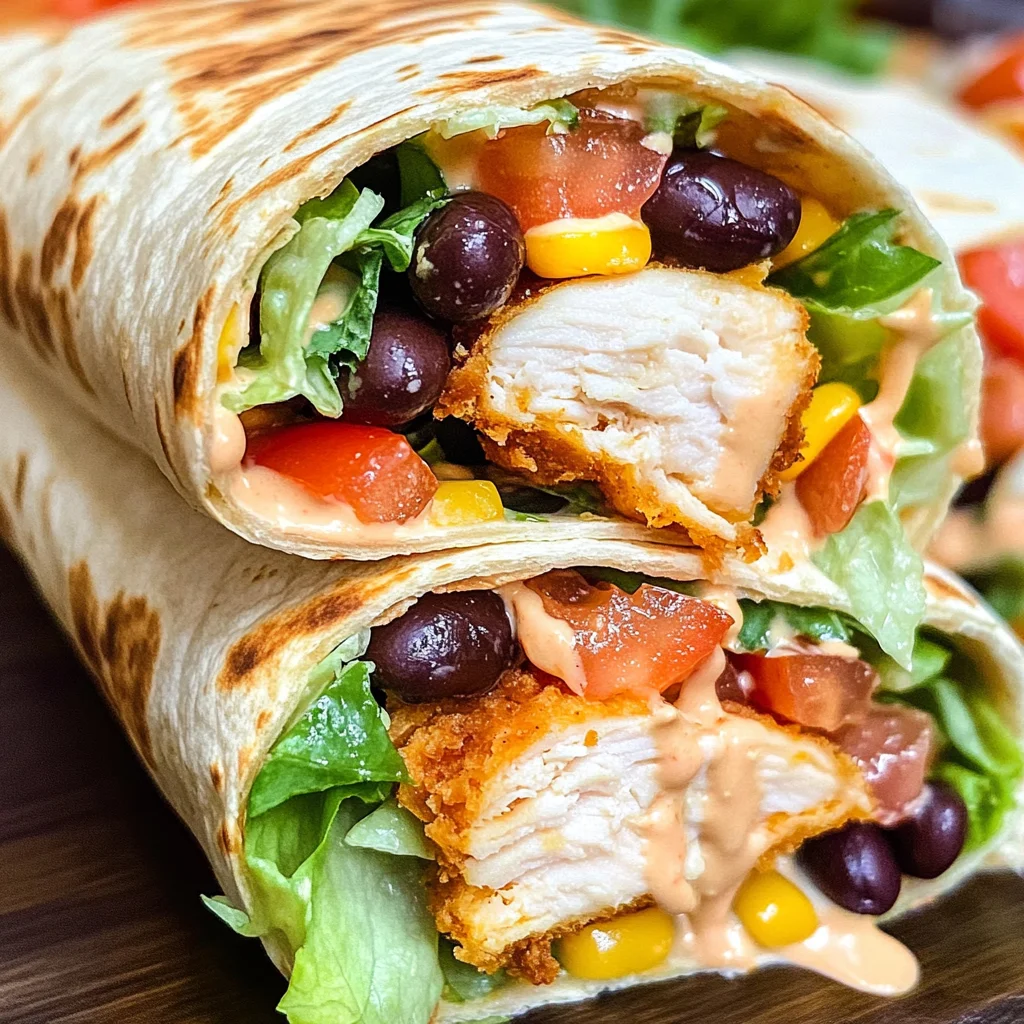
Southwest Chicken Wrap
There’s something truly magical about the way food can evoke memories and create connections. I still remember the first time I sunk my teeth into a Southwest Chicken Wrap—it was like a burst of flavors that transported me to a sun-drenched summer picnic, surrounded by laughter and the scent of fresh ingredients. This dish is more than just a meal; it’s an experience that wraps you in a warm embrace, blending crispy chicken, vibrant vegetables, and a creamy southwest dressing into a symphony of flavors that dances on your palate. I promise you, every bite of this Southwest Chicken Wrap is an invitation to savor life’s simple pleasures while making cherished moments with family and friends.
The beauty of this recipe lies not only in its taste but also in its incredible versatility and ease. In just 25 minutes, you can whip up a delightful lunch or dinner that feels both indulgent and wholesome. What makes it truly special is how it brings together familiar ingredients—like tender chicken tenders, fresh tomatoes, and hearty black beans—into a wrap that feels like home. It’s perfect for busy weeknights when you want something comforting yet quick or even for casual get-togethers where everyone can build their own wrap. Trust me; once you try this recipe, it will undoubtedly become a beloved staple in your culinary rotation.
Southwest Chicken Wrap: A Flavorful Journey Awaits
Welcome to the world of delicious possibilities wrapped in a tortilla! The Southwest Chicken Wrap is not just any meal; it’s a celebration of textures and tastes that come together beautifully. This dish embraces the essence of American-Mexican cuisine while allowing your creativity to shine through. You’ll find yourself enchanted by how easily these ingredients meld into something truly extraordinary. So grab your apron, because we’re about to embark on this delightful culinary adventure together!
Ingredients:
Let’s start by gathering our stars—the ingredients that will transform ordinary moments into something remarkable. Each component plays a vital role in creating the flavor profile that makes these Southwest Chicken Wraps so addictive.
- 6-7 crispy chicken tenders, cooked according to package directions. These little strips of joy are the backbone of our wrap, providing both crunch and heartiness. When selecting chicken tenders, look for those made with whole breast meat as they tend to be juicier and more flavorful. The key here is to follow the package instructions carefully—achieving that perfect crispiness is crucial for texture contrast against our fresh veggies.
- 6 flour tortillas. These soft wraps are essential for holding all those delicious fillings together while offering flexibility in each bite. Opt for high-quality tortillas made with simple ingredients; they should be pliable yet sturdy enough not to tear when filled generously. If you’re feeling adventurous, you might even try whole wheat or spinach tortillas for added flavor and nutrition!
- 6 romaine lettuce leaves. Crunchy greens add freshness and vitality to our wraps while also introducing a delightful texture element. Romaine is particularly great because it holds up well against moist ingredients without wilting too quickly. When choosing your lettuce, look for vibrant green leaves free from blemishes—this ensures you’re getting the best quality possible.
- 2 medium tomatoes, cut into slices. Their juicy sweetness balances out the savory elements beautifully while adding color to your presentation. Choose ripe tomatoes that yield slightly when gently pressed; they’ll be bursting with flavor! Remember not to skip this ingredient—their brightness elevates the entire dish.
- 1 pkg. frozen corn, thawed. Sweet corn kernels contribute bursts of sweetness that harmonize perfectly with savory flavors in our wrap. Thawing before cooking helps achieve that lovely roasted caramelization we desire when we sauté them later on—don’t rush this step!
- 1 Tbsp. oil (for cooking). A splash of oil helps create that golden-brown finish on our corn while preventing sticking during cooking—a small yet significant detail! Canola or olive oil works wonderfully here; both have neutral flavors allowing other ingredients to shine through.
- 1 can black beans, drained and rinsed. These protein-packed gems lend creaminess and depth without overpowering other flavors in our wrap—all while providing fiber that’s good for digestion! Make sure to rinse them thoroughly under cold water; this reduces sodium content while enhancing their natural earthy flavor.
- 1 cup shredded cheddar cheese. Richly melty cheese adds both flavor complexity and indulgence! When selecting cheddar, consider sharp varieties as they impart deeper taste notes compared to mild versions—a little goes a long way!
- 1 1/2 cups mayonnaise. This creamy base serves as the foundation for our southwest dressing, binding everything together seamlessly while adding richness that contrasts beautifully with crunchy veggies—a game-changer indeed! Opt for high-quality mayonnaise with minimal additives for optimal taste.
- 1/2 cup salsa (your favorite brand). Salsa introduces zestiness into our dressing; it’s what brings everything alive! Feel free to choose mild or spicy varieties based on personal preference—just make sure it’s packed with fresh ingredients!
- 1/2 cup milk (or non-dairy alternative). Milk thins out the dressing perfectly while lending creaminess without overwhelming richness—it’s all about balance here! If dairy-free options are preferred, almond or oat milk work wonderfully as substitutes without sacrificing flavor.
- 3 Tbsp taco seasoning (store-bought or homemade). This spice blend is absolutely paramount in achieving authentic southwest flair—think cumin, chili powder, garlic powder…a fiesta in every sprinkle! Don’t hesitate to adjust quantities based on desired spice levels!
- 1 Tbsp cumin adds warmth and earthiness unparalleled by any other spice—it really rounds out those southwestern flavors beautifully! A little pinch can elevate an entire dish from ordinary into extraordinary territory—trust me on this one!
Equipment You’ll Need:
Having the right tools at your disposal transforms cooking from a chore into pure joy—it makes everything smoother and more enjoyable! While these items may not be ingredients, they are essential partners in crafting something wonderful.
- Baking sheet – A sturdy baking sheet is invaluable for roasting our crispy chicken tenders evenly without sticking or burning—a non-negotiable piece of equipment if you want consistent results every time!
- Mixing bowls – Having several mixing bowls on hand allows us space to combine different components effortlessly—whether whipping up dressings or tossing salads beforehand!
- Skillet – A non-stick skillet will help sauté our corn until golden brown without any hassle—it’s key for achieving perfect texture while keeping cleanup relatively simple!
- Sharp knife & cutting board – Using sharp knives ensures precise cuts when slicing veggies; dull knives can lead to frustration (and accidents!). A sturdy cutting board provides stability during prep work—both are worth investing in!
In closing this section about tools: remember that having good-quality equipment enhances your overall experience significantly—it empowers creativity within each culinary endeavor!
Preparing the Southwest Chicken Wrap / Making Magic Happen
Step 1: Prepping Our Crispy Chickens
First things first: preheat your oven according to package directions so those chicken tenders emerge crisped-to-perfection from their cozy heat bath! While waiting patiently for them–as we all must do sometimes–let’s take advantage of this downtime by preparing our delicious southwest dressing mixture ahead of time! In a small mixing bowl (or whatever vessel speaks most comfortably), combine mayonnaise, milk, salsa along with taco seasoning & cumin—give them all good whisk until smooth & creamy goodness appears before us… Ahh yes! That divine aroma wafting through the air already hints at greatness ahead…Trust me when I say mixing these elements together creates sheer liquid gold destined for artistic masterpiece wrapped snugly inside tortillas later!
Step 2: Sautéing Sweet Corn
Once you’ve placed those chicken strips safely inside their heated sanctuary (a.k.a., oven), let’s turn attention towards sweet thawed corn kernels waiting eagerly offstage! Heat oil over medium-high heat within skillet until shimmering like sunshine dancing across water—as soon as it reaches desired temperature range (hot but not smoking!), add corn directly onto surface below—spread evenly across pan surface so they get maximum exposure during cooking process…This part takes only minutes but trust me here folks: don’t rush through this step either…it’s crucial because we want those gorgeous golden brown bits forming as natural sugars caramelize beautifully bringing forth delightful textures along with subtly enhanced flavors too…Now step aside momentarily & let magic happen before removing from heat once browned nicely—it’ll leave everyone craving more after tasting just one bite!
Step 3: Transforming Tender Chicken
With both corn sizzling away & chicken nearing readiness within oven’s embrace…let’s focus now upon transforming tender pieces freshly emerged from warmth into smaller strips perfect fit nestled cozily between layers filled generously later on—we do this by simply cutting them crosswise using sharp knife previously mentioned above…Make sure cuts remain uniform thickness throughout ensuring even distribution whenever wrapping begins shortly thereafter—we wouldn’t want anyone left behind feeling neglected during assembly phase now would we?
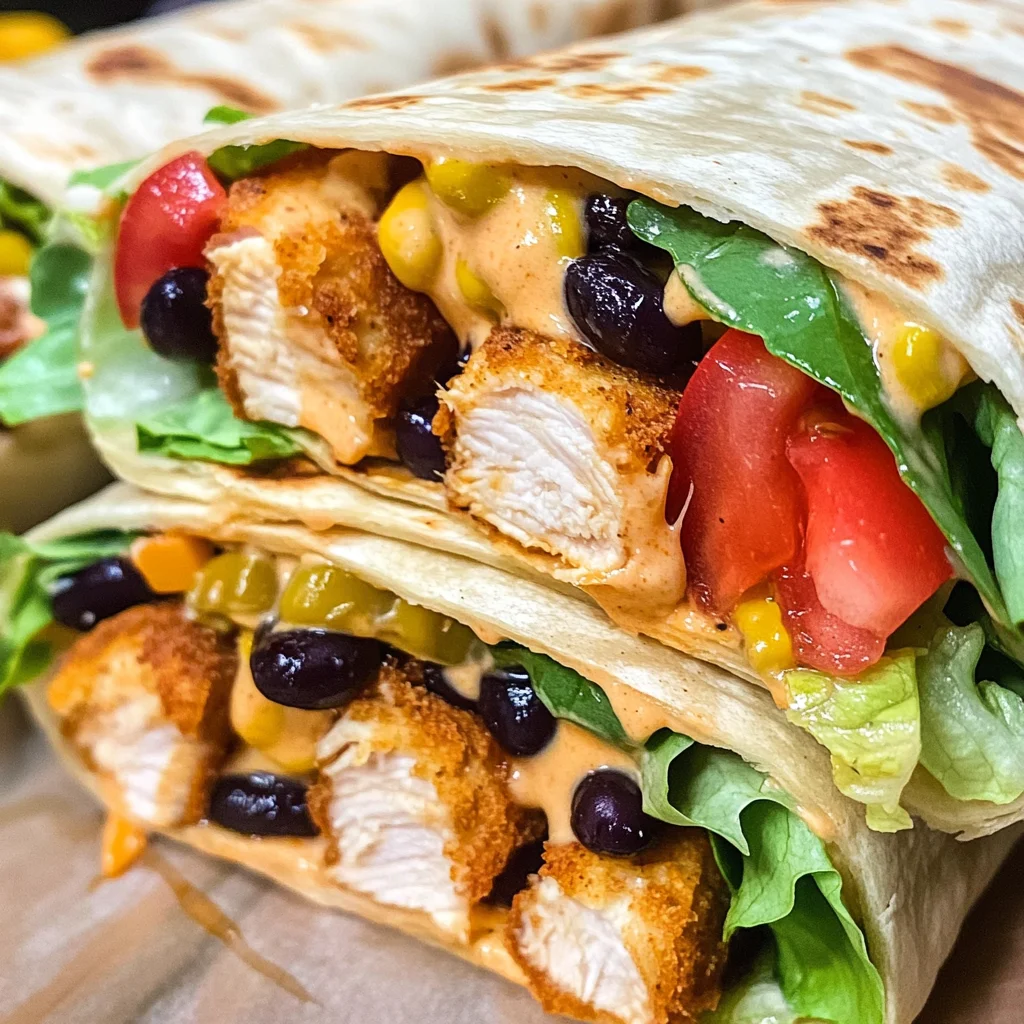
Step 4: Assembling The Wraps
At last ladies & gentlemen…the moment we’ve all been waiting impatiently arrives where everything comes together harmoniously! Grab tortillas laid flat upon clean surface nearby then begin assembly process by adding couple tablespoons worth southwest dressing mixture onto lower half area leaving room necessary roll up tightly afterward…Next layer generously atop dressing those crunchy romaine leaves followed closely by sliced tomatoes bursting juice upon contact plus drained black beans alongside sweetened corn kernels previously sautéed earlier paired beautifully alongside our freshly cut pieces glorious crispy chickens adorned lastly drizzled further with additional southwest dressing too if desired before rolling tightly closed transforming chaos into structured art piece ready devoured whole soon afterwards…
And there you have it—a beautiful assembly process creating heavenly wraps awaiting enjoyment amongst family members gathered around table sharing laughter alongside bites taken eagerly amid conversations blossoming lively throughout evening ahead…
I hope you’re feeling excited about diving into this recipe—I know I am! Just imagine how wonderful it’ll feel sitting down together enjoying these delicious Southwest Chicken Wraps after preparing them lovingly beforehand…you’ve got this friend!!
Step 5: Assemble Your Flavorful Masterpiece
Now comes the exciting part—assembling your Southwest Chicken Wrap! This is where all those vibrant ingredients come together to create a dish that not only looks stunning but also bursts with flavor. Start by taking one of your flour tortillas and laying it flat on a clean surface or plate. You want to make sure you have enough space to comfortably work without feeling rushed. When you’re ready, grab a couple of tablespoons of that luscious southwest dressing you prepared earlier and spread it generously across the lower half of the tortilla. Imagine each bite being infused with that creamy, tangy goodness; it’s like a warm hug for your taste buds!
Next, layer in the fresh romaine lettuce leaves. Trust me on this—this crisp green layer is absolutely essential as it adds not only crunch but also a refreshing contrast to the savory chicken and creamy dressing. Follow up with slices of juicy tomatoes; their vibrant red color will not only make your wrap visually appealing but also add a burst of freshness that balances out the richness of the dressing and chicken. Don’t forget about those black beans; they’re packed with fiber and protein, turning this wrap into a complete meal that will keep you satisfied without feeling heavy. Finally, sprinkle on some thawed corn and place those crispy chicken strips on top—don’t skimp here! Ensure every bite contains a bit of everything for an extraordinary flavor experience.
Step 6: Roll It Up Like A Pro
With all your delicious fillings nestled comfortably in the tortilla, it’s time to roll it up tightly like a gift ready to be opened! Begin by gently folding the sides of the tortilla inward, which helps contain all those scrumptious ingredients as you roll. This step is crucial because a well-rolled wrap ensures that each bite is balanced in flavor and texture, making for an utterly satisfying dining experience. Now, starting from the bottom where you’ve layered your fillings, begin to roll away from you. Keep everything snug but not overly tight; if you roll too tightly, you risk tearing the tortilla or spilling out all that goodness when you take a bite.
As you’re rolling, I find it helpful to cradle the wrap gently with one hand while using the other to guide and tuck in any filling that might try to escape. It’s kind of like wrapping up a cozy burrito blanket for your dinner! Once fully rolled, give it a gentle squeeze; this helps compact everything into place. If you’re feeling particularly indulgent (and who can blame you?), feel free to drizzle just a touch more southwest dressing over the top before cutting it in half diagonally—I promise you’ll thank me later when those flavors meld together beautifully!
Step 7: The Sizzling Final Touch
At this point, your Southwest Chicken Wrap is looking absolutely divine! But let’s take it one step further by giving it some extra warmth and texture through grilling or pan-searing. Heat up a non-stick skillet over medium heat—this is where magic happens! The reason we want to grill or crisp up our wraps is simple: it transforms them into something truly extraordinary by adding an enticing crunch while melting all those wonderful flavors together inside. Once your skillet is hot enough (you can test this by carefully flicking some water onto it; if it dances and evaporates quickly, you’re ready), gently place your assembled wraps seam-side down.
Allow them to cook for about 2-3 minutes per side. What you’re looking for here is that gorgeous golden-brown crust forming on the outside—this caramelization enhances flavor through what chefs call the Maillard reaction (a fancy term for how proteins react under heat). Don’t rush this step; flipping too soon can lead to tearing or uneven cooking. Instead, let patience be your ally here as you wait for those delightful grill marks to appear before turning them over with love and care.
Step 8: Serve Your Culinary Creation
Once both sides are beautifully golden-brown—trust me; you’ll know when they’re ready from that irresistible aroma wafting through your kitchen—it’s time to take them off the heat and let them rest for just a moment before serving. Why rest? Well, letting these wraps sit for even just a minute allows all those incredible juices from the chicken and veggies to redistribute throughout each bite instead of spilling out immediately upon cutting. It’s these little details that elevate home cooking into something truly memorable.
After they’ve had their brief moment of respite, slice each wrap in half diagonally with a sharp knife—the act itself feels almost ceremonial! And as you serve them up on plates or wooden boards alongside extra southwest dressing for dipping (because who doesn’t love extra sauce?), take a moment to appreciate how far you’ve come. Each vibrant color, every fragrant ingredient—it all tells a story about care, warmth, and shared moments around the table.
Final Touches: Elevate Your Experience
To round out this delightful meal, consider adding some sides that complement your Southwest Chicken Wrap beautifully. A simple side salad tossed with lime vinaigrette can brighten things up wonderfully or perhaps some crunchy tortilla chips served alongside fresh guacamole will make everyone swoon with joy at dinner time! Each component adds its own unique flair while enhancing flavors overall.
So gather around the table with friends or family (or both!), share stories filled with laughter as you indulge in these wraps made from scratch right at home. I promise you’ll find yourself reaching for seconds—or even thirds—and this recipe will earn its rightful place in your regular dinner rotation! Enjoy every bite—you’ve earned it!
Storage and Enjoyment Tips for Your Southwest Chicken Wrap
Now that you’ve created this delightful Southwest Chicken Wrap bursting with flavors and textures, it’s time to relish every bite! But let’s talk about what happens when you have some leftovers—because trust me, this wrap tastes so good, you’ll want to savor it again. Proper storage is key to keeping your wraps fresh and delicious, and I’m here to guide you through that process.
Storing Leftover Southwest Chicken Wrap
To ensure your leftover Southwest Chicken Wrap stays as delightful as the first bite, it’s essential to store it correctly. Place your wraps in an airtight container; this is crucial because it locks in moisture while keeping unwanted odors out. You can also wrap them tightly in plastic wrap or aluminum foil if you prefer. Generally, they will keep in the refrigerator for about 2-3 days, but I recommend enjoying them within the first 48 hours for optimal taste. To maintain that satisfying crunch of the tortilla and avoid sogginess, consider placing a slice of bread inside the container; it works wonders at absorbing excess moisture! When you’re ready to enjoy again, reheat them gently in the oven or on a skillet over medium heat until warmed through—this way, you’ll revive that crispy texture that makes these wraps truly extraordinary.
Freezing Components for Later
If you want to take your meal prep to the next level or simply want to be prepared for those busy nights ahead, freezing components of your Southwest Chicken Wrap is a fantastic option! The beauty of this method lies in its flexibility; you can freeze individual chicken tenders or even batches of your homemade southwest dressing. To freeze properly, place cooled components in freezer-safe bags or containers, ensuring as much air as possible is removed before sealing. They can keep well frozen for up to three months. When you’re ready to indulge again, thaw them overnight in the fridge and assemble fresh wraps when hunger strikes! This convenience not only saves time but also means you can have a delicious meal at your fingertips whenever cravings hit—how incredible is that?
Southwest Chicken Wrap

Enjoy this easy-to-make Southwest Chicken Wrap packed with flavor! Try this recipe today and bring excitement to your dinner table!
- Prep Time: 10 minutes
- Cook Time: 15 minutes
- Total Time: 25 minutes
- Yield: Serves 6
- Category: Dinner
- Method: Grilling
- Cuisine: Mexican-American
Ingredients
- 6–7 crispy chicken tenders
- 6 flour tortillas
- 6 romaine lettuce leaves
- 2 medium tomatoes, sliced
- 1 pkg. frozen corn, thawed
- 1 Tbsp oil (for cooking)
- 1 can black beans, drained and rinsed
- 1 cup shredded cheddar cheese
- 1 ½ cups mayonnaise
- ½ cup salsa
- ½ cup milk (or non-dairy alternative)
- 3 Tbsp taco seasoning
- 1 Tbsp cumin
Instructions
- Preheat oven for chicken tenders as per package directions.
- Prepare the southwest dressing by whisking together mayonnaise, milk, salsa, taco seasoning, and cumin in a mixing bowl until smooth.
- Sauté thawed corn in oil over medium-high heat until golden brown.
- Once chicken is cooked, cut it into strips.
- Assemble wraps by spreading dressing on tortillas; layer with lettuce, tomatoes, black beans, corn, and chicken strips.
- Roll tightly and grill in a skillet until golden brown on both sides.
Nutrition
- Serving Size: 1 wrap (200g)
- Calories: 495
- Sugar: 3g
- Sodium: 890mg
- Fat: 26g
- Saturated Fat: 6g
- Unsaturated Fat: 18g
- Trans Fat: 0g
- Carbohydrates: 48g
- Fiber: 5g
- Protein: 21g
- Cholesterol: 60mg