Sushi Bake
There’s something deeply enchanting about food that transcends mere sustenance; it carries stories, memories, and a sense of connection. When I think of the Sushi Bake, or sushi casserole as some may call it, I am transported to gatherings with friends and family where laughter and shared experiences intertwine with the delightful aroma of this warm dish wafting from the oven. It’s not just a recipe; it’s an experience that invites you to savor each layer — a beautiful harmony of flavors that seamlessly bridges the gap between traditional sushi and home-cooked comfort food. Imagine spooning into a dish that offers the comforting texture of warm rice combined with the delicate notes of imitation crab meat and the zing of spicy mayo. This is what makes Sushi Bake so special; every bite sings a symphony of flavors that cradles your heart and warms your soul.
What truly captivates me about this dish is its ability to adapt to any occasion, whether it’s a cozy family dinner or a lively potluck gathering with friends. It’s like bringing a piece of Japan into your kitchen while still making room for your personal touch. This fusion of cultures is what makes cooking such an exciting adventure! As you prepare this dish, you’ll find that it invites creativity – don’t hesitate to add more spice if you’re feeling bold or perhaps layer in some fresh veggies for added crunch. Each time you make it, I promise you’ll discover something new and extraordinary about this simple yet profound recipe. So let’s dive into this culinary journey together!
Sushi Bake: A Cozy Casserole Delight
Welcome to the world of Sushi Bake! This is not just another casserole; it’s a unique twist on traditional sushi rolls that will leave you craving more. With layers upon layers of deliciousness, from fluffy sushi rice to creamy spicy mayo and savory imitation crab meat, this dish is designed to be shared — but trust me, you might just want to keep it all for yourself! Let’s embark on this exciting culinary adventure together.
Ingredients:
As we gather our ingredients for this delightful Sushi Bake, think of each component as an essential note in our culinary symphony. Each one plays its part in creating something truly magical.
- 2 cups sushi rice (medium or short grain; about 4 cups cooked). The heart of our Sushi Bake lies in the rice — medium or short-grain varieties are essential here because they have just the right amount of starch to create that signature stickiness we associate with good sushi. When cooked properly, this rice turns fluffy yet sticky enough to hold everything together without becoming mushy or falling apart. Rinse it well before cooking until the water runs clear; this removes excess starch and ensures each grain remains distinct yet cohesive when baked.
- ¼ cup rice vinegar (regular, NOT seasoned rice vinegar). This ingredient adds an essential tangy brightness that balances out the richer flavors in our bake. Regular rice vinegar is preferable here because seasoned versions often contain added sugars and salts which can throw off the delicate balance we’re striving for. It’s like giving our sushi rice a refreshing lift — trust me on this one!
- 1½ tablespoons granulated sugar. A dash of sweetness goes a long way in enhancing flavors without making it overtly sweet. The sugar helps balance out acidity from the vinegar while tying together all the wonderful layers in our bake. It also gives our sushi rice that classic flavor profile reminiscent of traditional sushi.
- 1 teaspoon salt. Salt is absolutely paramount in elevating flavors; it enhances sweetness while also balancing acidity and richness in our dish. Just ensure you measure accurately; too much can overpower our creation.
- Toasted sesame oil (just a small amount for greasing; optional). While this ingredient isn’t required for taste, using toasted sesame oil adds an extra layer of depth and warmth when greasing your baking dish. Its nutty aroma sets the stage beautifully for what’s to come.
- 1 pound imitation crab meat. This ingredient provides that ocean-fresh flavor without being overpowering. Imitation crab has a mild taste that blends seamlessly with other ingredients while adding texture and protein. Look for high-quality brands that use real fish products to enhance authenticity; after all, we want our dish to shine!
- ½ cup Kewpie mayo & ¼ cup Kewpie mayo (totaling ¾ cup). Kewpie mayo is my secret weapon here! Unlike regular mayo, Kewpie has a rich umami flavor thanks to egg yolks rather than whole eggs and is slightly sweeter too. This creaminess contributes significantly to our filling while working harmoniously with other flavors.
- 1 tablespoon Sriracha (or more or less to your preference). Here’s where we kick things up a notch! Sriracha introduces heat that brightens every bite and gives our bake that exciting edge. Don’t hold back if you love spice — adjust according to your taste buds!
- 2 tablespoons sake (optional). While sake brings depth with its complex flavors, feel free to skip it if preferred since we’re avoiding alcohol-based ingredients today—there’s plenty going on already!
- 2 tablespoons soy sauce (light sodium). Soy sauce ties everything together beautifully by adding salty richness without overwhelming other flavors thanks to its lighter sodium content.
- 2 tablespoons granulated sugar (for unagi sauce). Just like before, sugar balances out salty elements while enhancing overall flavor profiles.
- 1 tablespoon mirin (optional). Mirin adds sweetness along with depth — if you’re skipping sake but still want those nuanced notes from Japanese cuisine without alcohol content, mirin can be used instead!
- English cucumber (sliced). Fresh cucumber brings crunchiness and lightness against rich textures; it’s like adding a refreshing splash amidst all those hearty flavors!
- Avocado (sliced). Creamy avocado adds another layer of richness — plus who doesn’t love avocado? Its smoothness complements quite nicely against tangier components.
- Furikake. This seasoning blend consists of seaweed flakes mixed with sesame seeds & spices—it adds umami goodness while enhancing visuals too!
- Seaweed snack (for serving). These little sheets are perfect accompaniments—they provide additional texture contrast when enjoying your bake straight from the oven!
Equipment You’ll Need:
Before we dive into creating magic in the kitchen, let’s gather our trusty tools! Having the right equipment not only makes cooking smoother but also enhances your enjoyment throughout the process.
- Medium saucepan & lid: Essential for cooking sushi rice perfectly — you’ll want even heat distribution here so every grain cooks uniformly without sticking together excessively.
- Baking dish: A glass or ceramic casserole dish works wonders as it allows even baking while showcasing those beautiful layers we’ve created inside!
- Mixing bowl: We’ll need this for combining ingredients smoothly—choose one large enough so nothing spills over during mixing sessions.
- Spatula: A silicone spatula will work best here since it won’t scratch your baking dish nor stick too much as you fold everything together gently.
Step 1: Preparing Your Sushi Rice
Begin by rinsing your sushi rice under cold water until it runs clear—this crucial step removes excess starch which would otherwise lead us astray toward clumpy disaster territory! Once rinsed well enough—place into medium saucepan along with measured water according package directions (usually around 2 cups per cup dry)—bring it up gradually over low-medium heat until boiling occurs then cover tightly reducing flame further down allowing gentle simmering action take place! After about 15 minutes’ patience pays off as aroma fills air announcing readiness—allow resting time afterward letting steam finish cooking process before fluffing up using fork—this ensures perfect texture achieved!
Step 2: Whisking Together Flavors
While waiting on those grains working their magic take moment breathe life into mixture meant uplift entire experience—grab mixing bowl whisk together rice vinegar alongside granulated sugar & salt until dissolved completely—a small task yet absolutely paramount because once poured onto freshly fluffed warm rice these elements meld seamlessly promoting balanced flavors throughout casserole itself later on!
Step 3: Combining Creamy Goodness
Now comes arguably most delightful part assembling everything—start by folding half portion Kewpie mayo along Sriracha directly into cooled imitation crab meat blending thoroughly ensuring even coverage across all chunks—it’s like wrapping them up snugly so each bite bursts forth joyous surprises later down line! Set aside remaining mayonnaise mixture since we’ll be needing later layering extravaganza unfolding ahead…
Step 4: Layering That Perfect Casserole
Time now assemble layers within baking dish starting first base layer comprising well-fluffed seasoned sushi rice spread evenly across bottom pressing gently downwards forming even foundation—we’re building something beautiful here folks! Next pour luscious crab mixture atop ensuring uniform distribution followed closely by second dose creamy mayonnaise blend draped generously over surface sprinkling furikake seasoning atop ready ignite taste buds further before finally crowning masterpiece fresh sliced cucumbers & ripe avocados nestling cozily underneath final coat awaiting glorious bake transformation occurring next…
And there you have just begun unraveling wondrous journey towards scrumptious satisfaction ahead! I hope you’re feeling excited about creating your very own Sushi Bake masterpiece full flavor-packed goodness waiting right around corner…
Step 5: Perfecting Your Sushi Rice – The Heart of the Dish
Now, let’s dive into the very foundation of your sushi bake: the rice! Rinse your sushi rice under cold water in a fine-mesh strainer until the water runs clear. This process is crucial because it removes excess starch, which can make your rice gummy instead of delightfully sticky. Once rinsed, combine the rice with 2½ cups of fresh water in a medium saucepan and bring it to a boil over medium-high heat. When it starts bubbling wildly, reduce the heat to low, cover it tightly with a lid, and let it simmer for about 18-20 minutes.
Why is this step so important? Cooking the rice correctly transforms it from simple grains into a beautifully cohesive base for your sushi bake. After the time is up, resist the urge to lift that lid right away; let it steam off heat for another 10 minutes. This resting period allows any remaining moisture to redistribute evenly throughout the grains, creating that perfect chewy texture we all love in sushi. When you finally lift that lid, you should see fluffy, slightly glossy rice – simply divine!
Step 6: Crafting the Sushi Vinegar – A Balancing Act
While your rice is resting and soaking up all that goodness, it’s time to prepare your sushi vinegar. In a small saucepan over low heat, combine ¼ cup of rice vinegar, 1½ tablespoons of granulated sugar, and 1 teaspoon of salt. Stir gently until both the sugar and salt are fully dissolved; this should take just a couple of minutes. The warmth helps meld these flavors together but doesn’t boil—trust me on this; boiling can alter their delicate essence.
This mixture is what gives your sushi rice its signature tangy flavor that balances out all the rich ingredients in your sushi bake. Once dissolved, remove it from heat and allow it to cool slightly before folding it into your cooked rice using a wooden spatula or paddle. Gently fluff the rice while incorporating the vinegar mixture—this technique is called cutting and helps maintain the integrity of each grain while infusing them with flavor. You’re looking for a light sheen on each grain as they absorb that luscious liquid gold.
Step 7: Building Layers of Flavor – Assembling Your Bake
With your seasoned sushi rice ready and waiting patiently, it’s time to layer everything into a baking dish that will soon be an aromatic masterpiece! Preheat your oven to 350°F (175°C) while you work. Grease an 8×8 inch baking dish lightly with toasted sesame oil—this step might seem minor but creates a non-stick surface that makes serving so much easier later on.
Now for the fun part! Start by spreading half of your perfectly seasoned sushi rice evenly across the bottom of the prepared dish using wet hands or a spatula; this keeps things tidy and prevents sticking. Next, take your pound of imitation crab meat and break it apart gently with your fingers before layering it atop that beautiful bed of rice—don’t be afraid to get messy here! This layering technique not only adds texture but also ensures every bite has that delightful crab flavor mingling with our other ingredients.
Step 8: Saucing It Up – The Flavor Elevation
This step transforms our humble layers into something utterly intoxicating! In a mixing bowl, combine ½ cup Kewpie mayo with an additional ¼ cup (yes, you read that right!) along with Sriracha based on how spicy you’d like this dish to be—feel free to adjust according to your taste buds’ preferences! Add two tablespoons each of soy sauce (light sodium for balance) and granulated sugar along with one tablespoon of mirin for depth. Whisk everything together until smooth; you want this sauce to be creamy yet pourable.
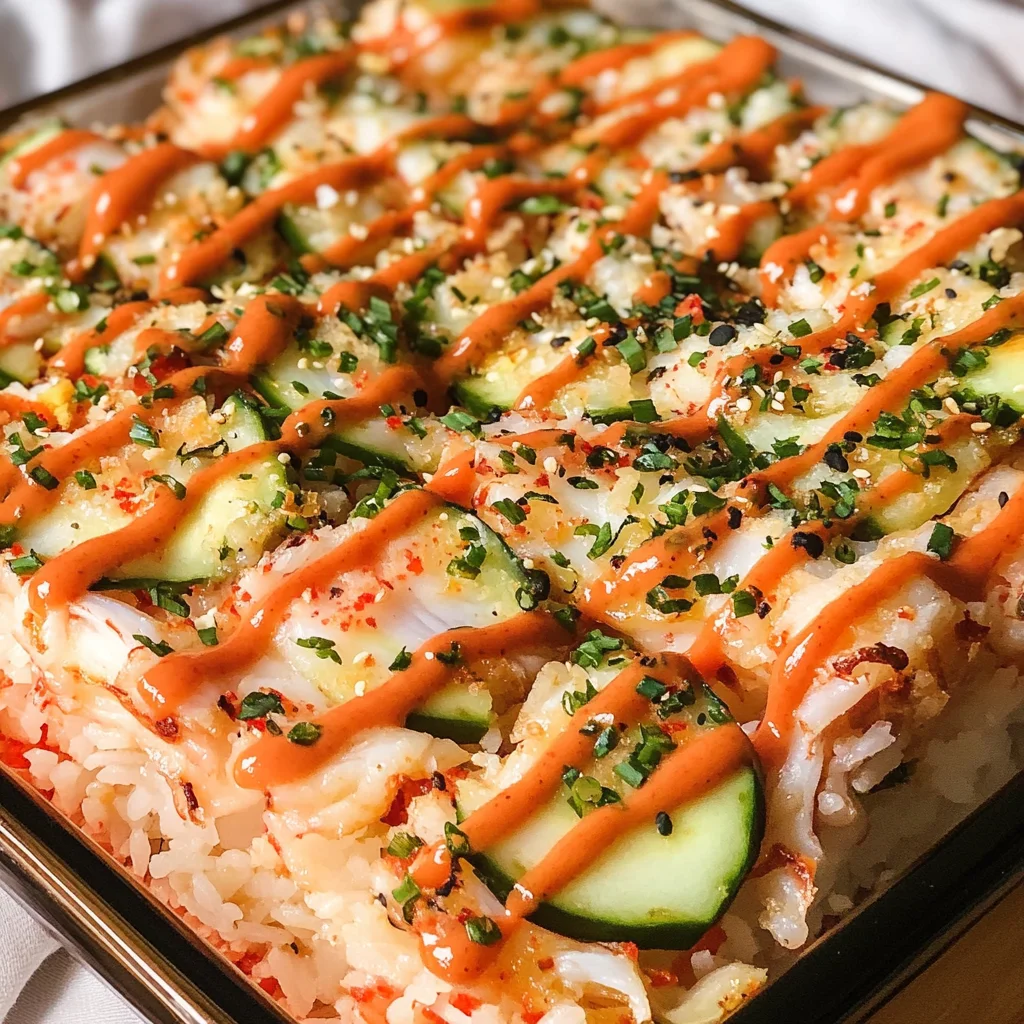
Once mixed well, drizzle half of this luscious concoction over the crab layer in your baking dish. Trust me when I say this sauce brings everything together like an artist’s brush on canvas! Spread it out evenly using a spatula so every corner gets touched by its magic. Top off everything with another layer of rice followed by more sauce on top—yes, we want those flavors stacked high! In fact, don’t forget to save some sauce for drizzling on top after baking; it’s going to add an extra layer of flavor that makes every bite even more delightful.
Baking Your Perfect Sushi Bake
Now comes one of my favorite moments—the baking phase! There’s something so satisfying about watching all those layers meld together as they cook.
Step 9: Baking – The Grand Finale
Carefully place your assembled sushi bake into that preheated oven for about 15-20 minutes or until heated through and golden on top—a visual cue you’ll come to cherish as you watch those edges bubble ever so slightly. As it bakes, I want you to savor this moment; imagine how those flavors are coming together in ways you can hardly wait to experience!
The aroma wafting through your kitchen will be utterly intoxicating—you’ll know you’re on the right track when you start getting whiffs of umami goodness filling every nook and cranny! When it’s done baking, allow it to rest for just five minutes before diving in; this brief moment allows everything inside to settle just enough so when you scoop out portions they hold together beautifully without falling apart.
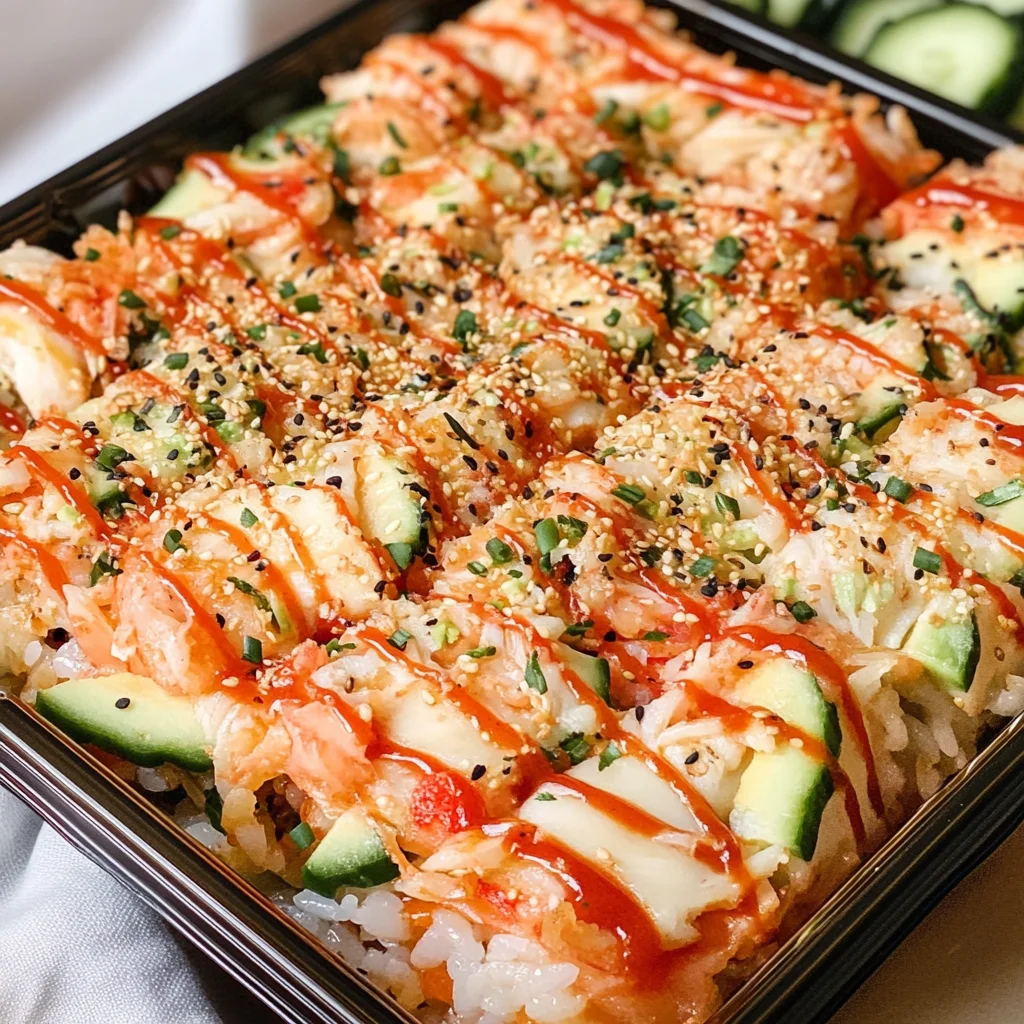
To serve up this whimsical creation with flair, sprinkle furikake generously over top along with thinly sliced cucumbers and creamy avocado slices—these fresh toppings add vibrant color and texture contrasting beautifully with our warm casserole below. For an added touch, serve alongside crispy seaweed snacks for dipping or snacking alongside each glorious bite!
And there you have it—a warm hug in casserole form known as sushi bake. This dish brings people together around the table just as food always does; I promise you it’ll become one cherished recipe in no time at all! Enjoy every last bite!
Storage and Enjoyment Tips for Your Sushi Bake
Oh, the moment has finally arrived! Your kitchen is filled with the intoxicating aroma of your freshly baked Sushi Bake, and I can just imagine the smiles it will bring to your table. It’s a dish that not only warms the heart but also creates lasting memories. But, let’s be honest, sometimes we can’t finish it all in one sitting (as hard as we try), so let’s chat about how to preserve this delightful creation for another day!
Storing Leftover Sushi Bake
To keep your leftover Sushi Bake fresh and flavorful, transfer it to an airtight container—this is crucial for maintaining that wonderful texture and taste. If you’re using a glass or plastic container, make sure it’s tightly sealed before placing it in the refrigerator. You can store your leftover sushi bake for about 3 to 4 days; however, I promise you it tastes best when enjoyed within the first couple of days. A pro tip? Slip a slice of bread into the container with your sushi bake. This little trick helps absorb excess moisture and keeps everything nice and fluffy! When you reheat it, aim for low heat in the oven or microwave to gently warm it through without drying out those beautiful layers. Just imagine digging into this comforting dish again, with those flavors still vibrant and inviting!
Freezing Sushi Bake for Later
If you want to take your meal prep game up a notch, consider freezing your Sushi Bake! To do so properly, allow it to cool completely before slicing it into portions. Wrap each slice tightly in plastic wrap or foil and place them in a freezer-safe bag or container. This method helps maintain its delicate balance of flavors and textures while keeping it fresh for up to 2 months in the freezer. The beauty of having this on hand is undeniable; picture yourself on a busy weeknight when cooking feels like an uphill battle—just pull out a portion from the freezer, pop it in the oven, and before you know it, you’ve got a comforting meal ready in no time! Trust me; having this delightful dish stashed away gives you both convenience and comfort.
Sushi Bake

Sushi Bake is a delightful twist on traditional sushi that’s perfect for gatherings or cozy family dinners. This warm and comforting casserole features layers of perfectly seasoned sushi rice, creamy imitation crab, and a luscious blend of spicy mayo that creates an explosion of flavor in every bite. With its inviting aroma and delicious textures, Sushi Bake is not just a meal; it’s an experience that brings people together. Whether you’re hosting a potluck or enjoying a quiet night in, this dish promises to impress with its unique fusion of flavors and simplicity. Let’s get cooking!
- Prep Time: 25 minutes
- Cook Time: 20 minutes
- Total Time: 45 minutes
- Yield: Serves approximately 6 people 1x
- Category: Dinner
- Method: Baking
- Cuisine: Fusion
Ingredients
- 2 cups sushi rice
- ¼ cup rice vinegar
- 1½ tablespoons granulated sugar
- 1 teaspoon salt
- 1 pound imitation crab meat
- ¾ cup Kewpie mayo (½ cup + ¼ cup)
- 1 tablespoon Sriracha (or to taste)
- 2 tablespoons soy sauce (light sodium)
- Sliced cucumber and avocado for topping
- Furikake seasoning
Instructions
- Rinse the sushi rice under cold water until the water runs clear. Cook according to package instructions (usually about 2½ cups water).
- In a small saucepan, whisk together the rice vinegar, sugar, and salt until dissolved. Mix into the cooked rice gently.
- In a mixing bowl, combine imitation crab with half of the Kewpie mayo and Sriracha.
- Preheat the oven to 350°F (175°C) and grease a baking dish lightly with sesame oil.
- Spread half of the seasoned rice in the baking dish, followed by the crab mixture, then drizzle with remaining mayo.
- Top with another layer of rice, sliced cucumbers, and avocados.
- Bake for about 15-20 minutes until heated through and golden on top.
Nutrition
- Serving Size: 1 slice (200g)
- Calories: 390
- Sugar: 6g
- Sodium: 680mg
- Fat: 18g
- Saturated Fat: 2g
- Unsaturated Fat: 16g
- Trans Fat: 0g
- Carbohydrates: 50g
- Fiber: 2g
- Protein: 12g
- Cholesterol: 30mg