Pistachio Rice Krispie Treats Recipe
There’s something incredibly special about the act of creating sweet treats that not only satisfy our cravings but also evoke memories of laughter and togetherness. My heart swells every time I think about gathering around a rustic kitchen table, sticky fingers and joyful giggles filling the air as we indulge in something homemade. And that’s exactly what you can expect with these Pistachio Rice Krispie Treats! This recipe isn’t just about mixing some ingredients; it’s an experience, a delightful journey that bridges the familiar nostalgia of classic Rice Krispie treats with the unique, irresistible flavor of pistachios. Picture each bite—a soft yet crunchy texture melting in your mouth, a sweet pistachio essence dancing on your palate, while the vegan marshmallows provide an ethereal fluffiness that makes you crave just one more piece.
As you dive into this Pistachio Rice Krispie Treats Recipe, you’ll find it’s more than just a modern twist on a childhood favorite; it’s a celebration of flavors that invites everyone to enjoy. These treats are perfect for any occasion—birthdays, potlucks, or even quiet afternoons when you need a little pick-me-up. Imagine biting into one as the sun streams through your kitchen window, the aroma of melted marshmallows wafting through the air—truly extraordinary! So grab your mixing bowl and let’s embark on this culinary adventure together. Trust me; I promise you will fall in love with every aspect of this recipe!
Pistachio Rice Krispie Treats Recipe: A Sweet Symphony of Flavor
Ah, my friend! You are in for a treat today! We’re crafting delightful Pistachio Rice Krispie Treats that blend nostalgia with vibrant flavor in every single bite. These bars are so easy to whip up, yet they shine with such individuality that they’ll capture hearts at any gathering. With the combination of crispy cereal and creamy vegan marshmallows infused with pistachio pudding mix and vanilla extract, these treats will elevate your dessert game to wondrous new heights!
Ingredients:
Let’s gather our ingredients for this enchanting journey! Each component plays a vital role in creating those magical bites filled with joy.
- 9 cups (237g) Rice Krispies Cereal. This iconic cereal is the backbone of our treat, providing that delightful crunch we all adore. The airy texture allows the marshmallow mixture to coat each piece beautifully, ensuring an even distribution of sweetness throughout. When selecting your Rice Krispies, look for freshness—the crunchier they are, the better the final result will be.
- 15 ounces (424g) mini vegan marshmallows. These little fluffy gems are absolutely essential for creating that gooey goodness we crave in Rice Krispie treats. They melt down into a lovely liquid gold that binds everything together perfectly without any animal products involved! When shopping for vegan marshmallows, check labels to ensure they contain no gelatin; plenty of brands offer delicious alternatives nowadays!
- 8 tablespoons (113g) unsalted butter. Butter is crucial here—not only does it enhance flavor and richness but it also adds moisture to our treats. Be sure to use unsalted butter so you can control the saltiness in your final product since we want those delicate pistachio notes to shine through without interference.
- 1 (3.4 ounce box) pistachio pudding mix. This is where things get really exciting! The pudding mix infuses our treats with an utterly intoxicating pistachio flavor while adding creaminess to the overall texture. You can find this at most grocery stores; however, if you’re feeling adventurous or can’t find it locally, there are online options available too! Just make sure it’s dairy-free.
- 1 teaspoon (15ml) vanilla extract. Ahh, vanilla—the soul mate of sweets! It brings warmth and depth to our Pistachio Rice Krispie Treats Recipe like nothing else can. Always opt for pure vanilla extract over imitation for that rich flavor profile we’re aiming for; trust me on this—it’s absolutely paramount!
Equipment You’ll Need:
Before we dive into making these delicious treats, let’s talk about the tools that will make our baking experience smoother and much more enjoyable! Having the right equipment is essential as each tool plays its part like an ensemble cast in a beautiful performance.
- 9×13-inch pan – This size is perfect for achieving those thick bars we desire from our treats. It provides ample space for spreading out our mixture evenly while allowing it to set properly without becoming too thin or dense.
- Large pot – A sturdy pot helps us melt our butter and marshmallows effectively without burning them—a crucial step since melted marshmallows can easily seize up if overheated!
- Large mixing bowl – We need room to combine all our ingredients without making too much mess—trust me; nobody wants sticky hands everywhere!
- Nonstick cooking spray – This little helper ensures nothing sticks to either your pan or wax paper when pressing down on those gooey treats later on—it’s an absolute must-have!
Now that we’ve gathered everything together let’s dive into making these Pistachio Rice Krispie Treats!
Step 1: Preparing Your Pan for Perfection
Start by lining your 9×13-inch pan with foil or parchment paper—this keeps things effortless when it’s time to remove those beautiful bars later on. Once lined, take a moment to spray it generously with nonstick cooking spray; I cannot stress enough how important this step is! It acts like a protective barrier between your creations and the pan itself so you won’t lose half your masterpiece when trying to serve them later.
Step 2: Gathering Your Cereal
In a large mixing bowl, measure out those glorious 9 cups of Rice Krispies cereal—the foundation upon which we’ll build our delightful towers of flavor! Make sure it’s all nice and fluffy before moving on; give it a gentle stir if needed just to break apart any clumps that may have formed during storage.
Step 3: Melting Butter and Marshmallows
Next comes one of my favorite parts—melting down our butter in a large pot over medium-low heat until it’s completely liquid gold! The reason we keep it at medium-low is simple: this slow melt ensures nothing burns while allowing us enough time to add those mini vegan marshmallows once it’s ready. As you toss them in after the butter has melted completely, stir continuously until they’re fully combined into one luscious mass—this will create that heavenly gooey texture we’re looking for!
Step 4: Infusing Flavor
Once you’ve achieved that blissful melted state with both butter and marshmallows mingling together harmoniously, remove from heat—this is where magic happens! Stir in the pistachio pudding mix along with vanilla extract; take a moment here—it smells absolutely divine! The combination elevates every bite into something truly extraordinary as those flavors meld together beautifully before introducing them back into their crunchy counterpart—the Rice Krispies cereal waiting patiently in its bowl.
Stay tuned as we continue transforming these simple ingredients into something spectacularly delicious—the anticipation is palpable!
The Magic of Melting: Creating Your Marshmallow Base
Step 5: Melding the Flavors Together
Now comes one of the most crucial steps in our Pistachio Rice Krispie Treats Recipe, where we meld all those delightful flavors into a creamy, dreamy mixture that will coat our cereal beautifully. Begin by melting your unsalted butter in a large pot over medium-low heat; trust me, this gentle approach is absolutely paramount! You want the butter to melt slowly, allowing it to become liquid gold without browning. This ensures that your treats have the perfect buttery flavor without any hint of bitterness that can come from overheated butter. As the butter begins to sizzle softly and emit its rich aroma, it’s time to add in your mini vegan marshmallows.
Stir the marshmallows into the melted butter gently with a wooden spoon or a silicone spatula. At first, you might feel like you’re battling against an impenetrable mass of marshmallow goo, but don’t be discouraged! Keep stirring until they begin to melt down into a smooth, glossy mixture. This process usually takes about 4-5 minutes, but patience is key here; you want to wait until you achieve that utterly intoxicating texture where everything is fully combined and oozy. Once you’ve reached this heavenly state of melted marshmallow bliss, remove the pot from heat and sprinkle in the pistachio pudding mix along with the vanilla extract. Stir vigorously until everything is incorporated—this step not only adds flavor but also enhances the creaminess of your treats.
Step 6: Coating Your Cereal – The Transformation
With your marshmallow mixture perfectly blended, it’s time for the magic to happen! Pour this enchanting mixture over your pre-measured Rice Krispies cereal in that large bowl we prepared earlier. Now, this part can get a little sticky (literally), so grab a spatula or wooden spoon and start folding the marshmallow mixture into the cereal with love and care. It’s important here to ensure that every single Rice Krispie gets thoroughly coated; trust me, this makes all the difference when it comes to achieving a uniform texture and flavor throughout your treats.
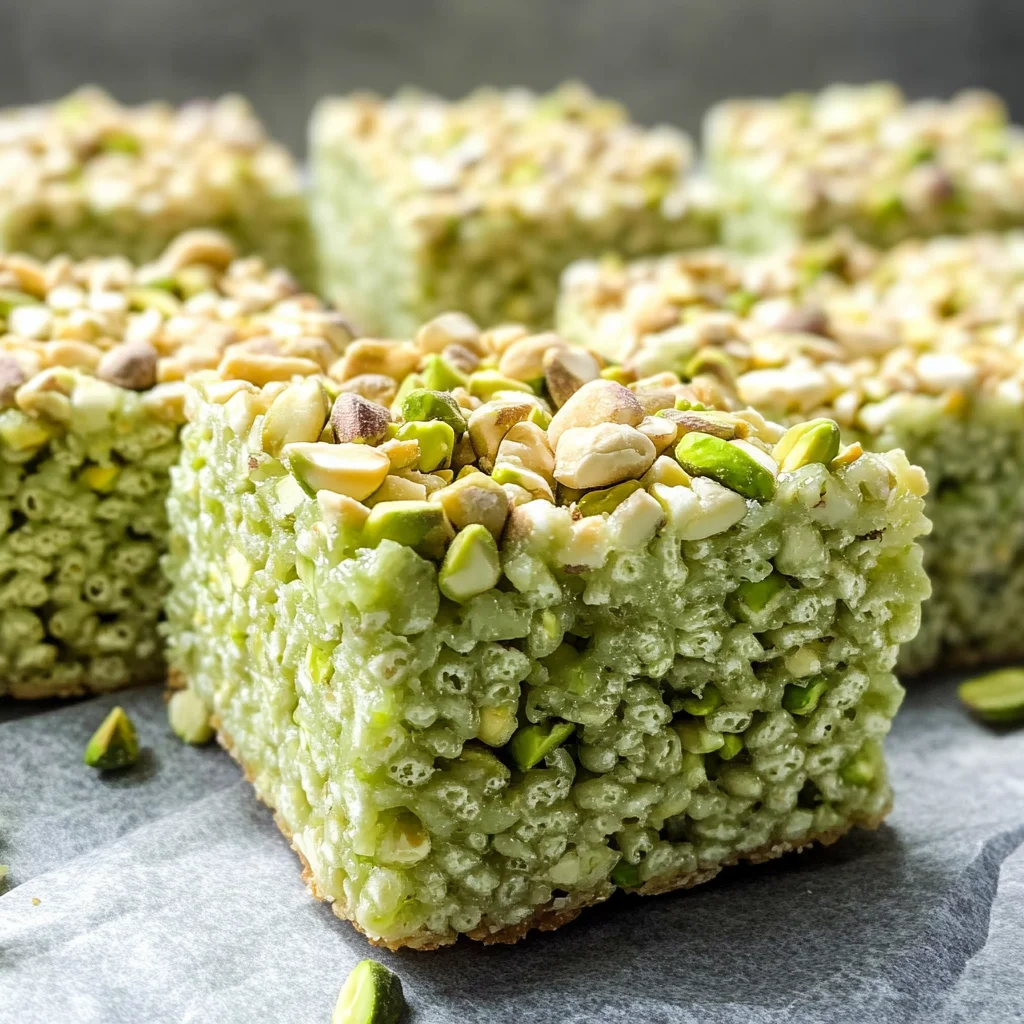
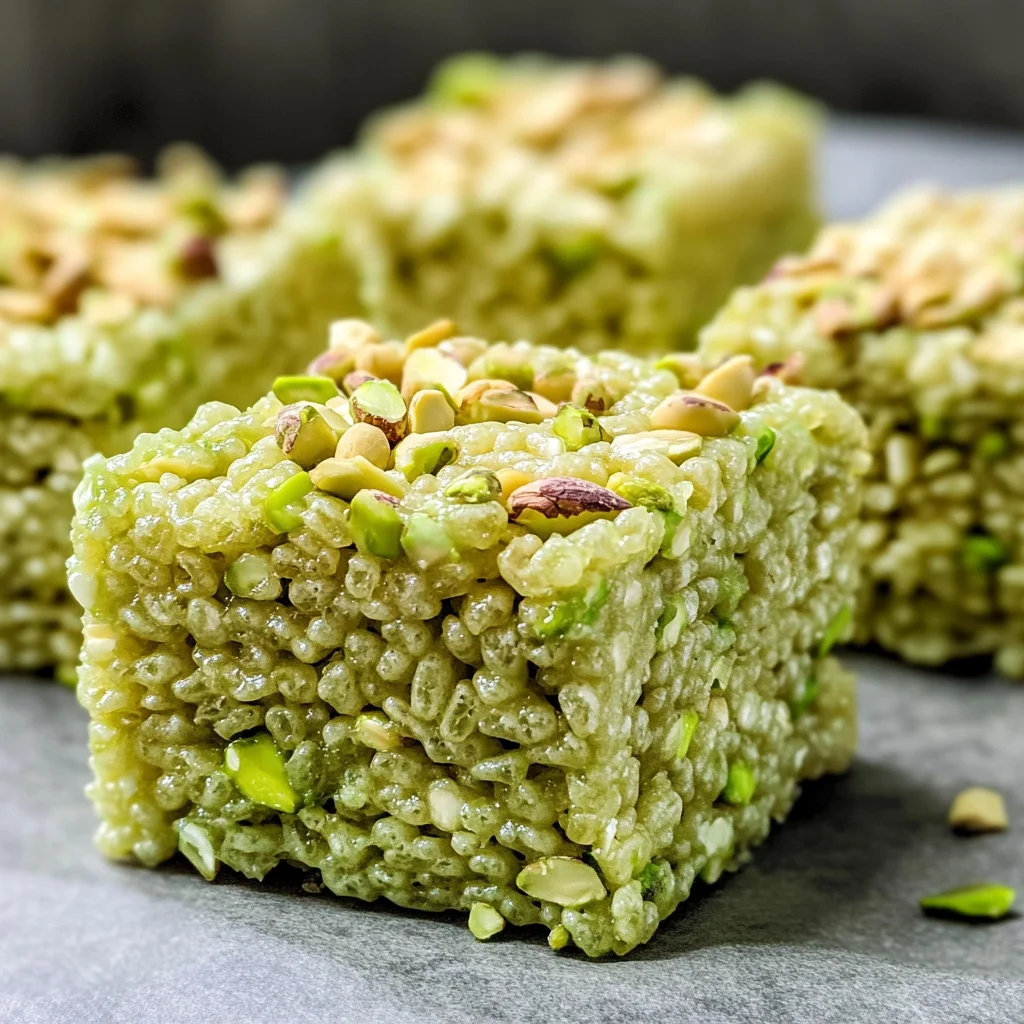
As you mix, you’ll notice how the vibrant green hue from the pistachio pudding starts to envelop each puffed rice piece—what a beautiful sight! It’s almost like watching spring unfold right in your mixing bowl! Aim for a consistent coating without crushing those delicate Rice Krispies; you want them intact for that delightful crunch when you finally take a bite. If you find yourself struggling with stickiness (which is likely), don’t rush—take your time, use gentle motions, and remember that this step is where all those flavors truly come together harmoniously.
Step 7: The Pressing Process – Forming Your Treats
Once everything is mixed beautifully and looks like a colorful symphony of flavors, it’s time to transfer this sticky goodness into your prepared 9×13-inch pan. Gently pour your mixture into the pan; if you’ve prepped it correctly with foil or parchment paper and nonstick spray, it should slide in easily without fussing too much. Now comes one of my favorite parts—the pressing! This step isn’t just about flattening; it’s about compacting those flavors together to create a solid base for our treats.
Using either clean hands or a sheet of wax paper sprayed lightly with nonstick spray (a game-changer here!), press down firmly but gently on the mixture. You want everything snugly packed together without squishing it too much—aim for an even surface that’s about 1-2 inches thick. Why is this part so significant? Compacting helps to ensure that when you cut these beauties later on, they hold their shape beautifully instead of crumbling apart at first touch. So take your time here—don’t rush this step! Letting them set properly now means fewer problems later when you’re ready to serve them up!
Step 8: Patience is Key – Letting Them Set
Now that you’ve shaped your treats into their mold, it’s absolutely essential to let them rest undisturbed until they’re completely firmed up—this typically takes about 30 minutes at room temperature. Why chill? Well, giving them time allows those ingredients to meld together fully as they cool down—a bit like letting a fine wine breathe before serving (minus any alcohol). During this cooling period, as the marshmallows set up alongside the buttery goodness and pistachio flavor infuses throughout each treat, you’ll find they become profoundly satisfying in texture.
The waiting can be tough; I know how tempting it can be to sneak bites while they’re still warm and gooey! But trust me on this: letting them cool will yield rewards beyond compare when you take that first bite later on—it transforms each treat into something truly extraordinary! After about half an hour has passed—and if you’re feeling particularly patient—you could even pop them in the refrigerator for quicker setting after they’ve cooled slightly on your counter.
Final Touches: Making Them Irresistibly Delicious
Step 9: Slicing Into Perfection
Once those delicious Pistachio Rice Krispie Treats have had their moment of zen and are now cool enough to handle without risk of melting fingers (always a plus!), it’s time for one final touch—slicing! Carefully lift them out using the edges of your parchment or foil (it should come out smoothly). Place them onto a cutting board where you can make precise cuts without worrying about any mess underneath.
Using a sharp knife (a serrated edge works wonders here), slice these beauties into squares or rectangles as per your preference—I often go for generous sizes because who doesn’t love an extra-large treat? As you cut through each layer, you’ll see how perfectly they hold their shape thanks to all that pressing we did earlier; there’s nothing more gratifying than seeing those layers come together so beautifully. Store any leftovers (if there are any!) in an airtight container at room temperature for up to three days—or freeze individual bars wrapped tightly in wax paper for up to three months if you’re really determined not to eat them all at once!
And there you have it—the complete journey through making these Pistachio Rice Krispie Treats! From melting marshmallows to slicing up perfect bars filled with joy and nostalgia—it’s been quite an adventure filled with warmth and sweetness just waiting for you share with friends and family alike (or keep all for yourself!). Enjoy every crumb and savor each flavorful bite—you’ve earned it!
Storage and Enjoyment Tips for Your Pistachio Rice Krispie Treats Recipe
Now that your Pistachio Rice Krispie Treats are beautifully set and ready to be devoured, it’s time to think about how to store any delightful leftovers or even if you want to stash some away for later indulgence. Trust me, these treats are just too good not to savor over a few days! Their sweet, nutty flavor combined with the chewy, crispy texture creates such a symphony of sensations that every bite is a dance on your taste buds. And while you may find it hard to resist devouring the entire pan in one sitting (I know I do!), having a storage plan ensures that you can return to this treat whenever those cravings hit!
Storing Leftover Pistachio Rice Krispie Treats Recipe
To keep your Pistachio Rice Krispie Treats as fresh as the day you made them, it’s important to store them properly. I recommend using an airtight container; this is crucial because it keeps moisture at bay and prevents your treats from becoming stale. If you’re like me and prefer a little extra protection, wrapping the treats in wax paper before placing them in the container adds an additional layer of freshness. They will last about three days at room temperature, but let’s be real—once you taste these beauties, they might not even last that long! A little tip I love is placing a slice of bread in the container; it helps maintain moisture without making the treats soggy. After a day or two, they might slightly lose their crispness but will still offer an utterly intoxicating flavor experience. When serving these delightful bars after they’ve been stored, simply cut into squares and maybe even warm them slightly in the microwave for about 10 seconds—this little touch brings back their gooey charm!
Freezing Pistachio Rice Krispie Treats for Later
If you find yourself with an abundance of treats (or if you just want to prepare ahead), freezing them is an excellent option! To freeze your Pistachio Rice Krispie Treats properly, first let them cool completely at room temperature before cutting them into bars. Then wrap each bar individually in wax paper and place them in an airtight container or zip-top freezer bag—this method avoids freezer burn and preserves that enchanting pistachio flavor. They can stay frozen for up to three months! When you’re ready to enjoy one again, there’s no need to wait hours for it to thaw; just pop one out and let it sit at room temperature for about 15-20 minutes or give it a quick zap in the microwave for an instant treat that tastes freshly made. The convenience of having these delights waiting patiently in your freezer means you’ll always have something special on hand for spontaneous gatherings or midnight cravings!
Pistachio Rice Krispie Treats

Indulge in the delightful nostalgia of Pistachio Rice Krispie Treats, where sweet and nutty flavors come together in a chewy, crunchy bar. This simple yet extraordinary recipe transforms classic Rice Krispies into a colorful treat infused with creamy pistachio pudding and fluffy vegan marshmallows. Perfect for any occasion, these treats are sure to bring smiles and joy to your gatherings—whether it be a birthday party, potluck, or a cozy afternoon snack. With just a handful of ingredients and straightforward steps, you’ll create a dessert that’s as fun to make as it is to eat!
- Prep Time: 15 minutes
- Cook Time: 10 minutes
- Total Time: 25 minutes
- Yield: Approximately 12 servings 1x
- Category: Dessert
- Method: No-bake
- Cuisine: American
Ingredients
- 9 cups Rice Krispies Cereal
- 15 ounces mini vegan marshmallows
- 8 tablespoons unsalted butter
- 1 box (3.4 ounces) pistachio pudding mix
- 1 teaspoon vanilla extract
Instructions
- Prepare a 9×13-inch pan by lining it with parchment paper and spraying with nonstick cooking spray.
- In a large mixing bowl, add the Rice Krispies cereal.
- Melt butter in a large pot over medium-low heat. Once melted, stir in mini vegan marshmallows until fully melted and smooth.
- Remove from heat and mix in the pistachio pudding mix and vanilla extract.
- Pour the marshmallow mixture over the Rice Krispies and gently fold until well coated.
- Transfer the mixture to the prepared pan and press down evenly.
- Allow to set for at least 30 minutes before cutting into bars.
Nutrition
- Serving Size: 1 bar (60g)
- Calories: 180
- Sugar: 13g
- Sodium: 75mg
- Fat: 6g
- Saturated Fat: 4g
- Unsaturated Fat: 2g
- Trans Fat: 0g
- Carbohydrates: 28g
- Fiber: <1g
- Protein: 1g
- Cholesterol: 0mg