Creamy Lemonade Bomb Pops
There’s something profoundly magical about summer treats that can whisk us away on a gust of nostalgia, isn’t there? The moment you take a bite or a lick of something cold and creamy, it transports you back to lazy afternoons spent outdoors, the sun warming your skin, laughter swirling around like the breeze. This is exactly how I feel about these Creamy Lemonade Bomb Pops—they’re not just a dessert; they’re a celebration of sunshine in every colorful layer! The refreshing tang of lemonade paired perfectly with luscious fruit creates a symphony of flavors that dances on your taste buds. It’s like capturing the essence of summer in a popsicle, and trust me when I say, once you make this recipe, you’ll want to share it with everyone you know.
What makes these Creamy Lemonade Bomb Pops so special is their vibrant layers and the joy they bring to any occasion. Picture this: you’re hosting a backyard barbecue, and as the sun dips low in the sky, you serve these beautiful popsicles. Their bright colors draw everyone in, while the flavors offer both nostalgia and excitement. You’ll hear delighted gasps as each person takes their first bite—it’s those little moments that create lasting memories! So let’s roll up our sleeves together and dive into this delightful culinary adventure that brings out the child in all of us.
Creamy Lemonade Bomb Pops: A Colorful Summer Delight
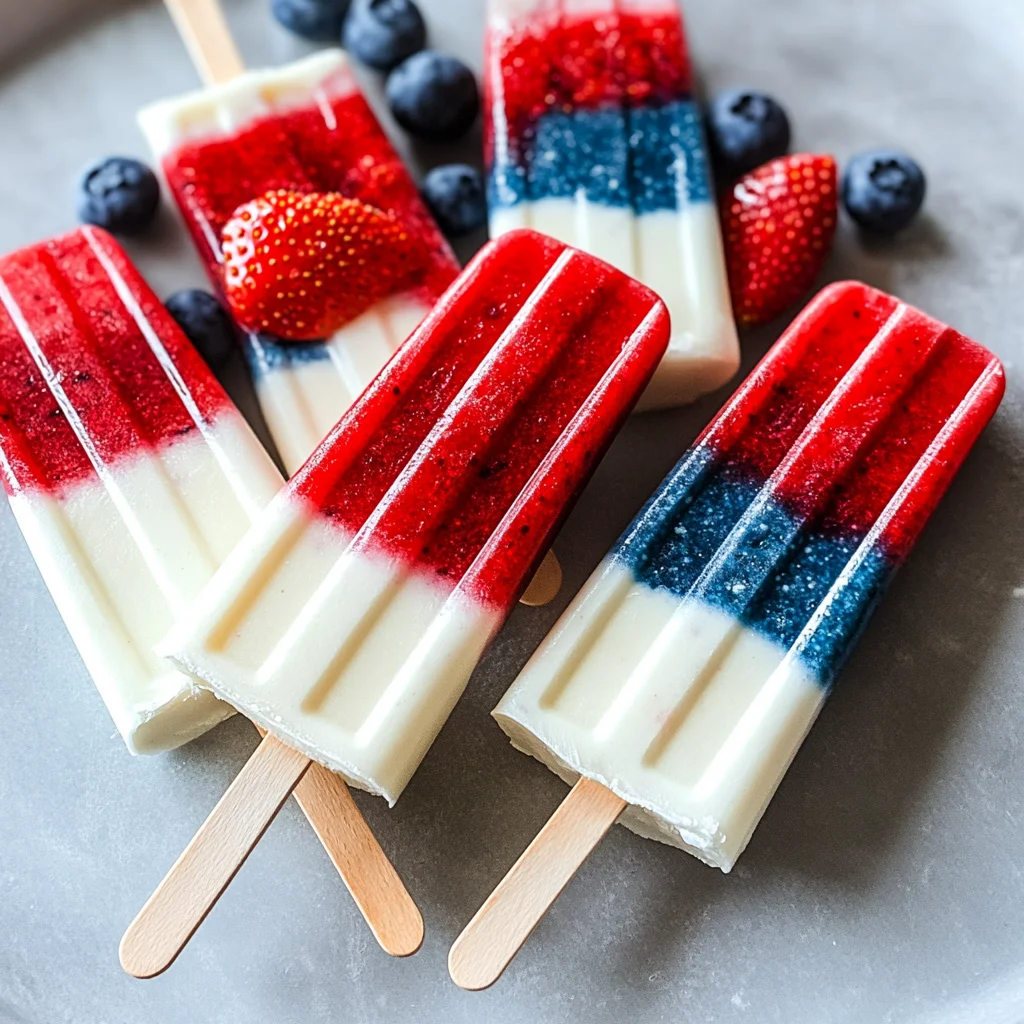
These Creamy Lemonade Bomb Pops are not only visually stunning but also incredibly easy to make! With just a handful of ingredients, you can craft these frozen treats that will impress friends and family alike. Each bite is an explosion of flavor: refreshing lemonade mingles beautifully with fresh strawberries and blueberries while creamy vanilla frozen yogurt ties everything together in delicious harmony. So grab your blender and let’s get started on creating these irresistible summer delights!
Ingredients:
As we embark on this culinary journey together, let me tell you how each ingredient plays its part in crafting these beautiful popsicles.
- 1/3 cup lemonade: This liquid gold is the foundation of our popsicles, delivering that quintessential tartness which defines their refreshing flavor profile. When choosing lemonade, opt for one that’s freshly squeezed if possible; it brings an unbeatable brightness compared to bottled varieties. The acidity from the lemons helps balance out the sweetness from our other ingredients, making sure each bite is perfectly tangy without being overwhelming.
- 1 cup sliced strawberries: Strawberries are nature’s candy—juicy and sweet with just a touch of tartness! When selecting strawberries for your bomb pops, look for ones that are bright red with no white or green spots; they should be fragrant too. Slicing them allows their juices to blend seamlessly into our lemon base, creating a lovely pink hue that’s as delightful to look at as it is to eat.
- 1/3 cup vanilla frozen yogurt or ice cream: The creaminess from our vanilla frozen yogurt adds an indulgent texture while tempering the sharpness of the lemonade layers. If you’re looking for lighter options, yogurt works wonderfully; however, if you’re craving something richer, go for high-quality ice cream! It’s important to let it soften slightly before blending so it incorporates smoothly without leaving chunks behind.
- Red food coloring: While this ingredient might seem purely aesthetic, adding food coloring enhances the visual appeal of your popsicles. A subtle touch will elevate your creamy strawberry layer from simple to spectacular! Just remember—less is often more; start with a drop or two until you reach your desired shade.
- 2/3 cup lemonade: Yes, we use more lemonade! This additional measure ensures that our pops have a balanced citrus flavor throughout all layers. It also gives us enough liquid to work with when blending our creamy white layer which follows.
- 1/3 cup vanilla frozen yogurt or ice cream (again): Repeating this ingredient emphasizes its vital role in creating layers; we want each section to be delightfully smooth and creamy while offering different flavor bursts as you savor them!
- 1/3 cup lemonade (again): You’ll notice how crucial lemonade is throughout this recipe—it truly binds everything together! The repetition also ensures we have enough zestiness to elevate each successive layer without overwhelming sweetness.
- 1/3 cup vanilla frozen yogurt or ice cream (yet again): Can you feel how much I adore this ingredient? Its rich texture provides an anchor point amidst all those vibrant flavors allowing them to shine through beautifully while maintaining harmony.
- 1/3 cup blueberries: These little gems pack a punch—not only do they contribute incredible flavor but also stunning color! When selecting blueberries, look for firm berries with deep blue hues; avoid any with wrinkles or mushiness as they indicate overripeness. We’ll be blending them into our final layer where they will infuse some delightful complexity!
- Blue food coloring: Similar to its red counterpart, blue food coloring is added for visual impact—it transforms our blueberry mixture into an eye-catching deep hue representing summer skies. Just like before—start small until you’re happy with the color!
Now that we’ve gathered all our ingredients and learned about their significance in creating perfect Creamy Lemonade Bomb Pops, let’s talk about ensuring we have all the right tools ready for this fun endeavor!
Equipment You’ll Need:
Having the right tools makes every cooking experience smoother—and trust me when I say that good equipment acts as essential partners in creating something wonderful together!
- Blender: This is undoubtedly your best friend in making these bomb pops! A powerful blender ensures everything blends seamlessly into silky layers without chunks getting stuck behind—this consistency is crucial for achieving those gorgeous stripes! If yours isn’t strong enough for blended fruits or thick yogurts, consider using one designed for smoothies instead.
- Popsicle molds: To create those iconic shapes we’re after, having sturdy molds is non-negotiable! Look for BPA-free silicone or plastic molds; they’re flexible enough to help release your pops easily once they’re frozen solid. Some even come with built-in handles which make enjoying them mess-free—a total win!
- Measuring cups: Precision matters when crafting layered desserts like these bomb pops because too much or too little can disrupt your beautiful aesthetic—we want each layer distinct yet cohesive!
With all our tools lined up and ready for action alongside our fabulous ingredients at hand, we’re set to begin preparing these delightful Creamy Lemonade Bomb Pops!
Step 1: Blending Up Our Red Layer
First things first—let’s whip up that vibrant red layer bursting with strawberry goodness! In your trusty blender, combine 1/3 cup of lemonade along with 1 cup of sliced strawberries and 1/3 cup of vanilla frozen yogurt (or ice cream if you’re feeling indulgent today). Blend them until smooth—you should hear that satisfying whirring sound as everything comes together beautifully! This process melds flavors while releasing sweet strawberry juice that sings harmoniously against zesty lemon notes.
Once blended well enough till completely incorporated (think velvety!), add a few drops of red food coloring—not only does it enhance visual appeal but also adds depth reminiscent of ripe strawberries basking under sunshine! Blend just until uniform color appears deeper than expected—that vibrancy will shine through every pop you’ll create later on.
Now comes my favorite part—dividing evenly among ten popsicle molds! Pour carefully so each mold receives equal amounts—this attention ensures every pop has beautiful layering when frozen solid later on. Place them upright inside your freezer space where they’ll chill out undisturbed for at least one hour—you want them firm enough before moving onto next delicious step!
Step 2: Creating Our Creamy White Layer
After patiently waiting through an hour filled with anticipation (trust me—it’ll be worth it!), it’s time to prepare our luscious white layer that’ll act as perfect contrast against those vivid reds below! Grab your blender again—and don’t worry about cleaning it out—in fact leaving residual flavors can add extra dimension here!
Combine another round of 2/3 cup lemonade along with another 1/3 cup vanilla frozen yogurt (or ice cream) until smooth once more—the result should resemble liquid cloud-like perfection readying itself atop previously set strawberry base below us now waiting expectantly!
Carefully pour this creamy mixture over cooled red layer within molds—you’ll want it distributed evenly across all ten compartments yet still keeping integrity intact below…so don’t rush this step either—I promise you won’t regret taking time here ensuring smooth transition between contrasting colors takes place perfectly!
Let these beauties chill out again inside freezer—for another hour—to ensure proper layering forms successfully before introducing final burst fruity element into mix soon coming next!
Step 3: Blending Our Blue Layer
Now onto arguably most exciting phase—the blue layer packed full sweetness from fresh blueberries readying themselves alongside splash zesty lemon once more! In clean blender yet again combine remaining 1/3 cup blueberry goodness along with final measure once more—another 1/3 cup lemonade alongside remaining dose last bit left over from prior batch made earlier too—yes indeed we’re repeating ourselves here because consistency matters immensely throughout entire process making sure flavors shine together harmoniously versus competing against each other wildly instead!
As usual blend until thoroughly combined yielding smooth texture reminiscent viscosity found within previous iterations created thus far—we’re building flavor upon flavor here whilst preparing ourselves visually impactful treat indulging senses beyond mere sight alone still comes alive through taste sensations awaiting ahead patiently down line soon!
Similar approach applies now regarding blue food coloring added next—as always proceed gently adding drops gradually becoming aware desired saturation level achieved ultimately resulting stunning deep navy hue emerges showcasing vibrancy reflecting warm sunny skies found outside homebound spaces around us beckoning summertime adventures ahead eagerly awaiting arrival shortly thereafter upon completion here today finally too…
Once blended thoroughly—as we’ve seen earlier repeat pouring action delicately across remaining spaces available within molds containing prior two creations resting underneath nicely built-up foundations laid down below before freezing completes course entirely—all factors considered matter greatly towards achieving optimal success every single time without fail maintaining integrity beauty preserved intact throughout stays true essence intended fully realized potential unlocked successfully leading onward journey forever remembered fondly always…
Step 4: Freezing Time!
Finally after patiently awaiting completion past several hours spent letting layers freeze solidly establishing themselves firmly within mold compartments you’ve created along way forward… Now allow yourself enjoy moment savor anticipation building steadily growing stronger minute-by-minute leading up towards joyous unveiling awaiting reveal soon approaching ahead finally too…
Once four hours have passed—with great caution gently remove bomb pops from molds holding onto handles securely while pulling slowly towards freedom releasing entirely without breaking apart unexpectedly happening suddenly causing distress after so much effort invested nurturing lovingly throughout entire process undertaken thus far indeed… Trust me staying calm collected here proves crucial maintaining composure preserving ultimate goal achieved ensuring final product enjoys utmost perfection sharing smiles joyously amongst gathering friends family alike reveling presence shared celebrating victory achieved conquering challenges tackled bravely head-on overcoming obstacles encountered during preparation journey taken towards end result sought after long awaited moment finally arrived unveiled eventually revealing finished masterpiece crafted lovingly created pure delight shared openly enjoyed freely amongst loved ones forever cherished memories formed lasting impressions made solidified unforgettable experiences embraced wholeheartedly shared openly cherished forevermore…
And there you have it—the magnificent Creamy Lemonade Bomb Pops are yours at last! Feel free indulge guiltlessly knowing every bite reflects care passion put into crafting such delightful treats destined bringing happiness joyfulness surrounding moments spent laughing reminiscing memories cherished deeply held close forever maintained… Enjoy my dear friend as summertime bliss unfolds everlastingly elegantly laid before us enticingly beckoning inviting exploration imbibed fully embraced wholeheartedly celebrating life lived passionately shared generously unreservedly amongst kindred spirits gathered near…
Making Your Creamy Lemonade Bomb Pops
Step 5: Blending the White Layer – A Smooth Symphony of Flavors
Now comes one of the most exciting steps in creating your Creamy Lemonade Bomb Pops—the white layer! This layer is where we incorporate that luscious vanilla frozen yogurt or ice cream, which will add a delightful creamy texture that contrasts beautifully with our vibrant red and blue layers. Begin by placing 1/3 cup of lemonade and 1/3 cup of vanilla frozen yogurt or ice cream into your blender. As you blend these ingredients together, watch them transform into a smooth, velvety mixture that almost looks like a fluffy cloud. This process is crucial because it ensures that the flavors meld harmoniously, creating a silky layer that is both refreshing and indulgent. After blending, take a moment to taste your creation; it should be perfectly sweet with just the right amount of tang from the lemonade.
Once you have achieved that dreamy consistency, it’s time to layer this white delight over your already frozen red layer. Carefully pour this mixture over the red base in each popsicle mold. You want to do this gently; using a small ladle can help you control the flow without disturbing the beautiful red layer underneath. This step is not merely about adding another component; it’s about building a visual masterpiece! The gentle contrast between layers signifies love and care in every bite. After you’ve evenly distributed the white layer, place your pops back into the freezer for at least another hour. This duration allows the layers to bond slightly, ensuring they don’t separate when you finally pull them out for enjoyment.
Step 6: Crafting the Blue Layer – A Burst of Freshness
With our white layer patiently chilling in the freezer, we can now turn our attention to crafting that stunning blue layer! In another round of blending, combine 1/3 cup lemonade, 1/3 cup vanilla frozen yogurt or ice cream, and 1/3 cup blueberries in your blender. The blueberries will not only contribute an irresistible flavor but also give us that gorgeous blue hue we’re after. Blend these ingredients until smooth and velvety—much like our earlier layers—but keep an eye on those blueberries! You want them fully incorporated so their tiny seeds don’t disrupt the creamy texture we’ve worked hard to achieve.
After blending, just as before, add a few drops of blue food coloring until you reach your desired shade; I recommend going for a vibrant hue reminiscent of a clear summer sky! Take a moment to admire how this blend looks before proceeding—it’s crucial for guaranteeing that lovely visual appeal when you finally unveil your popsicles. Once you’re satisfied with both taste and color, remove your pops from the freezer (don’t worry if they are slightly sticky; that’s just part of the fun!) and carefully pour this blue mixture over the set white layer. Remember to do this slowly and deliberately: we want distinct layers rather than a marbled effect! After achieving even coverage across all molds, return them to the freezer once more for at least four hours—or even overnight if you’re feeling especially patient. Trust me on this one; allowing ample time for freezing solidifies each layer’s unique charm while making sure they hold together when popped out later.
Step 7: Unmolding Your Masterpieces – The Grand Reveal
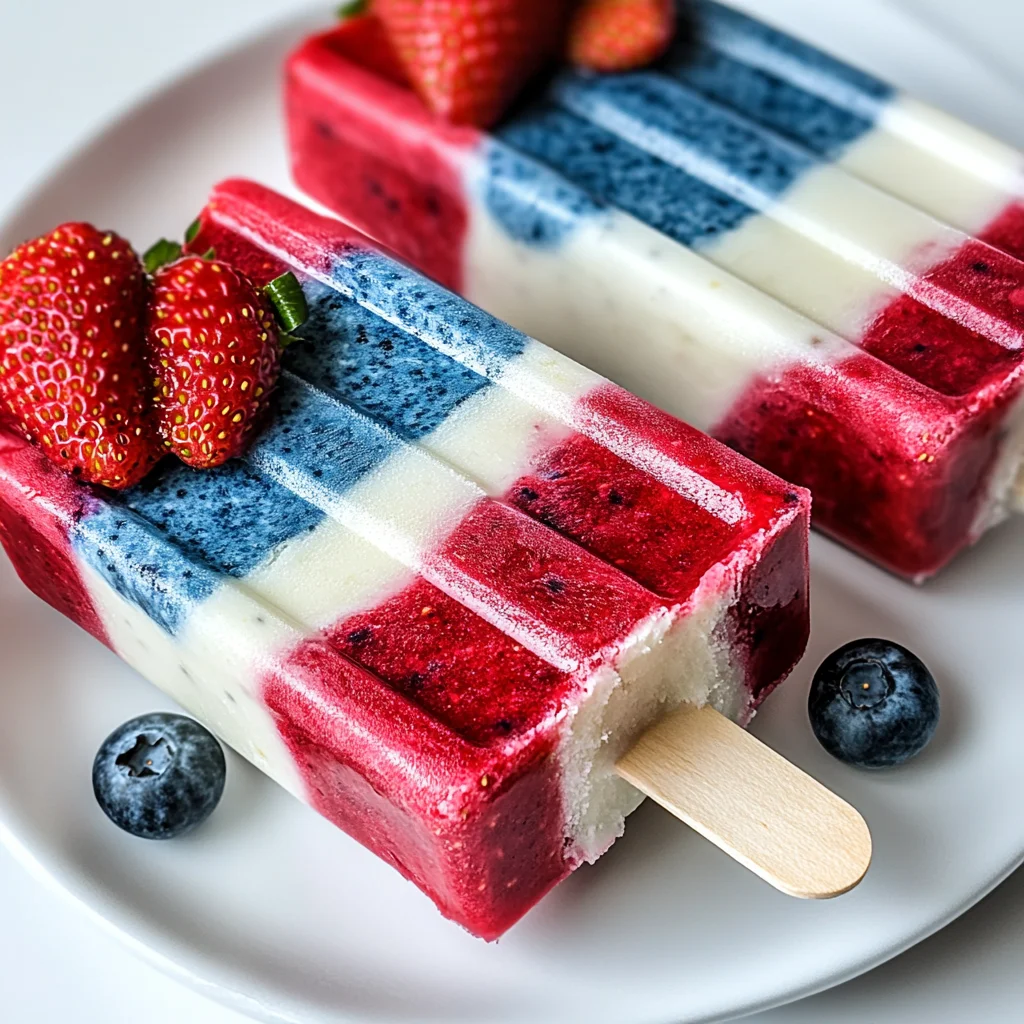
After what feels like an eternity (but really just four hours), it’s finally time for the grand reveal! Remove your popsicle molds from the freezer and take a moment to admire how stunning they look—the vibrant reds, whites, and blues dancing together in harmony create such eye-catching treats! To release them easily without any fuss or frustration, gently run warm water over the outside of each mold for about 10-15 seconds; this little trick helps loosen things up without melting away all your hard work. You’ll feel that satisfying “pop” as each icy creation releases itself from its mold—a truly joyous moment!
If you’re feeling adventurous (and let’s be honest, who isn’t?), consider garnishing these beauties with fresh fruit pieces or even some finely shredded coconut for an added tropical flair! Just imagine serving these at a summer gathering or family barbecue—the smiles on everyone’s faces will be absolutely priceless! Plus, don’t forget to capture that perfect Instagram shot before they disappear; their stunning colors deserve all the love!
Step 8: Enjoying Every Bite – Savoring Summer’s Essence
Now comes perhaps my favorite part—taking that first bite of your Creamy Lemonade Bomb Pops! As you sink your teeth into that first deliciously cold treat, notice how each layer reveals its unique flavor profile while playing beautifully off one another. The tanginess of lemonade dances with sweetness from strawberries and blueberries—all encased in creamy goodness reminiscent of childhood summers spent outdoors.
This moment is profoundly satisfying—not just because you’ve created something beautiful but because you’ve poured love into every step along the way. I promise you, these bomb pops are not just desserts; they’re memories waiting to happen with every lick and bite! So gather loved ones around—these pops are best enjoyed shared—and revel in both flavor and fellowship as summer days melt into warm evenings filled with laughter.
Conclusion:
What a journey we’ve taken together through this delightful recipe! I genuinely hope my enthusiasm shines through as brightly as those vibrant layers of color in your Creamy Lemonade Bomb Pops. This recipe isn’t just special because it’s a visual feast; it’s also an orchestra of flavors—the tartness from the lemonade balances beautifully with the creaminess of the yogurt, creating a profoundly satisfying experience that’ll have you reaching for another pop before you know it. Each bite evokes memories of summer days spent under sunny skies, which makes this treat truly extraordinary.
You absolutely must give this recipe a try! Not only does it deliver on taste, but it also brings joy into the kitchen with its simple yet rewarding process. Whether it’s a hot afternoon with friends or a family gathering where laughter fills the air, these pops shine bright as both a refreshing dessert and a conversation starter. Imagine pulling out your colorful creations from the freezer—the delight on everyone’s faces will be priceless!
Savoring one of these pops is an experience worth relishing; picture yourself enjoying one while lounging on your patio or hosting a backyard barbecue. They pair wonderfully with everything from homemade lemonade to freshly brewed iced tea—each sip complements the creamy texture perfectly. For an afternoon pick-me-up with friends or a whimsical addition to birthday parties, these pops are sure to elevate any occasion!
Feeling adventurous? This recipe is wonderfully adaptable! You could swap out strawberries for mangoes or blueberries for raspberries—each variation brings its own unique charm and flavor profile that enhances this already delightful treat. If you’re looking to create something visually stunning and deliciously different, why not try adding layers of kiwi puree or passion fruit? The possibilities are endless, and I can’t wait for you to dive into this culinary adventure! So grab those ingredients and get blending; I’d love to hear about your creations and any twists you put on these Creamy Lemonade Bomb Pops!
Creamy Lemonade Bomb Pops
Indulge in refreshing Creamy Lemonade Bomb Pops packed with fruity flavors! Try this easy recipe today and delight your taste buds!
- Prep Time: 20 minutes
- Cook Time: Freezing time varies
- Total Time: 0 hours
- Yield: Makes about 10 popsicles 1x
- Category: Dessert
- Method: Freezing
- Cuisine: American
Ingredients
- 1 cup sliced strawberries
- 1 cup blueberries
- 2/3 cup lemonade (divided)
- 1 cup vanilla frozen yogurt or ice cream (divided)
- Red food coloring (optional)
- Blue food coloring (optional)
Instructions
- Blend 1/3 cup lemonade, sliced strawberries, and 1/3 cup vanilla frozen yogurt until smooth. Add red food coloring if desired. Pour evenly into popsicle molds and freeze for 1 hour.
- Blend 2/3 cup lemonade and another 1/3 cup vanilla frozen yogurt until smooth. Pour over the strawberry layer in molds and freeze for another hour.
- Blend 1/3 cup blueberries, remaining lemonade, and last 1/3 cup vanilla frozen yogurt until smooth. Add blue food coloring if desired. Pour over the white layer in molds and freeze for at least 4 hours.
- To unmold, run warm water over the outside of the molds for easy release.
Nutrition
- Serving Size: 1 popsicle (approximately 65g)
- Calories: 85
- Sugar: 12g
- Sodium: 20mg
- Fat: 2g
- Saturated Fat: 1g
- Unsaturated Fat: 0.5g
- Trans Fat: 0g
- Carbohydrates: 16g
- Fiber: 1g
- Protein: 2g
- Cholesterol: 5mg